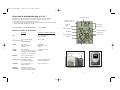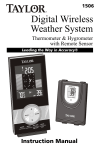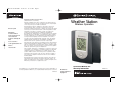
1
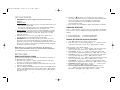
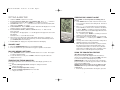
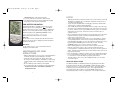
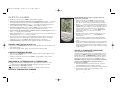
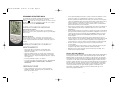
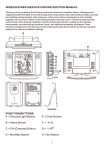
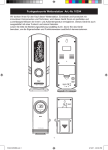
DWS-170-IB SP\ENG
10/12/04
11:32 AM
Page 1
GARANTÍA LIMITADA POR DOS AÑOS
Weather Station
(Válida únicamente en los EE.UU.)
HoMedics, garantiza este producto contra defectos en material y mano de
obra durante el período de dos años a partir de la fecha de compra original,
con las excepciones que se detallan a continuación.
Dirección postal:
Envirastation
Consumer Relations
Service Center Dept. 168
3000 Pontiac Trail
Commerce Township, MI
48390
Correo electrónico:
[email protected]
Toll Free
1-800-466-3342
Wireless Operation
Esta garantía de producto de HoMedics no cubre daños causados por
un uso inadecuado, abuso, accidente, la conexión de accesorios no
autorizados, la alteración del producto o cualquier otra condición sin importar
cual sea que se encuentre fuera de nuestro control. Esta garantía es válida
únicamente si el producto es comprado y operado en los EE.UU. Un
producto que requiera modificación o adaptación para habilitar su
funcionamiento en cualquier país que no sea aquel para el que fue diseñado,
fabricado, aprobado y/o autorizado, o la reparación de productos dañados
por estas modificaciones no está cubierta bajo esta garantía. HoMedics no
será responsable de ningún tipo de daños incidentales, consecuentes o
especiales. Todas las garantías implícitas, incluyendo entre otras aquellas
garantías implícitas de idoneidad y comerciabilidad, están limitadas a la
duración total de dos años a partir de la fecha de compra original.
Para obtener un servicio cubierto por la garantía para su producto HoMedics,
puede entregar la unidad personalmente o enviarla por correo junto con su
recibo de compra fechado (como prueba de la compra), el franqueo pagado,
junto con un cheque o una orden de pago por el monto de $5,00, pagadero
a HoMedics, para cubrir los gastos de manipulación.
Una vez recibido, repararemos o reemplazaremos su producto, según lo que
sea apropiado y se lo enviaremos con el franqueo pagado. Si es apropiado
remplazar su producto, lo remplazaremos por el mismo producto o un
producto similar de acuerdo con nuestras opciones. La garantía es válida
únicamente a través de nuestro Centro de servicio. El servicio realizado a
este producto por cualquier otro diferente al Centro de servicio HoMedics
anulará la garantía.
Esta garantía le proporciona derechos legales específicos. Es posible que
usted tenga derechos adicionales que pueden variar de un estado a otro.
Debido a las regulaciones de ciertos estados, es posible que algunas de las
limitaciones y exclusiones no se apliquen en su caso.
©2004 HoMedics, Inc. y sus compañías afiliadas, reservados todos los derechos. Envirastation™ es
una marca registrada de HoMedics Inc. y sus compañías afiliadas. Reservados todos los derechos.
IB-DWS170
Instruction Manual and
Warranty Information
El manual en
español empieza a
la página 13
DWS-170
DWS-170-IB SP\ENG
10/12/04
11:32 AM
Page 3
GETTING STARTED
1. IMPORTANT: Insert power supply cord into the home receiver
unit first.
Home Receiver:
• Insert the AC Adaptor Jack into the back of the unit and insert the cord
into a 120V household outlet.
• As a back up or alternate power source, install 2 alkaline AA batteries
according to the polarity indicated. Close the battery cover.
2. Remote Sensor: Loosen the 4 screws securing the battery cover with a
small screwdriver (included) and remove. Insert 2 alkaline AA batteries
according to the polarity direction indicated. Replace the cover and
tighten the 4 screws.
3. Place the home receiver as close as possible to the remote sensor.
This will help with synchronization between the two units.
4. REMEMBER: Once you are ready to position your remote sensor and
the home receiver, ensure that the distance is not outside the effective
transmission range (100 feet). Some building materials and location of the
home receiver or remote sensor can affect transmission quality and range.
Try various locations for best results.
NOTE: There are no consumer serviceable parts. All questions or
service request should directed to our consumer relations department.
(See Warranty section for contact information.)
SETTING TIME
RADIO-CONTROLLED CLOCK
The home receiver will start synchronizing the clock after the 1st channel of
the RF thermometer is registered.
1. At normal mode, hold the “ - ” button located on the back of the home
receiver for 3 seconds to force synchronization.
2. The antenna icon will appear during the synchronization process (on the
right side of the time display).
3. If the icon disappears afterwards, radio time signal is not available at that
moment. Try setting the home receiver in other locations. Remember to
place the unit away from sources of interference such as mobile phones,
appliances, TV etc.
2
4. Antenna icon
will appear on screen if the radio time reception is
successful. The radio-controlled clock will have a daily synchronization
at 1:00 am everyday. If previous attempts of reception were
unsuccessful, the home receiver will attempt synchronization
each hour until successful.
5. Each reception cycle is minimum 2 minutes and maximum 10 minutes.
TIME ZONE SELECTION
Press “ - ” button on back of home receiver to select from the following time
zones in the U.S. (zone is displayed in the upper right hand corner of time
display).
P - Pacific Standard Time
C - Central Standard Time
M - Mountain Standard Time
E - Eastern Standard Time
MANUAL SETTING FOR CLOCK & CALENDAR
1. Hold “SET ” button for 3 seconds to enter clock set.
2. First, select 12 hour or 24 hour setting using the “ + , - ” buttons located
on the back of the home receiver. Press “ SET ” button to confirm.
Now you will select the calendar settings3. Select Year - Use the “ + , - ” buttons located on the back of the home
receiver to adjust year setting. Press “ SET ” button to confirm.
4. Select Month - Use the “ + , - ” buttons located on the back of the
home receiver to adjust month setting. Press “ SET ” button to confirm.
5. Select Day - Use the “ + , - ” buttons located on the back of the home
receiver to adjust day setting. Press “ SET ” button to confirm.
6. Select Hour - Use the “ + , - ” buttons located on the back of the home
receiver to adjust hour setting. Press “ SET ” button to confirm.
7. Select Minute - Use the “ + , - ” buttons located on the back of the
home receiver to adjust minute setting. Press “ SET ” button to confirm.
8. DST On/Off (Daylight Savings Time) - Use the “ + , - ” buttons to turn
DST on or off. Press “ SET ” button to confirm.
9. Select Centigrade/Fahrenheit Temperature Readings - Use the
“ + , - “ buttons located on the back of the home receiver to select
Fahrenheit or Centigrade. Press “ SET ” button to confirm.
3
DWS-170-IB SP\ENG
10/12/04
11:32 AM
Page 5
TEMPERATURE/ HUMIDITY ALERT
SETTING ALARM TIME
1. Hold the “CLEAR” button for 3 seconds.
2. To select either first alarm (A1) or second alarm (A2) - Press “ + , - ” on back to
toggle between selections. Press “CLEAR” to confirm your selecton.
3. Set alarm time - Press “ + , - ” on the back of the unit to enter the desired Hr/ Min
values. Press “CLEAR” to confirm.
4. To view alarm time - Press “CLEAR” button. Alarm time will display for 5 seconds
and then resume to normal clock thereafter.
5. To select between alarm 1, alarm 2 or alarm off - Press “ + “ button on the
back of the unit.
For Daily Alarm - The appropriate “” icon will appear in the upper left corner of the
time display.
No Alarm - The “” icons will not be shown.
6. The home receiver will provide either a daily alarm, which last for 2 minutes or a
snooze mode where the alarm will repeat every 10 minutes until manually cleared
(see SNOOZE/LIGHT section below.)
7. To turn alarm off - Simply press any button under the LCD display.
SNOOZE/ LIGHT
1. Press the SNOOZE/LIGHT button for an extended backlight.
2. In snooze alarm mode, press this button to trigger a repetitive snooze alarm.
Press “ALERT” to turn temperature & humidity alert on
and off.
1. Hold “ALERT” button located on back of home receiver
for 3 seconds to enter the alert setting mode. The indoor
icon will flash.
2. Press “ +, - ” to select the between indoor temperature,
indoor humidity or remote sensor channels to be alerted
to. Press “ALERT” to confirm your selection. The Upper
pointer and the value on the LCD display will flash, enter
the desired upper limit with the
“ +, - ” buttons, press “ALERT” to confirm your selection
and then go to the lower limit setting.
3. The Lower pointer and value will flash, enter the desired
lower limit with “ +, - ” buttons, press “ALERT” to confirm
and exit.
4. You may enter an alert setting for the indoor temp, indoor
humidity and remote sensor temperature.
5. When the temperature hits the limit of your preset levels,
the Upper/Lower pointers and the temperature of the
respective channel (indoor or remote sensor) will flash
and produce an audible alarm. Press any button on the
home receiver to acknowledge and stop the alarm.
MIN/ MAX MEMORY SETTINGS
1. Press ”MIN/ MAX“ button to view the maximum values for 5 seconds. Press again
to view the minimum values.
2. To clear the memory record, press “CLEAR” while the respective values are
displayed on screen.
TEMPERATURE TREND INDICATOR:
In the upper right hand corner of the home receiver LCD display, you will see one
of 3 icons;
will indicate Rising Temperature readings if it changes more than
1 degree in an hour
will indicate Steady Temperature readings
will indicate Falling Temperatures if it is more than
1 degree in an hour.
4
USING THE PROJECTION FEATURE
(Only when powered by adaptor.)
The projection feature will display the time and outdoor/
remote sensor temperature. The projected TIME is the same
as shown on the base LCD display. The projected
TEMPERATURE is same as the remote sensor. To turn the
projection feature on, slide the projection switch on the back
of the unit to the ON position.
NOTE: If the projection feature is off, you may press the
SNOOZE button on top of the unit to trigger 5 seconds
of projection.
1. To turn the projected information 180 degrees, press the
5
DWS-170-IB SP\ENG
10/12/04
11:32 AM
Page 7
ROTATION button on the back of the unit.
2. To focus, rotate the focus knob to desired result.
3. The angle of the projector can be adjusted by angling
the projection arm forward or backward.
LOW BATTERY INDICATION
Low battery indication is available for the home receiver
and the remote sensor. A battery life “
” icon will be
shown on the home receiver or remote sensor. Replace the
batteries as necessary and follow the setup procedure as
mentioned earlier in the “GETTING STARTED” section.
MOUNTING INSTRUCTIONS
Table Top For the home receiver, snap the base into the back of the
unit. For the remote sensor, simply pull out the integrated
stand from the bottom.
Wall Mount For the remote sensor - Set a screw into the desired
hanging location and mount.
MAINTENANCE AND CARE
INSTRUCTIONS
• Extreme temperatures, shock or areas of unusual vibration
should be avoided to prevent damage to the units.
• Clean the units using only a soft, damp cloth to wipe.
Do not use solvents, abrasives, detergents or other strong
cleaning agents. After cleaning, wipe surfaces with a dry
cloth.
• Do not submerge units in water or other liquids.
• Do not subject the units to extremely severe temperatures
- DO NOT PLACE UNITS INTO OVENS, FREEZERS or
MICROWAVE OVEN.
6
NOTES
• Opening the housing of either the remote sensor or the home receiver will
invalidate your warranty. Do not attempt to repair this unit. There are no
consumer serviceable parts.
• If you encounter any difficulties in setting up your wireless thermometer
system, please contact Consumer Relations.
• Your new RF Thermometer is built with random security code technology.
The home receiver will learn the random code of the remote sensors and
log it in as channel 1, then set the additional remote sensors as channel 2
and channel 3 if necessary. The home receiver can monitor up to 3
separate sensors.
• Once a channel is registered, it will not accept any new sensors. However,
registered channels can be erased by removing the batteries in the
remote sensor or the home unit.
• When replacing batteries for the remote sensor - Remember to clear the
corresponding channel of the home receiver by removing the batteries,
and unplugging the adaptor or select the respective channel of the sensor
by pressing the CHANNEL button on the home receiver. Hold the
CHANNEL button for 3 seconds to clear the registration.
• When replacing batteries for the home receiver - Please remove the
batteries of all remote sensors. Once you have replaced the home
receiver batteries, re-install the batteries to the sensors and re-log them in
again. This will ensure that the home receiver and the remote sensors are
properly synchronized.
• Press the Tx button on the back of remote sensor to verify the RF reception.
• It is recommended to test the home receiver and the remote sensor next
to each other to ensure that both are properly synchronized.
• Keep the remote sensor out of direct sunlight and rain. Do not mount
on a metal surface.
About the Atomic Clock
The National Institute of Standard and Technology (NIST) in Fort Collins,
Colorado broadcasts the time signal (WWVB at 60kHz AM radio signal)
with an accuracy of 1 second per every 3,000 years. The signal will cover
a distance up to 2,000 miles from the source. Like a typical AM radio,
your Atomic Clock will not able to receive the WWVB signal in places
surrounded by heavy concrete or metal panels. The reception of the time
7
DWS-170-IB SP\ENG
10/12/04
11:32 AM
Page 9
signal can be affected by mobile phones, TV, electrical appliances or other
electronic interference. To get the best performance of the Atomic clock,
please install the home receiver near a window and away from large metallic
objects. If the unit is not working properly, change the unit position. There
may be some interference at this location.
TROUBLE SHOOTING
Indoor and Outdoor temperatures do not match when
placed next to each other Each sensor is manufactured to be +/- 2 degrees in accuracy under normal
conditions. So it is possible to have up to four degrees difference shown on
the separate temperature sensors (one could be “+2 degree” and the other
“-2 degrees”. Additionally, the calibration curve is different between the two
units because of the greater temperature range of the outdoor sensor.
Errors are usually noted on the extreme ends of the temperature ranges.
Base unit is not accepting remote transmissions The units may not be properly synchronized or the batteries may need to be
replaced. See “GETTING STARTED” section beginning on page 2 of the
instructions for detailed instructions. With the two units next to each other,
attempt synchronization. Remember to always place the remote sensor
within the effective transmission range and away from large metal surfaces.
What is the recommended battery type?
Your unit will come with an AC adaptor. As a backup power source, we
recommend using only alkaline batteries for replacements.
Where can I mount the remote sensor?
To get accurate readings and to prolong the life of your sensor, we recommend that you mount it out of direct sunlight and rain. Fog and mist will
not affect the sensor, but large volumes of soaking rain may. To guard
against this, we recommend that you mount it under the eve of your house,
your garage or any other suitable place that will keep it out of direct sun
and rain.
8
Outdoor Temperature Reading shows “- -”
This is usually an indication that the channel selector (located in the top left
corner of the home receiver) is set incorrectly to receive the signal from the
remote sensor. If you have only one remote sensor, ensure that the channel
selector is set to “1”. To change the channel, press the “channel” button
located on the front of the home receiver.
The home receiver may also be “scrolling” - looking for sensor readings from
more than one remote sensor. This home receiver can support up to three
remote sensors (only one is included). If it is looking for more than one
remote sensor, a “
” icon will appear below the channel designator.
Again, to select a reading from just one remote sensor, press the “channel”
button to remove the scroll icon and ensure that the channel selected now
reads “1”.
The unit is “locked” - I can’t perform unit functions When this occurs, the unit maybe in “forced synchronization” mode. If the
radio antennae icon shows “waves” projecting from it, the unit is attempting
to synchronize with the atomic clock frequency. To override, simply press the
“ - ” button on the back of the unit. You will now be able to perform all other
functions.
SPECIFICATIONS
Range of temperature/humidity measurement:
Indoor temp :
+32 F to +122 F (0 C to + 50 C)
Indoor humidity:
20% to 99% RH
Remote sensor:
-4 F to +140 F (-20 C to +60 C)
Channel:
max. 3 remote sensors
Temp. Alert:
Indoor Temp/ Humidity and Ch 1 thru 3
Transmission:
max. 100 ft. (30 m) open area, RF434 MHz
Resolution:
0.1 degree for temperature, 1% for humidity
Clock:
WWVB Radio-controlled
Power source:
AC adaptor - home receiver
2 Alkaline AA batteries - remote sensor
9
DWS-170-IB SP\ENG
10/12/04
11:32 AM
Page 11
FCC DISCLAIMER
This device complies with part 15 of the FCC rules. Operation is subject to
the following two conditions:
1. This device may not cause harmful interference, and
2. This device must accept any interference received, including interference
that may cause undesired operation.
FCC ID: L5C0761TX-H (Transmitter)
Freq. 434 MHz
Outdoor Temp.
Remote Sensor/
Channel Indicator
Channel
Scrolling
Trend
Indicator(s)
Indoor Temp.
Name and Functions of Buttons:
Functions
If button is held down
--
Enter clock & calendar
setting
1 step forward Alarm,
Snooze Alarm on/ off
Fast advance
-/ZONE/
1 step backward
Select PST, MST,
CST, EST
Fast backward
Atomic time seek
CLEAR/
ALARM
Clear memory at Min/ Max
display Read alarm time 5
sec at normal mode
Alarm time setting
MIN/MAX
Read minimum/ maximum
record 5 sec
ALERT
Temp alert on/ off
Enter temp alert setting
CHANNEL
Select Channel 1,2,3,
auto scroll
Delete current channel
SNOOZE/
BACKLIGHT
Backlight on 5 seconds,
Trigger snooze alarm,
stop alarm
SET
+/
Indoor Humidity
Low Battery
Time Zone
Alarm(s) Set
Atomic Time
LCD Clock
Date
Snooze Button/
Backlight
Projection
Lens
HOME RECEIVER
10
REMOTE SENSOR
11
DWS-170-IB SP\ENG
10/12/04
11:32 AM
Page 13
TWO YEAR LIMITED WARRANTY
(Valid in USA only)
HoMedics guarantees this product free from defects in material and
workmanship for a period of two years from the date of original
purchase, except as noted below.
Mail To:
Envirastation
Consumer Relations
Service Center Dept. 168
3000 Pontiac Trail
Commerce Township, MI
48390
e-mail:
[email protected]
Toll Free
1-800-466-3342
Estación meteorológica
Funcionamiento inalámbrico
This HoMedics product warranty does not cover damage caused by
misuse or abuse; accident; the attachment of any unauthorized
accessory; alteration to the product; or any other conditions whatsoever
that are beyond our control. This warranty is effective only if the product is
purchased and operated in the USA. A product that requires modification
or adaptation to enable it to operate in any country other than the country
for which it was designed, manufactured, approved and/or authorized, or
repair of products damaged by these modifications is not covered under
warranty. HoMedics shall not be responsible for any type of incidental,
consequential or special damages. All implied warranties, including but
not limited to those implied warranties of fitness and merchantability, are
limited in the total duration of two years from the original purchase date.
To obtain warranty service on your HoMedics product, either hand deliver
or mail the unit and your dated sales receipt (as proof of purchase),
postpaid, along with check or money order in the amount of $5.00
payable to HoMedics to cover handling.
Upon receipt, we will repair or replace, as appropriate, your product and
return it to you, postpaid. If it is appropriate to replace your product, we
will replace the product with the same product or a comparable product
at our option. Warranty is solely through our Service Center. Service of
this product by anyone other than HoMedics Service Center voids
warranty.
This warranty provides you with specific legal rights. You may have
additional rights which may vary from state to state. Because of individual state regulations, some of the above limitations and exclusions
may not apply to you.
©2004 HoMedics, Inc. and its affiliated companies, all rights reserved. Envirastation™
is a trademark of HoMedics, Inc. and its affiliated companies. All rights reserved.
IB-DWS170
Manual de instrucciones e
información de garantía
DWS-170
DWS-170-IB SP\ENG
10/12/04
11:32 AM
Page 15
PARA EMPEZAR
1. IMPORTANTE: Introduzca primero el cordón de la fuente de energía en la unidad
receptora interior.
4. El icono de la antena aparecerá en la pantalla si la recepción de la señal horaria de
radio es exitosa. El reloj controlado por radio tendrá una sincronización diaria, todos
los días a la 01:00 am. Si los intentos de recepción anteriores fracasaron, el receptor
doméstico intentará sincronizar cada hora, hasta tener éxito.
Receptor Interior:
5. Cada ciclo de recepción es como mínimo 2 minutos y como máximo 10 minutos.
• Introduzca el enchufe del adaptador de CA en la parte posterior de la unidad y
enchufe el cable en un tomacorriente doméstico de 120 V.
SELECCIÓN DE LA ZONA HORARIA
• Como fuente de energía de respaldo o alternativa, instale 2 pilas alcalinas AA de
acuerdo a la polaridad indicada. Cierre la tapa del compartimiento de las pilas.
2. Sensor Exterior: Afloje los 4 tornillos que aseguran la tapa del compartimiento de las
pilas con un destornillador pequeño (que se incluye), y retírela. Introduzca 2 pilas
alcalinas AA de acuerdo con la dirección de la polaridad que se indica. Vuelva a
colocar la tapa y ajuste los 4 tornillos.
3. Coloque el receptor interior tan cerca del sensor exterior como sea posible. Esto
ayudará a la sincronización entre las dos unidades.
4. RECUERDE: Cuando esté listo para colocar su sensor exterior y su receptor interior
en el lugar, asegúrese de que la distancia no esté fuera del límite efectivo de
transmisión (100 pies/ 30,5 m). Algunos materiales de construcción y la ubicación del
receptor interior o del sensor exterior pueden afectar la calidad y el ámbito de la
transmisión. Para obtener mejores resultados, pruebe con varias ubicaciones.
ATENCIÓN: No hay piezas que necesiten servicio por parte del usuario. Todas las
preguntas o solicitudes de servicio deberán ser dirigidas a nuestro departamento de
relaciones con el consumidor.
(Ver la sección de Garantía para la información del contacto.)
CÓMO CONFIGURAR LA HORA
RELOJ CONTROLADO POR RADIO
El receptor doméstico comenzará a sincronizar el reloj luego de que se registre el primer
canal del termómetro RF.
1. En el modo normal, mantenga presionado durante 3 segundos el botón “ - ” que se
encuentra en la parte posterior del receptor interior, para provocar la sincronización.
2. Durante el proceso de sincronización aparece el icono de la antena (en el lado
derecho de la pantalla de la hora).
3. Si posteriormente el icono desaparece, se debe a que la señal horaria de radio no
está disponible en ese momento. Intente colocar el receptor doméstico en otras
ubicaciones. Recuerde colocar la unidad lejos de Fuentes de interferencia tales como
teléfonos celulares, artefactos, televisores, etc.
14
Oprima el botón “ - ” al respaldo del receptor doméstico para seleccionar una de las
siguientes zonas horarias de los EE.UU. (la zona aparece en el rincón superior derecho
de la pantalla de la hora).
P – hora estándar del Pacífico (PST)
C – hora estándar Central (CST)
M – hora estándar de la Montaña (MST)
E – hora estándar del Este (EST)
CONFIGURACIÓN MANUAL DEL RELOJ Y EL CALENDARIO
1. Oprima y sostenga el botón “SET” por 3 segundos para ingresar al modo de ajuste
del reloj.
2. Primero, seleccione la configuración de 12 0 de 24 horas usando los botones “ + ” y
“ - ” ubicados en la parte posterior del receptor interior. Oprima el botón “SET” para
confirmar su selección.
Ahora seleccionará la configuración del calendario 3. Selección de la Hora – Use los botones “+, -” ubicados en el respaldo del receptor
doméstico para ajustar la hora. Oprima el botón “SET” para confirmar su selección.
4. Selección del Mes – Use los botones “+, -“ ubicados en el respaldo del receptor
doméstico para ajustar el mes. Oprima el botón “SET” para confirmar su selección.
5. Selección del Día – Use los botones “+, -“ ubicados en el respaldo del receptor
doméstico para ajustar el día. Oprima el botón “SET” para confirmar su selección.
6. Selección de la Hora – Use los botones “+, -“ ubicados en el respaldo del receptor
doméstico para ajustar la hora. Oprima el botón “SET” para confirmar su selección.
7. Selección del Mes – Use los botones “+, -” ubicados en el respaldo del receptor
doméstico para ajustar el mes. Oprima el botón “SET” para confirmar su selección.
8. Selección del Día – Use los botones “+, -” ubicados en el respaldo del receptor
doméstico para ajustar el día. Oprima el botón “SET” para confirmar su selección.
9. Seleccione la lectura de la temperatura en grados Centígrados/Fahrenheit – Use
los botones “ + , - ” ubicados en la parte trasera del receptor interior para seleccionar
entre grados Centígrados o Fahrenheit. Oprima el botón “ SET ” para
confirmar su selección.
15
DWS-170-IB SP\ENG
10/12/04
11:32 AM
Page 17
AJUSTE DE LA ALARMA
1. Mantenga presionado el botón “CLEAR” (borrar) durante 3 segundos.
2. Para seleccionar sea la primera alarma (A1) o la segunda alarma (A2) – Oprima “+,-“ en la parte
de atrás para alternar entre las dos opciones. Presione “CLEAR” para confirmar su selección.
3. Para ajustar la hora de la alarma - Presione “+,-“ en el respaldo de la unidad para ingresar los
valores Hr/Min (hora/minutos). Presione “CLEAR” para confirmar su selección.
4. Para ver la hora de la alarma - presione el botón “CLEAR” (borrar). La hora de la alarma
aparece en la pantalla por 5 segundos y luego vuelve a la pantalla normal del reloj.
5. Para seleccionar entre la alarma diaria y la alarma de repetición o alarma apagada - presione el
botón “ + “ en la parte posterior de la unidad.
Para la Alarma Diaria – El icono “” aparece en el rincón superior derecho de la pantalla de la hora.
Alarma Apagada – El icono “” no aparece en pantalla.
6. El receptor interior proporcionará ya sea una alarma diaria, que dura 2 minutos, o un modo de
alarma de repetición, en el cual la alarma se repetirá cada 10 minutos hasta que sea detenida
manualmente (vea la sección SNOOZE/ LIGHT (de repetición/ luz) a continuación).
7. Para apagar la alarma – Simplemente oprima cualquier botón debajo de la pantalla LCD.
SNOOZE/ LIGHT (Alarma repetida/Luz)
1. Presione el botón S N O O Z E/L I G H T (de repetición/ luz) para obtener un tiempo de iluminación de
fondo más prolongado.
Oprima “ALERT” para encender o apagar la alerta de
temperatura y humedad.
1. Oprima y mantenga el botón “ALERT” al respaldo del receptor
doméstico por 3 segundos para ingresar al modo de ajuste de
alerta. El icono de las condiciones al interior empieza a destellar.
2. Oprima “ +, - ” para seleccionar entre alerta de temperatura interior,
humedad interior o los canales del sensor exterior. Oprima el botón
“ALERT” (alerta) para confirmar su selección. El puntero superior y
el valor destellarán en la pantalla LCD; ingrese el límite superior
deseado con los botones “ +” y “ – ”, presione “ALERT” (alerta)
para confirmar su selección y luego vaya a configurar
el límite inferior.
3. El Puntero inferior y el valor empiezan a destellar; ingrese el valor
límite inferior con los botones “ +, - “; oprima “ALERT” para
confirmar y salir.
4. Puede ingresar una configuración de alerta para la temperatura
interior, para la humedad interior y para la temperatura del sensor
remoto.
5. Cuando la temperatura alcanza el límite de los niveles que usted ha
predispuesto, los punteros Superior/Inferior y la temperatura de los
canales respectivos (interior o sensor remoto) destellan y se oye la
alarma. Oprima cualquier botón del receptor doméstico para aceptar
y apagar la alarma.
2. En el modo de alarma repetida, oprima este botón para activar la alarma repetida.
USO DE LA FUNCIÓN DE PROYECCIÓN
AJUSTES DE MEMORIA MIN/MAX
1. Presione el botón “MAX/ MIN”para ver los valores máximos durante 5 segundos. Oprima otra vez
para ver los valores mínimos.
2. Para borrar el registro de memoria, presione "CLEAR" (borrar) mientras se vean los valores
respectivos en la pantalla.
INDICADOR DE LA TENDENCIA DE LA TEMPERATURA:
En el ángulo superior derecho de la pantalla LCD del receptor doméstico, verá uno de 3 iconos;
indicará lecturas de Temperatura en aumento si varía más de un grado en una hora
indicará lecturas de Temperatura constante
indicará lecturas de Temperatura en descenso si es más de un grado en una hora.
ALERTA DE TEMPERATURA/ HUMEDAD
16
(Sólo con alimentación del adaptador).
La función de proyección muestra la hora y la temperatura exterior del
sensor remoto. La HORA proyectada es la misma que aparece en la
pantalla LCD de la base. La TEMPERATURA proyectada es la misma
del sensor remoto. Para encender la función de proyección, deslice el
interruptor al respaldo de la unidad en la posición ON (encendido).
ATENCIÓN: Si la función de proyección está apagada, usted puede
oprimir el botón SNOOZE (alarma repetida) para activar la
proyección por 5 segundos.
1. Para girar la información proyectada de 180 grados, presione el
botón ROTATION (Rotación) al respaldo de la unidad.
2. Para enfocar, gire la perilla del foco hasta lograr el resultado deseado.
3. Puede ajustarse el ángulo del proyector inclinando el brazo
proyector hacia delante o atrás.
17
DWS-170-IB SP\ENG
10/12/04
11:32 AM
Page 19
INDICADOR DE BATERÍA BAJA
La señal de pilas descargadas está disponible tanto para el receptor
interior como para el sensor exterior. El ícono de carga de
la batería “
” aparecerá en el receptor interior o en el sensor exterior.
Cambie las pilas y siga el procedimiento de ajuste tal como se explicó
anteriormente en la sección "INTRODUCCIÓN".
INSTRUCCIONES DE MONTAJE
Colocación en la mesa Para el receptor doméstico, presione la base en el respaldo de la
unidad. Para el sensor remoto, simplemente saque el soporte integrado
desde el fondo.
• Si tiene alguna dificultad para instalar su sistema de termómetro inalámbrico, sírvase
ponerse en contacto con el departamento de relaciones con el consumidor.
• Su nuevo termómetro de RF (frecuencia de radio) está construido con tecnología de
códigos de seguridad aleatorios. El receptor interior tomará el código aleatorio de los
sensores exteriores y lo registrará como canal 1, luego configure los sensores
exteriores adicionales como canal 2 y canal 3 si fuera necesario. La unidad interior
puede monitorear hasta 3 sensores diferentes.
• Una vez que se registra un canal, no aceptará ningún sensor nuevo. Sin embargo, los
canales registrados pueden borrarse retirando las pilas del sensor exterior o de la
unidad interior.
Montaje de pared -
• Cuando cambie las pilas del sensor exterior: recuerde borrar el canal correspondiente
del receptor interior retirando las pilas y desenchufando el adaptador o seleccione el
canal respectivo del sensor presionando el botón CHANNEL (canal) en el receptor
interior. Mantenga oprimido el botón CHANNEL (canal) durante 3 segundos para
borrar el registro.
Para el receptor doméstico – Coloque el soporte en la posición
derecha. Coloque un tornillo (no incluido) en el lugar deseado en la
pared y cuelgue la unidad del tornillo usando el orificio de colgar en el
respaldo.
• Cuando cambie las pilas del receptor interior, sírvase retirar las pilas de todos los
sensores exteriores. Una vez que haya cambiado las pilas del receptor interior, vuelva
a instalar las pilas de los sensores, y vuelva a registrarlos. Esto asegurará que el
receptor interior y los sensores exteriores estén sincronizados de manera adecuada.
INSTRUCCIONES DE CUIDADO Y
MANTENIMIENTO
• Presione el botón Tx en la parte posterior del sensor exterior para verificar la
recepción de RF.
• Se recomienda probar el receptor interior y el sensor exterior uno junto al otro para
asegurarse de que ambos estén sincronizados de manera adecuada.
• Para prevenir daños a las unidades, es importante evitar
temperaturas extremas, golpes o las áreas que presenten
vibraciones anormales.
• Mantenga el sensor exterior protegido de la luz solar directa y de la lluvia. No lo
instale sobre una superficie metálica.
• Limpie las unidades usando sólo un trapo suave y húmedo para
limpiar. No use solventes, abrasivos, detergentes u otros agentes
limpiadores agresivos. Después de limpiar las superficies, séquelas
con un paño seco.
Acerca del reloj atómico
• No sumerja la unidad en agua u otros líquidos.
• No someta las unidades a temperaturas extremas – NO COLOQUE
LA UNIDAD EN HORNOS, CONGELADORES o APARATOS A
MICROONDAS.
OBSERVACIONES
• Si abre el armazón del sensor exterior o del receptor interior,
invalidará su garantía. No intente reparar esta unidad. No hay
piezas que necesiten servicio.
18
El National Institute of Standard and Technology (NIST, Instituto Nacional de Estándares y
Tecnología) en Fort Collins, Colorado, emite la señal horaria (una señal de radio AM,
WWVB a 60kHz) con una precisión de 1 segundo por cada 3000 años. La señal cubre
una distancia de hasta 2000 millas desde su fuente. Al igual que una típica radio AM, su
reloj atómico no será capaz de recibir la señal WWVB en lugares rodeados de mucho
hormigón o paneles de metal. La recepción de la señal horaria puede verse afectada por
teléfonos celulares, televisores, artefactos eléctricos u otras interferencias electrónicas.
Para obtener el mejor rendimiento del reloj atómico, sírvase instalar el receptor interior
cerca de una ventana y lejos de objetos metálicos grandes. Si la unidad no está
funcionando correctamente, cambie la posición de la misma. Puede que en esa
ubicación haya alguna interferencia.
19
DWS-170-IB SP\ENG
10/12/04
11:32 AM
Page 21
SOLUCIÓN DE PROBLEMAS
Las temperaturas interior y exterior no corresponden
cuando las unidades se colocan cerca entre ellas Cada sensor está construido para tener una aproximación de +/-2 grados en condiciones
normales. Así que es posible tener hasta dos grados de diferencia en sensores de
temperatura separados (uno podría tener “+2” grado y el otro “-2” grado). Además, la
curva de calibración es diferente entre las dos unidades porque el sensor de temperatura
exterior tiene un rango de temperaturas más amplio. Los errores por lo general quedan
anotados en los extremos de los rangos de temperatura.
La unidad base no recibe la transmisión de las unidades
periféricas Las unidades pueden no estar sincronizadas correctamente o puede ser necesario
sustituir las baterías. Para instrucciones detalladas, ver la sección “PARA EMPEZAR” que
empieza en página 2 de las Instrucciones. Trate de lograr la sincronización teniendo las
dos unidades a corta distancia entre ellas. Recuerde de colocar siempre el sensor remoto
dentro de la distancia efectiva de transmisión y lejos de grandes superficies metálicas.
¿Cuál es el tipo de batería recomendada?
Su unidad está equipada con un adaptador CA. Como respaldo de la alimentación de
corriente, recomendamos el uso solamente de baterías alcalinas como reemplazos.
¿Adonde puedo montar el sensor remoto?
Para lograr lecturas precisas y extender la vida útil del sensor, recomendamos el montaje
al abrigo de la luz solar directa y de la lluvia. La niebla y la bruma no afectan al sensor,
pero grandes cantidades de lluvia intensa pueden afectarlo. Para protegerlo,
recomendamos el montaje debajo del voladizo de su casa, del garaje o cualquier otro
lugar adecuado que lo abrigue de la luz solar directa y de la lluvia.
La lectura de la temperatura exterior indica “- -”
Es possible que el receptor doméstico esté “rastreando” – buscando lecturas desde más
de un sensor remoto. Este receptor doméstico puede funcionar con hasta tres sensores
remotos (se incluye sólo uno). Si el receptor doméstico está buscando más de un sensor
remoto, el icono “
” aparece debajo del indicador de canal. Otra vez, para seleccionar
una lectura de un solo sensor remoto, presione el botón “channel” para borrar el icono
de rastreado y asegurarse de que el canal seleccionado ahora esté en “1”.
La unidad está “bloqueada” – No puedo activar sus
funciones Cuando esto ocurre, es posible que la unidad se encuentre en modo de “sincronización
forzada”. Si el icono de la antena radio muestra “ondas” proyectándose del mismo, la
unidad está tratando de sincronizarse con la frecuencia del reloj atómico. Para
sobrepasar, simplemente oprima el botón “ - ” al respaldo de la unidad. Ahora usted
puede activar todas las otras funciones.
CARACTERÍSTICAS
Rango de temperaturas/medición de la humedad:
Indoor temp :
+32 F to +122 F (0 C to + 50 C)
Temperatura al cubierto:
de +32 F a +122 F (de 0 C a +50 C)
Humedad al cubierto:
de 20% a 99% RH (Humedad Relativa)
Sensor Remoto:
de -4 F a +140 F (de -20 C a +60 C)
Canal:
máx. 3 sensores remotos
Alerta de temperatura:
Transmisión:
Temp. interior/ Humedad y Canal 1 al 3
máx. 100 pies (30 m) en espacios abiertos, RF434 MHz
(frecuencia radio)
Resolución:
Reloj:
0,1 grados para la temperatura, 1% para la humedad
WWVB controlado por radio:
Alimentación de corriente:
Adaptador CA – receptor doméstico
2 Baterías alcalinas AA – sensor remoto
Esto en general indica que el selector del canal (ubicado en el rincón superior izquierdo
del receptor doméstico) no se encuentra ajustado correctamente para recibir la señal del
sensor remoto. Si usted tiene sólo un sensor remoto, asegúrese de que el selector del
canal esté ajustado en “1”. Para cambiar el canal, presione el botón “channel” (canal)
ubicado en el frente del receptor doméstico.
20
21
DWS-170-IB SP\ENG
10/12/04
11:33 AM
Page 23
DESCARGO DE RESPONSABILIDAD de la FCC
Temperatura exterior
Este artefacto cumple con la sección 15 de las reglas de la FCC (Comisión Federal de
Comunicaciones). El funcionamiento está sujeto a las siguientes dos condiciones:
1. Este artefacto no puede causar interferencias nocivas; y
2. Este artefacto debe aceptar cualquier interferencia que reciba, incluyendo la interferencia que
pueda causar un funcionamiento no deseado.
Nº de ID de la FCC: L5C0761TX-H (transmisor)
Indicador del sensor
exterior y del canal
Listado de
canales
Indicador(es)
de tendencia
Frec. 434 MHz
Temperatura interior
Nombre y función de los botones:
Funciones
Humedad al cubierto:
Batería Baja
Si el botón se mantiene presionado
Zona Horaria
Juego de Alarma(s)
SET
--
Ingresa los ajustes de
hora y calendario
+/
1 paso adelante Alarma,
Alarma Repetida on/off
(encendida/apagada)
Avance rápido
-/ZONA
1 paso atrás
Selección PST, MST,
CST, EST
Atrás Rápido
Búsqueda de señal
Atómica
Borra el máx/ min
de la memoria que se muestra
Lee el tiempo de alarma durante
5 segundos en el modo normal
Configuración de hora
de alarma
CLEAR/
ALARM
Lee los registros máximo y
mínimo durante 5 segundos
ALERT (alerta)
Encendido y apagado
de la alerta de temperatura
Ingresa la configuración de
la alerta de temperatura
CHANNEL
Selección de Canal 1,2,3,
listado automático
Borra el canal actual
SNOOZE/
BACKLIGHT
Iluminación de fondo en
5 segundos, dispara la alarma
de repetición, detiene la alarma
22
Reloj LCD
Fecha
Botón de alarma de
repetición/ luz de
fondo
MIN/MAX
Hora Atómica
Lente de
proyección
RECEPTOR DOMÉSTICO
SENSOR REMOTO
23