1
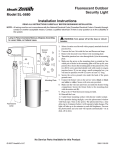
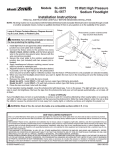
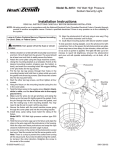
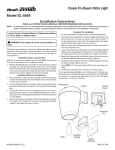
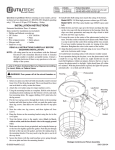
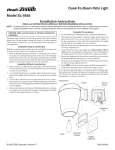
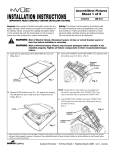
Model SL-5670/5676
High Pressure Sodium Dusk-To-Dawn Wall Light
Installation Instructions
READ ALL INSTRUCTIONS CAREFULLY BEFORE BEGINNING INSTALLATION.
NOTE: All wiring must be run in accordance with the National Electrical Code (Canadian Electrical Code in Canada) through conduit
or another acceptable means. Contact a qualified electrician if there is any question as to the suitability of the system.
CAUTION: Make sure the power is off before starting the
installation.
1. Select a location on a flat wall with structurally sound wood. The
wood should be at least 3/4 inch thick to safely secure the fixture.
Photocontrol
2. Loosen the two screws (A) securing the front housing until the
screws turn easily. Remove the front housing.
3. Loosen screw (B) two turns. Slide the reflector up until the keyholes clear the screw heads and remove the reflector.
If Mounting Directly to Wall
(A)
4. Knock out slugs at (C) and (D).
(B)
5. Attach cable clamp or flexible conduit to hole (D). Thread the ser(C)
(C)
vice wires thru this hole.
6. Mount the fixture with two 1/4 inch lag screws that will penetrate
the wood surface at least 3/4 inch.
Or, if Mounting to A 3-1/2" Or 4" Electrical Box
(E)
(F)
4. Determine which pair of slots line up with the mounting holes on your
box, (E) or (F). Knock out the slugs that line up. Knock out slug (D).
(F)
5. Thread the service wires thru hole (D).
6. Mount the fixture to the box with screws of the proper size for
your box.
Wiring and Final Assembly
7.
Connect
the
fixture
wires to the service wires (black to black and
Ground
(D) (E)
white
to
white).
Secure
with wire nuts provided.
Screw
8. Secure the service ground wire under the head of the green
ground screw.
9. Make sure the wire nuts and wires are inside the circular wiring
compartment. Reinstall the reflector and tighten screw (B).
Reflector
10. Model SL-5670 - Install ONLY a 35 watt H.P.S. type S76
lamp (provided).
Model SL-5676 - Install ONLY a 70 watt H.P.S. type S62
lamp (provided).
11. Reinstall the front cover.
To test operation during daylight, cover the photocontrol window with black tape. Turn on the power. The photocontrol has a time delay (up
to 2 minutes) before it will respond to light changes. The light will take up to ten minutes to reach full brightness. Uncover the photocontrol
and your unit will operate automatically—on at dusk, off at dawn.
Photocontrol
Window
No Service Parts Available for this Product
ONE YEAR LIMITED WARRANTY
This is a “Limited Warranty” which gives you specific legal rights. You may also have other rights which vary from state to state or province to province.
For a period of one year from the date of purchase, any malfunction caused by factory defective parts or workmanship will be corrected at no charge to you.
Light bulbs are not covered. To obtain a refund or a replacement, return the product to the place of purchase.
Not Covered - Repair service, adjustment and calibration due to misuse, abuse or negligence, light bulbs and other expendable items are not covered by
this warranty. Unauthorized service or modification of the product or of any furnished component will void this warranty in its entirety. This warranty does
not include reimbursement for inconvenience, installation, setup time, loss of use, or unauthorized service.
This warranty covers only DESA Specialty Products™ assembled products and is not extended to other equipment and components that a customer
uses in conjunction with our products.
THIS WARRANTY IS EXPRESSLY IN LIEU OF ALL OTHER WARRANTIES, EXPRESS OR IMPLIED, INCLUDING ANY WARRANTY, REPRESENTATION
OR CONDITION OF MERCHANT ABILITY OR THAT THE PRODUCTS ARE FIT FOR ANY PARTICULAR PURPOSE OR USE, AND SPECIFICALLY IN
LIEU OF ALL SPECIAL, INDIRECT, INCIDENTAL, OR CONSEQUENTIAL DAMAGES.
REPAIR OR REPLACEMENT SHALL BE THE SOLE REMEDY OF THE CUSTOMER AND THERE SHALL BE NO LIABILITY ON THE PART OF DESA
SPECIALTY PRODUCTS™ FOR ANY SPECIAL, INDIRECT, INCIDENTAL, OR CONSEQUENTIAL DAMAGES, INCLUDING BUT NOT LIMITED TO
ANY LOSS OF BUSINESS OR PROFITS, WHETHER OR NOT FORESEEABLE. Some states or provinces do not allow the exclusion or limitation of
incidental or consequential damages, so the above limitation or exclusion may not apply to you. Retain receipt for warranty claims.
© 2003 DESA Specialty Products™
598-1065-02
Modelo SL-5670/5676
Luz de Pared del Anochecer a la Madrugada a Alta
Instrucciones de Instalación
ANTES DE EMPEZAR LA INSTALACIÓN LEA CUIDADOSAMENTE TODAS LAS INSTRUCCIONES.
NOTA: Todo el cableado debe realizarse de acuerdo con el Código Nacional Eléctrico (Código Eléctrico Canadiense en Canadá) usando tubería
u otro medio aceptable. Contáctese con un electricista calificado si tiene alguna pregunta respecto a la adaptabilidad del sistema.
Ventana de
Fotocontrol
CUIDADO: Asegúrese de que la electricidad esté apagada
antes de comenzar la instalación.
1. Escoja un lugar en una pared plana que tenga una madera
estructuralmente buena.
2. Afloje los dos tornillos (A) asegurando la caja del frente hasta que
los tornillos giren con facilidad. Quite la caja del frente.
3. Afloje el tornillo (B) con dos vueltas. Deslice el reflector hacia arriba
hasta que los agujeros pasen la cabeza de los tornillos y quite el reflector.
Fotocontrol
(A)
Para Montaje Directo Sobre la Pared
(B)
(C)
(E)
(C)
(F)
(F)
(D) (E)
4. Saque a la fuerza los pedazos de metal en la parte (C) y (D).
5. Ponga la grapa para cables o el conducto flexible en el agujero (D).
Pase los cables de servicio por este agujero.
6. Monte el aparato con dos tirafondos de 1/4 de pulg. que penetrarán
la madera por lo menos por 3/4 de pulg.
O si lo Monta a una Caja Eléctrica de 3-1/2 pulg. o de 4 Pulg.
4. Determine qué par de ranuras están en línea con los agujeros de
montaje de su caja, (E) o (F). Saque a la fuerza los pedazos de
metal que están en línea. Saque el pedazo de metal (D).
5. Pase los cables de servicio por el agujero (D).
6. Monte el aparato a la caja con tornillos del tamaño apropiado
para su caja.
Cableado y Ensamble Final
Tornillo de
conexión a
tierra
7. Conecte los cables del aparato a los cables de servicio (negro a
negro y blanco a blanco). Asegúrelos con los conectores de cable
que se proveen.
8. Asegure el cable de servicio de conexión a tierra debajo de la cabeza
Reflector
del tornillo verde de conexión a tierra.
9. Asegúrese que los conectores de cable y los cables estén dentro del
compartimiento circular para cables. Reinstale el reflector y ajuste
el tornillo (B).
10. Modelo SL-5670 - Instale SOLAMENTE una bombilla de H.P.S. de 35 vatios tipo S76 (provista).
Modelo SL-5676 - Instale SOLAMENTE una bombilla de H.P.S. de 70 vatios tipo S62 (provista).
11. Reinstale la tapa del frente.
Para probar su funcionamiento durante el día, tape la ventana del fotocontrol con una cinta negra. Prenda la electricidad. El fotocontrol
tiene un retardo de tiempo (hasta de 2 minutos) antes de responder a los cambios de luz. La luz necesitará hasta diez minutos para alcanzar
su brillantez total. Quite la cinta del fotocontrol y su unidad funcionará automáticamente—prendido en la madrugada, apagado al atardecer.
No hay piezas de servicio disponibles para este producto
GARANTÍA LIMITADA A 1 AÑO
Esta es una “Garantía Limitada” que le da a Ud. derechos legales específicos. Usted puede también tener otros derechos que varían de estado a
estado o de provincia a provincia.
Por un período de 1 año desde la fecha de compra, cualquier mal funcionamiento ocasionado por partes defectuosas de fábrica o mano de obra será
corregido sin cargo para Ud. Las bombillas no están cubiertas. Para obtener el reembolso o reemplazo, devuelva el producto al lugar de compra.
No cubierto - Los servicios de reparación, regulación y calibración debidos al mal uso, abuso o negligencia, las bombillas y otras partes fungibles no se
cubren con esta garantía. Los Servicios no autorizados o modificaciones del producto o de cualquier componente que se provee invalidarán esta garantía
en su totalidad. Esta garantía no incluye reembolso por inconveniencia, instalación, tiempo de montaje, pérdida por uso, o servicio no autorizado
Esta garantía cubre solamente los productos ensamblados por DESA Specialty Products™ y no se extiende a otros equipos o componentes que el
consumidor usa junto con nuestros productos.
ESTA GARANTÍA ESTÁ EXPRESAMENTE EN LUGAR DE OTRAS GARANTÍAS, EXPRESADAS O SOBREENTENDIDAS, INCLUYENDO CUALQUIER
GARANTÍA, REPRESENTACIÓN O CONDICIÓN DE COMERCIABILIDAD O QUE LOS PRODUCTOS SE ADAPTEN PARA CUALQUIER PROPÓSITO
O USO EN PARTICULAR, Y ESPECIFICAMENTE EN LUGAR DE TODOS LOS DAÑOS ESPECIALES, INDIRECTOS, INCIDENTALES Y CONSECUENTES.
LA REPARACIÓN O EL REEMPLAZO DEBERÍA SER LA ÚNICA SOLUCIÓN DEL CLIENTE Y NO HABRÁ RESPONSABILIDAD POR PARTE DE DESA
SPECIALTY PRODUCTS™ POR CUALQUIER DAÑO ESPECIAL, INDIRECTO, INCIDENTAL O CONSECUENTE, INCLUIDOS PERO NO LIMITADOS A
CUALQUIER PÉRDIDA DE NEGOCIO O GANACIAS SEAN O NO PREVISIBLES. Algunos estados o provincias no permiten la exclusión o limitación de daños
incidentales o consecuentes, de modo que la limitación o exclusión arriba indicada puede que no se aplique a Ud. Guarde el recibo para reclamos de garantía.
© 2003 DESA Specialty Products™
598-1065-02 S
Modèle SL-5670/5676
Luminaire mural crépuscule-aurore au sodium haute pression
Mode d’installation
LIRE SOIGNEUSEMENT LES DIRECTIVES AVANT D’ENTREPRENDRE L’INSTALLATION.
Note: Le câblage doit être conforme aux exigences du Code canadien de l’électricité et être installé dans des canalisations ou autres
dispositifs acceptables. Si vous avez des doutes concernant la convenance du système, consultez un électricien reconnu.
Fenêtre de cellule photoélectrique
Mise en garde: Assurez-vous que le courant a été coupé
avant d’entreprendre l’installation.
Cellule
photoélectrique
(A)
(B)
(C)
(C)
1. Choisissez un endroit sur un mur plat, à ossature de bois solide. Le
bois doit avoir au moins 3/4 pouce (20 mm) d’épaisseur pour que le
luminaire puisse être fixé solidement.
2. Desserrez les deux vis (A) du boîtier avant jusqu’à ce qu’elles tournent
librement. Enlevez le boîtier avant.
3. Desserrez la vis (B) de deux tours. Faites glisser le réflecteur jusqu’à ce
que les trous de serrure libèrent les têtes de vis, puis enlever le réflecteur.
Pour le montage directement sur le mur
(E)
(F)
(F)
Vis de terre (D) (E)
4. Enlevez les débouchures (C) et (D).
5. Fixez le serre-fil ou le conduit flexible au trou (D). Insérez les fils de
service à travers ce trou.
6. Montez le luminaire avec deux tire-fond de 1/4 po, jusqu’à qu’ils
pénètrent au moins 3/4 po (20 mm) dans la surface de bois.
Ou pour le montage sur une boîte électrique de 3-1/2 ou 4 pouces
4. Déterminez la paire de trous ovalisés qui correspond aux trous de
montage de votre boîte, (E) ou (F). Enlevez les débouchures
correspondantes. Enlevez la débouchure (D).
5. Insérez les fils à travers le trou (D).
6. Montez le luminaire sur la boîte avec des vis de grosseur appropriée à
votre boîte.
Câblage et assemblage final
7. Raccordez les fils du luminaire aux fils de service (noir à noir et
blanc à blanc). Fixez-les avec les serre-fils inclus.
Réflecteur
8. Fixez le fil de terre de service sous la tête verte de la vis de terre.
9. Assurez-vous que les serre-fils et les fils se trouvent à l’intérieur du
compartiment de câblage circulaire. Remettez le réflecteur en place et
serrez la vis (B).
10. Modèle SL-5670 - Installez SEULEMENT une ampoule au sodium haute pression (SHP) de 35 W de type S76 (incluse).
Modèle SL-5676 - Installez SEULEMENT une ampoule au sodium haute pression (SHP) de 70 W de type S62 (incluse).
11. Remettez le boîtier avant en place.
Pour vérifier le fonctionnement du luminaire le jour, recouvrez la cellule photoélectrique de ruban noir. Mettez le courant. La cellule photoélectrique
a un délai d’allumage (jusqu’à 2 minutes) avant de réagir aux changements de luminosité. La lampe pourra prendre jusqu’à 10 minutes pour
atteindre sa pleine intensité. Enlevez le ruban et le luminaire fonctionnera automatiquement - s’allumera au crépuscule et s’éteindra à l’aurore.
Aucune pièce de rechange n’est disponible pour ce produit
GARANTIE LIMITÉE DE 1 AN
Il s’agit d’une « Garantie limitée » qui vous confère des droits juridiques spécifiques. Vous pouvez également jouir d’autres droits, variables d’une province à l’autre.
Pendant une période de 1 an à compter de la date d’achat, toute anomalie de fonctionnement imputable à un vice de matériau ou de main-d’oeuvre sera corrigée
gratuitement. Les ampoules ne sont pas couvertes par la garantie. Pour obtenir un remboursement ou un remplacement, retournez le produit au point d’achat.
Exclusions de la garantie - Le service de réparation, l’ajustement et l’étalonnage nécessités par un mésusage, un usage abusif ou la négligence, les
ampoules et autres consommables ne sont pas couverts par la présente garantie. Le service non autorisé ou la modification du produit ou d’un ou l’autre
de ses composants fournis invalidera totalement la présente garantie. Cette garantie ne comprend pas le remboursement pour dérangement, installation,
temps de montage, perte d’utilisation ou service non autorisé.
La garantie ne couvre que les produits assemblés DESA Specialty Products™ et ne s’étend pas aux autres équipements et composants que le client pourrait
utiliser conjointement avec nos produits.
CETTE GARANTIE TIENT EXPRESSÉMENT LIEU DE TOUTES AUTRES GARANTIES, EXPLICITES OU IMPLICITES, Y COMPRIS DE TOUTE GARANTIE
DE REPRÉSENTATION OU DE CONDITION DE CONVENANCE À LA COMMERCIALISATION OU À L’EFFET QUE LES PRODUITS CONVIENNENT À UN
BUT OU À UNE UTILISATION PARTICULIÈRE, ET SPÉCIFIQUEMENT DE TOUS DOMMAGES SPÉCIAUX, DIRECTS, INDIRECTS OU SECONDAIRES.
LE REMPLACEMENT OU LA RÉPARATION CONSTITUENT LE SEUL RECOURS DU CLIENT ET DESA SPECIALTY PRODUCTS™ NE POURRA ÊTRE
TENUE RESPONSABLE DE TOUS DOMMAGES SPÉCIAUX, DIRECTS, INDIRECTS OU SECONDAIRES, Y COMPRIS, SANS S’Y LIMITER, LES PERTES
COMMERCIALES ET PERTES DE PROFIT, QU’ELLES SOIENT PRÉVISIBLES OU NON. Certaines provinces n’autorisent pas l’exclusion ou la limitation des
dommages indirects ou secondaires, et la limitation ou l’exclusion ci-dessus pourrait ne pas s’appliquer à vous. Conservez le reçu pour réclamations sous garantie.
© 2003 DESA Specialty Products™
598-1065-02 F