1
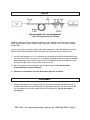
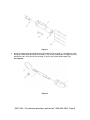
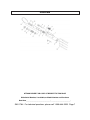
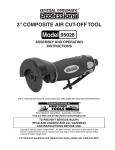
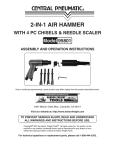
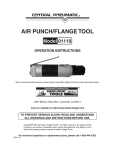
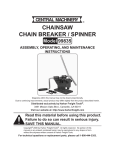
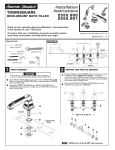
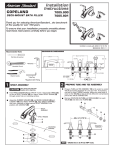
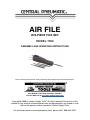
AIR FILE
W/4-PIECE FILE SET
MODEL 1704
ASSEMBLY AND OPERATING INSTRUCTIONS
Due to continuing improvements, actual product may differ slightly from product described herein.
3491 Mission Oaks Blvd. Camarillo, CA 93011
Visit our Web site at http://www.harborfreight.com
Copyright© 2006 by Harbor Freight Tools®. All rights reserved. No portion of this
manual or any artwork contained herein may be reproduced in any shape or form
without the express written consent of Harbor Freight Tools.
For technical questions and replacement parts, please call 1-800-444-3353.
SPECIFICATIONS
Housing material
Working pressure
Overall dimensions
Handle grip style
Air Consumption
File mounting method
Activation Method
Strokes per minute
Length of Key Stroke
Air inlet dimensions
File material
File styles
Hex Wrench
Machined and heat-treated carbon steel
90 P.S.I.
8-5/8”L X 2”W X 1-7/8”H (With Hanging Loop)
Contoured steel housing
4.0 C.F.M.
6MM (1/4”) fixed chuck with a 3MM (1/8”) head fastener
2 position slider
3,700
3/8”
1/4” - 18 NPT female
High carbon steel
Round, half-round, flat and triangle
Included
SAVE THIS MANUAL
You will need this manual for the safety warnings and precautions, assembly, operating, inspection,
maintenance and cleaning procedures, parts and assembly diagram. Keep your invoice with this
manual. Write the invoice number on the inside of the front cover. Write the product serial number
in the back of the manual near the assembly diagram, or write the month and year of purchase if
the product has no serial number. Keep this manual and invoice in a safe and dry place for future
reference.
WARNINGS AND PRECAUTIONS GENERAL AND SPECIFIC TO THIS PRODUCT
1. Wear proper clothing. Always use ANSI-approved safety impact goggles when assembling
or using this Air File. Wear long sleeved shirts, long pants and hard-toed shoes. Take off any
loose fitting jewelry and keep long hair covered to prevent being caught in moving parts.
2. Wear proper breathing protection. Remember that a “dust mask” is not a breathing
respirator. Use a Respirator that uses charcoal filters for the best protection.
3. Keep work area clean and well lighted. A dim and/or cluttered work area invites personal
injury.
4. Keep children away from work areas. Children can be a distraction and should be
supervised by an adult when near the work area. Never allow children to play with this
product even if it is turned off.
5. Store idle tools properly. Keep this Air File out of the reach of children.
6. Do not use the Air File if under the influence of alcohol or prescription drugs. Doing so
may cause damage to the tool, or personal injury. Do not use this or any tool if you are tired.
Use common sense at all times.
7. Check for damaged parts. Before using this Air File, carefully check for any parts that may
be missing or damaged and any other conditions that may affect the operation of this tool.
Replace or repair damaged and worn parts immediately using only a qualified repair facility.
SKU 1704 - For technical questions, please call 1-800-444-3353. Page 2
8. Always use the proper tools. This Air File was designed for a specific task. Do not alter this
tool, or use it for a purpose for which it was not intended.
9. Be careful when connecting/disconnecting air supply. It is recommended to use quick
disconnects (not included) rather than screw-on air connections.
10. Avoid accidental starts. Be sure all Files are securely fastened in this Air File before
plugging in or turning on Air Supply.
11. Use compressed air only. Clean, dry regulated compressed air at 90 PSI. Never use
oxygen, carbon dioxide, combustible gases, or any other bottled gas as a power source for
this tool.
12. Always disconnect air supply when this tool is not being used.
13. Use only Files that come with this Tool. Using or altering another file for use with this tool
could cause personal injury.
WARNING: Some dust created by power sanding, sawing, grinding, drilling and other construction
activities contains chemicals known [to the State of California] to cause cancer, birth defects or other
reproductive harm. Some examples of these chemicals are: Lead from lead based paint, crystalline
silica from bricks and cement or other masonry products, and arsenic and chromium from chemically
treated lumber. Your risk from these exposures varies depending on how often you do this type of
work. To reduce your exposure to these chemicals: Work in a well ventilated area, Work with approved
safety equipment such as dust masks that are specifically designed to filter out microscopic particles.
(California Health & Safety Code § 25249.5, et seq.)
NOTE: The warnings, cautions, and instructions discussed in this instruction manual cannot cover
all possible conditions and situations that may occur. It must be understood by the operator that
common sense and caution are factors that cannot be built into this product but must be supplied
by the operator.
NOTE: READ ALL INSTRUCTIONS BEFORE USING THIS PRODUCT
UNPACKING
When unpacking, check to be sure that all parts listed on page 5 of this manual are included. If
any parts are missing or broken, please call Harbor Freight Tools® at 1-800-444-3353 as soon as
possible.
SKU 1704 - For technical questions, please call 1-800-444-3353. Page 3
SETUP
(Air Line Components not included)
NOTE: For best service, you should incorporate an oiler, regulator, and inline filter, as shown
in the diagram above. Hoses, couplers, oilers, regulators, and filters are all available at Harbor
Freight Tools.
If you are not using an automatic oiler system, before operation, add a few drops of Pneumatic
Tool Oil to the airline connection. Add a few drops more after each hour of continual use.
1.
You will need to prepare a 1/4” air connector (not included) to connect to the Inlet Base Cap (15) on the Air File. First wrap the 1/4” air connector with pipe thread seal tape (not included) before threading it into the inlet. Connect the 3/8” ID Air Source Hose (not included) to a quick disconnect coupler (not included) and then to the Air File.
2. Set the air pressure on the regulator (not included) to 90 PSI. Do not exceed the recommended air pressure of 90 PSI.
3. Check the air connection for leaks. Disconnect from the air source.
ASSEMBLY
1.
Using the Hex Wench (17), slide the File (18) you wish to work with into the Guide Key (2) located at the front of the Air File Housing (1) and tighten Set Screw (9) which you will find just at the bottom of the front section of the Air File Housing (1). Do not over tighten.
See Figure 1.
SKU 1704 - For technical questions, please call 1-800-444-3353. Page 4
Figure 1
2.
Attach air supply to the Air Inlet Base Cap (15) of the Air File Housing (1), using either a quick disconnect (recommended, but not included), or by simply screwing the air supply to the Air Inlet Base Cap (15) of the Air File Housing (1) just in front of the Loop Hanger (16).
See Figure 2.
Figure 2
SKU 1704 - For technical questions, please call 1-800-444-3353. Page 5
OPERATION
1. With proper file inserted in the Air File, and with the air supply turned on, carefully place the file against the piece of work you are filing.
2. Carefully open the Slider Valve (4) located on top of the Air Drill Housing (1).
3. Start with even strokes and light pressure. Never force the Air File against the surface you are working with. Easy, light touches will work best.
inspection, maintenance, and cleaning
1. Always make sure the Slider Valve (4) is in its “OFF” position, and disconnect the Air File from its compressed air supply before performing any inspection, adjustments, maintenance, or cleaning.
2.
Before each use, inspect the general condition of the Air File. Check for loose screws, misalignment or binding of moving parts, cracked or broken parts, damaged air hose, and any other condition that may affect its safe operation. If abnormal noise or vibration occurs, have the problem corrected before further use. Do not use damaged equipment.
3. Daily: With a clean cloth, remove all dirt, oil, and grease from the Air File. If necessary, you may use a mild detergent. Do not use solvents, as damage to the Air File may occur. Do not immerse the Air File in any liquids.
PARTS LIST AND DIAGRAM
No# Description
1
Air File Housing
2
Guide Key
3
O-Ring (Large)
4
Slider Valve
5
O-Ring (Small)
6
Valve Nipple
7
Spring
8
Cylinder
9
Set Screw
Qty
1
1
2
1
1
1
2
1
1
No# Description
10 Piston
11 Plug
12 Spring
13 Filter
14 Retaining Ring
15 Air Inlet Base Cap 16 Loop Hanger
17 Hex Wench
18 Files
Qty
1
1
1
1
1
1
1
1
4
NOTE: Some parts are listed for illustration purposes only, and are not available individually
as replacement parts.
SKU 1704 - For technical questions, please call 1-800-444-3353. Page 6
DIAGRAM
ATTACH RECEIPT OR COPY OF RECEIPT TO THIS PAGE
Write Serial Number, if available, or Model Number and Purchase
Date Here____________________________, ______________________.
SKU 1704 - For technical questions, please call 1-800-444-3353. Page 7
90 day Warranty
Harbor Freight Tools Co. makes every effort to assure that its products meet high
quality and durability standards, and warrants to the original purchaser that this
product is free from defects in materials and workmanship for the period of 90 days
from the date of purchase. This warranty does not apply to damage due directly or
indirectly, to misuse, abuse, negligence or accidents, repairs or alterations outside
our facilities, criminal activity, improper installation, normal wear and tear, or to
lack of maintenance. We shall in no event be liable for death, injuries to persons
or property, or for incidental, contingent, special or consequential damages arising
from the use of our product. Some states do not allow the exclusion or limitation of
incidental or consequential damages, so the above limitation of exclusion may not
apply to you. This warranty is expressly in lieu of all other warranties, express or
implied, including the warranties of merchantability and fitness.
To take advantage of this warranty, the product or part must be returned to us
with transportation charges prepaid. Proof of purchase date and an explanation
of the complaint must accompany the merchandise. If our inspection verifies the
defect, we will either repair or replace the product at our election or we may elect
to refund the purchase price if we cannot readily and quickly provide you with a
replacement. We will return repaired products at our expense, but if we determine
there is no defect, or that the defect resulted from causes not within the scope of
our warranty, then you must bear the cost of returning the product.
This warranty gives you specific legal rights and you may also have other rights
which vary from state to state.
3491 Mission Oaks Blvd. • PO Box 6009 • Camarillo, CA 90311 • (800) 444-3353
SKU 1704 - For technical questions, please call 1-800-444-3353. Page 8