1
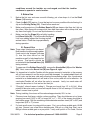
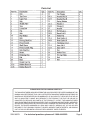
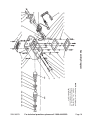
DUAL DRUM ROTARY
TUMBLER
90979
ASSEMBLY AND OPERATING INSTRUCTIONS
®
3491 Mission Oaks Blvd., Camarillo, CA 93011
Visit our Web site at http://www.harborfreight.com
Copyright© 2003 by Harbor Freight Tools®. All rights reserved. No portion
of this manual or any artwork contained herein may be reproduced in any shape
or form without the express written consent of Harbor Freight Tools.
For technical questions and replacement parts, please call 1-800-444-3353
Specifications
Overall Dimensions
6-1/2” W x 14-3/4” L x 6-3/4” H
Capacity
3.5 cups each Barrel
Barrel Size
4-3/4” H x 4-1/2” OD
Motor
110V / 60 Hz
Power Cord
18 Gauge / 3-Prong
Weight
8.3 Lbs.
Replacement Belt (37)
Sold as Sku 93835
Save This Manual
You will need the manual for the safety warnings and precautions,
assembly instructions, operating and maintenance procedures, parts list and
diagram. Keep your invoice with this manual. Write the invoice number on the
inside of the front cover. Keep the manual and invoice in a safe and dry place
for future reference.
Safety Warnings and Precautions
WARNING: When using tool, basic safety precautions should always be followed to
reduce the risk of personal injury and damage to equipment.
Read all instructions before using this tool!
1.
Keep work area clean. Cluttered areas invite injuries.
2.
Observe work area conditions. Do not use machines or power tools in damp or wet
locations. Don’t expose to rain. Keep work area well lighted. Do not use electrically
powered tools in the presence of flammable gases or liquids.
3.
Keep children away. Children must never be allowed in the work area. Do not let
them handle machines, tools, or extension cords.
4.
Store idle equipment. When not in use, tools must be stored in a dry location to
inhibit rust. Always lock up tools and keep out of reach of children.
5.
Do not force tool. It will do the job better and more safely at the rate for which it was
intended. Do not use inappropriate attachments in an attempt to exceed the tool capacity.
6.
Use the right tool for the job. Do not attempt to force a small Tumbler to do the work
of a larger industrial Tumbler. There are certain applications for which this Tumbler was
designed. Do not modify this Tumbler and do not use this Tumbler for a purpose for
which it was not intended.
7.
Dress properly. Do not wear loose clothing or jewelry as they can be caught in moving
parts. Protective, electrically nonconductive clothes and nonskid footwear are
recommended when working. Wear restrictive hair covering to contain long hair.
8.
Use eye, ear, and face protection. Always wear ANSI approved impact safety goggles.
Wear a full face shield if you are producing metal filings or wood chips. Wear an ANSI
approved dust mask or respirator when working around metal, wood, and chemical
dusts and mists.
SKU 90979
For technical questions, please call 1-800-444-3353.
Page 2
9.
Do not overreach. Keep proper footing and balance at all times. Do not reach over or
across running machines.
10.
Maintain tools with care. Keep tools clean for better and safer performance. Follow
instructions for lubricating and changing accessories. Inspect tool cords periodically
and, if damaged, have them repaired by an authorized technician.
11.
Disconnect power. Unplug Tumbler when not in use.
12.
Avoid unintentional starting. Be sure the switch is in the Off position when not in use
and before plugging in.
13.
Stay alert. Watch what you are doing, use common sense. Do not operate any tool
when you are tired.
14.
Check for damaged parts. Before using any tool, any part that appears damaged
should be carefully checked to determine that it will operate properly and perform its
intended function. Check for alignment and binding of moving parts; any broken parts
or mounting fixtures; and any other condition that may affect proper operation. Any part
that is damaged should be properly repaired or replaced by a qualified technician. Do
not use the tool if any switch does not turn On and Off properly.
15.
Guard against electric shock. Prevent body contact with grounded surfaces such as
pipes, radiators, ranges, and refrigerator enclosures.
16.
Replacement parts and accessories. When servicing, use only identical replacement
parts. Use of any other parts will void the warranty. Only use accessories intended for
use with this tool. Approved accessories are available from Harbor Freight Tools.
17.
Do not operate tool if under the influence of alcohol or drugs. Read warning
labels on prescriptions to determine if your judgment or reflexes are impaired while
taking drugs. If there is any doubt, do not operate the tool.
18.
Use proper size and type extension cord. If an extension cord is required, it must be
of the proper size and type to supply the correct current to the tool without heating up.
Otherwise, the extension cord could melt and catch fire, or cause electrical damage to
the tool. This tool requires use of an extension cord of 0 to 10 amps capability (up to 50
feet), with wire size rated at 18 AWG. Longer extension cords require larger size wire.
If you are using the tool outdoors, use an extension cord rated for outdoor use (signified
by “WA” on the jacket).
19.
Maintenance. For your safety, maintenance should be performed regularly by a qualified
technician.
Note: Performance of this tool (if powered by line voltage) may vary
depending on variations in local line voltage. Extension cord usage may
also affect tool performance.
Warning: The warnings, cautions, and instructions discussed in this
instruction manual cannot cover all possible conditions and situations
that may occur. It must be understood by the operator that common sense
and caution are factors which cannot be built into this product, but must
be supplied by the operator.
SKU 90979
For technical questions, please call 1-800-444-3353.
Page 3
Unpacking
When unpacking, check to make sure all of the parts on page 8 are
included. If any parts are missing or broken, please call Harbor Freight Tools at
the number on the cover of this manual as soon as possible.
How a Rotary Tumbler Works
The motion in the Barrel of a Tumbler simulates the natural action of flowing water or
ocean waves. Beaches and riverbeds contain rocks and pebbles smoothed by water and the
abrasive sand it carries. As rocks grind upon one another with constant water and sand in the
mix, they begin to round and smooth. Although this is a constant process, it does not however,
naturally polish the rocks.
The Tumbler uses an abrasive media instead of sand. It is graded by grain size, from
fine powder sized grains, up to large sized grains. By changing (usually by weekly intervals)
the grain size, rotating from coarse, medium, to fine, the rock or gemstone is smoothed much
more quickly than the natural process.
To polish using a Tumbler, you add a metallic oxide compound (see step 4 on page 5).
The complete process for a gemstone or rock to go from rough to a smooth, polished finish,
usually takes from 4-6 weeks.
Operation
I. Location
Note: The Tumbler will be working 24 hours a day for several weeks at a time, and needs to
be in a convenient and safe location that will not interfere with family activities. It
generates a slight humming sound. The motor becomes hot to the touch. This is
normal.
1.
Make it accessible. You will need to open it daily, in some cases.
2.
Locate it near a power outlet. It must be located in an open area that is away from any
flammable materials. Do not use the Rotary Tumbler outdoors.
3.
Do not put the tumbler on a table. The vibration of the unit may cause the tumbler to
crawl when placed on a smooth slippery surface.
4.
Only use the tumbler in an extremely safe location such as a concrete garage floor.
5.
Do not put it in a closet or drawer as it has a fan cooled motor and needs proper
ventilation.
6.
Do not let it freeze, as the water in either of the Rubber Barrels (22) will freeze and
become unbalanced, overloading the motor. Avoid extreme temperatures.
7.
It is possible for one of the Rubber Barrels (22) to break open and spill. Make sure the
location is safe for that possibility.
Caution: Always check on the tumbler on a regular basis to make
sure the unit is running properly and is not overheating. Make sure that
SKU 90979
For technical questions, please call 1-800-444-3353.
Page 4
conditions around the tumbler are unchanged, and that the tumbler
continues to operate in a safe location.
II. Before Use
1.
Before the first use, and once a month following, put a few drops of oil on the Shaft
Sleeve (14) bearings.
2.
Check the Belt (37) tension. It must be kept as loose as possible without allowing it to
slip on the Driving Pulley (35). Check before each use.
3.
Make sure the exteriors of the Rubber Barrels (22) are clean so that they don’t slip on
the rollers. Wipe them with a soapy cloth, then wipe them clean with a damp cloth, and
dry them thoroughly. Do not use liquid cleaners or solvents.
4.
Make sure that the Stops (6) are lightly touching
both Barrel Lids (28). This will prevent the Barrel
Lids from rubbing against the housing and will
reduce friction. Check the stops periodically
during operation.
Figure A
III. General Use
Note: These steps listed are for one barrel.
Both barrels should be used together.
If only one is to be “charged” (see step
2), use the other barrel on the
machine as well to help keep the first
in place. The barrels should be
mounted with the Knurled Nuts (24)
facing outward
1.
To open one of the Rubber Barrels (22), remove the Knurled Nut (24) and the Washer
(26). Next, remove the Barrel Lid (28)-see Figure A, right.
Note: It is imperative to load the Tumbler with the proper amount of materials, or the process
will not be successful, and the motor could be damaged. An underloaded barrel will
not lift rocks up the inner side walls allowing the cascading effect. Also, the abrasive
material in an underloaded unit will tend to form a slurry and will not be effective. An
overloaded Tumbler will not allow the rocks to cascade. Lastly, too much water will
cause the abrasives to float and not do their job.
2.
“Charging” a barrel means loading it. Charge your barrel from 1/2 to 3/4 full. More
pointed or abrasive rocks or stones will require closer to 3/4 full, leaving a 1/2 full barrel
when it comes time to polish.
Note: During tumbling, the stones will be reduced approximately 20% in size.
3.
Choose stones that have a similar surface condition. They should have a mix of sizes
ranging from small (3/16” to 3/8”) to large (3/4” to 1”). 25% of the stones should be in
the smaller range. Split the remaining volume between medium sized (3/8” to 5/8”) and
large sized (5/8” to 1”) stones.
4.
For best results use a four step polish process. First, use a silicon carbide grain, 60-90
grit size. Second, use a fine silicon carbide grain, 220 grit or a little finer. Next, use a
600 grit silicon carbide grain or a pre-polish. Lastly, use a polish of Tin Oxide, Cerium
SKU 90979
For technical questions, please call 1-800-444-3353.
Page 5
Oxide, or Titanium Dioxide. When tumbling hard materials, it might be necessary to
repeat the steps.
Note: More specific instructions for each step are covered under “Specific Instructions”,
below.
Approximate Amounts of Abrasive (for each Barrel)
Coarse Grind
Medium
Pre-polish
Polish
Burnish (soap)
4 Tbsp.
4 Tbsp.
6 Tbsp.
6 Tbsp.
1 Tbsp.
Note: An Abrasive Kit (not included) is available through Harbor Freight Tools, Item #
30956. This kit includes 4 oz. of coarse grit abrasive, 4 oz. of fine grit abrasive, 2 oz. of
pre-polish abrasive, and 2 oz. of polish abrasive.
5.
Add enough water to reach the bottom of the top layer of rocks.
6.
Seal the Rubber Barrel (22), and replace the Barrel Lid (28), Knurled Nut (24) and
the Washer (26).
7.
Set the Rubber Barrels (22) on the rollers, set the stops, and turn on the Power
Switch (13). Make sure you check during the first ten minutes to make sure both of the
tumblers aren’t leaking.
Note: Although this manual primarily deals with rock/gemstone tumbling, you can use this
Tumbler to work with metal and metal jewelry (without gemstones). This Tumbler may
be used to take the jagged, sharp edges off of small metal parts. To polish brass, gold,
silver, or copper, Harbor Freight Tools offers Polishing Media, Item # 46377.
Note: For more in-depth information on polishing jewelry, we recommend you purchase a
jewelry polishing handbook.
IV. Specific Instructions
IV-a. First Grind:
Run the Tumbler for 24 hrs., turn the tumbler off, remove the Barrel (22), and slowly
open the Barrel Lid (28), releasing the small amount of gas that builds up during the process.
Check the stones, which might show a little rounding, but not much. Clean the seals and
close. It is important to release the gas as it will turn the abrasive slurry, into a thick substance.
After another 24 hrs. check again. If the slurry is thickening, add a little water. Run for one
hour and check again. If it is still thick, add some more water. Let the Tumbler run continuously,
but check daily. Continue this process for 7-10 days to remove the sharp edges and rough
areas. Be patient. This is the most important step. When all of the edges are rounded you are
ready for the next step.
Note: Between steps you must clean the Rubber Barrel (22) and stones. Pour off the slurry
into a disposable container (i.e. a milk carton) and take care that the stones remain in
the Rubber Barrel (22).
Warning!! Never pour the slurry into your home plumbing system.
Next, remove the stones into a clean container or plastic bag. Finally, fill the Rubber
Barrel (22) 1/2 full with water and clean out the remaining slurry and grit. Wipe it clean with
a wet paper towel and then wipe it dry. To clean the stones, gently slosh them around in clean
water and remove them a few at a time checking for breaks or cracks. Discard broken or
SKU 90979
For technical questions, please call 1-800-444-3353.
Page 6
cracked stones. Place the stones in a plastic colander, or old nylon sock and rinse them
completely off. There should be no slurry or grit remaining on the stones.
IV-b. Second Grind:
Carefully replace stones into the Rubber Barrel (22). If the Rubber Barrel (22) is less
than 1/2 full, add plastic pellets (not included) to make up the difference. Add medium grit
(according to the measurements shown on the top of page 6) and water to the bottom of the
top layer of rocks. Reseal and tumble. Run it for 2-3 days before checking. They will begin to
smooth. After seven days they should have a smooth finish. If not, let them go another 2-3
days. Clean again as you did after grind one.
IV-c. Pre-polish:
Place stones into the Rubber Barrel (22) adding the correct amount of pre-polish and
plastic pellets (not included) if necessary, and water. Let it run for a week, checking every
other day. After a week take out 2-3 stones to test the progress. On a dampened piece of
leather, old rug, or towel, sprinkle a small amount of polishing compound, and rub the stone
vigorously with it. You should see a definite shine in a few moments. If they shine, clean the
Rubber Barrel (22) and you are ready for the last step. If not, continue to pre-polish and
check again in 24 hrs.
IV-d. Polish:
Gently set the stones in the Rubber Barrel (22) . Charge the tumbler with fresh water,
polishing compound, and plastic pellets to help cushion the stones. Make sure the volume is
at least 1/2 full, preferably 3/4 full. Tumble for 5 to 7 days. If they look the same dry as they do
wet, then they are finished. If they have a slight film, they need to be burnished.
IV-e. Burnishing:
Remove the stones, clean the Rubber Barrel (22) and remove and recover the plastic
pellets (set aside). Place the stones back in the Rubber Barrel (22) and replace the same
pellets. Use powdered soap such as Ivory® or White King® (see chart on page 5). Do not use
liquid detergents or dishwasher powders that have bleach. Add water as in previous steps
and seal the Rubber Barrel (22). Tumble for four days, and clean the barrel.
Notes to remember:
1.
You must clean between steps.
2.
When polishing or burnishing you must use plastic pellets (not included).
3.
It is recommended to use a log book to keep track of each step.
4.
If you start with stream worn or smooth stones, you may be able to eliminate the first
step.
5.
It is advised that you purchase a mineral book which goes into more detail about
selection of stones for tumbling. As you learn about relative hardness of each stone
you will achieve greater success by not mixing soft and hard stones.
6.
Always dispose of material properly.
SKU 90979
For technical questions, please call 1-800-444-3353.
Page 7
Maintenance
1.
Before the first use, and once a month following, put a few drops of oil on the Shaft
Sleeve (14) bearings.
2.
Check the Belt (37) tension. It must be kept as loose as possible without allowing it to
slip on the Driving Pulley (35). Check periodically.
To Adjust Belt (37) Tension:
a. Unplug the Power Cord (15) from its outlet.
b. Remove the four Bolts (1) holding the Top Cover (2) on.
c. Remove the Top Cover (2), Middle Plate (5), and Pads (3, 7), they should come off
as one assembly, and set them aside.
d. Loosen all four Round Cap Nuts (21) slightly, enough to allow them to move back
and forth.
e. Slide the Motor (17) away from the Power Switch (13) to increase tension, or
towards the Power Switch (13) to reduce tension or even remove the Belt (37).
f. Inspect the Belt (37) for cracks, tears, or other damage. Replacement Belts (37)
are sold under Sku 93835.
g. Reinstall the Middle Plate (5) and Top Cover (2) using the four Bolts (1).
3.
Make sure the exterior of the Rubber Barrel (22) is clean so that it doesn’t slip on the
rollers. Wipe it with a soapy cloth, then wipe it clean with a damp cloth, and dry thoroughly.
Do not use liquid cleaners or solvents.
REV 01/06
SKU 90979
For technical questions, please call 1-800-444-3353.
Page 8
Parts List
PLEASE READ THE FOLLOWING CAREFULLY
THE MANUFACTURER AND/OR DISTRIBUTOR HAS PROVIDED THE PARTS DIAGRAM IN THIS
MANUAL AS A REFERENCE TOOL ONLY. NEITHER THE MANUFACTURER NOR DISTRIBUTOR
MAKES ANY REPRESENTATION OR WARRANTY OF ANY KIND TO THE BUYER THAT HE OR
SHE IS QUALIFIED TO MAKE ANY REPAIRS TO THE PRODUCT OR THAT HE OR SHE IS
QUALIFIED TO REPLACE ANY PARTS OF THE PRODUCT. IN FACT, THE MANUFACTURER
AND/OR DISTRIBUTOR EXPRESSLY STATES THAT ALL REPAIRS AND PARTS REPLACEMENTS
SHOULD BE UNDERTAKEN BY CERTIFIED AND LICENSED TECHNICIANS AND NOT BY THE
BUYER. THE BUYER ASSUMES ALL RISK AND LIABILITY ARISING OUT OF HIS OR HER
REPAIRS TO THE ORIGINAL PRODUCT OR REPLACEMENT PARTS THERETO, OR ARISING
OUT OF HIS OR HER INSTALLATION OF REPLACEMENT PARTS THERETO.
SKU 90979
For technical questions, please call 1-800-444-3353.
Page 9
Assembly Diagram
NOTE: Some parts are listed and
shown for illustr ation
purposes only and are not
available individually as
replacement parts.
Page 10
For technical questions, please call 1-800-444-3353.
SKU 90979