1
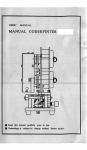
CYCLETREE
Model 02628
ASSEMBLY and OPERATING INSTRUCTIONS
(Bicycle’s not included)
®
3491 Mission Oaks Blvd., Camarillo, CA 93011
Visit our Web site at http://www.harborfreight.com
Copyright © 2002 by Harbor Freight Tools®. All rights reserved. No portion of this
manual or any artwork contained herein may be reproduced in any shape or form
without the express written consent of Harbor Freight Tools .
For technical questions and replacement parts, please call 1-800-444-3353
Specifications
Overall Dimensions
Hang Bar Dimensions
Base Post Dimensions
Center Post Dimensions
Casters
30” Square Base-Top of “T” Bar is 66” from the Base Beam
36” Height & 17-1/2’ Length per side, 7/8” Diameter
1-3/16” Sq. x 35-1/8” L x 1/16” Thick
1” Sq. x 36” L x 1/16” Thick
7/8” W x 3” Diameter
Save This Manual
You will need the manual for the safety warnings and precautions, assembly instructions,
operating and maintenance procedures, parts list and diagram. Keep your invoice with this
manual. Write the invoice number on the inside of the front cover. Keep the manual and
invoice in a safe and dry place for future reference.
Safety Warnings and Precautions
WARNING: When using the movable bicycle rack, basic safety precautions should always be followed to reduce the risk of personal injury and damage to equipment.
Read all instructions before using this movable bicycle rack!
1.
Keep work area clean. Cluttered areas invite injuries.
2.
Observe work area conditions. Do not use Cycletree in damp or wet locations. Don’t
expose to rain. Keep work area well lighted. Situate the Cycletree in a “child safe”
location. Only use the Cycletree on a flat, level, hard surface.
3.
Keep children away. Children must never be allowed in the work area. Do not let
them handle the Cycletree . Do not let children remove or add cycles to the Cycletree.
4.
Store idle equipment. When not in use, Cycletree must be stored in a dry location to
inhibit rust. Always keep Cycletree out of reach of children.
5.
Use the right tool for the job. There are certain applications for which this product
was designed. It will do the job better and more safely at the rate for which it was
intended. Do not modify this product and do not use this product for a purpose for
which it was not intended.
6.
Dress properly. Do not wear loose clothing or jewelry as they can be caught in
moving parts. Protective, electrically non-conductive clothes and non-skid footwear
are recommended when working. Wear restrictive hair covering to contain long hair.
7.
Use eye protection. Always wear ANSI approved impact safety goggles during
assembly.
8.
Do not overreach. Keep proper footing and balance at all times..
9.
Maintain this movable bicycle rack with care. Keep Cycletree clean for better and
safer performance. The handles must be kept clean, dry, and free from oil and grease
at all times.
Page 2
SKU 2628
Assembly
Refer to the Assembly Drawing on Page 6.
1. Form a square by facing both of the Base Brackets (#1) toward each other, and inserting
both of the Base Channeled Supports (#2) into the Base Brackets (#1), lining up the holes
on all four corners.
2. Put each of the Casters (#3) through the holes on the four corners of the base frame you
just constructed, from the bottom, so that the square frame sits on them.
3. Place Strut A (#6) on a top of the threaded caster bolt making sure the end with the most
severe angle faces the middle of the square. Refer to the Assembly Drawing on Page 6.
Secure it with a Flat Washer (#4) and Nut (#5).
4. On the opposite corner (diagonal), repeat step three with the other Strut A (#6).
5. On the two remaining corners, repeat the process in step three above, using both of the
Struts B (#8).
6. Set the Base Beam (#7) over the holes on the center of each of the Base Brackets (#1)
and secure it by putting a Bolt (#13) in from the top, and attaching a Flat Washer (#14) and
Nut (#15) from the bottom, on both sides. Make sure that the square receptacle on the Base
Beam (#7) faces up.
7. Slide the Base Post (#9A) through the flexible opening made by the top of the four Struts
and insert it into the square receptacle on the Base Beam (#7).
8. Line up the top of all four Struts with the two connection holes on the Base Post (#9A) and
secure both Struts A (#6) with a Bolt (#13), Flat Washer (#14) and Nut (#15). Next, secure
both Struts B (#8) with a Bolt (#13), Flat Washer (#14) and Nut (#15).
9. Insert the Center Post (#10A) into the Base Post (#9A) and secure it with 2 Bolts (#13A),
2 Flat Washers (#14A) and 2 Nuts (#15A). The Center Post (#10A) has various holes for
height adjustment.
10. Slide the Plastic Covered “T” Bar (#12A) onto the top of the Center Post (#10A) and
secure it with 2 Bolts (#13A), 2 Flat Washers (#14A) and 2 Nuts (#15A).
Operation
Warning: Hanging and dismounting of bicycles should only be done by adults who are
physically capable of safely handling and lifting the weight of a bicycle.
Hanging Bicycles
Hang one bicycle by threading the front wheel spokes through
the plasic covered “T” Bar, the next bicycle must be
hung the same way, but facing the opposite direction, (see photos
to the right and on front cover) continue the same procedure
making sure that all the contigious bicycles hang opposite to
each other. It is recommended that two people assist in hanging
the bicycles to maintain the balance and stability of the Cycletree.
Dismounting Bicycles Before lifting the front wheel off the
Plastic Covered “T” Bar (#12A), place a firm grip on the bicycle
frame, just behind the front fork, making sure that the bicycle
does not sway the wrong way, and carefully remove the bicycle
from the Cycletree.
Maintain balance to obtain the best and safest performance
of the Cycletree. Be sure that the multiple hanging bicycles
are evenly distributed on the Cycletree.
SKU 2628
Page 4
REV 12/03; REV 12/06
Maintenance
1. Periodically check that the hardware is tight. Tighten if necessary.
Parts List
Part No.
Description
1
Base Bracket
2
Base Channeled Supports
3
Castor 3"
4
Flat Washer Ø10
5
Nut M10
6
Strut A
7
Base Beam
8
Strut B
9A
Base Post
10A
Center Post
12A
Plastic Covered T-Bar
13
Bolt M6
13A
Bolt M8
14
Flat Washer Ø6
14A
Flat Washer Ø8
15
Nut M6
15A
Nut M8
Qty.
2
2
4
4
4
2
2
2
1
1
1
4
4
4
4
4
4
PLEASE READ THE FOLLOWING CAREFULLY
THE MANUFACTURER AND/OR DISTRIBUTOR HAS PROVIDED THE PARTS DIAGRAM IN THIS
MANUAL AS A REFERENCE TOOL ONLY. NEITHER THE MANUFACTURER NOR DISTRIBUTOR MAKES ANY REPRESENTATION OR WARRANTY OF ANY KIND TO THE BUYER THAT HE
OR SHE IS QUALIFIED TO MAKE ANY REPAIRS TO THE PRODUCT OR THAT HE OR SHE IS
QUALIFIED TO REPLACE ANY PARTS OF THE PRODUCT. IN FACT, THE MANUFACTURER
AND/OR DISTRIBUTOR EXPRESSLY STATES THAT ALL REPAIRS AND PARTS REPLACEMENTS
SHOULD BE UNDERTAKEN BY CERTIFIED AND LICENSED TECHNICIANS AND NOT BY THE
BUYER. THE BUYER ASSUMES ALL RISK AND LIABILITY ARISING OUT OF HIS OR HER
REPAIRS TO THE ORIGINAL PRODUCT OR REPLACEMENT PARTS THERETO, OR ARISING
OUT OF HIS OR HER INSTALLATION OF REPLACEMENT PARTS THERETO.
NOTE: Some parts are listed and shown for illustration purposes only and are not available
individually as replacement parts.
SKU 2628
Page 5
REV 12/03; 12/06
Assembly Drawing
SKU 2628
Page 6
REV 12/03; 12/06