Transcript
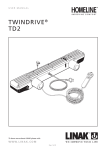
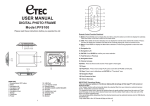
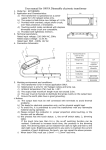
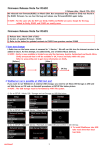
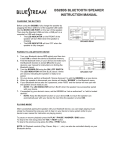
7160 User Manual
CONTROLS AND INDICATORS
REMOTE CONTROL
FRONT CONTROL PANEL
Assembly Illustration
iPod Dock
SAFETY INSTRUCTIONS
Clock/Alarm/Sleep
time setting
Mute
Stop
iPod play/pause
iPod tracks Repeat /
FM Stereo mode on/off
Alarm 1# on/off setting
(Alarm everyday)
Random
Alarm 2# on/off setting
(Alarm only once)
Snooze/Dimmer
iPod Menu set
IR receiver
RISK OF ELECTRIC SHOCK.
DO NOT OPEN
LCD screen
To reduce the risk of electric shock, do not remove cover (or back).
No user serviceable parts inside.
Refer servicing to a qualified service personnel.
Model No: A7160
Wall
Wall Mounting
Template
The lightening flash with arrowhead symbol with an equilateral triangle, is intended to alert the user to
1
the presence of uninsulated “dangerous voltage”within the product’s enclosure that may be of sufficient
magnitude to constitute a risk of electric shock to persons.
Drill Mounting Holes,
Insert Plastic Anchors
The exclamation point within an equilateral triangle is intended to alert the user to the presence of
important operating and maintenance (servicing) instructions in the literature accompanying the appliance.
Clock/Alarm/
Sleep time setting
2
User “Manual & Warranty”
3
4. Follow all instructions.
5. Do not use this apparatus near water.
7. Do not block any ventilation openings.
Volume -
Power on / Standby /
iPod Play/Pause /
AM/FM/Line-in(AUX) Mute
8. Do not install near any heat sources such as radiators, heat registers, stoves, or other apparatus (including amplifiers)
that produce heat.
Hang on Wall Panels
10. Unplug this apparatus during lightning storms or when unused for long periods of time.
Notes:
Please remove the plastic strip from the battery compartment of the remote
before use. (Remote will not function while the plastic strip is in place).
Function Mode Choice:
AM / FM / iPod /
Line-in(AUX)/
Radio preset confirm
6. Clean only with dry and soft cloth.
9. Protect the power cord from being walked on or pinched at the outlets and the exit point.
Downwards menu set
Volume +
Alarm 1# on/off setting
(Alarm everyday)
Attach Wall Panels
with Screws
3. Heed all warnings.
Confirm Menu set
Snooze / Dimmer
1. Read these instructions.
2. Keep these instructions.
Treble / Bass
Radio preset confirm
Time Setting/ Radio search
Upwards menu set
Next track /
Radio preset up /
Time confirm
Prev . track /
Radio preset down
Function Mode Choice
Power on / Standby
Prev . track /
Radio preset down
Next track /
Radio preset up /
Time confirm
Volume - / +
REAR PANEL
4
11. Only connect to the correct type of household power supply and wall outlets that match the adaptor included.
12. Do not overload wall outlets or extension cords as this can result in a risk of fire or electric shock.
13. Never push objects of any kind or spill liquid into the product as this could result in a risk of fire or electric shock.
14. Only use attachments/accessories specified by the manufacturer.
15. Refer all servicing issues to qualified service personnel. Servicing is required when the apparatus has been damaged
LCD DISPLAY
Completed
in any way, such as power-supply cord or plug is damaged, liquid has been spilled or objects have fallen into the
FM Antenna
5
apparatus, the apparatus has been exposed to rain or moisture, does not operate normally, or has been dropped.
16. This equipment might cause TV or radio interference even when it is operating properly. To eliminate interference you
can try one or more of the following corrective measures:
FM ANT
POWER
● Reorient or relocate the receiving antenna.
● Increase the distance between the equipment and the radio or TV.
● Use outlets on different electrical circuits for the equipment and the radio or TV.
● Consult your dealer or an experienced radio/television technician if the problem still exists.
1. POWER SUPPLY
4. LISTENING TO AM/FM RADIO
Using AC adaptor (included)
Use the included wall mounting template to determine locations for mounting screws.
2
Drill mounting holes and insert included plastic anchors
3
Attach the left and right wall mounting panels with the included screws
4
Hang the main unit on the wall mounting panels
5
Assembly process is completed
Lithium battery so the clock functions will not be lost in the event of
a power outage.
1
AM mode
A. Set 12/24 Hour Mode
12-hour
1
OFF
2
OFF
or
3
or
a). Press
or
only by using the remote control to manually search
for AM/FM stations 1-step at a time.
b). Press and hold more than 1 sec. to search FM/AM frequency quickly;
c). Press and hold until your favourite FM/AM frequency is displayed.
Press
FM mode
Power off
Press & hold
Standby
Power on
Function Mode
AM mode
1
B. Set the Clcok/Sleep/Alarm Times
Press
Press and hold
2
or
3
or
or
Change from hour to minute / Confirm Time
Press and hold
or
1
2
or
Set Sleep Time (only on Function Mode)
or
3
Play/Pause
3
4
or
When the Alarm by Buzzer is set and the unit is on Standby, the Snooze Function can be used. After the alarm sounds, press one of the
buttons (shown above) to enable the Snooze Function. In the Snooze Function, the alarm will stop and restart again every 9 minutes
(until turned off) and “SNOO” will show on the LCD Display
When “SNOO” is displayed on the LCD screen, the Snooze function is on. To turn off the Snooze Function, follow belowr point.
or
or
Mute
Volume Range: 0~30
FM mode
1
or
or
or
● Press the “P+” or “P-” buttons to recall the saved station
you want to hear from the Preset Memory.
823 Old Settlers Trail
As long as “SNOO” is not displayed on the LCD screen, Press
2:41
9. Maintenance
● Use a soft,clean cloth moistened with plain, luke-warm water to clean the exterior of the unit.
● Never use solvents such as benzene or other strong chemical cleaners since these could damage the unit’s finish.
● It is important that no liquid reaches the inside of the unit.
● Replace remote battery with anode up from back-side.
1
10. Troubleshooting
B. Alarm 2# Setting (Alarm only Once)
Alarm off --- Neither Buzzer Alarm icon nor Music Alarm icon is displayed.
No sound is heard
Buzzer Alarm --- Only Buzzer Alarm icon is displayed.
MP3 player
Radio noisy
FM ANT
POWER
C. If both Alarm 1# and Alarm 2# are set on, and unit is on Standby mode,
ON
OFF
Line In
IPOD CHARGING:
● When in the dock, the iPod unit will
always recharge until full.
Connect to MP3 player
Red Terminal
iPod video output
Notes: you can adjust volume on this unit or on the connected audio device.
LCD Screen will display “AL- -”:
or
11. Package Contents
Possible Problem
Solution
Power is not on
Press Power button
iPod is not working
Unplug iPod and test iPod
iPod not docked correctly
Make sure iPod docked correctly
The plasic strip of remote is
Remove the plastic strip
not removed
Wireless remote not work
Repeat Function
of the problem. Failure to enclose required information will result in delay of your shipment. Please
allow 4-6 weeks for product service or replacement.
including the antenna. Damage to external devices such as speakers and other memory devices are
Music Alarm --- Both Buzzer Alarm icon and Music Alarm icon are displayed.
Yellow
Terminal
Please enclose a copy of the sales receipt with the date of purchase and provide a detailed description
misuse, neglect, accident, abuse, commercial use, or modification of, or to, any part of the product,
Buzzer Alarm--- Only Buzzer Alarm icon is displayed.
White Terminal
Repeat all tracks
55343
not covered nor is the cost incurred in shipping the unit for warranty repair. Under no circumstances
1
Repeat 1 track
Suite 100
This warranty does not cover any product, which has been subject to damage due to an act of nature,
Alarm off --- Neither Buzzer Alarm icon nor Music Alarm icon is displayed.
Music Alarm --- Both Buzzer Alarm icon and Music Alarm icon are displayed.
-3:35
iPod screen
or
to adjust LCD screen backlight lighteness.
iPod menu Control
CD/DVD
No Repeat
freight prepaid to the address below.
ETEC USA
Symptom
18 of 21
obtain warranty service or replacement within the duration of the 90-day warranty, return the product
to disable Snooze function.
7. SETTING THE ALARM: BUZZER ALARM– MUSIC ALARM- ALARM OFF
5. Connecting another Audio Device. Line-in (AUX) Mode or with 3.5mm In-put Jack.
Stop, Prev track, Next track,
Repeat, Random
Set Alarm 2# Time
The Sleep timer can only be set during a Function Mode. All other times can be set from either in the Standby or Function Mode
or
Treble Range: -10~10
During the initial 90-day period after original purchase, we will service or exchange, at no charge. To
Hopkins, Minnesota
A. Alarm 1# Setting (Alarm Everyday)
Bass Range: -10~10
and all accessories.
A. Snooze Setting
B. Dimmer Setting
Notes:
AM mode
or
or
Set Clock Time
Set Alarm 1# Time
C. Using the Station Memory Presets
We warrant this product to be free from defects in material and workmanship under normal use for a
defective under this warranty, providing you submit proof of purchase (sales slip) along with the unit
8. SNOOZE / DIMMER SETTING
or
iPod
ETEC LIMITED 90-DAY WARRANTY
90-day period after purchase. We will repair or replace the unit free of charge should it become
● Press and hold (for 1+ second) the “P+” or “P-” buttons to quickly find the next available AM/FM stations
● When a desired station is found, it can be saved into one of the 40 Station Memory Presets (20 for AM & 20 for FM).
To add the station memory:
O Preset the “MEM” button
O Then using the “P+” or “P-” buttons, select the preset channel number (1 to 20) you want assigned to this station
O Press teh “MEM” button a second time to complete the addition of this station to memory
or
Line Out
Line in
Notes:
Press
3. Enjoy your iPod --- iPod Mode
Radio preset indicator
(1). The audio input source for the Music Alarm is determined by the last Music Function Mode used (iPod mode, Line-In mode, AM/FM mode) before selecting “Standby”
(2). The Music Alarm function features an alarm that gradually increases in volume. The unit will automatically turn on at the preset Alarm time.
(3). Buzzer Alarm can be enabled from a Function or Standby mode. The Music Alarm is only enabled when the unit is on Standby mode.
Adjust Hour/Minute value
or
iPod icon
Buzzer Alarm icon
To place the unit on STANDBY, press either the POWER button on the Remote Control or the POWER button below the LCD Display Panel
B. Setting the AM/FM Station Memory Presets
ON
Video Out
Line In
24-hour
or
POWER
ON
(AM or PM icon displayed)
or
Press & hold to set 12/24 hour mode
2. Power off / Standby / Power on
POWER
AM Freq. Indicator
FM Freq. Indicator
AM icon
FM icon
Line-in indicator
A. Selecting the AM/FM Frequency
FM mode
OFF
Time AM/PM icon
Mute icon
DC IN Jack
● Please make sure the power supply is plugged in for at least 8 hours
when using the unit for the first time to properly charge the built-in
Music Alarm icon
Power Switch on / off
6. Setting the Time
● Extend the attached FM antenna fully for the best FM reception.
● Press
to switch the FM Radio between Stereo and Mono.
Notes:
1
ON
Time display
Sleep icon
Radio icon
FM Stereo indicator
Function mode display
Remote battery is weak
Replace battery
Remote is not pointed towards
Point the remote towards the IR
the IR receiver of the unit
receiver of the unit
The antenna is placed in a
Move or rotate the antenna to
weak radio signal place or
improve the radio effect
direction
Sound distortion
Music overload, Sound is too
Decrease the volume
loud
Please switch off the power and turn it on again if the unit cannot work normally.
● Main Unit
● AC Adaptor
● Remote Control with 1-“CR2025” Battery
● AV Cable
● 3.5mm Audio Cable
● User “Manual & Warranty”
● Left and Right Wall Mounting Panels
● Wall Mounting Screws
● Wall Mounting Template
shall ETEC USA, be liable for any loss (direct, indirect, incidental, foreseen, unforeseen, special or
consequential) or for any damage arising out of, or in connection with, the use of this product.
UNDER NO CIRCUMSTANCES WILL ETEC USA BE LIABLE FOR ANY
INCIDENTAL OR CONSEQUENTIAL DAMAGES.
This warranty does not cover re-manufactured units, or product sold ‘As Is’.
This warranty is valid only in the United States and grants specific legal rights.