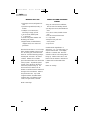
1
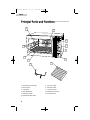
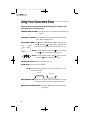
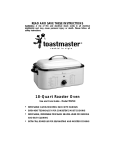
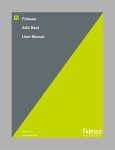
RTC1700SS Manual
10/2/03
4:06 PM
Page 2
Commercial Convection
Oven with Rotisserie
TEMP.
OFF
FUNCTION
TIME
ON
OFF
User Manual-
Model #
RTC1700SS
RTC1700SS Manual
10/2/03
4:06 PM
Page 3
English
IMPORTANT SAFEGUARDS
When using electrical appliances, basic safety precautions
should always be followed, including the following:
1. Read all instructions
2. Do not touch hot surfaces. Use handles or knobs.
3. Close supervision is necessary when any appliance used by or near
children.
4. To protect against electric shock, do not immerse cord, plug, or any
parts of the oven in water or other liquids.
5. Do not let cord hang over edge of table or counter, or touch hot
surfaces.
6. Do not operate appliance with damaged cord or plug or after the
appliance malfunctions, or has been damaged in any manner. Return
appliance to the nearest Authorized Service Center for examination,
repair, or adjustment.
7. The use of accessory attachments not recommended by the appliance
manufacturer may cause hazard or injury.
8. Do not place on or near a hot gas or electric burner, or in a heated
oven or in a microwave oven.
9. When operating the oven keep at least four inches of space on all sides
of the oven to allow for adequate air circulation.
10. Unplug from outlet when not in use and before cleaning. Allow to cool
before putting on or taking off parts, and before cleaning.
11. To disconnect, turn the control to OFF, then remove the plug. Always
hold the plug, but never pull the plug.
12. Extreme caution must be used when moving an appliance containing
hot oil or other hot liquids.
13. Do not cover the bottom or any other part of the oven with metal foil.
This may cause overheating of the oven.
14. Use extreme caution when removing tray or disposing of hot grease or
other hot liquids.
15. Do not clean with metal scouring pads. Pieces can break off the pad
and touch electrical parts, creating a risk of electric shock.
1
RTC1700SS Manual
10/2/03
4:06 PM
Page 4
English
16. A fire may occur if the oven is covered or touching flammable material,
including curtains, draperies, walls, and the like, when in operation.
Do not store any item on the oven during operation.
17. Extreme caution should be exercised when using containers constructed
of other than metal or glass.
18. Do not place any of the following materials in the oven: cardboard,
plastic, paper, or anything similar.
19. Do not store any materials, other than manufacturers recommended
accessories, in this oven when not in use.
20. Always wear protective, insulated oven mitts when inserting or
removing items from the hot oven.
21. This appliance has a tempered, safety glass door. The glass is stronger
than ordinary glass and more resistant to breakage. Tempered glass
can break, but the pieces will not have sharp edges. Avoid scratching
door surface or nicking edges. If the door has a scratch or nick,
contact customer service before using the oven.
22. Do not use outdoors.
SAVE THESE INSTRUCTIONS
FOR COMMERCIAL USE
NOTE: This appliance has a three-prong grounded plug. As a safety feature, this
plug will fit only in a three-prong outlet.
Thank you for using our Haier
product. This easy-to-use manual will
guide you in getting the best use of
your oven.
Remember to record the model
number. It is on a label in back of
the oven.
Model number
Date of purchase
Staple your receipt to your manual. You will need it to obtain
warranty service.
2
RTC1700SS Manual
10/2/03
4:06 PM
Page 5
English
Table Of Contents
PAGE
Important Safeguards .....................................................................1
Parts and Functions .........................................................................5
Using your Convection Oven .........................................................7
Roasting Chart ....................................................................................12
Rotisserie Chart....................................................................................14
Broiling Chart ......................................................................................15
Care and Cleaning ........................................................................16
Recipes ......................................................................................17-32
Warranty ........................................................................................34
3
RTC1700SS Manual
10/2/03
4:06 PM
Page 6
English
Convection Cooking
Convection cooking is the preferred method of cooking by many chefs.
You get superior results while saving time and energy. When roasting
meats, the fan circulates hot air around the roast, sealing in flavor and
juices. The roast is crispy and evenly browned on the outside, moist and
flavorful on the inside. When baking, the fan maintains uniform heat
throughout the oven. Baked goods are even, golden brown like those
from the finest pastry shops. Large, half-sheet pans slide right into the
oven in the place of the rack.
The oven also has settings for broil, rotisserie, and defrost. It is equipped
with a ROTISSERISE SPIT and FORKS. You can rotisserie roast two
chickens or an oven roast weighing up to 8 pounds. The slow-turning spit
provides natural basting of meats while fats drip away.
The oven can also be used to proof bread dough, slow cook, and
dehydrate food as well. Please take a few minutes to read this manual
before using your oven to become familiar with its parts and operation.
Included you will find a wide assortment of tasty recipes that were
specially written for use in your Commercial Convection Oven with
Rotisserie.
4
RTC1700SS Manual
10/2/03
4:06 PM
Page 7
English
Principal Parts and Functions
1
11
TEMP.
OFF
10
FUNCTION
9
2
8
TIME
ON
OFF
3
7
4
5
6
1. Rotisserie Forks and Spit
7. Power On Light
2. Rack Position
8. Electronic Timer
3. Oven Rack
9. Function Control
4. Drip/Baking Pan
10.Temperature Control
5. Rotisserie Handle
11.Convection Fan
6. Broiling/Roasting Rack
5
RTC1700SS Manual
10/2/03
4:06 PM
Page 8
English
Before Using Your Convection Oven
1. Read all instructions in this manual carefully. The information included
in this book will help you to use your Haier Commercial Convection
Oven with Rotisserie to its fullest.
2. Place your oven on a level surface such as a countertop or table. Be
sure the sides, back, and top of the oven are at least four inches away
from any walls, cabinets, or objects on the counter or table.
3. Remove all stickers from the oven except the rating label located on the
back.
4. Remove OVEN RACK, DRIP/BAKING PAN, BROILING/ROASTING
RACK, ROTISSERIE SPIT and FORKS. Wash them in hot, sudsy water
or in the dishwasher and dry thoroughly before placing in the oven.
5. When you are ready to use the oven, be sure that the TEMPERATURE
CONTROL and TIMER are in the OFF position. Plug the cord into
120-volt AC outlet.
IMPORTANT: Be sure that this is the only appliance
operating on this circuit.
6. We recommend a "trial run" at a high temperature to familiarize
yourself with your oven and to eliminate any protective substance or
oil that maybe have been used for packing and shipping set the
TEMPERATURE CONTROL to 450˚, FUNCTION CONTROL to BROIL,
and ELECTRONIC TIMER to 20 minutes. After the first 10 minutes,
switch the FUNCTION CONTROL to BAKE to activate the lower
heating elements. A small amount smoke and odor may be detected.
This is normal.
7. To avoid scratching, marring, discoloration, or fire hazard do not store
anything on top of the oven, especially during operation.
6
RTC1700SS Manual
10/2/03
4:06 PM
Page 9
English
Using Your Convection Oven
Please familiarize yourself with the following oven functions and
accessories prior to the first use:
TEMPERATURE CONTROL: Choose the desired or recommended temperature up
to 450˚F.
FUNCTION CONTROL: Select desired cooking function (Defrost, Bake/Extra,
Bake, Roast, Rotisserie, Broil).
ELECTRONIC TIMER: Press
to set the ELECTRONIC TIMER according to the
recipes. Then press On
to start cooking. When the time
Off
HOUR
MINUTE
has elapsed, a beep will sound and oven will shut off.
NOTE: To pause cooking process, press On
Off during operation.
Press On
again
to
restart
the
cooking
process.
Off
TIME
On
Off
NOTE: To cancel cooking process, press On
Off during operation
and press
until the display shows 0:00.
POWER-ON LIGHT: Illuminates when the oven is on.
OVEN RACK: Use in one of four positions
NOTE: OVEN RACK should always be facing up when placed in the
lowest rack position.
Facing Up
Facing Down
DRIP/BAKING PAN: Slides into rails below the RACK POSITIONS in the oven
for baking, roasting, broiling, and rotisserie roasting.
BROILING/ROASTING RACK: Fits into the DRIP/BAKING PAN for broiling
and roasting.
7
RTC1700SS Manual
10/2/03
4:06 PM
Page 10
English
Operation:
CAUTION: Appliance surfaces are hot during and after use.
• The fan will operate for all functions, but the heating elements will operate
differently.
• Be sure that the TEMPERATURE CONTROL is set on "•" before plugging the cord
into the outlet for use and when unplugging after use.
• Set TEMPERATURE CONTROL and FUNCTION CONTROL before setting
ELECTRONIC TIMER
• The oven will only operate if the ELECTRONIC TIMER has been set
to the desired time and the ON/OFF button has been pressed.
• For even cooking, always place foods in the oven with at least one inch of space
on all sides to allow proper air circulation.
• Preheat the oven when using the broil function.
Cooking Containers:
• The DRIP/BAKING PAN included with the oven is suitable for cookies, rolls,
biscuits, nachos, pork chops, etc.
• Most standard baking pans and casserole dishes are suitable for the Commercial
Convection Oven. The oven allows you to bake 2 – 8" pie or cake pans, 1 – 9"
or 10" pie or cake pan, 1 – 10" bundt or angel food cake pan, 1 – 12 cup
muffin pan, 1 – 13" x 9" x 2" baking pan, 1 jelly roll pan, 2 loaf pans, or
1 – 14" x 9" cookie sheet.
• Choose bakeware made of metal, oven-proof glass or ceramic.
• Your Commercial Convection Oven is designed to hold a half-sheet pan.
• Many convenience foods are packaged in non-metallic containers suitable for use
in microwave ovens as well as regular ovens. Check package directions to
determine if the container is suitable for use in a regular oven.
8
RTC1700SS Manual
10/2/03
4:06 PM
Page 11
English
Baking:
The bottom heating elements and the upper U-shaped heating
elements cycle on and off to maintain the selected temperature.
Convection baking is very consistent and even. The oven heats quickly, so
preheating is not necessar y. The fan circulates hot air around the food making
baked goods rise quickly and evenly. Most baked goods are placed on the rack
facing up in the lowest rack position. In many convection ovens, it is necessary to
lower the baking temperature to achieve acceptable results. The Commercial
Convection Oven has been designed for easy use. Lowering the baking
temperature is not necessary. Follow package or recipe directions for best results.
The Commercial Convection Oven is designed to hold a half-sheet pan. There is no
need to use the OVEN RACK, as the standard half-sheet pan will slide into one of
the rack positions. In most cases, you should use the lowest rack position. The
DRIP/BAKING PAN included with your oven can also be used for baking. It is
coated for easy clean up. The DRIP/BAKING PAN should always be
removed from the rails at the bottom of the oven when baking as
it will interfere with the flow of hot air from the bottom elements.
When used as the BAKING PAN, it should be placed on the OVEN RACK.
1. Place the OVEN RACK in the lowest rack position facing up.
2. Place the BAKING PAN on the center of the OVEN RACK.
3. When baking in a half-sheet pan, remove the OVEN RACK and place the
half-sheet pan in the lowest rack position.
4. Set TEMPERATURE CONTROL to the recommended temperature.
5. Set FUNCTION CONTROL to BAKE.
6. Set ELECTRONIC TIMER according to recipe directions.
7. Check baked goods 5-10 minutes before expected completion.
Recommended Baking Temperatures
Cakes:
Cheesecake:
Quick Bread:
Muffins:
Pies:
Cookies (large):
Cookies (jumbo):
9
325˚F-350˚F
300˚F
375˚F
400˚F
425˚F
350˚F
325˚F
RTC1700SS Manual
10/2/03
4:06 PM
Page 12
English
Proofing Bread Dough:
When making yeast bread, you can proof (raise) the bread in the oven on the BAKE
FUNCTION. Set TEMPERATURE CONTROL to 175˚F (the dot between 150 and
200). Reduce the recipe rising time by 25% to 30% and set ELECTRONIC TIMER to
that time. Allow dough to double in size. Turn TEMPERATURE CONTROL to the
desired baking temperature and set ELECTRONIC TIMER to the shortest completion
time given in the recipe.
SLOW COOKING:
Slow cooking is a long cooking process at a low temperature used to tenderize less
tender cuts of meat and blend flavors in soups and stews. Foods to be slow cooked
are usually placed in a covered casserole dish with some liquid and cooked at
250˚F for 4 to 12 hours.
1. Place the OVEN RACK in the lowest rack position facing up.
2. Place the covered casserole dish with food to be slow cooked on the center of the
OVEN RACK.
3. Set TEMPERATURE CONTROL to 250˚F.
4. Set FUNCTION CONTROL to BAKE.
5. Set ELECTRONIC TIMER according to recipe directions.
NOTE: The DRIP/BAKING PAN should always be removed from the rails in the
bottom of the oven when slow cooking, as it will interfere with the flow of
hot air from the bottom heating elements.
Defrosting:
The heating elements do not operate for this function.
For defrosting, the fan circulates air to thaw food in a shorter period of time than
conventional methods of defrosting.
IMPORTANT: Defrosted foods should be cooked as soon as possible after
thawing and should never be left at room temperature when completely thawed as
harmful bacteria will begin to grow. DO NOT defrost large amounts of food at
one time.
1. Place the DRIP/BAKING PAN in the rails near the bottom of the oven.
2. Place the OVEN RACK in the lower rack position facing up.
3. Place the food to be defrosted in the center of the OVEN RACK.
4. Set TEMPERATURE CONTROL to "•".
5. Set FUNCTION CONTROL to DEFROST.
6. Set ELECTRONIC TIMER to the shortest amount of time necessary for defrosting.
Check food when the timer shuts off and the bell rings. Add more time if
necessary.
10
RTC1700SS Manual
10/2/03
4:06 PM
Page 13
English
Bake/Extra:
The bottom element and rear O-shaped element cycle on and off to
maintain temperature.
This function allows you to cook more than one layer of food at one time without
rotating pans.
1. Place first sheet pan in the low rack guide (for cookies use low, middle, or upper
rack positions).
2. Place second sheet pan in the middle rack position and third sheet pan in the
upper rack position.
3. Set TEMPERATURE CONTROL according to recipe.
4. Set FUNCTION CONTROL to BAKE/EXTRA
5. Set ELECTRONIC TIMER according to recipe.
Roasting:
The top heating elements cycle on and off to maintain the selected
temperature.
When roasting, hot air circulates around the meat sealing in flavor and juices. The
roast is crispy and evenly browned on the outside, moist and flavorful on the inside.
Roasting time is 25% to 30% faster than conventional ovens.
1. Place the BROILING/ROASTING RACK in the DRIP/BAKING PAN.
2. Place the meat fat side up on the BROILING/ROASTING RACK
(unless otherwise directed).
3. It is not necessary to preheat the oven during roasting.
4. Slide the DRIP/BAKING PAN into position in the rails at the bottom of the oven.
5. Set TEMPERATURE CONTROL to the desired temperature.
6. Set FUNCTION CONTROL to ROAST.
7. Set ELECTRONIC TIMER to the desired time.
Use the following chart as a guide for roasting. Use a reliable meat thermometer
for the most accurate results. Roasts should stand for 10 to 15 minutes before
carving. During this time, they will continue to cook, which will increase the meat
thermometer reading by approximately 10˚F.
11
RTC1700SS Manual
10/2/03
4:06 PM
Page 14
English
ROASTING CHART: (Roasting times are per pound)
Type/Oven Temp.
Weight (lb) Approx. Roasting Time Meat Therm. Reading (F)
20-22 min.
23-24 min.
25-27 min.
Rare-120˚-130˚
Med-140˚-150˚
Well-160˚-170˚
3-6
18-20 min.
21-23 min.
24-26 min.
Rare-120˚-130˚
Med-140˚-150˚
Well-160˚-170˚
Standing Rib
3-6
20-22 min.
23-24 min.
25-27 min.
Rare-120˚-130˚
Med-140˚-150˚
Well-160˚-170˚
Pork: 350˚
Loin (Bone in)
Loin (Boneless)
Fresh Ham
3-6
3-8
4-8
25 min.
15 min.
25 min.
Well-170˚
Well-170˚
Well 170˚
6-8
12-16
15 min.
15-17 min.
140˚
140˚
6-8
20-23 min.
25 min.
Med-170˚
Well 180˚
20 min.
25 min.
15 min.
20 min.
180˚
180˚
180˚
180˚
Beef: 350˚
Sirloin Tip/
Top Round
3-8
Eye Round
Smoked Ham:
325˚
Full Cooked
w/bone (half)
(whole)
Lamb: 350˚
Leg
Poultry: 325˚
Chicken, unstuffed
6-8
Chicken, stuffed
6-8
Turkey, unstuffed
16-22
Turkey, stuffed
16-22
12
RTC1700SS Manual
10/2/03
4:06 PM
Page 15
English
Rotisserie Roasting:
The top heating elements cycle on and off to maintain the
maximum temperature in the oven.
Rotisserie roasting is a healthy way to cook meats because the slow-turning spit
provides natural basting while fats drip away. The rotisserie can be used to roast
meats up to 8 pounds and will easily handle two 4-pound chickens. Season the
roast with salt, pepper or your favorite spices, or brush barbecue sauce, or,
vegetable oil as desired. It is not necessary to preheat the oven for
rotisserie roasting.
1. Place one ROTISSERIE FORK on the end of the ROTISSERIE SPIT opposite the
point with the tines facing the center and tighten the screw slightly.
2. Slide the pointed end of the ROTISSERIE SPIT through the center of the roast.
3. Place the other ROTISSERIE FORK on the other end of the ROTISSERIE SPIT with
the tines facing the roast.
4. Adjust the roast so that it is centered on the ROTISSERIE SPIT. Make sure the
FORKS secure the roast on the SPIT and tighten the screws.
5. When cooking poultry, legs and wings should be secured to the body with
string, making the roast as compact as possible. This is necessary for smooth
movement of the ROTISSERIE SPIT.
6. Season or baste the roast as directed.
7. Place the DRIP/BAKING PAN in the rails at the bottom of the oven to catch the
drippings.
8. Put the pointed end of the ROTISSERIE SPIT in the drive socket on the right
interior wall of the oven.
9. Place the grooved end on the spit support on the left interior wall of the oven.
10. Set TEMPERATURE CONTROL to 450˚F.
11. Set FUNCTION CONTROL to ROTISSERIE.
12. Set ELECTRONIC TIMER to the shortest time recommended.
13. When the roast is done, turn TEMPERATURE CONTROL back to "•".
14. Remove the ROTISSERIE SPIT from the oven using the included ROTISSERIE
HANDLE. Place the roast on a cutting board or platter and allow to stand for
10-15 minutes.
15. Using a potholder, loosen the screw on the ROTISSERIE FORK and slide it out.
Remove the ROTISSERIE SPIT with other FORK from the roast. Carefully remove
the ROTISSERIE FORKS and carve the roast.
CAUTION: The ROTISSERIE SPIT, ROTISSERIE FORKS, SCREWS, and the roast will
be hot. Use mitts or potholders for handling.
13
RTC1700SS Manual
10/2/03
4:06 PM
Page 16
English
Use the following chart as a guide for rotisserie roasting. Use a reliable meat
thermometer for the most accurate results. Roasts should stand for 10 to 15 minutes
before carving. During this time they will continue to cook, increasing the meat
thermometer reading by approximately 10˚F.
ROTISSERIE CHART:
Type
Weight
Temperature Setting
Chicken
3-4 lb.
450˚
11/2 - 2 hr.
4-8 lb.
450˚
2 - 2 1/2 hr.
Pork Roast
4-6 lb.
450˚
11/2 - 2hr.
Roast Beef
3-5 lb.
450˚
11/2 hr. (rare)
13/4 hr. (med.)
2 hr. (well)
450˚
1 hr.
450˚
11/2 - 2 hr.
Cornish Hens-2
Smoked Ham
Boneless
1.5 lb. each
4-5 lb.
Cooking Time
Broiling:
The top heating elements cycle on and off to maintain the
maximum temperature in the oven.
In the Commercial Convection Oven, it is not necessary to turn food because the fan
circulates the hot air around the food. The food must be placed on the
BROILING/ROASTING RACK fitted into the DRIP/BAKING PAN to allow the
circulation of air.
If browner meats are desired, brush the surface with Worcestershire sauce or
browning and seasoning sauce. Barbecue or other sweet sauces should be brushed
on during the last 15 minutes of broiling. They will burn if applied too early in the
cooking.
14
RTC1700SS Manual
10/2/03
4:06 PM
Page 17
English
1. Remove the DRIP/BAKING PAN, and BROILING/ROASINT RACK from the oven.
2. Place the OVEN RACK facing down in the middle position.
3. Set TEMPERATURE CONTROL to 450˚F.
4. Set FUNCTION CONTROL to BROIL.
5. Set ELECTRONIC TIMER for 5 minutes to preheat the oven.
6. While the oven is preheating, place the BROILING/ROASTING RACK in the
DRIP/BAKING PAN. Place the food to be broiled directly on the
BROILING/ROASTING RACK, unless otherwise directed.
7. When the oven is preheated it will automatically shut off and the bell will ring.
8. Place the DRIP/BAKING PAN with the BROILING/ROASTING RACK and the
food on the OVEN RACK and close the door.
9. Set the TIMER for the shortest time recommended. It is not necessary to turn food
during broiling.
CAUTION: DO NOT leave the oven unattended during Broiling.
BROILING CHART:
Type
Beef:
Steak:
Porterhouse,
Sirloin,
London Broil,
Top Round
Hamburger
Pork:
Chops
Ribs
Sausage
Chicken:
Fish:
Fillets
Steaks
15
Weight/Thickness
Desired Doneness
Cooking Time
1 inch
Rare
Medium
Well Done
18-20 min.
21-23 min.
24-28 min.
6 ounces
(1 inch)
Rare
Medium
Well Done
15-17 min.
18-21 min.
22-25 min.
1 inch
Cut in pieces
Links
Well Done
Well Done
Well Done
19-23 min.
30-35 min.
25-30 min.
Pieces with skin
Boneless Breasts
Halves with skin
Well Done
Well Done
Well Done
20-25 min.
12-15 min.
30-40 min.
Well Done
10-12 min.
Well Done
15-20 min.
1/
2
inch
1 inch
RTC1700SS Manual
10/2/03
4:06 PM
Page 18
English
Care and Cleaning
1. Press ON/OFF to stop ELECTRONIC TIMER and turn TEMPERATURE CONTROL
to "•". Unplug before cleaning.
2. Allow oven and accessories to cool completely before cleaning.
3. Clean the outside of the oven with a damp cloth and dry thoroughly. Clean
stubborn stains with a nonabrasive liquid cleaner. Rinse and dry thoroughly. Do
not use metal scouring pads or abrasive cleaners that will scratch the surface.
4. Clean the glass door with a cloth or sponge dampened with warm, sudsy water.
Dry thoroughly.
5. Wash the OVEN RACK, the BROILING/ROASTING RACK, ROTISSERIE SPIT with
FORKS, and DRIP/BAKING PAN in hot, sudsy water or in the dishwasher. Rinse
and dry thoroughly.
6. If crumbs and spills have accumulated at the bottom of the oven, wipe with a
damp cloth. Dry thoroughly.
7. DO NOT use abrasive cleaners or metal scouring pads to clean the OVEN
RACK, BROILING/ROASTING RACK, or DRIP/BAKING PAN. Clean stubborn
stains with a nylon or polyester mesh pad and a mild, nonabrasive cleaner such
as Soft Scrub, Cameo, or Bon Ami. Rinse and dry thoroughly.
8. The walls on the inside of the oven are stainless steel. Remove heavy spatter after
use with a nylon or polyester mesh pad, sponge or cloth dampened with warm
water. Blot dry with a paper towel or soft, dry cloth.
9. DO NOT use metal scouring pads or abrasive cleaners that will scratch
the surface.
Replacing the Light Bulb:
The light bulb inside the oven can be replaced if it burns out. New light bulbs may
be obtained at your local hardware store. Please make sure the bulb is a 15-watt
oven-rated bulb. To remove the old light bulb, loosen screw on the light bulb cover
on the upper rear corner of the right interior wall. Remove the cover. Turn the bulb
counterclockwise to remove. Place the new bulb in the socket and turn the bulb
clockwise to tighten. Replace the light bulb cover and tighten the screw.
16
RTC1700SS Manual
10/2/03
4:06 PM
Page 19
English
Recipes
OATMEAL RAISIN MUFFINS
BLUEBERRY CORN MUFFINS
1/2
3/4
1 cup yellow cornmeal
1 cup flour
1/2 cup sugar
1 tablespoon baking powder
1 teaspoon salt
1/3 cup vegetable oil
3/4 cup milk
1 egg
1/2 cup fresh or frozen blueberries,
unthawed
cup whole wheat flour
cup white flour
3/4 cups old fashioned oats (oatmeal)
1/4 cup brown sugar, firmly packed
1 teaspoon cinnamon
2 teaspoons baking powder
1 teaspoon baking soda
1 teaspoon salt
1 cup buttermilk
1 egg
1 teaspoon vanilla
1/4 cup oil
1 cup raisins
Spray a 12-cup muffin pan with
cooking oil spray or line with cupcake
liners. In a large mixing bowl, combine
dry ingredients. In another bowl
combine, buttermilk, egg, vanilla, and
oil. Slowly stir into the dry ingredients
just until combined. Stir in the raisings.
Fill the muffin cups to within 1/2 inch of
the top. Place the muffin pan on the
OVEN RACK in the lowest position with
rack facing up. Set the oven to 400˚F.
Bake for 18-22 minutes or until a toothpick inserted in the center comes out
clean.
Makes 12 muffins
17
Spray a 12-cup muffin pan with
cooking oil spray or line with cupcake
liners. In a large mixing bowl, combine
dry ingredients. In another bowl
combine oil, milk, and egg. Slowly stir
into the dry ingredients just until
combined. Gently fold in the
blueberries. Fill the muffin cups to
within 1/2 inch of the top. Place the
muffin pan on the OVEN RACK in the
lowest position with rack facing up. Set
the oven to 400˚F. Bake for 18-20 minutes or until a toothpick inserted in the
center comes out clean.
Makes 12 muffins.
RTC1700SS Manual
10/2/03
4:06 PM
Page 20
English
PUMPKIN’N PEAR BREAD
SOUR CREAM CHOCOLATE CAKE
1 can (15 ounces) pumpkin
1/4 cup oil
2 eggs
1 can (8.25 ounces) pears with liquid,
mashed
1 1/4 cup brown sugar, firmly packed
4 cups flour
1/2 teaspoon salt
2 tablespoons baking powder
1 teaspoon cinnamon
1/4 teaspoon nutmeg
1/4 teaspoon allspice
1/2 cup chopped walnuts
1 box (18.5 ounces) chocolate cake mix
with pudding in the mix
1 cup sour cream
1/3 cup water
1/2 cup oil
4 eggs
1 cup semi-sweet chocolate morsels
Grease two (8 1/2" x 4 1/2 " x 2") loaf
pans. In a large mixing bowl combine
pumpkin, oil, eggs, pears, and brown
sugar. In another mixing bowl, combine
the remaining ingredients. Stir the dry
ingredients into the pumpkin mixture
until all the flour is incorporated. Spoon
batter into prepared pans. Place the
pans on the OVEN RACK in the lowest
position facing up. Set the oven to
375˚F. Bake for 45-50 minutes or until
a toothpick inserted in the center comes
out clean.
Grease a 10-inch bundt pan. In a large
mixing bowl, combine all ingredients,
except chocolate chips, using a hand
mixer at low speed. Continue to mix at
medium speed for about 3 minutes. Stir
in the chips. Spoon the batter into the
prepared pan. Place the pan with the
cake on the rack in the low position
facing down. Set the oven to 350˚F.
Bake for 45-50 minutes or until a
toothpick inserted in the center comes
out clean. Remove from the oven and
allow to cool on a rack for 10 minutes.
Turn the cake onto a serving dish. Cool
and sprinkle with powdered sugar.
Makes 1 bundt cake
Makes 2 loaves
18
RTC1700SS Manual
10/2/03
4:06 PM
Page 21
English
EASY BREAD MACHINE
DINNER ROLLS
STRAWBERRY APPLE PIE
1 pint strawberries, hulled and sliced
3 tart cooking apples, peeled and
thinly sliced
1 cup sugar
1/4 cup flour
1/2 teaspoon cinnamon
Pastry for a 2-crust pie
In a large mixing bowl combine the
berries, apples, sugar, flour and
cinnamon. Fit one of the pie crusts into
a 9-inch metal pie plate. Spoon the
fruit mixture into the crust mounding the
fruit in the center and top with the
second crust. Fold the edges of the top
crust under the bottom crust, seal and
flute the edges. Make several slits in the
top of the pie to vent the steam. Place a
cookie sheet under the pie to catch any
dripping. Place the cookie sheet on the
OVEN RACK in the lowest position with
rack facing up. Set the oven to 425˚F.
Bake for 45-50 minutes or until golden
brown.
Makes 1 pie
1 cup plus 2 tablespoons warm water
cup butter, cut in pieces
1 egg
3 tablespoons mashed potato flakes
3 cups bread flour
3 tablespoons sugar
1 teaspoon salt
1 envelope active dry yeast
1/3
Place all the ingredients in the order
listed into the bread pan of an
automatic bread machine. Set machine
on the dough or manual cycle and press
start. When the cycle is complete
remove the dough and allow it to stand
for 10 minutes. Sprinkle a small
amount of flour on a cutting board. Cut
the dough in half and roll into two
12-inch ropes. Cut each rope into 12
equal-sized pieces. If the dough
becomes sticky while shaping, knead in
additional flour. Shape the dough into
balls. Spray the DRIP/BAKING PAN
with cooking oil spray. Place the rolls
on the pan 1/2 inch apart. Place pan
on the rack in the lowest position with
the rack facing up. Set the oven to
175˚F and allow to rise for 15 minutes
or until double in bulk. Raise the
temperature to 400˚F. Bake for 12-15
minutes or until golden brown and the
rolls sound hollow when tapped.
Makes 24 rolls
19
RTC1700SS Manual
10/2/03
4:06 PM
Page 22
English
CHOCOLATE SWIRLED
CHEESECAKE
36 (cream filled) chocolate sandwich
cookies
1/2 cup melted butter or margarine
3 packages (8 ounces each) cream
cheese, at room temperature
4 eggs, at room temperature
1 cup sugar
2 teaspoons vanilla
1 cup sour cream
1 teaspoon lemon juice
1/4 cup chocolate syrup
Crush cookies using a food processor or
a rolling pin. Stir melted butter into the
crumbs. Spoon the crumb mixture into
13" x 9" x 2" baking pan and cover
with plastic wrap. In a large mixing
bowl, using a mixer at medium speed,
blend the cream cheese and eggs. Mix
until smooth. Add sugar, vanilla, sour
cream, lemon juice, and flour. Mix until
well combined. Pour the mixture into
the prepared pan. Pour the chocolate
syrup over the cake in an "S" pattern.
Using a knife inserted 1/4 inch into
batter, swirl the chocolate into the cake
batter. Place the pan on the OVEN
RACK in the lowest position with rack
facing up. Set the oven to 300˚F. Bake
for 50-60 minutes or until a knife
inserted 1-inch from the center comes
out clean. Turn TEMPERATURE
CONTROL to "•" and allow the cake to
cool in oven for 20 minutes. Refrigerate
at least 4 hours.
JUMBO CHOCOLATE AND VANILLA CHIP COOKIES
1/4
3/4
cup butter
cup brown sugar
1/4 cup sugar
1 egg
1 teaspoon vanilla
1 1/3 cup all-purpose flour
1/2 teaspoon baking soda
1/2 teaspoon salt
3/4 cup jumbo chocolate chips
1/4 cup vanilla chips
In a mixing bowl, cream the butter and
the sugars using an electric mixer. Add
the egg and vanilla. Beat well.
Combine the flour, baking soda, and
salt. Add to the bowl mixing well on
low speed. Stir in the chips. Pack a
small ice cream scoop or a 1/4 cup
measure with dough. Drop the cookie
dough on the ungreased DRIP/BAKING
PAN. Place the pan on the rack in the
lowest position with rack facing up. Set
the oven to 325˚F. Bake for 18-22
minutes or until the cookies are lightly
browned.
Makes 24 cookies
Makes 1 cake
20
RTC1700SS Manual
10/2/03
4:06 PM
Page 23
English
HOLIDAY TURKEY
1 – 16-22 pound turkey
Worcestershire sauce
Seasoned salt
2-3 teaspoons cornstarch
1 teaspoon browning and seasoning
sauce
1/4 cup water
Remove neck and giblet packet from the
turkey. Rinse turkey well. Rub a small
amount of Worcestershire sauce into the skin
and sprinkle with seasoning salt or your
favorite combination of herbs. Insert an oven
thermometer in the thickest part of the breast
near the leg. Calculate the approximate
cooking time at 15 minutes per pound *.
Place the turkey directly on the BROILING/
ROASTING RACK in the DRIPPING/
BAKING PAN. Slide the pan into rails at the
bottom. Set the oven to 325˚F. Roast for
4 – 5 1 /2 hours. Check the temperature on
the meat thermometer occasionally. Continue
to cook until the thermometer reads 170˚F or
the pop-up timer pops. Remove the turkey.
Allow turkey to stand for about 15 minutes
before carving. The turkey will
continue to cook and the thermometer should
read 180˚F before carving. Skim the fat from
the juices that have accumulated in the pan.
Pour these drippings into a small saucepan
and add about 1 tablespoon of cornstarch
and the browning and seasoning sauce
dissolved in 1/4 cup of water. ** Cook for 5
minutes or until the gravy boils and thickens
slightly. Pour the gravy into a pitcher and
serve with the sliced turkey.
Makes 16-24 servings
* If the turkey is stuffed, roast 20 minutes per lb.
**If more gravy is desired add an envelope of
turkey gravy mix dissolved in 1 cup of water or a
can of prepared gravy to the drippings.
21
FRUITY SMOKED HAM
AND YAM DINNER
1 half (6-8 pound) or whole (12-16
pound) smoked ham, bone-in
1/2 cup sweet and sour sauce
1 tablespoon raspberry or strawberry
jam
1/2 cup orange juice
1 cup ginger ale
2 tablespoons cornstarch
6 medium-size yams (about 2 pounds)
Combine the sauce, jam, juice, ginger
ale and cornstarch. Set aside. Place
the ham directly on the
BROILING/ROASTING RACK in the
DRIP/BAKING PAN. Insert a meat
thermometer into the center of the ham
away from the bone. Calculate the
approximate cooking time at 15 minutes
per pound. Slide the pan into the rails
at the bottom. Set the oven to 325˚F.
Roast 1 1/2 - 2 hours. Check the
temperature on the meat thermometer
occasionally. One hour before the ham
is done, place the yams on the rack
around the ham and brush the sauce on
the ham. Pour the remaining sauce into
the pan. Continue to cook until the
thermometer reads 140˚F, if using fully
cooked ham or 160˚F, if using uncooked
ham. Remove the ham to a board and
allow to stand for 10 minutes before
carving. Wrap the yams in foil to keep
warm while carving the ham. Skim fat
from sauce and pour into a fat
separator to remove. Pour the sauce
into a pitcher and serve with the sliced
ham.
Makes 6 to 18 servings, depending on
the size of the ham
RTC1700SS Manual
10/2/03
4:06 PM
Page 24
English
APPLE AND BREAD STUFFED
ROASTED CHICKEN WITH
ROASTED NEW POTATOES
2 tablespoons butter or margarine
1 tart cooking apple, peeled and cut
into chunks
1 onion, chopped
4 cups dry bread stuffing mix
1 cup applesauce or apple juice
6-8 pound roasting chicken
Paprika, onion powder and garlic salt,
to taste 8 New Potatoes
2-3 teaspoons cornstarch
1 teaspoon browning and seasoning
sauce or Worcestershire sauce
1/4 cup water
In a 10-inch fry pan, melt the butter and
sauté the apple and onion until nicely
browned. Stir in the stuffing mix,
applesauce, and water. Allow the
stuffing to cool slightly and then spoon
into the cavity of the chicken. Sprinkle
the skin of the chicken with seasonings.
Calculate the approximate cooking time
at 25 minutes per pound *. Place the
chicken directly on the
BROILING/ROASTING RACK in the
DRIP/BAKING PAN. Slide the pan into
the rails. Set the oven to 325˚F. Roast
2 – 2 1/2 hours. About 45 minutes
before the chicken is scheduled to be
done, place the potatoes on the rack
around the chicken. Check the
temperature on the meat thermometer
occasionally. Continue to cook until the
thermometer reads 170˚F. Remove the
chicken. Allow the chicken to stand for
about 15 minutes before carving. The
chicken will continue to cook and the
thermometer should read 180˚F before
carving. Skim the fat from the juices
that have accumulated in the pan. Pour
the drippings into a small saucepan.
Add about 1 tablespoon of cornstarch
and browning and seasoning sauce
dissolved in 1/2 cup of water to the
drippings to thicken the gravy **. Cook
for 5 minutes or until the gravy boils
and thickens slightly. Pour the gravy
into a pitcher and serve with the sliced
chicken.
Makes 6 servings
* If the chicken is unstuffed roast 20
minutes per pound.
**If more gravy is desired add an
envelope of chicken gravy mix
dissolved in 1 cup of water or a can
of prepared gravy to the drippings at
this time.
22
RTC1700SS Manual
10/2/03
4:06 PM
Page 25
English
CORN BREAD STUFFED
PORK LOIN
TURKEY’N BEEF MEAT
LOAF DINNER
1 bag (6 ounces) corn bread stuffing
mix
1 can (14 ounces) chicken broth
1 cup orange juice
2 tablespoons melted butter
1 bag (6 ounces) dried mixed fruit bits
or assorted whole dried fruits,
chopped
6 to 8 pound whole boneless loin of
pork
1 envelope of pork gravy mix dissolved
in 1 cup of water
1 pound ground turkey
1/2 pound ground beef
1 egg
1/2 cup flavored bread crumbs
1 envelope (1.2 ounces) dried onion
soup mix
1/3 cup catsup
1/4 cup water
3 slices American cheese
Worcestershire sauce
3 slices pork or turkey bacon, cut in half
3 medium potatoes, cut in 1/8’s
2 medium onions, cut in 1/8’s
8 ounces baby carrots
Salt, pepper, herbs and spices, to taste
Combine all ingredients except the pork
and the gravy mix. Place the pork fat
side down on a cutting board. Make
slits 1 inch apart in the pork cutting
down to within a 1/2 inch of the fat to
form a pocket for the stuffing. Be
careful not to cut through. Spoon about
1/4 cup of the stuffing into each pocket.
Place the roast directly on the
BROILING/ROASTING RACK in the
DRIP/BAKING PAN. Place a meat
thermometer into the center of one of
the pork slices. Calculate the
approximate cooking time at 15 minutes
per pound. Slide the pan into the rails.
Set the oven to 350˚F. Roast 11/2 - 2
hours. The meat is done when the
thermometer reaches 170˚F. Skim the
fat from the juices that have
accumulated in the drip pan. Pour these
drippings into a small saucepan and
add the gravy mix. Cook for 5
minutes or until the gravy boils and
thickens slightly. Pour the gravy into a
pitcher and serve with the sliced pork.
Makes 10-14 servings
23
In a medium mixing bowl combine the
meats, egg, bread crumbs, onion soup
mix, catsup and water. Mix well and
put 1/2 of the mixture on the DRIP/
BAKING PAN. Press the cheese in the
center of the meat and cover with the
remaining meat mixture. Form into an
oblong loaf making so that the cheese is
sealed into the meat. Sprinkle
Worcestershire sauce over the meat.
Place the bacon on the top of the meat
loaf. Arrange the potatoes and
vegetables around the meat loaf and
sprinkle with salt, pepper, and
additional herbs or spices, if desired.
Place the pan on the rack in the lowest
position with rack facing up. Set the
oven to 350˚F. Bake for 50-60 minutes
or until the meat loaf and potatoes are
nicely browned.
Makes 6-8 servings
RTC1700SS Manual
10/2/03
4:06 PM
Page 26
English
ROAST BEEF WITH TWICE-BAKED
CHEESY POTATOES
4 to 6-pound boneless sirloin tip roast
Worcestershire sauce
Garlic powder, paprika and dried
onion to taste
8 medium-size baking potatoes (about 3
pounds)
4 ounces grated cheddar cheese
2 tablespoons Parmesan Cheese
1/2 cup sour cream
1/4 cup milk
1 teaspoon garlic powder
1 can of beef gravy or 1 envelope of
gravy mix dissolved in 1 cup water
Rub the surface of the meat with
Worcestershire sauce and then sprinkle
with garlic, paprika, and dried onion.
Calculate the approximate cooking time
at 20-22 minutes per pound for rare,
23-24 minutes per pound for medium,
25-27 minutes per pound for well done.
Place a meat thermometer in the thickest
part of the roast. Place the potatoes on
the rack around the roast. Set the oven
to 350˚F. Slide the pan into rails at the
bottom. Roast for 1 hour 20 minutes to
3 hours and 20 minutes. Check the
meat thermometer reading occasionally.
Continue to cook until the thermometer
reads rare (120˚-130˚F), medium
(140˚F) or well done (160˚-170˚F).
After 1 hour, remove potatoes to a cutting board and allow to cool for about
15 minutes. Slice a small piece off the
top of each potato. Scoop out the
potato from the skins and place in a
medium mixing bowl. Reserve skins.
Add the cheese, sour cream, milk, and
garlic powder to the mixing bowl.
Blend, with a hand mixer, until the
mixture is smooth. Spoon the potato
mixture in the potato skins, and sprinkle
each with paprika. Place the prepared
potatoes on the rack with the roast 30
minutes before the roast is done.
Remove the roast to a cutting board and
allow to stand about 10 minutes. Skim
the fat from the juices that have
accumulated in the drip tray. Pour the
drippings into a small saucepan along
with the prepared gravy. Cook for 5
minutes or until the gravy thickens. Pour
the gravy into a pitcher and serve with
the sliced beef.
Makes 8-12 servings, depending on the
size of the roast
24
RTC1700SS Manual
10/2/03
4:06 PM
Page 27
English
MOROCCAN-STYLE LEG OF
LAMB WITH
COUSCOUS AND VEGETABLES
1 tablespoon Dijon mustard
1 tablespoon lemon juice
Garlic powder, onion powder, paprika
to taste
6 to 8 pound leg of lamb
1/4 cup oil
1 medium onion, chopped
1 eggplant, peeled and cut into 1-inch
cubes
2 carrots, chopped
2 stalks celery, chopped
1 teaspoon dried basil
1 teaspoon salt
1/4 teaspoon pepper
1 can (15 ounces) chick peas with liquid
1 can (14 ounces) beef broth
1 can (16 ounces) strewed tomatoes
2 cups couscous
1 can or 1 envelope brown gravy mix,
prepared as directed
Combine the mustard and lemon juice
and brush it on both sides of the lamb.
Sprinkle with garlic, onion and paprika.
Insert a meat thermometer into the
center of the lamb away from the bone.
Calculate the approximate cooking time
at 25 minutes per pound. Place the
roast, fat side up, directly on the
BROILING/ROASTING RACK, in the
DRIP/BAKING PAN. Slide the pan into
rails. Set the oven to 350˚F and roast 2
1/2 to 3 hours. Check the temperature
on the meat
thermometer occasionally. Continue to
cook until the lamb has reached desired
temperature: (160˚F for rare, 170˚F for
medium, or 180˚F well done). About
20 minutes before the roast is done,
25
sauté the onions in oil in a 3-quart
saucepan until lightly browned. Add
the carrots and celery and sauté 2
minutes. Stir in the eggplanxz and the
remaining ingredients. Cook for 15
minutes or until the vegetables are
tender and the couscous has absorbed
most of the liquid. Remove the lamb
and the rack and place the lamb on a
cutting board. Allow the meat to stand
for about 10 minutes before carving.
Skim the fat from the drippings that
have accumulated in the pan. Pour
these drippings into a small saucepan
with the water and gravy mix. Cook for
5 minutes or until the gravy boils and
thickens. Slice meat and serve with the
gravy, couscous, and vegetables.
Makes 12 servings
RTC1700SS Manual
10/2/03
4:06 PM
Page 28
English
BOW TIE PASTA AND CHICKEN
CACCIATORE CASSEROLE
12 ounces bow tie pasta
2 tablespoons olive oil
1 large onion, chopped
2 cloves garlic, crushed
1 medium red pepper, chopped
1 package (10 ounces) fresh mushroom
slices
1 1/2 pounds boneless white or dark
meat chicken, cut into bite size pieces
1 tablespoon basil
1 tablespoon dried parsley
1 jar (28 ounces) tomato sauce
1 teaspoon salt
1/4 teaspoon pepper
2 tablespoon grated Parmesan cheese
8 ounces grated mozzarella
Cook the pasta according to package
directions. Drain and spoon into
3-quart casserole. Heat the oil in a
10-inch fry pan and sauté the onion for
3 minutes. Add the garlic, red pepper,
and mushrooms. Sauté until the
mushrooms are limp (about 3 minutes).
Spoon the contents of the fry pan into
the casserole with the pasta. Add
remaining ingredients except the
cheeses. Stir well to combine. Sprinkle
the cheeses on top of the casserole.
Place the pan on the rack in lowest
position with rack facing down. Set the
oven to 350˚F. Bake for 30 minutes or
until the casserole is hot and the cheeses
are melted and brown.
CHICKEN POT PIE
2 pounds boneless white meat chicken,
cut into 3/4 inch chunks
3 stalks celery, with leaves
1 can (10 3/4 ounces) cream of mushroom soup
1 envelope (1.8 ounces) white sauce
mix, dissolved in 1/2 cup milk
1 can (15.25 ounces) whole kernel
corn, drained
1 package (10 ounces) frozen peas and
carrots, defrosted
2 teaspoons minced dried onion
1 teaspoon garlic powder
1 tablespoon parsley flakes
1/4 teaspoon thyme
2 ready-to-bake pie crusts
Place all of the ingredients except the
pie crusts into a 13" x 9" x 2" baking
pan. On a lightly-floured board roll
both of the pie crusts together to form
one 15" x 11" crust. Place the crust
over the mixture in the pan. Roll the
edges and pinch together making sure
to completely cover the filling
ingredients. Cut a few slits in the crust
to allow the steam to vent. Place the pie
on the rack in the lowest position facing
up. Bake at 425˚F for 45-55 minutes or
until golden brown.
Makes 8-12 servings
Makes 8-12 servings
26
RTC1700SS Manual
10/2/03
4:06 PM
Page 29
English
MEXICAN TACO PIE
1 package (8 ounces) refrigerator biscuits
1 pound lean ground beef, turkey, or
chicken
1 envelope (1.25 ounces) taco
seasoning or sloppy Joe mix
1 can (6 ounces) tomato paste
1 1/2 cups water
3 ounces each grated cheddar and
Monterey Jack cheeses
Chopped tomato, shredded lettuce,
chopped onion, sour cream and
guacamole
Place the biscuits into a 9 or 10-inch pie
plate, pressing together to form a crust.
In a 10-inch fry pan, brown the meat.
Drain fat. Add the seasoning package,
tomato paste, and water. Stir well to
combine. Simmer for 10 minutes.
Spoon the meat mixture over the biscuits
in the pie plate. Top with the grated
cheeses. Place the pie on the rack in
lowest rack position facing up. Set
the oven to 400˚F. Bake for 25-30
minutes or until the cheese is melted and
the edge of the crust browns. Remove
the pie from the oven. Top it with
chopped tomatoes, shredded lettuce,
chopped onion, and dollops of sour
cream, and guacamole, if desired.
Make 6-8 servings
27
CHEESY RICE AND VEGETABLE
MEDLEY
1 bag (16 ounces) frozen cauliflower,
broccoli and carrot medley, thawed
1 package (10 ounces) fresh mushroom
slices
1 can (10.75 ounces) cheddar cheese
soup
1 can (14 ounces) chicken broth
1 1/2 cups water
1 teaspoon each garlic and
onion powder
1 cup raw rice
Combine all the ingredients in a
greased 13" x 9" x 2" baking pan or a
2-quart casserole dish. Cover tightly
with foil or casserole dish. Place the
casserole on the rack in lowest position
facing up. Set the oven to 425˚F and
bake for 50-60 minutes or until the rice
is tender and has absorbed all the
liquid.
Makes 12 servings
RTC1700SS Manual
10/2/03
4:06 PM
Page 30
English
SOUTH OF THE BORDER OVEN
FRIED CHICKEN
3 whole boneless, skinless chicken
breasts, cut in half
1/3 cup barbecue sauce
1/4 cup fat-free honey mustard salad
dressing
1 tablespoon Worcestershire sauce
2 cups corn flakes, crushed*
1 envelope (1.4 ounces) taco seasoning
mix
1 teaspoon salt
1/2 teaspoon garlic powder
1/2 teaspoon onion powder
Cut the chicken into 6 pieces and flatten
slightly. Combine the barbecue sauce,
dressing, and Worcestershire sauce in a
pie plate. Pour the crumbs onto a flat
plate. Dip the chicken into the liquid
and the crumb mixture, coating both
sides of the chicken. Place the chicken
on the BROILING/ROASTING RACK in
the DRIP/BAKING PAN. Place the pan
on the OVEN RACK in the middle
position facing up. Set the oven to
425˚F. Bake for 20 minutes or until the
chicken is nicely browned.
TURKEY, VEGETABLE,
AND STUFFING BAKE
1 pound cooked* turkey (or chicken),
about 4 cups
1 package (16 ounces) frozen mixed
vegetables, thawed
1 can (10.75 ounces) cream of
mushroom soup
1 teaspoon garlic powder
1/2 teaspoon onion powder
1 tablespoon Worcestershire sauce
4 ounces grated cheddar cheese
2 1/2 cups dry bread stuffing mix
1 tablespoon melted margarine
1 cup water
1 cup turkey or chicken gravy
Combine the first seven ingredients in a
13" x 9" x 2" baking dish. In a small
bowl combine the stuffing mix, butter
and water. Top the turkey vegetable
mixture with the stuffing and pour the
gravy all over all. Place the casserole
on the OVEN RACK in the lowest
position with rack facing up. Set the
oven to 350˚F. Bake for 35-40minutes
or until the stuffing is browned and the
casserole is heated through.
Makes 6 pieces
Makes 8-12 servings
*For crushed corn flakes, place in a
sealable plastic bag and use a rolling
pin to crush.
*Raw chicken can be substituted for
cooked chicken. Bake for an
additional 10 minutes.
28
RTC1700SS Manual
10/2/03
4:06 PM
Page 31
English
HERB MARINATED BROILED
CHICKEN
2 tablespoons grated Parmesan cheese
2 tablespoons olive oil
2 tablespoons lemon juice
1 teaspoon chopped turkey
1 teaspoon chopped chives
1 teaspoon paprika
1 teaspoon Dijon mustard
1/8 teaspoon each dill, thyme, sage
4-pound broiler fryer chicken, cut in half
Set TEMPERATURE CONTROL to 450˚
and FUNCTION CONTROL to BROIL.
Preheat for 20 minutes. Combine all
ingredients except chicken in a
gallon-size sealable plastic bag. Add
the chicken and seal. Marinate at room
temperature while the oven is
preheating. Remove the chicken from
the bag and place it on the
BROILING/ROASTING RACK in the
DRIP/BAKING PAN. Pour the extra
marinade over the chicken. Slide the
pan onto the OVEN RACK in the middle
rack position facing down. Broil for
30-40 minutes or until skin is crisp and
well browned.
BONELESS BARBECUED
PORK RIBS
3 pounds boneless pork ribs, cut 1
inches thick
1 cup catsup
1/3 cup teriyaki sauce
2 tablespoons brown sugar
1 tablespoon mustard
1 teaspoon garlic powder
1 teaspoon onion powder
Set TEMPERATURE CONTROL to 450˚F
and FUNCTION CONTROL to BROIL.
Preheat for 20 minutes. Combine all
ingredients except ribs in a small
saucepan and bring to a boil. Pour into
a large bowl and allow to cool at room
temperature. Place the ribs on the
BROILING/ROASTING RACK over the
DRIP/BAKING PAN. Slide the pan onto
the OVEN RACK in the middle rack
position facing down. Broil for 15
minutes. Remove the ribs to the bowl
containing the sauce. Turn each to coat
well. Return the ribs to the rack and
cook for 15-20 minutes or until glazed
and nicely browned.
Makes 6-8 servings
Makes 2-4 servings
29
1/2
RTC1700SS Manual
10/2/03
4:06 PM
Page 32
English
BROILED STUFF SALMON WITH
LEMON BUTTER
2 (1-pound each) salmon filets
1/2 pound seafood salad chunks,
chopped
1/2 cup flavored bread crumbs
1/4 cup olive oil
2 tablespoons lemon juice
1/2 cup butter
1 teaspoon Dijon mustard
1/2 teaspoon chopped parsley
1/2 teaspoon chives
1/2 teaspoon dill
Set TEMPERATURE CONTROL to 450˚F
and FUNCTION CONTROL to BROIL.
Preheat for 20 minutes. Make a cut
lengthwise down the center of the
salmon. Combine the chopped seafood,
bread crumbs, and olive oil. Stuff the
salmon with the combined filling. Place
the fish on the BROILING/ROASTING
RACK over the DRIP/BAKING PAN.
Slide the pan onto the OVEN RACK in
the middle rack position facing down.
Broil for 13-15 minutes or until the
stuffing is brown and the fish flakes
easily with a fork. While the fish is
cooking, melt the butter and mustard
and add the seasonings. Stir well to
combine. Pour the lemon butter over
the fish before serving or serve
separately.
BROILED BREADED FISH FILLETS
8 flounder fillets, about 2 pounds total
cup mayonnaise
1 teaspoon Dijon mustard
1 teaspoon lemon juice
1/2 teaspoon dill
2 tablespoons flavored bread crumbs
Lemon slices
1/4
Set TEMPERATURE CONTROL to 450˚F
and FUNCTION CONTROL to BROIL.
Preheat for 20 minutes. Combine the
mayonnaise, mustard, lemon juice, and
dill. Spray the DRIP/BAKING PAN with
cooking oil spray. Place the fillets on
the pan. Spread with mayonnaise
mixture. Sprinkle the bread crumbs
over the fish. Slide the pan onto the
OVEN RACK in the middle rack position
facing down. Broil for 10-12 minutes or
until the crumbs are brown and the fish
flakes easily with a fork. Serve with
lemon slices.
Makes 6-8 servings
Makes 4 servings
30
RTC1700SS Manual
10/2/03
4:06 PM
Page 33
English
HONEY MUSTARD SPIT ROASTED
CHICKEN
2 tablespoons honey
1 tablespoon Dijon mustard
1 teaspoon lemon juice
1 tablespoon mayonnaise
1 teaspoon crushed rosemary
1 teaspoon crushed sage
1/2 teaspoon onion
1/2 teaspoon garlic powder
2 (3-4 pounds each) whole chickens
Place one FORK onto the SPIT and
tighten down the screw to fasten it in
place. Place the SPIT through the neck
hole. Pierce the skin with the FORK and
secure it in the surrounding meat.
Repeat with the second chicken. Place
the second FORK onto the SPIT and
press it into the legs of the second
chicken. Push them together and tighten
the screw on the second FORK. Center
the chicken on the SPIT by loosening the
screws and re-tightening where needed.
Re-adjust the chickens if necessary to be
sure they are balanced *. Insert the
pointed end of the SPIT into the right
hand side of the drive socket. The left
hand side should (the grooved side) rest
on the spit support. Place the
DRIP/BAKING PAN in the rails at the
bottom of the oven. Set TEMPERATURE
CONTROL to 450˚F and FUNCTION
CONTROL to ROTISSERIE. Cook for 1
hour. Remove the chicken with the
ROTISSERIE HANDLE and brush the skin
with the honey mustard glaze. Check
for doneness by inserting a meat thermometer into the area between the leg
and breast of one of the chickens. It is
done when the thermometer reads
180˚F. Continue to cook 10 minutes.
31
*If you wish you can tie the legs together with white string and then tie the
chicken to the SPIT.
This is not necessary if the chickens are
placed on the SPIT as directed.
BARBECUE BEEF ROAST
3/4
cup catsup
2 tablespoons soy sauce
2 tablespoons honey
1-2 teaspoons liquid smoke flavoring
1 teaspoon onion powder
1/4 teaspoon garlic powder
4-5 pound top sirloin roast
Combine all the ingredients except the
meat in a small saucepan and bring to
a boil. Reduce heat and simmer 10
minutes. Allow the sauce to cool. Place
one FORK onto the SPIT and tighten
down the screw to fasten it in place.
Insert the SPIT into the center of meat
and place the other FORK onto the SPIT.
Press it into the meat. Readjust the meat
until it is in the center of the
SPIT. Insert the pointed end of the SPIT
into the right-hand side of the drive
socket. The left-hand side (the grooved
side) rests on the spit support. Place the
DRIP/BAKING PAN in the rails at the
bottom of the oven. Set TEMPERATURE
CONTROL to 450˚F and FUNCTION
CONTROL to ROTISSERIE. Cook 1
hour. Brush with barbecue sauce.
Check for doneness by inserting a meat
thermometer into thickest part of the
meat. Do not touch the SPIT with the
thermometer. Continue to cook 10
minutes for each 10˚F needed
(120˚F – 130˚F for rare,
140˚F – 150˚F for medium, or
160˚F – 170˚F for well done).
RTC1700SS Manual
10/2/03
4:06 PM
Page 34
English
SPICY SLOW-COOKED TWO
BEAN AND SAUSAGE SOUP
1 pound hot Italian sausage, casings
removed
1 large onion, chopped
1 teaspoon garlic powder
1 teaspoon salt
1/2 - 1 teaspoon ground red pepper
3 stalks celer y
3 carrots, chopped
2 cans (15 1/2 ounces each) chick peas
with liquid
2 pounds lentils, rinsed and drained
2 packages (10 ounces each) frozen
chopped spinach, thawed
1 jar (20 ounces) salsa
1 pound boneless chicken thighs
Sauté the sausage in a 10-inch fry pan
until lightly browned. Stir in the onions
and sauté until browned. Spoon the
sausage and onions into a 3-quart
casserole. Add the remaining
ingredients and cover. Place the
casserole on the OVEN RACK in the
lowest rack position facing up. Set the
oven to 250˚F and slow cook for 4-6
hours.
Makes 12 servings
POT ROAST DINNER
2 tablespoons flour
1 teaspoon each of garlic powder,
onion powder, and paprika
1 (4-6 pound) bottom round roast
1 tablespoon oil
1 tablespoon Worcestershire sauce
1 cup water
1 can (14 ounces) beef broth
2 tablespoons minced dry onions
1 envelope (1.5 ounces) beef stew seasoning mix
1/2 pound carrots, peeled and cut in
1/3’s
1 1/2 pounds potatoes cut in 1/4’s
1 cup water
Combine the flour and seasonings in a
plastic bag. Place the roast in the bag
and shake to coat. In a 10" frying pan,
brown the coated roast on all sides in
the oil. Place the roast in a 3-quart
casserole dish along with the
Worcestershire sauce, water, beef,
broth, onion soup, and stew seasoning
mix. Cover. Place the casserole on the
OVEN RACK in the lowest rack position
facing up. Set TEMPERATURE
CONTROL to 250˚F. Set FUNCTION
CONTROL to BAKE and slow cook for
4-6 hours. Add the vegetables and
remaining water if needed. Turn
TEMPERATURE CONTROL to 350˚F and
cook until the vegetables are tender,
(about 1 hour). Remove the roast from
the casserole and allow it to cool for 10
minutes before slicing. Slice and serve
with the vegetables and gravy.
Makes 8-12 servings
32
RTC1700SS Manual
10/2/03
4:06 PM
English
Cook’s Notes
33
Page 35
RTC1700SS Manual
10/2/03
4:06 PM
Page 36
English
Limited Warranty
Full ONE year
This warranty covers all defects in workmanship or materials for a period of 12 months
from the date of purchase, provided you are
able to present a valid proof-of-purchase (the
original receipt)
Exceptions: Commercial or Rental Use
Warranty is 90 days from date of original
purchase.
This warranty covers appliances within the
Continental United States, Puerto Rico and
Canada.
What is not covered by this warranty:
Damage from other than normal use or
improper installation.
Damage from misuse, abuse, accident,
alteration, lack of proper care and maintenance. Failure caused by build-up of food
matter or water deposits.
Product, whose rating label has been
removed or altered.
Product serviced by other than authorized
service center.
Replacement or repair of household fuses,
circuit breakers or wiring.
Labor, shipping charges and replacement of
defective parts beyond the initial 12-month
period.
Do not return this product to the store.
If you need assistance with this product,
please contact "Haier Customer Satisfaction
Service at 1-877-337-3639 between 9:00
AM and 5:00 PM (EST) Monday to Friday.
Before calling, please have the following
information available:
Model number of your appliance. The name
and address of the store you purchased the
unit from and the date of purchase. A clear
description of the problem.
Haier will repair or replace any part free of
charge including labor that fails due to a
defect in materials or workmanship, or
replace with a comparable model.
THIS LIMITED WARRANTY IS GIVEN IN LIEU
OF ALL OTHER WARRANTIES, EXPRESSED
OR, INCLUDING THE WARRANTIES OF
MERCHANTABILITY AND FITNESS FOR A
PARTICULAR PURPOSE
The remedy provided in this warranty is
exclusive and is granted in lieu of all other
remedies.
This warranty does not cover incidental or
consequential damages, so the above
limitations may not apply to you. Some states
do not allow limitations on how long an
implied warranty lasts, so the above
limitations may not apply to you.
This warranty gives you specific legal rights,
and you may have other rights, which vary,
from state to state.
Haier America
New York, NY 10018
34
RTC1700SS Manual
10/2/03
4:06 PM
Page 1
IMPORTANT
Do Not Return This Product To The Store
If you have a problem with this product, please contact the "Haier Customer
Satisfaction Center" at 1-877-337-3639.
DATED PROOF OF PURCHASE REQUIRED FOR WARRANTY SERVICE
115V, 60 Hz
Made in China
RTC1700SS
Issued: Aug 01
Haier America
New York, NY 10018
Printed in China