1
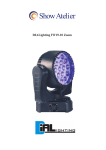
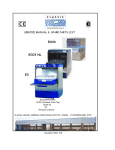
Front Load Washer
Rondelle avant de chargementl
Lavadora delantera de la carga
User Manual
Guide de l’Utilisateur
Designed to use only HE
(High Efficiency) Detergent
Manual del Usuario
HWF5300AW
English
important safety instructions
READ ALL INSTRUCTIONS BEFORE USE.
WARNING! For your safety, the information in this manual must be followed to minimize the risk of
fire or explosion, electric shock, or to prevent property damage, personal injury, or loss of life. Always
read and obey all safety messages. All safety messages will tell you what the potential hazard is,
tell you how to reduce the chance of injury, and tell you what can happen if the instructions are not
followed.
WARNING - To reduce the risk of fire, electric shock, or injury to persons
when using your appliance, follow the basic precautions, including the
following:
1. Read all of the instructions before using this appliance.
2. Use this appliance only for its intended purpose as described in this user manual.
3. T his washer must be properly installed in accordance with the installation instructions
before it is used.
4. Unplug your washer before cleaning.
5. N
ever unplug your washer by pulling on the power cord. Always grasp the plug firmly
and pull straight out from the outlet.
6. Do not operate your washer in the presence of explosive flames.
7. Do not use the washer for commercial clothes washing.
8. Do not tamper with controls.
9. D
o not allow children to play on or in the appliance. Close supervision of children is
necessary when the appliance is used near children.
10. Washer must be grounded, see grounding instructions on page 2.
11. U
nder certain conditions, hydrogen gas may be produced in a hot-water system that
has not been used for 2 weeks or more HYDROGEN GAS IS EXPLOSIVE. If the hot
water system has not been used for such a period, before using a washing machine,
turn on all hot-water faucets and let the water flow from each for several minutes. This
will release any accumulated hydrogen gas. As the gas is flammable, do not smoke or
use an open flame during this time.
12. D
o not wash articles that have been previously cleaned in, washed in, soaked in, or
spotted with gasoline, dry-cleaning solvents or other flammable or explosive substances
to the wash water. These substances give off vapors that could ignite or explode.
13. D
o not add gasoline, dry-cleaning solvent, or other flammable or explosive substances
to wash water. These substances give off vapors that could ignite or explode.
14. Before the appliance is removed from service or discarded, remove the door.
15. Do not reach into the appliance if the tub or agitator is moving.
16. Do not install or store this appliance where it will be exposed to the weather.
17. D
o not repair or replace any part of the appliance or attempt any servicing unless
specifically recommended in the user-maintenance instructions or in published user
repair instructions that you understand and have the skills to carry out.
18. ALWAYS follow the fabric care instructions supplied by the garment manufacturer.
1
English
19. D
o not place items exposed to cooking oil in your washer. Items contaminated with
cooking oils may contribute to a chemical reaction that could cause a load to catch fire.
20. D
o not use fabric softeners or products to eliminate static unless recommended by the
manufacturer of the fabric softener or product.
21. T his appliance is not intended for use by persons (including children) with reduce
physical, sensory or mental capabilities, of lack of experience and knowledge, unless
they have been supervision or instructions concerning use of the appliance by a person
responsible for their safety.
22. If the supply cord is damaged, it must be replaced by the us, ours service agent or
similarly qualified persons in order to avoid a hazard.
SAVE THESE INSTRUCTIONS
GROUNDING INSTRUCTIONS
This appliance must be grounded. In the event of malfunction or breakdown,
grounding will reduce the risk of electric shock by providing a path of least
resistance for electric current. This appliance is equipped with a cord having an
equipment-grounding conductor and a grounding plug. The plug must be plugged
into an appropriate outlet that is properly installed and grounded in accordance
with all local codes and ordinances.
Warning – Improper connections of the equipment-grounding conductor can
result in a risk of electric shock. Check with a qualified electrician or serviceman if you are in doubt as to whether the appliance is properly grounded. Do
not modify the plug provided with the washer - if it does not fit the outlet, have a
proper outlet installed by a qualified electrician.
DANGER
Risk of child entrapment. Before you throw away your old
appliance, take off the door so that children may
not easily get trapped inside.
Thank you for purchasing our Haier
product. This easy-to-use manual
will guide you in getting the best
use of your washer.
Remember to record the model and
serial number. They are on a label
in back of the washer.
Model number
Serial number
Date of purchase
Staple your receipt to your manual. You will need it to obtain
warranty service.
2
English
electrical connections
T his appliance must be grounded. In the event of an electrical short circuit,
grounding reduces the risk of electric shock by providing an escape wire for
the electric current. This appliance is equipped with a cord having a grounding
wire with a grounded plug. The plug must be inserted into an outlet that is
properly installed and grounded.
• Improper use of the plug can result in a risk of electric shock.
•C
onsult a qualified electrician or service person if the grounding
instructions are not completely understood or if doubt exists as to
whether the appliance is properly grounded.
Wiring Requirements:
• T his appliance must be plugged into at least 15 AMP 120 VOLT, 60 HZ
GROUNDED OUTLET.
Note: W
here a standard two-prong outlet is encountered,
it is the personal responsibility and obligation of the
consumer to have it replaced with a properly grounded
three-prong outlet.
Extension Cords:
We do not recommend that you use an extension cord.
Power Interruptions
Occasionally there may be power interruptions due to thunderstorms or other
causes. Remove the power cord from AC outlet when a power outage occurs.
When power has been restored re-plug power cord to AC outlet. If outage is for
a prolonged period, clean washer before using it again.
3
English
table of contents
IMPORTANT SAFETY INSTRUCTIONS............................................. 1
GROUNDING INSTRUCTIONS........................................................ 2
ELECTRICAL CONNECTING.............................................................. 3
PARTS AND FEATURES.................................................................... 5
Front.................................................................................................. 5
Back.................................................................................................. 6
INSTALLATION INSTRUCTIONS...................................................... 7
Tools and Materials Required............................................................... 7
Unpacking Your Washer..................................................................... 8
Installation........................................................................................ 10
OPERATIONAL INSTRUCTIONS.................................................... 12
Touch Sensitive Control Panel............................................................. 12
Washer Operating Procedure............................................................. 14
Features........................................................................................... 15
Cycles ............................................................................................ 15
Normal Washing Sounds................................................................... 16
Cycle Selection......................................................................... 17
Washing Methods................................................................... 18
Using the Dispenser.......................................................................... 19
CARE AND CLEANING GUIDE...................................................... 21
Cleaning and Maintenance................................................................ 21
Moving and Vacationing and Storage................................................. 23
Troubleshooting..................................................................... 24
Technical Specification.......................................................... 27
Limited Warranty.................................................................... 28
4
English
PARTS AND FEATURES
Front
4
1
5
2
3
6
1. Detergent / Bleach / Softener
Dispenser
4. Control Panel
2. See-through Glass Door
6. Adjustable Leveling Legs (2)
3. Button / Coin Trap Cover
5
5. Door Handle
English
PARTS AND FEATURES
Back
5
1
6
7
2
8
9
10
3
4
12
11
1. Top Cover
8. Transportation Bolt (2 Per Brace)
2. Brace
9. Back Cover
3. Power Cord
10. Hose Clip (3)
4. Transportation Bolt (2 Per Brace)
11. Adjustable Leveling Legs (2)
5. Air Vent for Safety
12. Cap (4)
6. Water Inlet Valve (C & H)
7. Drain Hose Connection
6
English
installation instructions
Tools and Materials Required
You will need to have the following tools to help you in the
installation of your washer:
• Scissors
• Standard Screwdriver
• Pliers
• Wrench
• Tape Measure
• Gloves
• Level
Accessories Supplied
Quantity
2
1. Hot & Cold Water Inlet Hoses
4
2. Flat Water Inlet Hose Washers
(Already Installed in each end of
water inlet hoses)
3. User Manual
1
4. Energy Label
1
1
5. Drain Hose Holder
1
6. Tie Strap1
7. Clamp for drain hose 1
1
1
8. Drain Hose 1
1
9. Bottom Cover 1
10. Bolts to Install Bottom Cover 8
8
1
11. Wrench 1
1
3
USER MANUAL
Energy Guide
4
2
5
6
9
7
8
10
11
7
English
UNPACKING YOUR APPLIANCE
WARNING: Two or more people may be needed to install and move the appliance.
Follow the procedure below to unpack your washer remove packing materials.
As shown in the figure, remove all the packing materials. Upon opening of the package,
water drops may be seen on the plastic bag and the porthole. This is a normal phenomenon
resulting from water tests in the factory.
1-Base (1)
6-Spacer Pad (2)
2-Front post (2)
7-Back Post (2)
3-Sleeve (1)
8-Package carton(1)
4-Stepper (1)
9-Adhesive tape (2)
5-Back pad (2)
10-Package bag (1)
NOTE: 1. A bottom cover is wrapped in the stepper.
2. Be careful while handling the bottom cover.
3. Remove all anti-scratch film from the washer.
WARNING: T o avoid danger of suffocation, please keep the package bag and
the accessories bag away from children.
8
English
Install the bottom cover
1. Lay the package carton on the ground.
2. Lay the washer slowly down on the package carton on the back panel side.
3. Install the bottom cover on the bottom panel by screwing 8 bolts provided in the
accessories bag.
4. Lift and straighten the washer to the upright position.
NOTE: 1. At least two people are needed to complete the above work.
2. Install the bottom cover before removing transport bolts.
3. While laying down the washer be sure the front side is upward.
4. T he direction of the bottom cover must be installed according to the following
figure indicated.
Front Side
Package Carton
Transportation Bolts
The washer is fitted with transportation bolts to prevent internal damage during
transportation. Transportation bolts must be removed before using the washer.
Removing Transportation Bolts
1. U
nscrew the 4 bolts with a wrench. At first undo the lower side to remove easily. One
of the bolts retains the power cord of the washer to prevent operating with out removing
bolts.
2. R
emove the bolts and the sleeves to release the power cord. Keep the 4 bolts and sleeves
for future use.
NOTE: If transportation bolts and sleeves are not removed, it may cause severe vibration,
noise and malfunction.
NOTE: W
hen the washer is transported the transportation bolts and the sleeves must be
reinstalled.
3. Close the 4 holes with the caps supplied.
9
English
installation
Location Requirements
1. T he proper location for your washer should have a flat and even floor. This will improve
performance, minimize noise and decrease washer movement.
2. T he unit can be installed under a custom counter, in basement, laundry room, closet, or
other recessed area.
Additional Requirements
1. A
grounded electrical outlet. Recommended less than 6 feet
from washer.
2. H
ot and cold water faucets located less than 4 feet from
water fill valves with a water pressure of 4.4-145 psi.
3. It is not recommended to use washer on soft flooring such
as carpets or foam.
4. D
o not operate washer if ambient room temperature is less
than freezing, may cause damage to unit.
Installation clearances
1. T he optimal location for your
washer should be big enough to
open the washer door completely
for easy installation and servicing.
2. A
llow some additional space
on the sides and rear for easy
installation, service and reduced
noise.
Water Connection
First, connect the elbow coupling end of the water inlet hose to the valve on the washer.
Then, connect the straight coupling end of the inlet hose to the water tap.
NOTE: 1.Do not crossthread when connecting inlet hose to the valve. Connect the cold
water tap to cold inlet on the washer and hot to hot.
2. Water supply pressure must be between 4.4 and 145 psi (30~1000kPa).
3. Over tightening may cause damage to the valve.
4. C
heck for leakage of washing machine connections by turning the tap completely
on.
5. Make sure that there is no kink in the hose and that it is not crushed.
6. B
e sure that the two water inlet hoses are connected to the correct
water faucets.
7. M
ake sure that a flat washer is present in each end of the water inlet hose
before use.
10
English
NOTE:This washer is to be connected to the water mains using new hoses. Old hoses
should not be used. Do not install your
washing machine in a room where
Cold
temperatures may be below freezing.
Hot
Frozen hoses may burst under pressure.
If the washer is delivered in the winter
Straight
months and temperatures are below
Elbow
Coupling End
freezing, store the washing machine at
Coupling End
room temperature for a few hours before
putting it into operation.
Drain System
• T o prevent water leakage, do not place the drain hose
higher than 96 inches from the bottom of the washer and
secure drain hose tightly and securely.
Using the provided clamp connect the drain hose to the
washer.
NOTE: 1) D
rain hose, clamp, drain hose holder and tie
strap are placed in the accessory bag in the
drum.
2) U
se tie strap to secure the drain hose to a stand
pipe, inlet hose or laundry tub.
3) C
are should be taken so the drain hose
is not immersed in water.
Level the Washer
• L eveling the washing machine properly prevents excessive
noise and vibration. Install your washer on a solid and level floor
surface.
• If the floor is uneven, adjust the adjustable legs as required. The legs
can be extended to level the washer. The more the legs are extended,
the more the washer will vibrate.
• Use a level to make sure that the washer is perfectly level.
• L eveling of your washer must be done while the washer is spinning
with a load. Use a wrench to adjust the legs until there is no vibration. Once done,
tighten the lock nuts to level the washer.
NOTE:Do not lift the washer using the dispenser drawer or door as a handle.
Steps to Level the washer (As shown in the figure)
1. Loosen the lock nut using a wrench.
2. Level the washer by turning the adjustable legs.
3. T urn the lock nut on each leg towards the base of the
washer with a wrench.
4. Once leveled tighten lock nut against the housing.
11
English
Operational Instructions
Touch Sensitive Control Panel
WARNING: T o reduce risk of fire, electric shock or injury to persons, read
"Important Safety Instructions" before operating this appliance.
16
1
2
3
4
5
6
7
15 17
12
8
13
9
14
10
11
1) Power ON/OFF Pad
• Touch pad to power ON or turn OFF the washer. In off status touch power pad for 1
second washer will turn on in default program status (Normal/Casual Cycle). To turn off
washer touch pad for at least 2 seconds during running or just one second during the
pause and stand by status. To change or cancel a running cycle touch this pad to power
off and then reprogram.
2) Cycle Select
• Gently move your fingers along the pad to select your wash cycle. Each cycle has preset
water temperature, soil level spin speed and options. In certain cycles the settings can
manually be programmed to suit your needs.
3) Start/Pause Pad
• Touch this pad once to start the wash cycle. Touch this pad once again to pause the
activity during the wash cycle. If you don't touch the start/pause pad within 5 minutes of
selecting a cycle, the washer will automatically shut off. You could pause the running cycle
to change the options by pressing the "Start / Pause" pad.
4) Soil Level
• Select clothes soil level. There are 3 levels to choose from: Heavy, Medium and Light.
•W
ash cycle increases in time for each level increased. Selection should be based on the
soil level in clothes. The dirtier the clothes the heavier the level.
5) Rinse Level
• There are 4 selections to choose from Baby Care which gives you the maximum rinse time
to Eco which gives you the least.
Baby Care rinse level gives extra rinse time to remove any soap and detergent left on
clothes after wash. While Eco. rinse would be used on the cycle where extra rinse time may
not be needed.
6) Spin Speed
• Enables the selection of spin speed during the wash cycle. Touch this pad if you want
to change the preprogrammed selection. Selections may vary per the cycle chosen. All
selections are not available in all cycles. Certain clothes are not recommended to be spun
12
at high speeds. Please see clothes manufacturer recommendation for best results.
English
7) Water Temperature (Wash / Rinse)
• To select inlet water temperature for wash and rinse. Selection may vary per the cycle
chosen. All selections are not available in all cycles. Follow fabric care labels for best
results.
8) Beeper (Signal)
• Signal volume can be adjusted soft–loud or off. As adjusted, signal will sound during
selection of cycles or options and when wash cycle is completed. At the end of washing
cycle the unit will sound 3 long beeps. When choosing an option, if signal beeps twice
it means that the option is not available. A signal will sound if the washer goes in error
status.
9) Extended Spin
• To increase spin time activate this option. This helps to remove extra water and saves
drying time. Once the wash load is in the spin cycle this pad can not be activated.
10) Stain Treat
• This function increases the wash time in different cycles. Use this for very heavily soiled
clothes.
11) Rinse & / Spin
• This option is used for clothes that do not need to be washed. Clothes sitting in a drawer
or hanging in the closet for a long time may not only need to be rinsed and spun to make
them feel fresh again.
Touch pad to select this option. The washer will now switch off the wash mode and will be
in the rinse and spin cycle. Touching the pad for a second time will set the washer to spin
only.
The rinse and spin speeds could be changed by touching their respective pad (5 & 6).
The "Wash" "Rinse" & "Spin" icons by the Time Display Zone (16) will be lit to indicate the
selected function.
12) Delay
• With the machine in standby, you can chose a delay start time from 1-30 hours. To do so,
touch the delay pad. Each touch of this pad advances the delay in one hour increments. To
activate the delay function touch the Start / Pause (3) pad. Doing so will cause the delay
(12) pad to flash. When set at 24:00, push the delay pad again and the delay time is
cancelled. After setting if wash program is change delay time is cancelled.
13) Prewash
• Use this option for heavily soiled clothes. By activating this it will add wash time before
the main wash to the wash cycle. The RINSE &/ SPIN option can not be selected if this
function is activated.
Note: R
emember to add detergent to the Prewash compartment of the dispenser drawer.
14) Custom Program
• To customize your favorite wash programs simply choose your cycle, wash settings and
options and touch the "Custom Program" pad (Approximately 3 Seconds) until a beep
confirms the settings. Time display will show “rb”. A maximum of 10 programs can be
stored, one for each cycle. To use your saved setting, go to the desired cycle and touch the
"Custom Program" pad. The washer will automatically go to the saved setting.
15) Child Lock
• When the machine is running, in pause or in delay cycle, press the RINSE &/ SPIN pad
for more than 3 seconds, child lock will activate. Touch again to cancel the child lock. You
can unlock the child lock function only by touching this pad. Power off, program finish, or
unplugging the power will not unlock the child lock! If the child lock function is activated,
the child lock LED is on; if not, the child lock LED is off.
13
English
16) Time Display Zone
• Time display zone will show time as following: If time is less than 1 hour, display as 0:XX
(such as 0:45), more than 1 hour but less than 9 hours display as X: YY (such as 3:28),
more than 10 hours, display as XX: YY (such as 13:20).
17) Door Lock LED
• If the door lock is secured the door lock LED will be on. If door lock is not locked, and the
door can open, door lock LED is off. To add a garment touch the Start / Pause pad (3). The
door lock icon will be Off. Once the garment is added, close the door and touch the Start
/ Pause pad again. The washer will resume its operations.
Washer Operating Procedure
1. Lightly touch the On/Off pad to power on the washer.
2. S
elect wash cycle by touching the pad by the cycle. A light will illuminate the cycle
chosen.
3. O
nce selection is made, the soil level, rinse level, spin speed and the wash/rinse water
temperatures are pre-set. At this point, if you choose not to have any other options, lightly
touch the start/pause pad to start the wash cycle.
If you want to change the preset settings before you touch the Start / Pause pad.
1. Lightly touch the soil level, rinse level, spin speed and water temperature to select.
2. A
ny of the supplied options: Delay Start, Prewash, Beeper setting, Extended Spin, Stain
treatment, Rinse & Spin or Custom Program can be now chosen.
3. A
fter option selection, lightly touch the start/pause pad to start the wash cycle. (All
options not available in all cycles).
4. T o customize your settings, once your favorite settings are selected touch the Custom
Program pad and hold for 3 seconds.
5. T o child lock the control panel touch the Rinse&/Spin pad and hold for 3 seconds. To
unlock the child lock function only touch the Rinse&/Spin pad. Power off pad cannot
unlock the child lock function. During activation of the child lock function, the child lock
LED is on.
6. Y
ou could pause the washer and if the door lock light on the control panel will be Off
during this time the door of the washer can be opened to Add a Garment.
7. W
ith the machine in standby, you can chose a delay start time from 1-24 hours. To
do so, touch the delay pad. Each touch of this pad advances the delay in 30 minutes
increments. To set the delay function touch the Start / Pause (3) pad. Doing so will cause
the delay (12) pad to flash. When set at 24:00, push the delay pad again and the delay
time is cancelled. After setting wash program is change, delay time is cancelled. Program
changes, delay time is also cancelled.
Features
Electronic Touch Pad Controls: Allows you to use the washer at the touch of your fingertips.
5 Compartment Dispenser: Use liquid or powdered detergent for prewash, powdered
detergent for main wash, liquid detergent for main wash, liquid bleach and liquid fabric
softener for optimum wash.
Designed specially to use only HE (High Efficiency) detergent
Energy Star unit saves you water and energy
Sanitary Cycle: An additional internal water heater automatically heats the water to ideal
levels to clean those hard to remove stains.
14
English
Custom Cycle: You do not have to remember your favorite setting. Simply program and set it.
Automatic Setting: Once you choose your required wash cycle, the soil level, rinse level,
spin speed, water temperature and signal will set automatically making the unit automatic
operation. If desired in certain cycles you could change these settings and choose options to
personalize your needs.
Capacity: The absence of an agitator gives you additional space to wash large and bulky
items like bed sheets, comforters and large loads.
Drum: The stainless steel drum keeps the unit looking clean and avoids rust.
Add a Garment: When the lock sign is Off on the panel, during this period an additional
garment can be added to the wash cycle.
AMT door Seal: Reduces the collection of mildew and bacteria that is harmful to the wash.
Heavy Duty Suspension System: The washtub uses shock absorbers in suspension system that
maintains an equal balance when heavier loads are being washed. This system can control
tension softly and tenderly so the machine will balance quietly without shutting down. Thus
helping in reduction of noise and vibration.
Control Panel Display: Will display the remaining wash time or error message during a wash
cycle. If the delay start function is chosen, it will display the remaining time for wash cycle to
begin.
CYCLES
Sanitary - This cycle is intended for heavily soiled garments. An internal water heater raises
the Extra Hot wash water temperature to 154°F (68°C) to help tackle those hard to remove
stains.
Heavy Duty - This cycle is preset to use hot water to deep clean heavily soiled durable
colorfast fabrics.
White - This cycle is preset to use hot water to deep clean white garments.
Normal / Casual - This cycle is for normally soiled cottons, linens, and mixed garment loads.
Green Wash - This cycle provides a convenient way to select an eco-friendly cold water
wash. An easy cycle selection automatically determines the best options for an effective
energy saving wash program.
Perm Press - This cycle is preset for a low spin speed to help maintain wrinkle-free clothing
and reduce creases in synthetic fabrics.
Active Wear - This cycle is intended for spandex, stretch fabrics, and high performance knits
often found in athletic clothing.
Quick Wash - This cycle is intended for lightly soiled garments that are needed in a hurry.
Delicate / Silk - This cycle is intended to gently wash delicate garments and lingerie with
sheer fabrics with lace trim.
Hand Wash - This cycle is intended to gently clean garments labeled “Hand Wash”.
NOTE: All functions may not be available in all cycles.
NOTE: It is important to check instructions on clothes label to select the ideal wash cycle.
Wrong cycle selection could damage and discolor the clothing. Certain clothes
should only be dry cleaned.
15
English
NORMAL WASHING SOUNDS
The following sounds are normally heard during the operation of the washer:
• Tumbling sounds: This is normal as the heavy wet clothes in the washer are continuously
being tossed around
• Air rushing noise: This happens when the washer tub spins at a very high RPM.
• Wash and rinse cycles going on and off will also make clicking sounds as well as spraying
and water splashing sound.
• Drain pump operational sound, when dirty water is being drained.
Preset Cycle
Cycles
Cycle
Time
Wash
Speed
Spin Speed
Wash / Rinse
Temperature
Soil Level
Sanitary
1:35
45rpm
Max 1300
Extra Hot / Cold
Medium
Heavy Duty
1:18
45rpm
Max 1300
Hot / Cold
Medium
White
1:10
45rpm
Max 1300
Hot / Cold
Medium
Normal / Casual
0:54
45rpm
Max 1300
Warm / Cold
Medium
Green Wash
0:54
45rpm
Max 1300
Cold / Cold
Medium
Perm Press
0:49
40rpm
Max 900
Warm / Cold
Medium
Active Wear
0:43
45rpm
Max 1200
Warm / Cold
Medium
Quick Wash
0:31
45rpm
Max 1200
Warm / Cold
Light
Delicate / Silk
0:44
40rpm
Max 900
Warm / Cold
Medium
Hand W ash
0:37
40rpm
Max 900
Cold / Cold
Medium
NOTE: T he cycle time may vary in different environments. The temperature of water and
water pressure will specially affect the timing.
16
English
CYCLE SELECTION
Select Cycles Desired According To Fabric Types And Soil Level
Cycle
Fabric type
Normal /
Casual
Clothes of cottons, linens and
synthetic fabrics,
work clothes,
jeans, shirts
Perm
Press
Dress shirt /
pants wrinkle
free clothing,
poly / cotton
blend clothing,
table cloths
Quick
Wash
Lightly soiled
clothing and
small loads
Active
Wear
Active sports
and some casual
ware clothes
Hand
Wash
Items labeled
"hand
washable"
Delicate /
Silk
Dress shirts /
blouses nylons,
sheer or lacy
garment
Green
Wash
Clothes of cottons, linens and
synthetic fabrics,
work clothes,
jeans, shirts
Whitest
Cotton
Cotton, linen.
towels, shirts,
sheets, jeans,
mixed loads
Heavy
Duty
Large item such
as blankets and
comforters
Sanitary
Heavily soiled
work clothes,
etc.
Soil Level
Rinse Level
Spin Speed
Water
Temperature
Medium
Normal
Extra High
Warm / Cold
Heavy
Light
Baby Care
Extra
Eco.
High
Medium
Low
Extra Low
No Spin
Hot / Cold
Cold / Cold
Tap Cold / Cold
Medium
Normal
Low
Warm / Cold
Heavy
Light
Extra
Eco.
Medium
Extra low
No Spin
Hot / Cold
Warm / Warm
Cold / Cold
Tap Cold / Cold
Light
Normal
High
Warm / Cold
Heavy
Medium
Extra
Eco.
Medium
Low
Extra Low
No Spin
Hot / Cold
Warm / Warm
Cold / Cold
Tap Cold / Cold
Medium
Normal
High
Warm / Cold
Heavy
Light
Baby Care
Extra
Eco.
Medium
Low
Extra Low
No Spin
Warm / Warm
Cold / Cold
Tap Cold / Cold
Medium
Normal
Low
Cold / Cold
Light
Extra
Eco.
Extra Low
No Spin
Warm / Warm
Warm / Cold
Tap Cold / Cold
Medium
Normal
Low
Warm / Cold
Light
Extra
Eco.
Extra Low
No Spin
Warm / Warm
Cold / Cold
Tap Cold / Cold
Medium
Normal
Extra High
Cold / Cold
Heavy
Light
Baby Care
Extra
Eco.
High
Medium
Low
Extra Low
No Spin
/
Medium
Extra
Exrta High
Hot / Cold
Heavy
Light
Baby Care
Normal
Eco.
High
Medium
Low
Extra Low
No Spin
Extra Hot
Warm / Warm
Warm / Cold
Cold /Cold
Tap Cold / Cold
Medium
Normal
Extra High
Hot / Cold
Baby Care
Exra
Eco.
High
Medium
Low
Extra Low
No Spin
Extra Hot
Warm / Warm
Warm / Cold
Cold /Cold
Tap Cold / Cold
Medium
Normal
Extra High
Extra Hot /Cold
Heavy
Light
Baby Care
Exra
Eco.
High
Medium
/
Heavy
Light
Delay
Time
Prewash
Extended
Spin
StainTreat
Rinse &
Spin
•
•
•
•
•
•
•
•
•
•
•
•
•
•
•
•
•
•
•
•
•
•
•
•
•
•
•
•
•
•
•
•
•
•
NOTE: T o protect your wash load, all settings may not be available with all cycles, the shaded levels represent the preset
setting.
17
English
WASHING METHODS
CAUTION: W
hen first using the washing machine, choose the SANITARY cycle and
run it without clothes. Use only HE High Efficiency detergent. Use 1/2 the
manufacturer’s recommended amount for a medium sized load. This initial cycle
serves to ensure the interior is clean before washing clothes.
Sorting Of Clothes
• Soil (Heavy, Medium, Light) - Separate clothes according to the amount of soil content.
•C
olors (Whites, Lights, Dark) - Separate dark colors from the whites as colors can transfer
causing discoloration.
• Lint (Produce & Collectors) - Separately wash the lint producer's and collectors.
Loading The Washer
• Load each item loosely.
• Separate the white and colored clothes. Separate heavy clothes from light clothes.
• Carefully check all pockets and cuffs for small items. They may damage the drum.
• Pre-treat all stains and heavily soiled areas for best results.
• Do not overload the washer.
• Close the door properly after loading the clothes.
• Combine larger & small items in a load.
•S
ingle items may cause unit to go off balance. Single bulky items such as blankets,
comforters or bedsheets can be washed separately.
NOTE: D
o not wash water proof clothing. Do not overload the drum with items. The door
should close easily. When unloading check under door seal for small items.
Laundry loading
A) Open the washer door.
B) U
nfold the sorted items of clothing and place them loosely into the drum. Mix up large and
small items so they distribute evenly during the spin cycle.
NOTE: D
o not exceed the maximum load. Overloading will cause poor wash results and
encourage creasing.
C) Close the door watching for trapped items of clothing between the door and door seal.
Door must close easily and not by force.
D) F illing laundry detergent additive. Open the dispenser drawer and add laundry products
to the detergent, bleach, or fabric softener compartments. Close drawer slowly to avoid
spills. See “Using the Dispenser.”
NOTE: 1) Keep detergent and additives out of the reach of children.
2) If too little detergent is used the laundry will not clean properly and will eventually
become gray and stiff.
3) If too much detergent is used excessive suds reduce wash movement producing
poor washing and rinsing results.
18
English
E) S
elect wash cycle. Turn on the washer by pressing Power. Select the desired cycle and
options. Not all options are available with all cycles. For available options, buzzer sounds
a short beep. If option is not available buzzer sounds 2 short beeps. See “Cycle Selection”
for details (pg.17).
NOTE: W
hen delaying a cycle, use only powered detergents in the main wash compartment
since liquid detergents may seep out of the compartment during Delay Wash, before
the wash cycle begins.
F) Select Start/Pause
Select Start/Pause to start the wash cycle.
NOTE: 1) T o change a cycle: Touch and hold the "Power" pad for 2 seconds to turn off
the washer. Turn on the power and reselect the desired cycle and options. Touch
"Start/Pause" to restart the cycle.
2) T o open door: Touch "Start/Pause" to pause the cycle only when the door lock
LED is Off you can open the door. Door can not be unlocked under the following
conditions.
- Motor is running
- Water temperature is high inside the washing machine
- Water level is high
CAUTION: The door of the washer may get hot during wash cycle.
USING THE DISPENSER
1. The dispenser has 5 compartments.
1. Liquid or powder detergent for prewash
2.1 Powder detergent for main wash
2.2 Liquid detergent for main wash
3. Liquid bleach
4. Liquid fabric softener
2. After choosing your detergents, load them into the
dispensers by:
a. Open the dispense drawer
b. L oad into compartments and close drawer slowly so no detergent spills out or
enters washer too quickly.
Your washer is designed to use only HE "High Efficiency" detergents.
HE detergents are formulated specifically for front load washers and contain suds reducing
components. HE detergents make less suds improve washing and rinsing performance, and
help to keep the interior of your washer clean. If a regular detergent is used, it may cause
oversudsing and unsatisfactory performance. For the best washing and rinsing performance,
low-suding HE detergents are strongly recommended.
1. Prewash Detergent Compartment
* Add detergent to this compartment when using the Prewash option. Liquid or powered
detergent may be used in this compartment. The detergent will automatically be
dispensed during Prewash if the Prewash option is selected.
NOTE: L iquid detergent will drain into the washer drum as it is added.
19
English
2. Main Wash Detergent Compartment
* Add measured detergent to this compartment for Main wash. Detergent is flushed from
the dispenser at the beginning of the cycle. Either powdered or liquid detergent can be
used.
* Liquid detergent can be added only to the liquid detergent compartment.
* Powdered detergent can be added only to the powdered detergent compartment.
* Do not exceed "Max" fill line.
3. Liquid Chlorine Bleach Compartment
* Add appropriate amount of bleach to compartment. The bleach will be automatically
dispensed during the wash cycle.
* Do not exceed the "Max" fill line. Overfilling may cause damage to clothing.
* Do not pour undiluted liquid bleach directly onto the clothes or into the drum. Fabric
damage can occur.
* Do not use powdered bleach in this compartment.
4. Fabric Softener Compartment
* Add recommended amount of fabric softener to this compartment.
* Dilute concentrated softeners with warm water to the fill line.
* Do not exceed the maximum fill line. Overfilling may cause early dispensing of the
fabric softener, which could result in stained clothes.
* Do not pour fabric softener directly on clothes.
* The fabric softener will be automatically dispensed during the last rinse cycle.
NOTE: If there is a leak or spill with laundry products (soap, detergent, bleach, softener,
etc.) on the top of your washer, clean immediately. These products can damage the
finish or controls if left there too long.
After Washing
When the program has ended:
1) Turn the Power off.
Additional: A
t end of washing cycle, beep signal will sound, then panel will display “END”.
5 minutes later the machine powers off.
2) Open the door.
NOTE: (A) If the Child Lock was selected, you should release it;
(B) The door can’t be unlocked in the follow conditions:
- The motor is running.
- Water temperature inside the washing machine is high.
- Water level is high.
3) Remove the laundry.
4) Leave the loading door ajar to allow the inside of the washing machine to dry.
20
English
CARE AND CLEANING GUIDE
WARNING: T o reduce the risk of electric shock, disconnect this appliance from the power
supply before attempting any user maintenance. Turning the power OFF does
not disconnect this washer from the power supply. You must disconnect the
plug from the electrical source.
WARNING: A
lways unplug your appliance to avoid electric shock before cleaning.
Ignoring this warning may result in death or injury. Before using cleaning
products, always read and follow manufacturers instruction and warnings to
avoid personal injury or product damage.
CLEANING AND MAINTENANCE
Use a damp or sudsy cloth for cleaning control panel
• To avoid any kind of damage to cabinet finish, wipe appliance cabinet as needed. If
you spill liquid / powdered softener, bleach or detergent on the cabinet, wipe cabinet
immediately because it can damage the finish.
• Do not use any abrasive, harsh chemicals, ammonia, chlorine bleach, concentrated
detergent, solvents or metals scouring pads. Some of these chemicals may dissolve,
damage and / or discolor your appliance.
• Remove pins or other sharp objects from clothes to prevent scratching interior parts.
• The Detergent Dispenser Compartment has a removable insert. Over time, this
compartment may accumulate dried detergent, dirt and debris. You must remove the
insert, then rinse in a sink or remove debris with a soft brush.
Cleaning the water inlet filter
* To prevent blockage to water supply or the accumulation of contaminants clean the water
inlet filter regularly.
* If your water is very hard or contains traces of lime deposit, the
water inlet filter may become clogged.
NOTE: We recommend cleaning it every few months.
1.Turn off the water tap.
2.Disconnect the water inlet hose from both the valve and the water
tap. Pull out the filter from the valve.
3.Clean the filter using a hard bristle brush.
4.Insert the filter and reconnect the hose to the valve,
5.Rinse the filter in the straight coupling end of the inlet hoses under
flowing water.
6.Reconnect the hose to the water tap.
21
English
Cleaning the Button / Coin Trap
CAUTION:
• Disconnect power before cleaning the Button / Coin trap.
• Failure to screw the Button/Coin trap and emergency cap
tightly can result in leakage.
• Clean the Button / Coin trap once in 6 months.
• Beware of hot water inside the Button/Coin trap.
Step 1. Drain the remaining water
1
2
• Pull the rubber tube (1) out slowly.
• Unscrew the emergency cap (2), allow the remaining water
to flow into a vessel by the washer.
• Replace the tube with cap.
3
Step 2. Clean the Button/Coin trap
• Turn the Button/Coin trap (3) counterclockwise.
• Clean out the foreign objects from the Button/Coin trap.
• Turn the Button / Coin trap clockwise back, tighten securely.
4
Step 3. Close the trap cover (4)
Cleaning the Door Seal
1. Make sure washer is completely empty
2. Carefully check seal between the door opening and the tub for stains. Make sure to pull
back seal and check for foreign objects.
3. Wipe area with dry cloth and let air-dry.
IMPORTANT: Wear rubber gloves when cleaning for prolonged periods.
Cleaning the Drum
1. Make sure drum is empty.
2. Use a soft cloth or sponge to wipe clean, but do no use
abrasive cleaning products. Wipe outside of unit to keep
clean and wipe up spills immediately.
3. Only use HE detergents. For optimal washer freshness
and keep washer open to allow drum to air dry.
Glass Door
Cleaning the dispenser
Seal
• To pull the dispenser drawer out press down the lock lever to remove.
Remove the liquid detergent compartment. Remove liquid bleach and
liquid fabric softner cap. Clean with soft brush. Reinstall, and replace the
dispenser compartment and caps.
A) Liquid detergent compartment
B) Lock lever
C) Liquid bleach compartment
D) Liquid fabric softner compartment.
22
English
Always do the following to maintain washer freshness
• Use only HE "High Efficiency" detergent. Leave the door slightly open after each cycle to
allow for better ventilation and drying of washer interior.
• If the procedure does not sufficiently improve the machine freshness, evaluate your
installation and usage conditions for other causes.
CAUTION: If there are small children in the house, care must be taken so that they can not
climb into or play inside the washer while it is open for drying.
• Water Inlet Hoses: Periodically inspect hoses for bulges, kinks, cuts, wear and tear and
leaks. Replace if necessary.
MOVING AND VACATION AND STORAGE
Store your washer where it will not freeze. Frozen, water can damage your unit. Also
disconnect washer and turn off water supply. Drain water from hoses and keep washer door
open to allow drum to air dry.
• Start Up After Washer is Stored: Flush water pipes and reconnect hoses and power. Run
one empty load with HE detergent to clean out drum. Choose sanitary cycle and run
without loading clothes. Use half the manufacturer's recomended amount of detergent for a
medium size load.
CAUTION: T his equipment is not designed for maritime use or for mobile installations such
as in RV's, air craft, etc. When disposing of the washer, cut off the power cord,
and destroy the plug. Disable the door lock to prevent young children being
trapped inside.
23
English
TROUBLESHOOTING
WARNING: R
epairs to the washing machine must only be carried out by qualified
personnel. Repairs carried out by inexperienced persons may cause injury
or serious malfunctioning. To reduce the risk of electric shock, disconnect this
appliance from the power supply before attempting any user maintenance.
Turning off the "Power" pad does not disconnect this appliance from the power
supply
Contact your local service center.
Problem
Noise in
Button / Coin Trap
Vibrating noise
Water leaks
Excessive suds
Possible Cause
Solution
* F oreign objects such as
coins or safety pins may
be in drum or trap.
Stop washer and check
drum and trap filter. If noise
continues after washer is
restarted, call for service.
* Have all the transportation
bolts and packing been
removed?
* Wash load may be
unevenly distributed in the
drum.
* Are all the feet resting
firmly on the ground?
See Installation Instructions
for removing transportation
bolts.
* F ill hose connection is
loose at tap or washer.
* House drain pipes are
clogged.
Check and tighten hose
connections.
* T oo much detergent or
unsuitable detergent.
Reduce detergent amount or
use low sudsing detergent.
Stop washer and rearrange
wash load.
Adjust the leveling leg.
Make sure all four legs are
in firm contact with the floor
or the pedastal.
Unclog drain pipe. Contact
plumber if necessary.
Your washer is designed
specially to use only HE
"High Efficiency" detergent
Water does not enter
washer or it enters
slowly
*W
ater supply is not
adequate in area.
* Water supply tap is not
completely open.
* Water inlet hose is bent.
* The filter of the inlet hose
clogged.
* Water pressure is less than
0.03MPa
Check another tap in the
house.
Fully open tap.
Straighten hose.
Check the filter of the inlet
hose.
Check water pressure.
24
English
Repairs to the washing machine must only be carried out by qualified personnel. Repairs
carried out by inexperienced persons may cause injury or serious malfunctioning.
Contact your local service center.
Problem
Water in the washer
does not drain or
drains slowly
Washer does not start
Washer won’t spin
Possible Cause
Drain hose is bent or
clogged.
The Button/Coin trap is
clogged.
Check height of drain hose
it should be less than 96"..
Clean and straighten the
drain hose.
Clean the Button/Coin trap.
See "Drain System" Adjust
height of drain hose.
Electrical power cord
may not be plugged in or
connection may be loose.
Make sure plug fits tightly in
wall outlet.
House fuse is blown, circuit
breaker tripped, or a power
outage has occurred.
Reset circuit breaker or
replace fuse. Do not
increase fuse capacity.
If problem is a circuit
overload, have it corrected
by a qualified electrician.
Water supply tap is not
turned on.
Turn on water supply tap.
Check that the door is firmly
shut.
Long wash cycle time
The water supply and
drainage does not stop
25
Close the door and Touch
the Start/Pause pad. After
Touching the Start/Pause
pad, it may take a few
moments before the clothes
washer begins to spin.
The washing time may vary
with the amount of laundry,
water pressure, water
temperature, and other
using conditions.
If imbalance is detected or if
the suds removing program
operates, the wash time
shall be increased.
Does not use HE detergent.
Stains under the door seal.
Use only HE detergent.
Washer odor
The door cannot be
unlocked by touching the
Start/Pause pad to stop the
washer.
Solution
Wipe off the stains.
Leave door ajar after use.
The water temperature or
the level is high.
Drain the water by using
Rinse&/Spin cycle. (The
door may be opened after
the Rinse&/Spin cycle is
complete.)
Check that the height of the
drain hose is below 30".
Adjust the height of the
drain hose.
Check if the end of the drain
hose is in the water.
Place the end of the drain
hose away from the water
surface.
English
Repairs to the washing machine must only be carried out by qualified personnel. Repairs
carried out by inexperienced persons may cause injury or serious malfunctioning.
Contact your local service center.
Warning code
Abnormal item
ErLC
door lock abnormal
ErUL
door unlock abnormal
Solution
Pushing the door to check whether it is properly
close; cut off the power and then turn on again.
If error still exist, please contact service personnel.
Cut off the power and then turn on again. If error still
exist, please contact service personnel.
Cut off the power.
Check if the drain hose is bent or clogged.
Check if the height of the drain hose end is more
than 96" above the floor.
Check if the drain filter is clogged.
If error still exist, please contact service personnel.
bloc punp
drainage abnormal
Err3
temperature sensor error
Please contact service personnel.
Err4
heating resistor failure
Please contact service personnel.
Check the two water inlet hose nuts to see if they are
properly fixed.
Check if the inlet hoses are bent or clogged.
Check that water pressure is less than 0.03MPa.
no taps
water inlet error
Check if the water tap is not turned on.
Check if the water supply is failed.
If the problem is solved, touch the Start/Pause pad to
continue the cycle; If error still exist, please contact
service personnel.
Err7
motor no rotation error
Err8
water over flow error
Er10
water level sensor error
Please contact service personnel.
The washer will auto drain out of water, and then
auto clean up; If error still occur, please contact
service personnel.
Please contact service personnel.
It is not recommended to wash single item.
1.Cut off the power.
UNB
unbalance error
2.Redistribute the washing clothes.
3. R
estart the spin cycle by touching “RINSE&/SPIN”
pad twice.
EUAr
communication error
between user interface
board and power board
door
door not closed
PF
The Power is Low
Please contact service personnel.
Close door, then touch the “start” pad again.
Please Contact Service Personel
26
English
Problems with clothes:
•C
lothes are too wrinkled: This is due to improper sorting, overloading and washing in too
hot water repeatedly. Avoid overloading and resort your load.
Do not mix heavy clothes such as work clothes with light clothes such as blouses, light
shirts and delicate items. You may need to wash in warm or cold water.
•S
oap residue: Detergent may not be dissolving in water. Check water
temperature. Use less detergent.
•S
pots or stains on your clothes: This is due to incorrect use of fabric softener. You may
need to read proper instructions on the detergent container and follow proper directions
for using the softener.
•C
lothes are grayed or yellowed: This is due to not using enough detergent for large loads.
You may have to add more detergent to the load.
•C
lothes are ripped & have holes/excessive wear & tear: This is due to sharp objects such
as pins and belt buckles left in pockets. You will need to remove small loose sharp objects.
Fasten belts, zippers, metal snaps etc.
technical specification
Power Supply
Max Working Current (A)
Water Pressure (PSI)
Washing Power
Spinning Power
Spinning Speed
Size (High, Depth, Width)
Weight (lbs.)
27
120V~60Hz
12 AMPS
4.4 ~ 145 (30~1000kPa)
300 Watts
800 Watts
1300 rpm
1010mm x 808mm x 686mm
39-3/4" x 31-13/16" x 27"
242 (110kg)
English
limited warranty
In Home Service
Full ONE Year Warranty
For 12 months from the date of original
retail purchase, Haier will repair or replace
any part free of charge including labor
that fails due to a defect in materials or
workmanship.
Limited Warranty
After one year from the original retail
purchase date, Haier will provide a part at
no cost, as indicated below, to replace said
part as a result of a defect in materials or
workmanship. Haier is solely responsible
for the cost of the part. All other costs
such as labor, trip charge, etc are the
responsibility of the owner.
Second through Fifth Year
Haier will provide the cabinet assembly
should the cabinet rust through.
Second through Tenth Year
Haier will provide the inner stainless steel
wash tub.
NOTE: This warranty commences on
the date the item was purchased and the
original purchase receipt must be presented
to the authorized service representative
before warranty repairs are rendered.
Exceptions: Commercial or Rental
Use Warranty
90 days labor from date of original
purchase
90 days parts from date of original
purchase
No other warranty applies
For Warranty Service
Contact your nearest authorized service
center. All service must be performed by
a Haier authorized service center. For the
name and telephone number of the nearest
authorized service center please call 1-877337-3639.
Before calling please have available
the following information:
Model number and serial number of your
appliance. The name and address of the
dealer you purchased the unit from and
the date of purchase. A clear description
of the problem. A proof of purchase (sales
receipt).
This warranty covers appliances
within the continental United States,
Puerto Rico and Canada. What is not
covered by this warranty:
Replacement or repair of household fuses,
circuit breakers, wiring or plumbing.
A product whose original serial number has
been removed or altered.
Any service charges not specifically
identified as normal such as normal
service area or hours.
Damage to clothing.
Damage incurred in shipping.
Damage caused by improper installation
or maintenance.
Damage from misuse, abuse accident, fire,
flood, or acts of nature.
Damage from service other than an
authorized Haier dealer or service center.
Damage from incorrect electrical current,
voltage or supply.
Damage resulting from any product
modification, alteration or adjustment
not authorized by Haier.
Adjustment of consumer operated controls
as identified in the owners manual.
Hoses, knobs, lint trays and all attachments,
accessories and disposable parts.
Labor, service transportation, and shipping
charges for the removal and replacement
of defective parts beyond the initial
12-month period.
Damage from other than normal
household use.
Any transportation and shipping charges.
THIS LIMITED WARRANTY IS GIVEN
IN LIEU OF ALL OTHER WARRANTIES,
EXPRESSED OR, INCLUDING THE
WARRANTIES OF MERCHANTABILITY AND
FITNESS FOR A PARTICULAR PURPOSE
The remedy provided in this warranty is
exclusive and is granted in lieu of all
other remedies.
This warranty does not cover incidental or
consequential damages, so the above
limitations may not apply to you. Some
states do not allow limitations on how long
an implied warranty lasts, so the above
limitations may not apply to you.
This warranty gives you specific legal rights,
and you may have other rights, which vary,
from state to state.
Haier America
New York, NY 10018
28
IMPORTANT
Do Not Return This Product To The Store
If you have a problem with this product, please contact the
"Haier Customer Satisfaction Center" at 1-877-337-3639.
DATED PROOF OF PURCHASE REQUIRED FOR WARRANTY SERVICE
IMPORTANT
Ne pas retourner ce produit au magasin
Pour tout problème concernant ce produit, veuillez contacter le
service Haier au 1-877-337-3639.
UNE PREUVE D'ACHAT DATÉE EST REQUISE POUR BÉNÉFICIER DE LA GARANTIE.
IMPORTANTE
No regrese este producto a la tienda
Si tiene algún problema con este producto, por favor contacte el "Centro de
Servicio al Consumidor de Haier" al 1-877-337-3639 (Válido solo en E.U.A).
NECESITA UNA PRUEBA DE COMPRA FECHADA PARA EL SERVICIO DE LA GARANTIA
120V~60Hz
Made in China
Fabriqué en Chine
Hecho en China
Haier America
New York, NY 10018
Printed in China
HWF5300AW
Issued: Febraury 2010
©2010 Haier America Trading, LLC. All Rights Reserved. 100686 0608