1
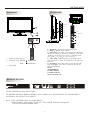
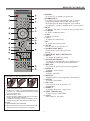
FULL HD LCD TV
OWNER' S MANUAL
MODEL: L32M3F
Please READ this manual carefully
before operating your TV, and retain
it for future reference
Contents
1
Safety and warnings..........................................................................................................2-3
2
Introduction.....................................................................................................................4
3
Installation.......................................................................................................................5-8
4
Remote Controller .........................................................................................................9
5
TV Operation..................................................................................................................10-13
6
TV Trouble shooting.......................................................................................................14
-1-
SAFETY AND WARNINGS
IMPORTANT SAFETY INSTRUCTION
WARNING:
1.Read these safety instructions.
2.Keep these safety instructions.
3.Heed all warnings.
4.Follow all safety instructions.
5.Do not use this apparatus near water.
6.Clean only with dry cloth.
7.Do not block any ventilation openings. Install in
accordance with the manufacturers instructions.
8.Do not install near any heat sources such as radiators ,
stoves, or other apparatus (including amplifiers)that
produce heat.
9.Protect the power cord from being walked on or
pinched particularly at power outlets, and the point
where they exit from the apparatus.
10.Only use attachments/accessories specified by the
manufacturer.
11.Unplug this apparatus during lightning storms or
when unused for long periods of time.
12.Refer all servicing to qualified service personnel.
Servicing is required when the apparatus has been
damaged in any way, such as the power-supply cord
or plug is damaged, liquid has been spilled or objects
have fallen into the apparatus, the apparatus has been
exposed to rain or moisture , does not operate normally,
or has been dropped.
13.Apparatus must not be exposed to dripping or
splashing and no objects filled with liquids, such as
vases, should be placed on the apparatus.
14.WARNING:The battery(battery or batteries or battery
pack) shall not be exposed to excessive heat such as
sunshine, fire or the like.
15:The mains plug is used as disconnect device, the
disconnect device shall remain readily operable.
16:
This is CLASS II apparatus with double
To prevent fire or shock hazard, do not expose this
appliance to rain or moisture.
Thank you very much for purchasing this TV. To enjoy
your product from the very beginning, read this manual
carefully and keep it handy for easy reference.
INSTALLATION
Locate the TV in the room where light does not strike
the screen directly.
Total darkness or a reflection on the picture screen can
cause eyestrain. Soft and indirect lighting is recommended
for comfortable viewing.
Allow enough space between the TV and the wall to
permit ventilation.
Avoid extremely warm locations to prevent possible
damage to the cabinet or premature component failure.
This TV can be connected to AC 100-240 Volts. 50/60 Hz.
Never connect to a DC supply or any other power supply.
Do not cover the ventilation openings when using the TV.
CAUTION
Never tamper with any components inside the TV, or any
other adjustment controls not mentioned in this manual.
All LCD-TVs are high voltage instruments. When you
clean up dust or water drops on the LCD PANEL or
CABINET, the power cord should be pulled out from the
receptacle, then wipe the TV with a dry soft cloth. During
thunder and lighting, unplug the power cord and antenna
cord to prevent damage to your TV. All repairs to this TV
should only be performed by qualified TV service personnel.
Warning: Change or modifications to this unit not expressly
by the part responsible for compliance could void the user 's
authority to operate the Equipment.
insulation, and no protective earth provided.
CAUTION
RISK OF ELECTRIC SHOCK
DO NOT OPEN!
CAUTION
TO REDUCE THE RISK OF ELECTRIC SHOCK, DO
NOT REMOVE COVER (OR BACK).NO USER
SERVICEABLE PARTS INSIDE. REFER SERVICING
TO QUALIFIED SERVICE PERSONNEL.
a. Do not expose to dripping or splashing.
b. No objects filled with liquids, such as vases, shall be
placed on the apparatus.
c. The mains plug of this device is used as the disconnect
device and shall remain readily accessible and operable.
d. No naked flame sources, such as lighted candles, should
be placed on the apparatus.
e. Allow suitable distances around the apparatus for sufficient
ventilation. Ventilation should not be impeded by covering
ventilation openings with items such as newspapers, table
cloths, curtains and such like.
This symbol indicates that this productincorporates
double insulation between hazardous mains voltage
and user accessible parts. When servicing use only
identical replacement parts.
WARNING: To reduce the risk of fire or electric shock,
do not expose this apparatus to rain or cords.
The symbol indicates that dangerous voltages
constituting a risk of electric shock are present
within this unit.
The symbol indicates that there are important
operating and maintenance instructions in the
literature accompanying this unit.
-2-
SAFETY AND WARNINGS
High voltages are used in the operation of this television
receiver. Do not remove the cabinet back from your set.
Refer servicing to qualified service personnel.
Never stand on, lean on, or suddenly push the television or
its stand. You should pay special attention to children.
Serious injury may result if it falls.
To prevent fire or electrical shock hazard, do not expose
the television receiver to rain or moisture.
Do not place your television on an unstable cart, stand,
shelf or table. Serious injury to an individual , and damage
to the television, may result if it falls.
Do not drop or push objects into the television cabinet
slots or openings. Never spill any kind of liquid on the
television receiver.
When the television receiver is not used for an
extended period of time, it is advisable to disconnect
the AC power cord from the AC outlet.
Do not block the ventilation holes in the back cover.
Adequate ventilation is essential to prevent failure of
electrical components.
Avoid exposing the television receiver to direct sunlight
and other sources of heat. Do not stand the television
receiver directly on other products which give off heat,
e.g. video cassette players and audio amplifiers. Do not
place naked flame sources, such as lighted candles on
the television.
Dim:515*320mm(
Do not trap the power supply cord under the television
receiver.
If the television is to be built into a compartment or similar
enclosure, the minimum distances must be maintained. Heat
build-up can reduce the service life of your television, and
can also be dangerous.
-3-
INTRODUCTION
Accessories
Main features
Used as Television, display terminal,PC display
High luminance,wide viewing angle
Can store 99 TV programs
AC Power Cord.........................
1
Infrared Remote Controller......
1
Battery(AAA)...............................2
HDMI interface
User s M anual...............................1
5 NICAM
Main parameter
Vie wing Picture Size(diagonal)
Resolution
Aspect Ratio
TV System
Video Signal System
32
1920x1080
16 : 9
PAL-B/G I D/K,SECAM-L/L SECAM-B/G SECAM-D/K
PAL/NTSC/SECAM
Receiving Channel
1-99
Response Time
6.5ms
Viewing Angle
176 H/ 176 V
Brightness
500cd/m2
Dynamic Contrast
Inpu t Power Voltage
Po we r consumption
Audio Outpu t Powe r
Signal Input
1500:1
AC 100 V-240 V~ 50 /60Hz
170W
2x 8W
Horizontal definition
THD 7%
Analog RGB(VGA) x 1
High-Definition Multimedia Interface (HDMI) x 2
Rear Composite Video Input x 2
Audio Input x 4
YCb (Pb )Cr (P R) x 1
Side Composite Video Input x 1
Side HEAD PHONE x 1
Side USB x 1
TV line
Composite Video input >=350
Y Cb(Pb ) Cr(Pr)
>=400
-4-
INSTALLATION
KEYBOARD
Front panel
SOURCE
MENU
3
CH+
CH-
1
VOL+
2
VOL-
USB
USB
HEADPHONE
HEADPHONE
VIDEO
STANDBY
AV2
VIDEO
L
L
R
R
30
1
1:
Remote control sensor.
2:
Indicator LED: GREEN
RED
3:
30
2
1 SOURCE Display the input source menu.
2 MENU Display main MENU.
3 CH+/CH-:In TV mode press CH+ or CH- to
change the channel up and down.In MENU mode, press
CH+ or CH- to select items .In standby mode,
press CH+ or CH- to turn on the TV.
4 VOL+/VOL-:Adjust sound level.In MENU mode,
press VOL+ or VOL- to adjust the item that you
selected.
5. STANDBY : Press this button to turn the unit ON
from STANDBY mode. Press it again to turn the set
back to STANDBY.
6.USB
7.HEADPHONE
8.VIDEO INPUT
9.AUDIO INPUT-L
10.AUDIO INPUT-R
3
4
5
6
7
8
9
0
+
+
VOL
CH
_
_
POWER ON.
STANDBY.
Key board
REAR AV PASTER
HDMI2 INPUT
Pr
Pb
L
AV1
Y
R
HDMI1 INPUT
PC
AUDIO INPUT
RF INPUT
All the terminals are(from left to right):
AC POWER SOCKET, HDMI 1, HDMI 2, VGA , YPbPr, AV1, AUDIO INPUT, PC AUDIO INPUT,
ANTENNA, AV OUTPUT, AV3 INPUT.
Note: 1.AV1 and YPbPr share one audio channel.
2.When HDMI 1 port get DVI signal, the PC Audio
receive the audio for HDMI 1 port.
-5-
channel is changed to
INSTALLATION
ANTENNA
Note:
Aerial connections:IEC(female).
Input impendance:75 unbalanced.
-6-
INSTALLATION
PC
STEPS:
8
Be sure both the TV and computer are Power off.
1.Connect VGA and audio cable
2.Connect power cord
3.Power on the TV, switch to PC mode
4.Power on the PC
This sequence is very important.
HDMI2 INPUT
Pr
Pb
L
AV1
Y
R
HDMI1 INPUT
PC
AUDIO INPUT
RF INPUT
PC
PRESET MODE
RESOLUTION
V.Freq.(Hz)
H.Freq.(KHz)
1
800*600
60
37.88
2
1024*768
60
48.36
3
1280*768
60
47.3
NOTE:
PC V.Freq.(Hz) not more than 60Hz.
-7-
INSTALLATION
AV EQUIPMENT
This TV provides three groups of AV, one group of YPbPr for convenient connection to VCR, DVD or other
video equipment. Please refer to the owner s manual of the equipment to be connected as well.
You can use the input terminals on TV set rear as follows.
VIDEO EQUIPMENT with YPbPr
Y Yellow (video)
R Red (audio R)
VIDEO EQUIPMENT
W White(audio L)
G
B
R
W
R
R Red(Pr)
W
R
B Blue(Pb)
Y
From video
output
G Green(Y)
From audio outputs
G
B
W
R
R
Y
W
Y
W
R
HDMI2 INPUT
Pr
Pb
L
AV1
Y
R
HDMI1 INPUT
PC
AUDIO INPUT
Y
W
RF INPUT
R
R
HDMI
VIDEO EQUIPMENT
W
VIDEO EQUIPMENT
W
R
Y
R
Y
To VIDEO
output
To video
output
To audio outputs
To audio outputs
It can be connected to the following appliances: VCR, multi disc player, DVD, camcorder, video game
or stereo system, etc.....
YPbPr can support these video fomats:480i,576i,480p,576p,720p,1080i.
Note: 1.AV2 share the audio input channel
2.When HDMI 1 port get DVI signal, the
receive the audio for HDMI1 port.
PC Audio
-8-
channel is changed to
REMOTE CONTROLLER
MUTE
POWER
1
11
NICAM
1
2
12
3
2
RECALL
4
5
6
7
8
9
13
0
MENU
SOURCE
14
3
15
4
ENTER
16
5
EXIT
6
DISPLAY
SOUND
+
18
PIC
VOL
CH
_
_
7
SLEEP
ASPECT
19
8
9
17
+
TV
AV
HDMI
MIX
YPbPr
PC
10
REVEAL
HOLD
LIST
INDEX
SUBPAGE
SIZE
AUTO
TEXT
20
21
Insert Batteries Into the Remote Control
1
2
3
1. Remove the battery cover.
2. Inserting the 2 AAA 1.5V batteries making sure the
polarity (+ or -) of the batteries matches the polarity
marks inside the unit.
3. Mount the battery cover.
Replace with new batteries when the TV set begins
to show the following symptoms:
Operation is unsteady or erratic. Sometimes the TV
set does not function with Remote Control Unit.
Remark:
1) Alkaline Battery Recommended.
2) Remove batteries when they are exhausted or if the
remote control is not to be used for long time.
1:POWER
To set the TV to standby or power on.
2:NUMBER KEY:
For direct access to programmes. For a 2 digit
programme number, the second digit must be
entered before the dash disappears. The number
(in analog TV mode) is displayed for a few seconds.
3:MENU
To display the menu or return to the previous menu
4: CURSOR
To move within the menu.
5: EXIT
Used to exit menu.
6: VOL+/To adjust the sound level.
7: PIC
To switch the picture mode.
8: SLEEP
Set the time to turn off the TV.
9: SOURCE HOT KEYS
Switch to the source that you want
directly.
10:TELETEXT KEYS (OPTIONAL)
11:MUTE
To disable or enable the sound.
12:NICAM (OPTIONAL)
To switch to nicam mode.only available in TV
programmes with nicam mode transmission.
13:RECALL
To access the previously viewed programme.
14:SOURCE
To display source menu .
15:ENTER
Confirms selection.
16:DISPLAY
Displays/removes the programme information.
17:SOUND
To switch sound mode.
18:CH+/CHTo access the next or previous TV
Programmes.
19:ASPECT
To change the picture aspect ratio.
20:TEXT (OPTIONAL)
To enter or exit TELETEXT.
21:AUTO
Auto adjust in PC mode.
-9-
TV OPERATION
1. PICTURE MENU
3.OSD MENU
The first item of the MENU is PICTURE MENU.
You can adjust picture effect here, such as contrast,
brightness, etc.
Press
to move, press
to adjust.
The third item of the MENU is OSD MENU.
OSD
ENGLISH
OSD LANGUAGE
PICTURE
CONTRAST
50
BRIGHTNESS
50
HUE
50
COLOUR
50
OSD H-POSITION
50
OSD V-POSITION
OSD DURATION
50
30
OSD HALFTONE
50
50
SHARPNESS
COLOUR TEMP
NORMAL
ASPECT
16:9
PICTURE MODE
STANDARD
3D NR
MID
4.FUNCTION MENU
Note:
1). HUE only available when receiving NTSC
signal.
2). If contrast, brightness, hue, colour, sharpness
be adjusted, the picture mode will return to
personal.
The fourth item of the MENU is FUNCTION MENU.
You can adjust settings below
1).SLEEP TIME:adjust this item,you can set the sleep
timer.
2).LANGUAGE:adjust teletext language.
3).RESETTING:Reset all the settings to default value.
2.SOUND MENU
FUNCTION
The second item of the MENU is SOUND MENU.
You can adjust sound here.
Press to move, press to adjust.
OFF
SLEEP TIMER
RESETTING
SOUND
BASS
50
TREBLE
50
BALANCE
SOUND MODE
50
STANDARD
5.CHANNEL MENU
The fifth item of the MENU is channel menu(only
use in TV source).You can complete channel search
and setting here.
Note:
1). If Bass, Treble are adjusted, the sound mode will
return to personal .
CHANNEL
COLOUR SYSTEM
AUTO
SOUND SYSTEM
DK
SKIP
OFF
AUTO SCAN
MANUAL SEARCH
FINE TUNING
CHANNEL EDIT
-10-
TV OPERATION
1).Colour system: adjust the colour system,
Auto is remmended.
2).Sound system:adjust the sound system.
Please select the right sound system for
your contry.
3).Skip:If select on,you can select the channel
only by dight button.
4).Auto scan:Serach all the channels automaticly.
5).Manual Search
Search the channels manually.
Channel: Select the channel of the manual search.
Search: Press
begin tosearch.
Store:Press
to store the channel
Delete the channel
Press 2 to select one channel.
Press 1 to delete or press 2 to
cancel.
001
002
003
004
005
006
007
008
009
010
011
012
013
0 14
015
016
017
018
019
020
021
022
023
024
025
026
027
028
029
1
CHANNEL
650.25MHz
55.25MHZ
SEARCH
STORE
6. PIP
The Sixth item of the MENU is PIP Menu, you can
select PIP or POP operation.
OK
6)Finetuning:finetuning the current program.
7).Channel edit:Press
to entre the channel edit
menu
.Rename the channel:
You can press
to select one channel and press
1 button to rename it.
Use
select character ,press 1 to store the
name or press 2 to cancel.
Use
select character positon.
PIP
MULTI WINDOW
OFF
SUB SOURCE
YPBPR
SIZE
LARGE
PIP POSITION
TOP L
BORDER COLOUR
BLUE
SOUND SOURCE
MAIN
SWAP
001
002
003
004
005
006
007
008
009
010
011
012
013
0 14
015
016
017
018
019
020
021
022
023
024
025
026
027
028
029
001
002
003
004
005
006
007
008
009
010
011
012
013
0 14 A
015
016
017
018
019
020
021
022
023
024
025
026
027
028
029
1)Multi window
Open the PIP/POP window
2).Sub source
Select the sub source
3).Size
Adjust the PIP window size
4).PIP Position
Adjust the position of the PIP window
5).Border colour
Adjust the border colour of the sub window
6).Sound source
Select the sound source.
7).Swap
Swap the main source and the sub source.
Change the sequence.
Press 3 to select onechannel position ,then
press
to select another channel,
when the 2 channels are hlighted,you can swap
them, press 1 to confirm or press 2
to cancel.
001
002
003
004
005
006
007
008
009
010
011
012
013
0 14 B
015
016
017
018
019
020
021
022
023
024
0 25A
026
027
028
029
001
002
003
004
005
006
007
008
009
010
011
012
013
0 14B
0 15A
016
017
018
019
020
021
022
023
024
025
026
027
028
029
-11-
TV OPERATION
Source
TV AV1 AV2 AV3 DVD SCART
YPBPR
HDMI1
HDMI2
PC
TV
AV1
AV2
AV3
DVD
SCART
YPBPR
HDMI1
HDMI2
PC
Note:
:The two sources cannot do PIP/POP
:The two sources can do PIP/POP.
The sources in the table are optional. If any of these sources are not available in your unit,
please ignore these sources.
2.GEOMETRY
1).H-Position: adjust the horizontal position of the
screen.
2).V-Position :adjust the vertical positon of the
screen.
3).Clock: finetune the screen width.
4).Phase: finetune the phase of the sreen,usually don
not adjust this item.
In PC mode,there are two items that are different
with other sources.
1. PC MENU
You can adjust picture here, such as contrast,
brightness.
Press
to move, press
to adjust.
PC
CONTRAST
50
BR IGHTNESS
50
GEOMETRY
H-POSITION
PICTURE MODE
V-POSITION
STANDARD
FULL
ASPECT
COLOUR TEMP
PC
COLOR TEMP.
USER
USER-R
50
USER-G
50
USER-B
50
-12-
0
CLOCK
100
PHASE
0
AUTO ADJUST
1).Colour temp: press
to entre the colour temp
MENU.To select the colour temp,that you like.
100
TV OPERATION
USB Function:(optional)
1.MP3 menu
) Select the mp3 item of the USB menu, and press
to entre the MP3 menu.
)Press
to entre folders or exit folder until Mp3
files are found.
)Press to play the MP3 file ,press “MENU” button
to exit.
Note :
When playing the mp3 music, press to move ,and
press to play, stop, pause, etc.
1.Entre the “USB” menu.
1)Press the “source” button to entre the source menu.
2)press to select the “USB”.
3)Press to entre the “USB”menu.
4)press
to select the JPEG menu or MP3 menu.
Mp3
MP3
110.MP3
VOLUME
25
EQ
1.JPEG menu
)Select the JPEG item of the USB menu, and press
to entre the JPEG menu.
)Press
to entre folder or exit folders until JPEG
files are found.
)Press
to display the JPEG files ,press “MENU”
button to exit .
JPEG
JPG
110.JPG1
FOLDERS
2009/03/10 08:53:00
Note:
1.Press to select previous picture or next
Picture, press to rotate the picture.
-13-
Trouble shooting
Trouble phenomenon
Picture
Audio
Snow
Ghost
Noise
Normal audio
Interfere
Normal Picture
No picture
Inspection
antenna position, direction
or connection
antenna position, direction
or connection
Noise
electronic equipment,car/
motorcycle,fluorescent light
Mute
Volume(inspect wether the
mute function on the remote
control are started , or audio
system are correct or not)
Mute
Power cord is not inserted
Power switch is not opened
Contrast and brightness/volume
setup
Press standby key on the remote
control for inspecting
No color
Normal audio
color control
Scramble
Normal audio
or weak
retune channel
No color
Noise
Audio system
Special Explanation The accessories such as remote control is not belongs
to the guarantee
-14-