1
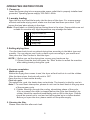
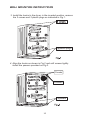
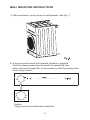
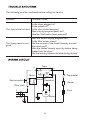
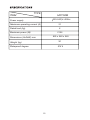
Start
1 Read all instructions before using this dryer.
2 The interior of the dryer should be cleaned periodically by qualified service
personnel. An excessive amount of lint build up in the interior of the dryer could
result in inefficient drying and pose a possible fire hazard.
3 The appliance must not be installed behind a lockable door, a sliding door or a door with
a hinge on the opposite side to that of the tumble dryer in such a way that a full opening
of the tumble dryer is restricted.
4 Attention - rear panel can be hot.
5 The tumble dryer should not be used if industrial chemicals have been used to
clean the dryer.
6 The dryer must only be used for its intended purpose.
7 Clean lint screen before or after each load.
8 This appliance is not intended for use by people (including children) with reduced
physical, sensory or mental capabilities, or lack of experience and knowledge,
unless they have been given supervision or instruction concerning use of the
appliance by a person responsible for their safety. Young children should be
supervised to ensure that they do not play with the appliance.
9 Do not operate the dryer if any parts are missing or broken.
10 To avoid fire hazard or electrical shock do not use an adaptor plug or extension
cord or remove grounding prong from electrical power cord. Failure to follow this
warning can cause serious injury, fire or death.
11 To avoid fire hazard or electrical shock do not reach into the drum while the drum is
moving. Wait until the dryer has stopped completely before reaching into the drum.
12 Do not attempt to modify or repair the controls.
13 The final part of a tumble dryer cycle occurs without heat (cool down cycle) to cool
items to a temperature that ensures that they will not be damaged. Never stop a
tumble dryer before the end of the drying cycle unless all items are quickly removed
and spread out so that the heat is dissipated.
14 Do not dry items that have been previously cleaned in, washed in, soaked in, or
spotted with substances such as cooking oil, acetone, alcohol, petrol, kerosene, spot
removers, turpentine,waxes and wax removers, etc. Do not store or use these items
on or in the vicinity of the dryer. Do not place items exposed to cooking oils in your
dryer. Items contaminated with cooking oils may contribute to a chemical reaction that
could cause a load to catch fire. Oil-affected items can ignite spontaneously, especially
when exposed to heat sources such as in a tumble dryer. The items become warm,
causing an oxidation reaction in the oil. Oxidation creates heat. If the heat cannot
escape, the items can become hot enough to catch fire. Piling, stacking or storing
oil-affected items can prevent heat from escaping and create a fire hazard. If it is
unavoidable that fabrics that contain vegetable or cooking oil or have been
contaminated by hair care products be placed in a tumble dryer they should first be
washed in hot water with extra detergent - this will reduce, but not eliminate, the
hazard.
1
15 Do not dry unwashed items in the tumble dryer.
16 Fabric softeners, or similar products, should be used as specified by the fabric
softener instructions.
17 To prevent fire, do not use heat to dry items containing plastic, foam rubber or
similarly textured rubber-like materials, or items containing feathers or down. Items
such as foam rubber (latex foam), shower caps, waterproof textiles, rubber backed
articles and clothes or pillows fitted with foam rubber pads should not be dried in the
tumble dryer.
18 This dryer must be properly installed in accordance with the installation instructions
before it is used.
19 Do not install or store this dryer where it will be exposed to water and /or the weather.
Keep surrounding areas free from the accumulation of lint, dust and dirt.
20 To prevent shock hazard and assure stability during operation, the dryer must be
installed and electrically grounded by a qualified service person in accordance with
local codes.
21 Do not sit on top of the dryer.
22 If the power cord is damaged, it must be replaced by the manufacturer, its service
agent or similarly qualified persons in order to avoid a hazard.
23 Always disconnect dryer from electrical supply before attempting any service.
Disconnect power cord by grasping the plug, not the cord.
24 Do not repair or replace any part of the dryer or attempt any servicing unless
specifically recommended in the user-maintenance instructions.
25 Before the dryer is removed from service or discarded, remove the dryer door to
prevent accidental entrapment.
26 Remove all objects from pockets such as lighters and matches
Caution, risk of fire - this is a safety symbol. Failure to follow the warnings
outlined in these user instructions can cause a fire hazard.
4
9
RACK FITTING INSTRUCTION . . . . . . . . . . . . . . . . . . . . . . . . .12
14
WIRING CIRCUIT. . . . . . . . . . . . . . . . . . .. . . . . . . . . . . . . . . . . 14
15
PROGRAM DESCRIPTIONS . . . . . . . . . . . . . . . . . . . . . . . . . . 15
2
Start
Program selector
Control panel
Start button
Adjustable outlet
grill and lint filter
Door
Power supply cord
Back plate
Air intake grill
Model number
and Serial number
Read all instructions before using this dryer.
This dryer has been designed for domestic use only.
SAVE THESE INSTRUCTIONS.
This diagram may be slightly different from the layout of the dryer you
have just purchased due to technical imprivements.
3
Attention:
1.Before operation, clean off any dust and dirt inside the drum of the dryer with a damp
towel
2.Clean off any debris on the lint filter and in the duct to increase the drying efficiency.
Turning on power
Before turning on the power off the dryer check whether the supply voltage is in
accordance with the value indicated on the name plate.
Preparation of laundry load
- The dryer can only dry laundry which has been spun dry. Do not put in laundry which
is still dripping wet or has excess water.
- Make sure all pockets are empty before placing laundry in the dryer. Remove all lighters
and matches.
- Pull up zippers, mend loosened fasteners and tie up ribbons to prevent the
laundry from being entangled. If necessary, put small items in a laundry bag.
- To achieve a better drying result ensure the clothes are separated before loading into the
dryer.
Load to dry
Laundry type
Maximum load
Cotton fabric
6 kg
Warning:
1. Avoid drying wool, silk and other
delicate fabrics, they maybe
damaged.
2. Do not exceed the recommended
load limit. This could damage the
dryer as well as the laundry.
4
Synthetic fabric
3 kg
OPERATING INSTRUCTIONS
1. Power up
Insert the power plug into an appropriate power outlet that is properly installed and
grounded. Operating power supply: 220-240V~50Hz.
2. Laundry loading
Open the door and load the laundry into the drum of the dryer. For a more energy
efficient and better drying result, make sure the load has been spun dried. Try to
loosen the load when placing in the dryer.
Note: Check labels on clothing before placing them in the dryer. Some articles are not
suitable for machine dry. High temperature may damage the fabric.
May be tumble dry .
Do not tumble dry .
Normal dry .
Air dry, only .
3.Setting drying time
Turn the timer knob to set an optimal drying time according to the fabric type and
quantity. You can choose cool cycle or warm cycle according to your needs and
then press the “Start” button to start the dryer.
NOTE: 1. Before you set the drying time, ensure your hands are dry.
2. Please close the door and press the “Start” button to restart the machine
after adding laundry during the cycle.
4. Program completion
Warm air cycle:
Before the drying time comes to end, the dryer will add cold air to cool the clothes.
After the timer stops, the knob will point to OFF.
Open the door to remove the laundry.
Cool air cycle:
Throughout the cycle, the heater does not activate. The laundry is dried by cool air.
Note: 1.To avoid timer interruption, please do not turn the timer knob to the gray area
of the program cycle.
2. Clothes should go through the cooling down/airing phase of the cycle.
If for any reason the dryer is stopped before the cycle has fininshed, dry
clothes should be removed immediately and not left in the dryer. Clothes
should be spread out to cool and not left bunched eg.in a clothes basket.
Before you open the door, please switch off the power supply.
5. Cleaning the filter
Please clean the filter after each load.
5
Start
Please do not turn the
timer knob to this gray
area of the program
cycle.
Dryer timer: The timer will let you set the timer for up to 200 minutes to dry
your clothes depending on the load of the clothes.
This dryer has two program types. The light blue colour is the cool air cycle and
the dark blue is the warm air cycle. During the cool air cycle the heater does not
come on and the clothes are dried by cool air. During the warm air cycle the
heater activates and the clothes are dried by warm air. In the last 20 minutes of
the warm cycle, the heater stops and the laundry is cooled down.
There is an arrow on the timer knob. Turn the timer knob till the arrow points to
the time selected. Push the "Start" button. The dryer starts the cycle and counts
down, moving anti-clockwise, until the timer points to the "OFF" position.
6
WARNING! Unplug the power cord prior to any cleaning
Cleaning the surface
Wipe off any dust or dirt.
Note: Do not use excessive water,a damp cloth is fine.
Do not use solvent.
Do not use spray cleaners when cleaning the interior.
Do not use harsh or abrasive cleaners.
Cleaning the filter screen
To ensure good ventilation effect during drying, the filter screen must be cleaned before
or after each use.
1. Remove the filter
Gently push together the clip on the filter screen
and then pull out towards yourself.
2.Cleaning the filter
Remove the lint with a soft brush or vacuum
cleaner. Be careful not to damage the filters.
Remove any remaining lint from the lint screen
on the door.
3. Re-installing the filter
After cleaning filters, put the screen back in place.
Note: Never operate your dryer without the lint filter.
7
UNPACKING YOUR DRYER
Dimensions
a=825 mm
b=595 mm
c=560 mm
Weight=30 kg
Remove the transport packaging (fig.1) and remove the dryer rack
from the top packaging (fig.2). Remove the tape on the front (fig.3
and fig.4), the wall mounting kit attached to the drum with tape on
the inside and the panel film, before starting the dryer.
fig.1
fig.2
fig.3
fig.4
Packing accessories
Check list of the accessories and materials provided with the machine:
Name
Quantity
Owner’s manual Wall mounting kit
1
1
Panel film
1
Screw
6
To ensure the dryer operates normally, attention must be paid to the
following:
1. The rear of the dryer must not have any restriction to the intake of
fresh air.
2.Check the dryer for any damage. If any damage is found do not operate
and contact your supplier or Authorised Service Sentre.
3.The dryer must be kept away from flammable substances.
4.The surrounding environment must be dry and ventilated.
5. For best results, the ambient temperature should be between 10
and 35 .
8
WALL MOUNTING INSTRUCTIONS
The dryer can be mounted on the wall in the inverted position only by
following these instructions.
Invert the dryer so that the control panel is at the bottom (see figure 3)
this allows easier access to the controls.
1. Determine the location of the dryer on the wall and mark the
bracket position.
A minimum 50 mm is needed between the top of the dryer and
the celling for ease of installation;
If mounting above a washing machine, allow sufficient room to
open the lid of the washer.
Tools required
For plaster/
Wooden wall
Drill&3mm Bit
Philips head screwdriver
1
1
Wall mounting kit includes
Description
Plastic Spacers
Wall hanging brackets
Hanging hook
Wood screws, 12gx50mm
Screws for hanging hooks
and plastic spacers.
2
2
2
4
6
2. Fix the wall hanging brackets to the wall securely (eg. into the stud).
If the studs are too far apart, fit a timber slat to the studs then mount the
brackets onto the slat. The distance between each is 553 mm as per
diagram.
553 mm
Wood screw
9
WALL MOUNTING INSTRUCTIONS
3. Install the hooks to the dryer, in the inverted position, remove
the 2 screws and 2 plastic plugs as indicated in Fig.1 .
plastic plugs
4. Align the hooks as shown in Fig.2 and refit screws tightly.
Install the spacers provided as Fig.2.
2 hooks
3 screws
2 spacers
10
WALL MOUNTING INSTRUCTIONS
5. With assistance, mount dryer on wall brackets. See Fig. 3
6. A second control panel with inverted symbols is supplied.
Peel the release paper from the back of inverted film then
place new control panel film on the surface so that the writing is the
correct way around.
start
Caution:
Plug must be accessble after installation.
11
RACK FITTING INSTRUCTION
DRYER FREE STANDING-UPRIGHT
For ease of access, the rack is to be mounted near the dryer top. Firstly,hold the rack
horizontally with the two end projections pointing upwards and away from yourself.
Position the rack near the top of the dryer
and place the end of the right rack projection
into the right cabinet mounting hole (Fig.1).
Then gently pull on the left rack projection until
it fits around the cabinet and springs into the
left cabinet mounting hole.
The rack will now lie horizontally, supported
by the cabinet. Rotate the door outlet grills
that the air exausts upwards and through the
rack.
RACK STORAGE - DRYER UPRIGHT
When the drying rack is not needed, simply pivot the rack upwards untill it lies flat on the top
of your dryer.
WALL MOUNTED - DRYER INVERTED
In this situation, the rack is to be mounted near the dryer door part way along the cabinet.
Firstly hold the rack horizontally with the
two end projections pointing upwards and
away from yourself.
Position the rack in front of the dryer and
place the end of the right rack projection
into the right cabinet mounting hole ( Fig.2).
Then gently pull on the left rack projection
until it fits around the cabinet and springs
into the left cabinet mounting hole.
The rack will now lie horizontally, supported
by the cabinet.
Rotate the door outlet grill so that the air exhaust blows upwards and through the rack.
12
RACK FITTING INSTRUCTION
RACK STORAGE - DRYER INVERTED.
To hold the dryer rack out of the way
when not in use, it will be necessary to
attach the retaining clip to the base of
your dryer.
To do this, firstly remove the screw located
4 cm from the right corner of the inverted
dryer ( Fig.3).
Then position the retaining clip over the hole
so that the prong on the clip is near the
cabinet corner and faces outwards (Fig.4).
LOADING DRYER RACK
To make use of the drying rack, firstly rotate
the outlet grill so that the louvers point towards
the rack.
Place items to be dried at the centre of the rack
for best airflow.
Shoes should be placed upside down.
A large woollen article e.g. a cardigan, should
be placed over the whole rack, and to ensure
more even drying will need rearranging from
time to time.
Caution:
1.The maximum weight placed on the dryer rack should not exceed 1 kg.
2.Make sure the clothes are suitable for the dryer.
3.As the exhause air temperature rises at the end of a normal drying cycle, it
is important that you regularly check items on the rack to make sure they
are not overheated.
13
The following must be confirmed before calling for service:
Problem
Possible Cause
The dryer does not start
Is the dryer plugged in?
Is the power on?
Is the door closed properly?
Has a drying program been set?
Has the Start button been pressed?
Was the correct drying program set?
Is the filter screen clean?
Did the amount of the loaded laundry exceed
the rated load?
Was the loaded laundry spun dry before being
loaded into the dryer?
Did the lanudry become twisted during drying?
The drying result is not
good
T2
Timer
T3
MS
1~
Relay
Startup switch
1
6
T4
T1
Capacitor
4
Thermostat
5
Heater
Door Lock
L
M
1
N
14
Fuse
Motor
ITEM
TYPE
HDY60M
220-240)V~/50Hz
Power supply
Maximum operating current (A)
10
Rated load (kg)
6
2100
Maximum power (W)
825 x 560 x 595
Dimensions (HxDxW) mm
Weight (kg)
30
Waterproof degree
IPX 4
15