1
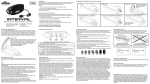
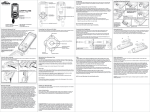
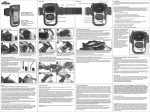
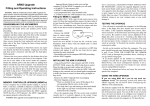
!WARNING!
H2O Audio stands behind our products.
Failure to follow our instructions could destroy
your iPod and will void the Warranty. If you
have any concerns, or experience any
difficulties with your H2O Audio product, we
are here to help you, so please contact us
directly. We can be reached at:
1.800.708.6080
[email protected]
www.h2oaudio.com
How to install / replace the T-Seal
Removable
T-Seal Instructions
1. Unlatch and open case.
2. Starting at any corner, gently remove the
T-seal. (Do not stretch or pull on T-Seal)
The most important feature of your H2O
Audio Waterproof Housing is the removable
T-Seal.
The removable T-Seal is the main barrier
between the harmful water and your iPod.
It is extremely important that special
attention is paid to ensure the T-Seal is
seating completely in all four corners and
the Housings Contact Surface. If the T-Seal is
dirty, out of alignment, twisted or pinched in
any way it will compromise the integrity of
the housing and should not be used.
H2O Audio has provided an extra T-Seal
(included) in the event of annually
replacement, accidental damage, loss,
overexposure to direct sunlight, or if the
T-Seal has become misshaped though
misuse.
3. To install a new or clean T-Seal, start at
any corner, push the T-Seal into the corner
and run your finger along the T-Seal
pushing it into the Housing Contact
Surface.
4. Ensure the T-Seal is seated properly in
all four corners and the Housing Contact
Surface.
How to install / replace the T-Seal
Cleaning & Storing the T-Seal
5. Gently close lid and lock latch. The lid
should close without any resistance. If
you experience any resistance when
closing the housing please call customer
service immediately at 1.800.708.6080
x213 before using your housing.
It is extremely important that you
keep the T-Seal clean & free of
sand, dirt, hair, lint, and other
debris.
To clean the T-Seal remove it from
the housing.
Correct
This T-seal is correctly seated in a closed
housing, sealing the housing and
protecting the iPod from water.
Wash T-Seal in warm fresh water,
ensuring all debris is cleaned from
the T-Seal.
*Strong detergents, soaps, and
chemicals MUST NEVER be used to
clean the Housing or the T-Seal.*
Allow T-Seal to air dry. Once dry
install back into the housing.
Please refer to the “How to install
/ replace your T-Seal” on how to
properly install the T-Seal.
6. Visually inspect the outside of the
housing and ensure the T-seal is installed
correctly. If the T-Seal is dirty, out of
alignment, twisted or pinched in any way
it will compromise the integrity of the
housing and should not be used.
Incorrect
The misaligned T-Seal becomes pinched
between the base and lid (as Shown)
creating an opening in the housing that
will cause the housing to flood.
For long term storage, store in a
plastic bag out of direct sunlight.
3. Introduction
2. Housing Features
H2O Audio for iPod
nano (2nd Gen)*
LatchTight TM Locking
System
The H2O Audio waterproof housing lets you to listen to digital audio during
active watersports. It houses the Apple iPod nano (2nd Gen) digital media
player.
Compatible with
2 nd Gen iPod nano
HOUSING: The housing features the LatchTightTM Locking System which
keeps the unit waterproof during operation. The H2O Audio housing allowsTM
for functional control of the player while in the water with the Commander
Scroll Wheel.
Lens Clear
Display Window
NOTE: The iPod is NOT waterproof without the H2O Audio housing and
headphones and is NOT covered under the product warranty. Any attempt
to use the housing with an audio player other than the Apple iPod nano
(2nd Gen) will void the Warranty.
®
Printed Instructions
h2oaudio.com
HEADPHONES: The housing is only waterproof when combined with H2O
Audio waterproof headphones (sold separately). Use of other headphones
with a 3.5mm stereo connector will result in a water resistant case, and should
not be submerged.
TM
Commander Scroll
Wheel Control
4. Leak Test
SealTightTM Connector
*If you have a 1st Gen iPod nano please check out the
H2O Audio for iPod nano (1 st Gen) S6-1A3
IMPORTANT: Make sure the seal is fully seated against the housing base each time you close the
housing. Use the lid to compress the seal into the base if required.
Before utilizing the system for the first time, it is highly recommended to
perform a 'Leak Test'. Follow the instructions below.
DO NOT INSTALL THE iPod nano (2nd Gen) INSIDE THE HOUSING FOR THE
LEAK TEST
1. Open the housing, and visually inspect the housing T-Seal.
2. Verify the T-Seal is fully seated and free of debris, then close and lock
the housing using the latch.
3. Immerse the housing, without the iPod, in water and soak for 30
minutes.
4. Manipulate the controls during submersion.
5. Remove from the water, dry the exterior, and visually inspect the
housing for any sign of leaks before opening.
6. Open the housing upside down to prevent water from dropping into
the housing during opening.
7. After a successful 'Leak Test', install the iPod in the housing.
Before using this system, please be sure to read, understand, and follow the instruction of this manual.
6. The T-Seal
5. Unlock / Locking the Housing
Unlocking your housing
Locking your housing
T-Seal
7. Installing the iPod into the Housing
The removable, white, T-Seal (retained in
the lid), between the base and the lid of
the housing is what keeps your iPod safe
and dry.
Installing the iPod
T-Seal
1
1. Slide latch button towards
the unlock
icon.
1
Contact Surfaces
1. Close the lid, and hook the
Water
iPod nano
buckle under the base.
Housing
IT IS EXTREMELY IMPORTANT YOU ENSURE THE T-SEAL IS PROPERLY
SEATED DURING EACH CLOSURE. If it is out of alignment, or twisted you
will cause damage to or destroy your iPod.
2
2. While holding the latch button
towards the unlock
icon,
push up on the side of the latch.
2
2. Pull the
latch towards the
housing and snap in place.
Prior to use, verify:
Do NOT use if:
1. T-Seal is aligned properly in the
1. T-Seal is twisted, or out of
Contact Surface of the lid prior
to closure.
alignment during closure.
2. T-Seal and contact surface have
3.
3
3. Verify the lid and latch are closed
3
3. Unhook the buckle from the
base.
and the button is positioned on
the icon prior to entering the
water.
2. T-Seal and Contact Surfaces
been cleaned as necessary using
a soft, lint-free cloth.
have any dirt, lint, hair, and/or
other debris.
T-Seal and Contact Surface are
free of scratches and other
imperfections.
3. You see scratches or imperfections
on the T-Seal or Contact Surfaces.
DO NOT USE SILICONE GREASE as this will damage the seal.
To ensure the T-Seal is fully seated in the base of the housing, firmly squeeze
both sides (the base and lid) of the housing together after each insertion of
the player. Always check to make sure the latch is closed and locked prior to
use.
If you have any questions or doubts, please contact H2O Audio Customer Support
1. Align the audio port with the
stereo jack in the housing.
IMPORTANT: Remove any skins or
covers from your iPod before installing
it into the housing.
2. Gently snap the player into the
audio jack. Verify the player is
completely plugged into the
audio jack.
Compatible with 2nd Gen iPod nano
Removing the iPod
1. Slide the player off
of the stereo jack.
Now the player can
slide straight out of the
housing.
NOTE: Do not disturb the T-Seal during removal of the player. If the T-Seal is moved, Please use the
housing lid to completely seat the T-Seal.
S9 - 70 20061013
TM
8. Connecting the Headphones
10. General Storage Procedures
9. Commander Scroll Wheel Control
TM
The SealTight Connector is what keeps your audio connection safe and
dry underwater. It is designed specifically to create a seal around the
H2O Audio Series Waterproof Headphones (sold separately). Using any
other headphones will not have a complete waterproof connection, and
reduces the waterproof rating to water-resistant.
TM
The Commander Scroll Wheel Control is a waterproof assembly, which
allows you to maintain complete control over the iPod’s Click wheel
functions. Refer to iPod Instruction Manual for complete details of how
to use the player.
Menu Button
For long-term storage, store in a plastic bag out of direct sunlight.
CAUTION: The life of a T-Seal is typically one (1) year. Contact H2O Audio
for spare T-Seals or a maintenance kit. Always remember to reinstall the
T-Seal before next use. Do not expose the housing to extreme heat, such
as the inside of a hot car, or in hot direct sunlight, such as on a beach, or
boat deck. Doing so may cause damage and subsequent flooding.
CAUTION: The housing is succeptible to internal condensation with
extreme temperature fluctuations. Use above 105°F(40C) can result in
internal condensation. When used in temperatures below freezing, frost
will appear on the interior of the housing.
1. To create a waterproof connection, align the 3.5mm stereo plug on the
Next / FastForward Button
headphones with the stereo jack of the housing.
Select Button
Scroll Wheel rotates
Clockwise &
Counter- Clockwise
2. Insert the headphones into the stereo jack of the housing, ensuring
TM
that the plug mates securely into the SealTight Connector.
TM
CAUTION: The SV Series Headphones do not fit with the SealTight Connector boot
featured on the H2O Audio Series housings. If your headphones have a connector
that looks like the one shown below, you can not use them with this housing.
Play / Pause Button
Previous / Rewind
Button
13. General Use Notice
READ THIS MANUAL CAREFULLY. IF YOU HAVE ANY QUESTIONS PLEASE CONTACT H2O
AUDIO CUSTOMER SUPPORT PRIOR TO USE.
IMPROPER USE OF THIS SYSTEM MAY CAUSE THE USER TO MAKE MISTAKES OR
DECISIONS THAT MAY LEAD TO SERIOUS INJURY OR DEATH.
H2O Audio Waterproof Headphones (required for use underwater)
IMPORTANT WARNING AND DISCLOSURE:
THOSE USERS THAT ELECT TO UTILIZE THIS SYSTEM AT, OR NEAR, THE WATER'S
SURFACE, MUST MAINTAIN SAFETY AWARENESS OF MOVING WATER CRAFTS.
Pro Armband for extreme sports
ALWAYS MAKE SURE TO HAVE THE AUDIO PLAYER VOLUME TURNED TO ZERO AND
THE SPEAKERS AWAY FROM THE EARS WHEN TURNING ON THE H2O AUDIO UNIT. IF
THE VOLUME LEVEL IS NOT ZERO WHEN THE H2O AUDIO IS TURNED ON, IT MAY
CAUSE EAR INJURY DUE TO A SUDDEN BURST OF VOLUME. THE VOLUME SHOULD BE
SLOWLY INCREASED WITH AN AUDIO FILE PLAYING TO SET THE SPEAKER VOLUME TO
COMFORTABLE OUTPUT LEVELS PRIOR TO POSITIONING THE SPEAKERS NEXT TO THE
EARS.
Swimbelt designed by swimmers
IT CAN BE POTENTIALLY DANGEROUS TO PLAY YOUR HEADSETS WHILE ENGAGING IN
ACTIVITIES THAT REQUIRE YOUR FULL ATTENTION. YOU SHOULD EXERCISE EXTREME
CAUTION OR DISCONTINUE USE IN POTENTIALLY HAZARDOUS SITUATIONS. DO NOT
USE THE HEADPHONES WHILE DRIVING, CYCLING, OR OPERATING ANY MOTORIZED
VEHICLE. IT MAY CREATE A TRAFFIC HAZARD AND IS ILLEGAL IN SOME AREAS.
12. Contact Us
Customer Support is available Monday to Friday 9AM to 5PM PST.
www.h2oaudio.com
P. 800.708.6080 or 858.623.0339
F. 858.225.0815
E. [email protected]
Copyright Notice:
This owner’s manual is copyrighted, all rights reserved. It may not, in whole or in part, be copied,
photocopied, reproduced, translated, or formed into any electronic format without prior consent in
writing. H2O Audio is a registered trademark of Diver Entertainment Systems, Inc. Apple and iPod
are registered trademarks of Apple Computer Inc.
Patents 6396769, 6614722, 6954405 Others Pending.
Storing the housing in these conditions may lead to a damaged housing,
causing it to leak.
Rinse the EXTERIOR of the system in fresh water after EACH use:
1. Make sure the housing is securely closed with headphones attached.
2. Soak in clean fresh water for 30 minutes.
3. Rinse the entire system with freshwater
4. Completely dry the entire exterior of the system using a clean soft
cloth.
5. Dry face down so water can properly drain from the Commander TM
Scroll Wheel.
Strong detergents, soaps, and chemicals MUST NEVER be used to clean
the system.
SV Series Headphones Connector
11. Available Accessories
CAUTION: Do not store housing in the following environments:
* Solvents or other chemical fumes
* High humidity
* High Ozone
* Extreme temperature fluctuations
AVOID USING HEADPHONES AT HIGH VOLUME. HEARING EXPERTS ADVISE AGAINST
CONTINUOUSLY LOUD AND EXTENDED PLAY. IF YOU EXPERIENCE RINGING IN YOUR
EARS, REDUCE VOLUME OR DISCONTINUE USE.
THE MANUFACTURER DOES NOT WARRANT AND WILL NOT BE HELD RESPONSIBLE IN
ANY WAY FOR DAMAGES TO THE iPod, OR LOSS OF DATA, INCLUDING LOSS OF DATA
STORED IN THE iPod, RESULTING FROM AN EXCESSIVE IMPACT, THUNDER, OR AN
EORED ON YOUR DEVICE.
14. Warranty Coverage
H2O Audio guarantees, to the original purchaser only, that the equipment purchased
(EXCLUDING THE iPod ) is free of defects in material and/or under normal recreational use
for a period of one year (1) from date of consumer purchase from an Authorized Dealer;
provided that proper care and maintenance have been performed as prescribed by the
owner's guide included with the equipment. Should this product prove to be defective for
any reason (other than those listed as limitations below) the product will be serviced or
replaced at H2O Audio's sole discretion at no charge (excluding shipping and handling).
This warranty shall be void if the registration is not completed and sent to H2O Audio
Customer Services within 30 days of purchase. This warranty shall be void if the
equipment has been tampered with by anyone not authorized to perform service. The
warranty is non-transferable and extends to the original purchaser only and is valid only if
the equipment was purchased from an authorized dealer. Warranty does not extend to
cover damage from accident, abuse, tampering, lack of maintenance, theft, or loss. Service
or modifications by anyone other than an Authorized H2O Audio agent will void the
warranty. H2O Audio will not be responsible for recovery or replacement of the product in
the event of loss or theft. H2O Audio, its Authorized International Distributors, and
Authorized Dealers make no other warranties, either express or implied or orally, or in
writing, with respect to any other warranty coverage except those expressly stated within
the preceding sentences. H2O Audio will not be held responsible for any agreements orally
or in writing with the exception of those expressly included in this warranty statement. The
warranty registration card and the terms contained herein supersede all statements
contained in any and all owner's guides, instruction cards, or other equipment literature or
catalogs. In no event will H2O Audio, its Authorized International Distributors, and
Authorized Dealers be held responsible or liable for any personal injuries resulting from the
use of the covered equipment, or for any other damages, whether direct, indirect,
incidental, or consequential; even if H2O Audio has been advised of such damages.
Warranty does not extend to any damages that may occur to the iPod or loss of any data.
15. Returns
Prior to any return, a Return Authorization (RA) number must be obtained. To receive an
RA number, go online to www.h2oaudio.com/returns.php and follow the simple
instructions on how to return a product. Proof of purchase from an Authorized Dealer
will be required. A copy of the original sales receipt and a copy of the owner's portion of
the warranty card must accompany all correspondence regarding the equipment covered
by this warranty agreement or in direct reference to this warranty.
S6 - 70 20061013
S9
20060531