1
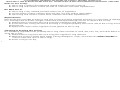
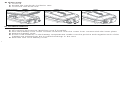
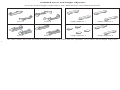
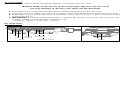
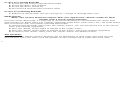
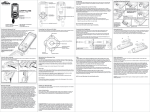
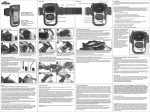
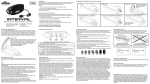
w w w . H 2 O A u d i o . c o m
Deep Dive Waterproof Case & Speakers
Depth Rating 300ft/90m
For updated manuals please visit our web site www.h2oaudio.com
iDV1-75 20080819
O-ring
Mask Clip
Speaker
Lanyard Hole
®
iPod Control Buttons
Insert Holes &
Height Adjuster Holes
LED lights
Battery Cover
Cam Knob
Depth Rating 300ft / 90m
Connector Cable
Cam Knob Lock
1
2
Quickstart:
Instructions:
I. Read “Getting Familiar with the iDive 300”
I. Getting Familiar with the iDive300
Before using the iDive300 for the first time, it is highly recommended that you become familiar with
opening and closing the case to ensure the case is sealed properly during use. To verify that you have
sealed the case properly we recommend that you test the product without an iPod inside before initial use.
Please follow the instructions below:
II. Unlock and open case
III. Install batteries (3 AA)
IV. Install iPod specific inserts and height adjusters (see page 10 for fit chart)
V. Install iPod
VI. Turn on iPod
VII. Close and lock Case
VIII. Press and hold the power button on the iDive300 case
(Green LED should light on back of case)
3
1. Read the iDive300 instruction manual to familiarize yourself with the product.
2. Unlock and open the case (see page 6) and verify the blue O-ring is clean and free of debris.
3. Close and lock the case (see page 7).
4. Immerse the case (without an iPod inside) in water and soak for 30 min.
5. Manipulate the iDive300 controls during submersion.
6. Remove from the water and dry the exterior. Visually inspect the case for any sign of leaks before
opening.
Call H2O Customer Service if you have any questions or concerns.
II. The O-ring
The removable, blue O-ring retained in the lid of the iDive300 is what keeps your iPod safe and dry.
The supplied silicone grease helps ensure the O-ring will not twist or become dislodged when closing or
opening the case. Lubricating the O-ring does not improve the seal and only a small amount of silicone
grease is necessary to lubricate the O-ring. Use only the silicone grease provided to lubricate the O-ring.
4
IT IS EXTREMELY IMPORTANT YOU ENSURE THE O-RING IS PROPERLY SEATED IN ITS
TRACK AND IS FREE OF DEBRIS BEFORE EACH USE. FAILURE TO DO SO MAY CAUSE DAMAGE TO OR DESTROY YOUR IPOD.
Prior to use verify:
1. The O-ring is lightly lubricated and seated within the track in the lid.
2. The O-ring and contact surface are free of scratches and other imperfections.
Do NOT use if:
1. The O-ring is dry, cracked, twisted, and/or out of alignment.
2. O-ring and/or contact surfaces have any dirt, lint, hair, and/or other debris.
3. The O-ring and contact surface have scratches and other imperfections.
Replacement
H2O Audio has provided an extra O-ring. The O-ring should be replaced annually or in the event of damage,
loss, overexposure to direct sunlight, or become misshaped through misuse. To replace the O-ring:
1. Remove the O-ring from the case using the supplied O-ring remover.
2. Install the new O-ring into the lid ensuring it is aligned properly. The round side of the O-ring should
be facing out.
3. Apply a thin layer of the supplied silicone grease to the O-ring.
4. Install O-ring into the lid ensuring it is aligned properly with the round side of the O-ring facing out.
5. Apply a thin layer of the supplied silicone grease to the O-ring.
For long term storage of the O-ring, store in a plastic bag out of direct sunlight.
III. Opening & Closing the Case
To Open Case
Ensure the exterior of the case and the immediately surrounding area is dry before opening the case. The
internal components of the iDive300 are not waterproof
1. Open the cam knob lock
2. Rotate the cam knob counter-clockwise 180°
3. Open Lid
(Please note: The lid may be difficult to open due to a vacuum created in the case during air travel or shipment).
Cleaning & Storing the O-ring
It is extremely important that you keep the O-ring clean and free of sand, dirt, hair, lint, and other debris. To
clean the O-ring:
1. Remove the O-ring from the case using the supplied O-ring remover.
2. Wash the O-ring in warm fresh water (strong detergents, soaps, and chemicals MUST NEVER be
used to clean the case or the O-ring).
3. Allow O-ring to air dry.
5
6
To Close Case
1. Close lid
2. Rotate the cam knob clockwise 180°
3. Close the cam knob lock
IV. Install batteries
1. Open case.
2. Disconnect and remove iPod from case if installed.
3. Turn the battery cover screw counter-clockwise until the screw loses contact with the insert plate.
4. Remove battery cover.
5. Install 3 AA batteries in the battery compartment. Make sure the positive and negative ends of the
battery are oriented per the inscribed markings in the case.
6. Reinstall and close battery cover.
7
V. Install iPod specific inserts and height adjusters
The inserts and height adjusters are used to securely hold your iPod in the correct location inside the case.
Consult the following chart to determine which inserts and height adjusters should be used with your iPod
model.
Please note some iPod models will not require height adjusters.
iPod Model
Upper Insert Letter
Lower Insert Letter
iPod touch
iPhone*
iPhone 3G*
iPod 5th Gen (30Gb)
iPod 5th Gen (60/80Gb)
iPod classic (80Gb)
iPod classic (160Gb)
iPod nano 1st Gen
iPod nano 2nd Gen
iPod nano 3rd gen
A
A
A
B
B
B
B
C
C
D
B
A
A
B
B
B
B
C
C
D
Height Adjuster
Number
1
N/A
N/A
2
N/A
4
3
N/A
N/A
N/A
* The iDive300 is not certified to work with the iPhone or iPhone 3G and will cause
interference with phone capabilities.
8
Included insert and height adjusters
Insert and height adjuster reference
A
1
Inserts and height adjusters are labeled to aid identification.
B
2
A
1
B
iPod touch
B
4
B
Insert B
Height Adjuster 1
3
B
Height Adjuster 4
iPod nano 1st Gen
iPod classic (160 Gb)
C
D
D
C
C
Height Adjuster 3
B
iPod classic (80 Gb)
C
Insert D
4
B
3
Height Adjuster 2
iPod 5th Gen (60/80 Gb)
Insert C
B
iPod 5th Gen (30 Gb)
iPhone & iPhone 3G
B
Insert A
2
A
iPod nano 2nd Gen
iPod nano 3rd Gen
As new iPods become available please check our web site for updates on Inserts and height adjusters.
9
10
Power On/Off
Press and hold the power button for 2 seconds to turn the iDive300 on/off.
VI. Insert iPod
1. Ensure the correct inserts and height adjusters are installed for your iPod
(PLEASE NOTE: If the correct insert and height adjusters are not used
you may damage or destroy your iPod and the iDive300)
2. Place iPod in the inserts with the iPod dock connector facing toward the cam knob.
3. Insert the connector cable into the dock connector of the iPod with the H2O Audio logo facing up.
4. Depending on your iPod model, press and hold the “Play / Pause” button or press the Power button
to turn the iPod on.
5. IMPORTANT: For touch-screen iPod models, to prevent the display screen from locking, access the
General Settings to turn the Auto-Lock feature off.
- Settings - General - Auto-Lock - “Never”
Red LED indicates a failed connection of the iPod.
When the Red LED is illuminated, controls will be limited to adjusting the volume of the built-in
amplifier.
In case of a Blue LED
Restart the iDive300 by turning the power off then on. If this does not solve the problem:
1. Turn off the iDive300.
2. Disconnect the connector cable from the iPod.
3. Ensure the iPod is on.
4. Reconnect the connector cable to the iPod.
5. Turn on the iDive300.
Previous/Fast-forward
Up
Volume Play/Pause
Down
Controls
Next/Fast-forward
Select
11
iPod Authentication
Green LED indicates successful connection of the iPod.
Blue LED indicates that the authentication timed out.
When the Blue LED is illuminated there is some limited function of the iPod controls.
VII. Operation
Menu
After turning the iDive300 on, all 3 LEDs on the back of the case should illuminate within a few seconds.
If connected successfully only the Green LED should remain lit.
Mode
Power
12
In case of a Steady Red LED
1. Ensure you are using a supported iPod model.
2. Ensure the iPod is fully charged.
3. Ensure the iPod is turned on.
4. Disconnect & reconnect the connector cable.
In case of a Flashing Red LED
1. Batteries of the iDive300 case are running low – change or recharge them soon.
For Mask Strap Mounting:
To Remove Mask Clip:
Feed mask strap
through the slits in
each slot of the clip.
Mode Button
Note: The current firmware release does not support the “Photo” mode on iPod
models with a touch-screen interface
For touch-screen iPod models it’s necessary to use the mode button to cycle between the various iPod
menus/modes (i.e. Photo menu (not currently supported), Video menu, Audio menu, etc.). The mode button
does not function with scroll-wheel controlled iPod models.
1. Starting from the Audio menu, press the “Mode” button - this will transfer the user to the “Photo”
menu (not currently supported).
2. Press the “Mode” button again to transfer to the “Video” menu.
3. Press the “Mode” button again to transfer to the “Photo” menu (not currently supported).
4. To return to the “Audio” menu, press the “Mode” button one additional time.
VIII. Speakers
iDive300 speakers feature specially designed clips for attachment to mask straps. The mask clips are
removable for users who wish to put the speakers inside a diving hood or under their mask strap.
13
IX. General Storage Procedures
For long-term storage, store in a cool dry place out of direct sunlight.
CAUTION: The life of a O-ring is typically one (1) year. Contact H2O Audio for spare O-rings and silicone
grease. Always remember to reinstall the O-ring before next use. Do not expose the case to extreme heat,
such as the inside of a hot car, or in direct sunlight, such as on a beach, or boat deck. Doing so may cause
damage and subsequent flooding.
CAUTION: The case is susceptible to internal condensation with extreme temperature fluctuations. Use
above 105°F (40C) can result in internal condensation. When used in temperatures below freezing, frost
will appear on the interior of the case.
14
CAUTION: Do not store case in the following environments:
* Solvents or other chemical fumes
* High humidity
* High Ozone
* Extreme temperature fluctuations
Storing the case in these conditions may lead to a damaged case, causing it to leak.
Rinse the EXTERIOR of the system in fresh water after EACH use:
1. Make sure the case is securely closed.
2. Soak in clean fresh water for 30 minutes.
3. Rinse the entire system with freshwater.
4. Completely dry the entire exterior of the system using a clean soft cloth.
5. Let air dry.
Strong detergents, soaps, and chemicals MUST NEVER be used to clean the system.
X. Contact Us
Customer Support is available Monday to Friday 9AM -5PM PT.
web: www.h2oaudio.com
Phone: 1.800.708.6080 or 858.623.0339
Fax: 858.225.0815
Email: [email protected]
15
XI. FCC Certification:
This device complies with part 15 of the FCC rules. Operation is subject to the following two conditions: (1)
This device may not cause harmful interference and (2) This device must accept any interference, received,
including interference that may cause undesired operation.
Note: This equipment has been tested and found to comply with the limits for a Class B digital service,
pursuant to part 15 of the FCC Rules. These limits are designed to provide reasonable protection against
harmful interference in a residential installation. This equipment generates, uses, and can radiate radio
frequency energy and, if not installed and used in accordance with the instructions, may cause harmful
interference to radio communications. However there is no guarantee that interference will not occur in a
particular installation. If this equipment does cause harmful interference to radio or television reception,
which can be determined by turning the equipment off an on, the user is encouraged to try to correct the
interference by one or more of the following measures:
- Reorient or relocate the receiving antenna
- Increase the separation between the equipment and receiver
- Connect the equipment into an outlet on a circuit different from that to which the receiver is
connected
- Consult the dealer or an experienced radio/TV technical for help.
Note: The manufacturer is not responsible for any radio or TV interference caused by unauthorized
modifications to this equipment. Such modifications could void the user’s authority to operate the equipment.
XII. General Use Notice
Read this manual carefully. If you have any questions please contact H2O Audio customer support prior to
use.
16
Improper use of this system may cause the user to make mistakes or decisions that may lead to serious
injury or death.
Important warning and disclosure:
Any individual intending to utilize this product during S.C.U.B.A diving activities must be properly trained
and certified by an accredited agency. Further, it is recommended that all divers stay within recreational
dive limits and follow all safety stop considerations.
Those users that elect to utilize this system at, or near the water’s surface, must maintain safety awareness
of moving watercrafts.
Important warning and disclosure:
It can be potentially dangerous to play your speakers while engaging in activities that require your full
attention. You should exercise extreme caution or discontinue use in potentially hazardous situations.
Do not use the speakers while driving, cycling, or operating any motorized vehicle. It may create a traffic
hazard and is illegal in some areas.
Avoid using speakers at high volume. Hearing experts advise against continuously loud and extended play.
If you experience ringing in your ears, reduce volume or discontinue use.
XIII. Warranty Coverage
1 Year Limited Warranty
been neglected, altered, abused, used for a purpose other than the one for which they were manufactured,
repaired by customer or any party without H2O Audio’s written authorization, or used in any manner
inconsistent with H2O Audio’s instructions. Please refer to the care and maintenance instructions for more
details. Product Manuals are available for download on the H2O Audio website as well as packaged with
the product.
Warranty claims involving personal property damage will be put through a series of tests to determine if
the product has been misused or improperly cared for. Should a product be determined by H2O Audio to
have manufacturing or material defects which resulted in damage to personal property, H2O Audio, at its’
sole discretion, will make reparation to the customer in the form of a repair or replacement of equal value.
No compensation for loss of data, ect.
Products must be purchased from an Authorized Dealer. The product warranty program will not be valid
for product purchased through an unauthorized source. For a directory of H2O Audio Authorized Dealers,
please visit the store locator section on the company website. If you have questions as to whether or not a
dealer is authorized, please call Customer Support.
This warranty applies to customers who properly fill out and complete the warranty registration with proof
of purchase within 30 days of purchase. Failure to complete the registration will void the warranty. H2O
Audio will, at its sole discretion and without charging the customer, repair or replace any components that
fail in normal use.
The warranty is valid only for the original owner who purchases the unit from an authorized dealer.
(Transfers are not qualified for warranty).
H2O Audio’s 1 year limited warranty covers defects in materials and/or workmanship of all H2O Audio
product 1 year from date of original purchase. This warranty does not apply to any products which have
17
18
To Obtain Service:
Please go to support section of our website or contact customer support at
Customer Support Hours and Contact Information:
Monday through Friday 9AM to 5PM PT
Tel: 858.623.0339
Toll Free: 800-708-6080
[email protected]
PLEASE NOTE: No service returns will be accepted without a pre-return authorization RA#, which must be clearly marked on the outside of the package. The
product will be returned COD if submitted without an RA#. Upon receipt, your return will be carefully inspected and assessed for damage and warranty coverage,
if applicable. The system may be pressure tested to verify the integrity of the product prior to any service. All warranty costs will be covered according to the terms
and conditions provided, including return shipment to you when the unit is still in the warranty period. Shipping & handling charge will apply for service repairs
made beyond the 1 year warranty period. For any non-warranty service, you will be advised as to repair costs prior to any work being done.
XVI. Returns
Prior to any return, a Return Authorization (RA) number must be obtained. To receive an RA number, go
online to www.h2oaudio.com/returns.php and follow the simple instructions on how to return a product.
Proof of purchase from an Authorized Dealer will be required. A copy of the original sales receipt and
a copy of the owner’s portion of the warranty card must accompany all correspondence regarding the
equipment covered by this warranty agreement or in direct reference to this warranty.
FAQ’s:
Q: Will this product work with the original iPhone or 3G iPhone?
A: Yes, however, the user will experience interference with phone functions.
Q: Why does the volume turn low when I install my iPod?
A: The iDive300 has an internal amplifier to reproduce audio down to depths of 300 feet. The
water pressure at this depth requires a powerful amplifier to drive the sound through the
headphones. At full depth, the force of the sound waves is mitigated by the water pressure. At
lesser depths or on the surface, this loud volume can damage your hearing. As a safety precaution,
the iPod volume is set to ¼ as soon as an iPod is connected.
Q: Why is there a “Mode” button?
A: Newer iPod models, with a touch-screen interface, need a special command sequence to
transfer between Audio, Photo (not currently supported), and Video modes. The “Mode” button
provides 1-touch access to the music and video capabilities of your iPod.
Note: The current firmware release does not support the “Photo” mode on iPod
models with a touch-screen interface. For more information please visit www.h2oaudio.com.
19
20
Q: Why is the Red LED flashing?
A: The iDive300 is designed to measure battery-life of the 3-AA batteries that are used to power
the “Made for iPod” connection electronics and the power amplifier. The Red LED will start to flash
when the batteries have approximately 25% charge remaining. Note, the battery indicator of the
iPod does not reflect the power remaining in the 3-AA batteries.
Notes:
- “Made for iPod” means that an electronic accessory has been designed to connect specifically to
iPod and has been certified by the developer to meet Apple performance standards.
- Apple is not responsible for the operation of this device or its compliance with safety and
regulatory standards.
21
22
w w w . H 2 O A u d i o . c o m
11010 Roselle St. Suite 150, San Diego CA, 92121 Phone: 1.800.708.6080 or 858.623.0339 Email: [email protected]
Copyright Notice: This owner’s manual is copyrighted, all rights reserved. It may not, in whole or in part, be copied, photocopied, reproduced, translated, or formed into
any electronic format without prior consent in writing. H2O Audio is a registered trademark of H2O Audio, Inc. Apple and iPod are registered trademarks of Apple Inc.
Patents 6396769, 6614722, 6954405, 7263032 Others Pending.