1
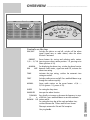
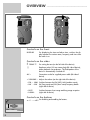
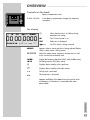
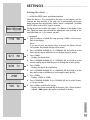
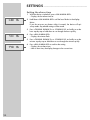
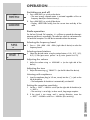
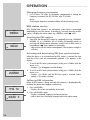
PORTABLE RADIO
Music Boy 71
___________________________________________________________________
DEUTSCH
ENGLISH
FRANÇAIS
ITALIANO
PORTUGUÊS
ESPAÑOL
NEDERLANDS
POLSKI
DANSK
SVENSKA
SUOMI
TÜRKÇE
2
3
4
7
Sicherheit/Informationen
Auf einen Blick
Stromversorgung
8
11
160
Einstellungen
Betrieb
Informationen
16
17
20
Safety/Information
Overview
Power supply
22
25
160
Settings
Operation
Informations
30
31
34
Sécurité/Informations
Vue d’ensemble
Alimentation électrique
35
38
160
Réglages
Fonctionnement
Informations
43
44
47
Sicurezza/informazioni
In breve
Alimentazione elettrica
48
51
160
Impostazioni
Funzionamento
Informazioni
56
57
60
Segurança/Informações
Vista geral
Alimentação de corrente
61
64
160
Regulações
Funcionamento
Informação
69
70
73
Seguridad/Información
Vista general
Alimentación de corriente
74
77
160
Ajustes
Funcionamiento
Información
82
83
86
Veiligheid/informatie
In een oogopslag
Stroomtoevoer
87
90
160
Instellingen
Gebruik
Informatie
95
96
99
Bezpieczeństwo/informacje
Przegląd funkcji
Zasilanie
100
103
160
Programowanie
Obsługa
Informacje
108
109
112
Sikkerhed, informationer
Kort oversigt
Strømforsyning
113
116
160
Indstillinger
Funktion
Informationer
121
122
125
Säkerhet/information
En överblick
Strömförsörjning
126
129
160
Inställningar
Användning
Information
134
135
138
Turvallisuus/tietoja
Yleiskatsaus
Virransyöttö
139
142
160
Säädöt
Käyttö
Tietoja
147
148
151
Güvenlik/Bilgiler
Genel Bakış
Güç Kaynağı
152
155
160
Ayarlar
Çalıştırma
Bilgiler
ENGLISH
SAFETY, INFORMATION _____________________
Safety
To ensure that this device provides you with long-term satisfaction and
enjoyment, please observe the following instructions.
This device is designed for the playback of audio signals. Any other use is
expressly prohibited.
DISPLAY
VICE
! SER
!
Protect the device from moisture (water drops or splashes). Do not place any
vessels such as vases on the device. These may be knocked over and spill
fluid on the electrical components, thus presenting a safety risk. Do not
place any objects such as burning candles on the device.
When deciding where to place the device, please note that furniture surfaces are covered by various types of varnish and plastic, most of which
contain chemical additives. These additives can corrode the device supports, leaving residues on the furniture surfaces which can be difficult or
impossible to remove.
Do not use any cleaning agent, as this may damage the casing. Clean the
device with a clean, moist leather cloth.
Never open the device casing. Warranty claims are excluded for damage
resulting from improper handling.
The type plate is located on the bottom of the device.
If malfunctions occur due to brief mains overloads or static electricity charges, reset the device. To do this, pull out the power plug and connect it
again after a few seconds.
Information
This device is noise-suppressed according to the applicable EU directives.
This product fulfils the European directives 89/336/EEC, 73/23/EEC and
93/68/EEC.
This device conforms to the safety regulation DIN EN 60065 (VDE 0860)
and therefore the international safety regulation IEC 60065.
Technical data
Power supply:
230 V, 50/60 Hz
Max. power consumption:
Operation <6W, Stand-by <1W
Output:
DIN 45324, 10% THD 750 mW
Frequency band:
FM 87.5 ...108.0 MHz
MW 522 ... 1620 kHz
LW 144 ... 281 kHz
SW 5.95 ... 15.6 MHz (49 ... 19 m)
Dimensions and weight:
W x H x L 260 x 150 x 70 mm
Weight approx. 1.35 kg
Technical and design modifications reserved.
16
OVERVIEW
___________________________________________
DISPLAY
PRE
Boy 71
SE T
1/6
2/7
3/8
2/7
3/8
1/ 6
5/10
5
10
TEXT
TIME
ALARM
ON
4/9
4/9
SLEEP
MEMO
OFF
ON/OFF
SNOOZE
DOWN
UP
TUNING
Controls on the top
Switches the device on and off; switches off the alarm
signal (signal tone or radio station) when the alarm
function is activated.
ON/OFF
PRESET
Preset buttons for storing and selecting radio stations
1/6 ... 5/10 (pressing once selects station positions 1-5; pressing twice
selects positions 6-10).
ALARM
For displaying the alarm time; switches the alarm function
ON
OFF between radio station, signal tone and Off; activates the
alarm time setting.
TIME
Activates the time setting; switches the automatic time
setting on and off.
TEXT
Switches radio text on and off. Press and hold down to go
through the radio text quickly.
MEMO.
Stores radio stations on the preset buttons »1/6 ...
5/10« (presets 1-5, presets 6-10).
SLEEP
For setting the sleep timer.
SNOOZE
Interrupts the alarm function.
Press briefly to increase or decrease the frequency in steps
of 50 kHz.; press and hold down to start the automatic
UP station search.
For setting the time, day of the week and alarm time;
switches between the 12-hour and 24-hour format.
TUNING
Ľ
DOWN
Ń
Telescopic antenna for FM and SW reception.
Carrying handle.
ENGLISH
M usic
17
OVERVIEW
___________________________________________
TONE
VOLUME
• FM
• MW
• LW
• SW
• DIST.
• LOCAL
Controls on the front
For displaying the time and alarm time; switches the display between the station name, frequency and time while
the radio is on.
DISPLAY
Controls on the sides
ɦ
TONE
ɼ
For setting the tone (on the left side of the device).
0
Earphone socket (3.5 mm stereo plug) (left side of device);
Mono playback via earphones. The loudspeaker of the
device is automatically switched off.
AC ~
Connection socket for supplied power cable (left side of
device).
+ VOLUME – Adjusts the volume (on the right side of the device).
• FM • MW Switches between the FM (VHF), MW (medium wave),
• LW • SW LW (long wave) and SW (short wave) frequency bands
(right side of device).
• DIST.
• LOCAL
Switches between short-range and long-range reception
(right side of device).
Controls on the bottom
x
t t
••
18
For disabling and enabling the buttons.
OVERVIEW
___________________________________________
Controls on the back
Battery compartment cover.
9kHz
10kHz
9 kHz 10 kHz
In the battery compartment; changes the frequency
increments.
The display
PM
TEXT
f
t
O
1
.
00 . 00: 0000
Shows that the time is set; flashes during
automatic time setting.
PM
The 12-hour format is set.
TEXT
Radio text is displayed.
f
An RDS station is being received.
MEMORY
Appears when a station position is being selected; flashes
when a radio station is being saved.
00.00:0000
Shows the station name, frequency and position, as well
as the current time and alarm time.
FM MW
LW SW
Display the frequency band FM (VHF), MW (middle wave),
LW (long wave) or SW (short wave).
e
Displays alarm stand-by with signal tone.
ɷ
Displays alarm stand-by with radio station.
t
љ
1
FM MW LW SW e ɷ
w
MEMORY
The key lock is activated.
The sleep timer is activated.
Appears and flashes if the batteries are low (not for auxiliary batteries or if the device is connected to the mains
power cable).
ENGLISH
w
19
POWER SUPPLY ___________________________________
Mains operation
Note:
Check that the mains voltage on the type plate (on the bottom of the
device) corresponds to your local mains supply. If this is not the case,
contact your specialist dealer.
1
Insert the supplied power cable into the »AC ~« socket on the left of the
device.
2
Plug the mains cable into the socket (230 V~, 50/60 Hz).
Notes:
If there are batteries in the device, these are switched off automatically
during mains operation. The only way to disconnect the device from the
mains supply is to pull out the plug.
Battery operation
You can also operate the device using standard batteries (not supplied). In
this case, you must disconnect the mains power cable.
9kHz
1
Open the battery compartment by pressing the area marked with an
arrow on the drawing and lifting the cover.
2
Insert four batteries (Type IEC/4 x1.5V/AM 1/LR 20/D size) according
to the polarity marked on the battery compartment.
Notes:
Remove the batteries when they are flat or when you know that the
device will not be used for a long period of time. When the batteries
are low, a battery symbol appears and flashes in the display. This function does not work when the power cable is plugged into the device.
The manufacturer accepts no liability for damage resulting from leaking
batteries.
10kHz
Environmental note:
Batteries, including those which contain no heavy metal, may not be
disposed of with household waste. Please dispose of used batteries in
an environmentally sound manner. Find out about the legal regulations
which apply in your area.
f
1
ENERGY
Inserting back-up batteries
During mains operation, the back-up batteries ensure that stored settings
are not lost in the case of a power failure or when the device is briefly disconnected from the mains.
9kHz
20
1
Open the battery compartment by pressing the area marked with
arrows on the drawing and lifting the cover.
2
When inserting the batteries (micro type/2x1.5V/AM 4/LR 03/AAA
size) in the small compartment, observe the polarity marked on the
compartment base.
10kHz
Note:
If no main batteries are inserted and there is no mains power supply,
you have approximately 10 seconds to change the back-up batteries.
POWER SUPPLY ___________________________________
Additional information for units sold in the UK.
Units sold in the UK are suitable for operation from a 240V ac, 50Hz mains
supply.
The range of multi-system receivers is built to work in most European countries. However, the mains plug and socket system for the UK differs from
many European countries.
This appliance has been supplied with a fitted, non-removable, approved
converter plug for use in the UK. This converter plug is fitted with a 5A rated
fuse.
In case this appliance is supplied with a moulded 2-pin Euro plug only,
which is unsuitable for UK operation, this must be cut off and immediately
disposed of. An approved 13A, 3-pin UK plug should then be fitted by a
qualified electrician.
Note:
The severed Euro plug must be destroyed to avoid a possible shock
hazard should it be inserted into a socket elsewhere.
If a non-rewireable 3-pin plug or a rewireable 13A (BS1363) 3-pin plug is
used, it must be fitted with a 5A ASTA or BSI approved BS1362 fuse. If any
other type of plug is used it must be protected by a 5A fuse either in the
plug, or at the distribution board. If this type of plug becomes defective,
ensure that the fuse is removed before disposal, to eliminate potential shock
hazard.
If it is necessary to change the fuse in the non-rewireable plug, the correct
type and rating (5A ASTA or BSI approved BS1362) must be used and the
fuse cover must be refitted. If the fuse cover is lost or damaged, the lead and
plug must not be used until a replacement is obtained. Replacement fuse
covers should be obtained from your dealer.
Important:
The wires in the mains lead are colour coded in accordance with the following code:
BLUE – NEUTRAL
BROWN – LIVE
As the colours of the wires in the mains lead of your appliance may not correspond with the coloured marking identifying terminals in your plug, proceed as follows:
Replacement mains lead sets can be obtained from your local dealer, or by
contacting Grundig Consumer Relations (01788 570088)
Moulded 3-pin lead set, suitable for UK use:
Ref: Leadset UK
8290-991-224
Moulded 2-pin Euro lead set, not suitable for UK use:
Ref: Leadset Euro
8290-991-316
ENGLISH
Connect the BLUE coloured wire to plug terminal marked with the letter “N”
or coloured black.
Connect the BROWN coloured wire to the plug terminal marked with the letter “L” or coloured red.
In no circumstance must any of the wires be connected to the terminal marked with the letter “E”, earth symbol “z”, coloured green, or green & yellow.
21
SETTINGS ______________________________________________
Setting and storing radio stations ...
... with the automatic station search
SEARCHING F
w PM TEXT
f
MEMORY
e
ɷtљ
1
RDS FEATURE
When the device is first connected to the mains or the batteries are first
inserted, the device begins an automatic FM station search and stores the
first ten stations with strong signals on the preset buttons 1/6, 2/7, 3/8,
4/9, 5/10. In this process, preference is given to RDS stations. The following appears in the display: »SEARCHING FM PLEASE WAIT«. You can stop the
search by pressing »MEMO.«.
After the search is completed, a demo program with the various RDS functions starts in the display. This program can be interrupted by pressing any
key. The demo program can be re-started at any time by pressing and
holding down »DISPLAY« and can be ended by pressing any key.
However, you can also tune stations manually and store them on the preset
buttons.
... manual
w
f
FANTASY
1
Press »ON/OFF« to switch on the device.
– You will hear the radio station last selected.
2
Press »•FM •MW •LW •SW« (right side of device) to select the
wave band.
3
Keep pressing »TUNING DOWN Ľ« or »TUNING UP Ń« until you
reach the frequency you want.
– Display: the frequency changes in 50 kHz steps (FM), 9 kHz steps
(MW) 1 kHz steps (LW) or 5 kHz steps (SW);
w
FM
94.55
or
Press »TUNING DOWN Ľ« or »TUNING UP Ń« for approximately
one second.
– Display: the automatic search stops at the next station with a strong
signal.
w
FM
w
FM
w
f
MEMORY
100.60
f
MEMORY
100.60 4
f
ANTENNE
22
4
Press »MEM0.« to activate the memory function.
– Display: »MEMORY« flashes.
Note:
If you do not press any button within 8 seconds, the device will quit
memory mode without making any changes.
5
Press the desired preset button »1/6, 2/7, 3/8, 4/9, 5/10« once
(preset stations 1 to 5) or twice (preset stations 6-10).
– Display: e.g. »4«, »MEMORY« flashes.
6
Press »MEMO.« again to store the station.
– Display: the frequency, »4« and »MEMORY«, then the station name.
SETTINGS ______________________________________________
Setting the clock ...
... with the RDS time synchronisation
w PM TEXT
f
MEMORY
e
ɷtљ
1
RDS FEATURE
When the device is first connected to the mains or the batteries are first
inserted, the time and day of the week are set automatically during the
demo program after the automatic station search is completed – provided
an RDS station with an RDS signal is received.
During the wait for an RDS time signal, »w« flashes in the display. If the
time signal has been received and the appropriate time and day of the
week have been set, »w« remains constant.
... manual
14:43 MO
1
With the device switched off, keep pressing »TIME« until the hours
flash in the display.
Note:
If you do not press any button within 8 seconds, the device will quit
set-up mode. Any altered settings will be stored.
16:39 MO
24HR
Press »TUNING DOWN Ľ« or »TUNING UP Ń« briefly to set the
hours step-by-step or hold down to run through the hours quickly.
3
Press »TIME«.
– Display: the minutes flash.
4
Press »TUNING DOWN Ľ« or »TUNING UP Ń« briefly to set the
minutes step-by-step or hold down to run through the minutes quickly.
5
Press »TIME«.
– Display: the day of the week flashes.
6
Press »TUNING DOWN Ľ« or »TUNING UP Ń« briefly to set the
day step-by-step or hold down to run through the days quickly.
7
Press »TIME«.
– Display: »24HR« or »12HR«.
8
Press »TUNING DOWN
or 12-hour format.
9
Press »TIME« to confirm the setting.
– Display: the current time and day of the week. If the 12-hour format is
selected, »PM« appears during the second half of the day.
PM
4:39 TU
Ľ« or »TUNING UP Ń« to set the 24-hour
ENGLISH
16:43 MO
2
23
SETTINGS ______________________________________________
Setting the alarm time
6:30 AL
7:30 AL
7:40 AL
24
1
With the device switched off, press »ON ALARM OFF«.
– Display: the last alarm time set.
2
Hold down »ON ALARM OFF« until the hour flashes in the display.
Note:
If you do not press any button within 8 seconds, the device will quit
set-up mode. Any altered settings will be stored.
3
Press »TUNING DOWN Ľ« or »TUNING UP Ń« briefly to set the
hour step-by-step or hold down to run through the hours quickly.
4
Press »ON ALARM OFF«.
– Display: the minutes flash.
5
Press »TUNING DOWN Ľ« or »TUNING UP Ń« briefly to set the
minutes step-by-step or hold down to run through the minutes quickly.
6
Press »ON ALARM OFF« to confirm the setting.
– Display: the set alarm time.
– After a short time, the display changes to the current time.
OPERATION __________________________________________
Switching on and off
w
f
FANTASY
1
Press »ON/OFF« to switch on the device.
– The most recently selected station is activated regardless of the set
frequency band (Last Station Memory).
2
Press »ON/OFF« to switch off the device.
– Display: »GOOD BYE« briefly, then the current time and day of the
week.
GOOD BYE
Radio operation
For the best FM and SW reception, it is sufficient to extend the telescopic
antenna and direct it accordingly. The radio has a built-in rod antenna for
LW and MW reception. Turn the device around to direct the antenna.
Selecting the frequency band
5.955
1
SW
Press »• FM •MW •LW •SW« (right side of device) to select the
frequency band.
Selecting stored stations
FM
f
MEMORY
87.60 1
1
Select the desired station using the station buttons »1/6, 2/7, 3/8,
4/9, 5/10« (press once: presets 1 to 5), twice: (presets 6 to 10).
Adjusting the volume
1
Adjust the volume using »+ VOLUME –« (on the right side of the
device).
Adjusting the tone
1
ɦ
Adjust the tone using »
TONE
ɼ « (on the left side of the device).
Listening with earphones
1
Insert the earphone plug (ø 3.5 mm, stereo) into the »0« jack on the
left of the device.
– The loudspeaker of the device is automatically switched off.
Setting the reception sensitivity
1
Set the »• DIST. • LOCAL« switch (on the right side of the device) to
»• DIST.«.
– The sensitivity is set to high, in other words, long-range reception.
2
If the signal is too strong, and is causing distortion, move the
»• DIST. • LOCAL« switch to »• LOCAL« (low sensitivity).
ENGLISH
w
25
OPERATION __________________________________________
Changing frequency increments
1
Use »9 kHz 10 kHz« (in the battery compartment) to change the
frequency increments (FM 50/100 kHz, MW 9/10 kHz).
Note:
Switching the frequency increments deletes all stored settings (reset).
RDS station service
w
f
ENERGY
RDS (Radio Data System) is an information system which is transmitted
additionally by most FM stations. If the device is currently receiving an RDS
station, it displays the station name, e.g. »ENERGY«, and »f«.
Searching for RDS stations
1
w
FM
f
100.60
Search for the desired RDS station by repeatedly pressing »TUNING
DOWN Ľ« or »TUNING UP Ń« briefly (incremental search) or
pressing and holding down (automatic search) until an RDS station is
received and »f« appears in the display.
– After a short time the station name appears if the reception strength is
sufficient.
Activating and deactivating RDS time synchronisation
When the device is on activated and an RDS station is received, the time
and day of the week are automatically updated. »w« appears in the
display.
w
f
1
To switch off RDS time synchronisation, briefly press »TIME« while the
device is on.
– Display: »w« disappears from the display.
2
To switch on RDS time synchronisation, briefly press »TIME« while the
device is on.
– Display: »w« flashes until the RDS time signal is received. Subsequently, »w«remains constant.
VILRADIO
Calling up RDS information
When an RDS station is being received, the frequency is displayed briefly
and then the station name appears continuously.
w
w
FM
26
f
9:46 TU
f
106.90 9
1
Press »DISPLAY«.
– Display: the current time and day of the week.
2
Press »DISPLAY« again.
– Display: waveband, frequency and preset position.
– After a short time, the display changes back to the station name.
OPERATION __________________________________________
Radio text
Some RDS stations provide radio text as additional information. The radio
text appears as ticker text in the display.
TEXT
f
RADIO TEXT E
w
TEXT
1
To call up radio text, briefly press »TEXT«.
– The information appears after a short time.
2
For a fast run-through of the radio text, press and hold down »TEXT«.
Note:
If no radio text is provided by the current station, »NO TEXT« appears in
the display.
f
NO TEXT
3
Press »TEXT« briefly to quit radio text.
Alarm mode
Alarm with signal tone
9:46 TU
1
Press »ON/OFF« to switch off the device.
2
To set the alarm signal to signal tone (»e«), press »ON ALARM
OFF« until »e« appears in the display.
– After a short time, the display changes to the current time.
3
Briefly press »ON ALARM OFF« to check the alarm time.
– Display: the set alarm time and »e«.
– After a short time, the display changes to the current time.
– The alarm goes on with a signal tone at the set time.
e
6:00 AL
e
Alarm with radio station
21:55 WE
ɷ
1
Press »ON/OFF« to switch on the device.
2
Press »• FM •MW •LW •SW« (right side of device) to select the
frequency band.
3
Select the desired station using the station buttons »1/6, 2/7, 3/8,
4/9, 5/10« (press once: presets 1 to 5), twice: (presets 6 to 10).
4
Adjust the alarm volume using »– VOLUME +« (on the right of the
device).
5
Press »ON/OFF« to switch off the device.
6
Select the radio alarm (» «) by pressing »ON ALARM OFF« until
» « appears in the display.
– After a short time, the display changes to the current time.
ɷ
ɷ
ENGLISH
w
27
OPERATION __________________________________________
7
7:50 AL
ɷ
Briefly press »ON ALARM OFF« to check the alarm time.
– Display: the set alarm time and » «.
– After a short time, the display changes to the current time.
– The selected radio station switches on at the set alarm time.
ɷ
Briefly displaying the alarm time
1
With the device switched on, briefly press »ON ALARM OFF«.
– The display changes from the frequency or station name to the set
alarm time.
– Display: »e« or » «.
– After a short time, the display changes back to the frequency or station
name;
ɷ
6:30 AL
ɷ
or
With the device switched off, press »DISPLAY«.
– The display changes from the current time to the set alarm time.
– Display: »e« or » «.
– After a short time, the display switches back to the current time.
ɷ
Interrupting the alarm
w
f
1
ENERGY
ɷ
Press »SNOOZE« while the alarm is sounding.
– Display: »e« or » « flashes.
– The alarm (signal or radio) stops.
– The alarm goes on again at 5-minute intervals (the total alarm time is
90 minutes).
ɷ
Cancelling the alarm for the day
1
8:45 MO
ɷ
Press »ON/OFF« while the alarm is sounding.
– Display: the current time and »e« or » «.
– The alarm (signal tone or radio) stops, but the alarm function remains
activated for the next day at the set time.
ɷ
Deactivating/activating alarm stand-by
28
1
To deactivate alarm stand-by, press »ON ALARM OFF« until »e« or
» « no longer appear in the display.
– The set alarm time is saved.
2
To activate alarm stand-by, press »ON ALARM OFF« until »e« or
» « appear in the display.
ɷ
ɷ
OPERATION __________________________________________
Timer mode
The device possesses a sleep timer, which switches it off in radio mode at a
preset time. It is possible to set nine switch-off times between 90 and 10
minutes.
Switching on the sleep timer
w
f
1
Press »SLEEP« to switch on the device.
– Display: »
« and » SLEEP 90«.
– You will hear the radio station last selected.
2
To set the switch-off time (90, 80, 70, 60, 50, 40, 30, 20, 10), press
»SLEEP« as many times as necessary.
«, briefly, for example » SLEEP 30« , then the station
– Display: »
name or frequency.
SLEEP 90
љ
w
f
љ
љ
SLEEP 30
љ
Note:
Briefly press »SLEEP« to check the remaining switch-off time.
Switching off the sleep timer early
1
w
f
To switch off the sleep timer early, keep pressing »SLEEP« until
» SLEEP 00« briefly appears in the display.
– Display: »
« disappears from the display.
– The device switches off
љ
SLEEP 00
љ
or
press »SNOOZE«;
or
press »ON/OFF«.
General information
Disabling the buttons
f
FANTASY
t
1
2
x
tt
t
t tt
x
Use »
/
– Display: »
«.
« on the bottom of the device to disable the buttons.
Use »
/
– Display: »
« on the bottom of the device to enable the buttons.
« disappears from the display.
Deleting all settings
Interrupt the power supply for at least 2 minutes to reset the device to its
original state. All settings are lost when you do this.
1
Remove all the batteries – including the back-up batteries.
2
Pull out the power cable and wait for at least 2 minutes before plugging
it in again.
– The time, alarm time and radio settings are deleted.
ENGLISH
w
29
Grundig Multimedia B.V.
Atrium, Strawinskylaan 3105 • NL-1077 ZX Amsterdam • http://www.grundig.com
06/38