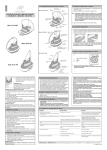
1
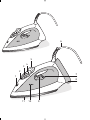
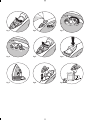
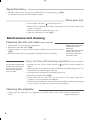
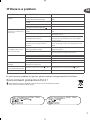
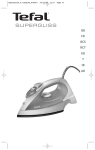
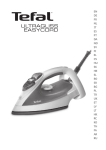
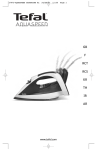
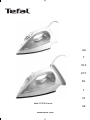
GB
F
RCS
RCT
KR
T
IR
Mod. FV21XX series
AR
www.tefal.com
6
5
4
3
2
7
1
8
11
10
9
fig.1
fig.2
fig.3
fig.4
fig.5
fig.6
fig.7
fig.8
fig.9
Description
1.
2.
3.
4.
5.
6.
Spray nozzle
Anti-calc valve
Steam control
Filling inlet
Spray button
Electric power cord
7.
Thermostat indicator light and
temperature setting indicator
8. Extra Stable Heel* (depending on
model)
9. Thermostat dial
10. Tank max indicator
11. Soleplate
*Your iron has been designed with an Extra Stable Heel (depending on model) for more safety.
For your safety
• This appliance complies with the technical rules and standards for safety currently in force (Electromagnetic
Compatibility, Low Voltage, Environnement).
• This appliance is not designed to be used by people (including children) with a physical, sensory or
mental impairment, or people without knowledge or experience, unless they are supervised or given prior
instructions concerning the use of the appliance by someone responsible for their safety. Children must
be supervised to ensure that they do not play with the appliance.
• Warning ! The voltage of your electrical installation must correspond to that of the iron (220V-240V or 127V
depending on model). Connecting to the wrong voltage may cause irreversible damage to the iron and will
invalidate the guarantee.
• This iron must always be plugged into an earthed socket. If using a mains extension lead, ensure that it is
correctly rated (10A or 13A, depending on model), with an earth connection.
• If the electrical cord becomes damaged, it must be immediately replaced by an Approved Service Centre to
avoid any danger.
• The appliance should not be used if it has fallen, if it has obvious damage, if it leaks or has functional
anomalies. Never dismantle your appliance: have it inspected by an Approved Service Centre, so as to avoid
any danger.
• Never immerse your iron in water !
• Do not unplug your appliance by pulling on the cord. Always unplug your appliance: before filling or rinsing the
reservoir, before cleaning it, after each use.
• Never leave the appliance unattended when it is connected to a power source; if it has not cooled down for
approximately 1 hour.
• Your appliance gives off steam, which may cause burns, especially when you are ironing on a corner of your
ironing board. Never direct the steam towards people or animals.
• Your iron should be used and placed on a stable surface. When you put your iron onto its iron rest, make sure
that the surface on which you put it is stable.
• This product has been designed solely for domestic use. Any inappropriate use or use contrary to the
instructions releases the brand from all responsibility and renders the guarantee invalid.
Before first use
• Before using your iron with the steam function for the first time, we
recommend that you operate it in a horizontal position for a few
moments, away from your linen.
• During the first few uses, a harmless odour and smoke may be given
off. This has no effect on the use of the iron and will disappear quickly.
4
Please read these
instructions carefully.
Remove any labels from
the soleplate before
heating up the iron.
If you have very hard
•
water, mix tap water with
commercially available
•
demineralised water in the
following ratio :
- 50% tap water,
- 50% demineralised water.
What water to use ? GB
Your appliance has been designed to function with untreated tap water.
However, Self-cleaning of the appliance should be carried out once a month.
Never use any of the types of water below that contain organic waste or
mineral elements and may cause spitting, brown staining or premature
ageing of your appliance: commercially available pure demineralised water,
water from tumble dryers, scented water, softened water, water from
refrigerators, water from batteries, water from air conditioners, distilled water,
rain water, boiled or filtered water, bottled water, etc.
Preparation
Filling the water tank
• Unplug your iron before filling it and set the steam control to
• Place the iron flat and fill it (fig.2) .
(fig.1).
Fill the tank up to the
“MAX”. Never fill your iron
directly under water tap.
Use
Adjust the temperature and the steam
It is normal for the
indicator light to switch on
and off during ironing.
In order to avoid water
dripping from the iron
onto the linen:
- turn off the steam when
ironing silk or synthetic
fabrics.
- set it at the minimum
position for wool.
If you turn down the
thermostat, wait until the
thermostat light comes
back on before beginning
to iron again. When
ironing fabrics with mixed
fibres, set the ironing
temperature for the most
delicate fibre. For delicate
fabrics we recommend
testing the fabric first on
an inconspicious place eg
(inside the hem).
If you want to dry iron,
set the Steam control to
• Select the temperature (see table below or iron’s heel) setting the thermostat
facing the indicator (fig.3).
• The thermostat light comes on (fig.4). It will go out when the soleplate is hot
enough.
• Set the steam control (fig.5) to the desired position, consulting the table
below.
FABRIC
LINEN
COTTON
WOOL
SILK
SYNTHETIC
(Polyester, Acetate, Acrylic,
Nylon)
DIAL
POSITION
THERMOSTAT
STEAM SETTING
POSITION
MAX
•••
••
•
= STEAM ZONE
• Your iron heats up quickly: so begin by ironing fabrics that are ironed at low
temperatures first, then go on to those requiring a higher temperature.
.
5
Spray Function
• Whether steam or dry ironing, you are able to use the Spray button
to dampen laundry to remove stubborn creases.
(fig.6)
Store your iron
• Set the steam control to and unplug the iron.
• Wait until the soleplate cools down and empty the tank. A little water may
remain in the tank.
• Wind the cord around the heel of the iron.
• Store the cold iron on its heel (fig.7).
Maintenance and cleaning
Cleaning the anti-calc valve (once a month)
• Unplug your iron and empty the water tank.
• Remove the anti-calc valve (fig.8).
• Soak the valve in a cup of white vinegar or plain lemon juice for 4 hours.
(fig.9).
• Rinse the valve under running water and replace the anti-calc valve.
Unplug your iron and let
it cool down before
cleaning it.
The iron will not function
without the anti-calc
valve. Never touch the
end of the valve !
Carry out the self-cleaning operation (once a month)
To slow down scaling and
prolong the useful life of
your iron, carry out the
self-cleaning operation
once a month.
• Unplug your iron, set the steam control to and fill the water reservoir to
MAX.
• Place your iron on its heel, set the thermostat button to MAX, plug in your iron
and wait for the indicator light to go out.
• Unplug the iron and place it horizontally over a sink.
• Remove the anticalc valve (fig.8).
• Gently shake the iron over the sink until some of the water (along with
impurities) runs out through the soleplate.
• At the end of the operation, put the anticalc valve back in place and then plug
in your iron for 2 minutes on its heel to dry the soleplate.
Cleaning the soleplate
• Unplug the iron, and when the soleplate is just warm, wipe it with a soft Never use abrasive or
aggressive products.
cloth.
6
If there is a problem
PROBLEM
GB
POSSIBLE CAUSE
SOLUTION
Water drips from the holes in the The chosen temperature is too low and does
soleplate.
not allow for the formation of steam.
You are using steam while the iron is not hot
enough.
There is too much steam.
You have stored the iron horizontally, without
emptying it and without setting it to .
You are using chemical descaling
Brown streaks come through
the holes in the soleplate and
agents.
stain the linen.
You are not using the right type of water.
Position the thermostat in the steam range (from •• to
MAX).
Wait until the thermostat light goes out.
Reduce the steam.
See the section "Store your iron".
Do not add any descaling agents to the water in the water
tank.
Perform a self-cleaning operation and consult the chapter
"What water to use ?".
Fabric fibres have accumulated in the holes of Perform the self-cleaning operation and clean the soleplate
the soleplate and are burning.
with a damp sponge. Vacuum the holes of the soleplate
from time to time.
Your linen has not been rinsed sufficiently or
Make sure that your laundry is rinsed sufficiently so as to
you have ironed a new garment before
remove any deposits of soap or chemical products on new
washing it.
clothes.
You are ironing with an inappropriate
setting (temperature too high).
You are using starch.
Clean the soleplate as indicated above. Select the
appropriate program.
Clean the soleplate as indicated above. Always spray starch
onto the reverse side of the fabric to be ironed.
There is little or no steam.
The water tank is empty.
The anti-calc valve is dirty.
Your iron has a build-up of scale.
Your iron has been used dry for too long.
Fill it.
Clean the anti-calc valve.
Clean the anti-calc valve and carry out a self-clean.
Carry out a self-clean.
The soleplate is scratched or
damaged.
You have placed your iron flat on a metallic
rest-plate or ironed over a zip.
Always set your iron on its heel.
Steam or water come from the
iron as you finish filling the tank.
The steam control is not set to the
Check that the steam control is set to the
The spray does not spray.
The water tank is not full enough.
The soleplate is dirty or brown
and can stain the linen.
position.
position.
Fill up the water tank.
If you have any problem or queries, please contact an Approved Service Center.
Environment protection first !
Your appliance contains valuable materials which can be recovered or recycled.
Leave it at a civic waste disposal centre.
SSEAC TEFAL
1460-1740
or
SSEAC TEFAL
127
1265
7
Description
1.
2.
3.
4.
5.
6.
Spray
Tige anti-calcaire
Commande vapeur
Orifice de remplissage
Touche Spray
Cordon d’alimentation
7.
8.
9.
10.
11.
Voyant et repère réglage du thermostat
Talon Extra Stable* (selon modèle)
Bouton du thermostat
Repère maxi du réservoir
Semelle
*Votre fer est conçu avec un talon Extra Stable (selon modèle) pour une plus grande sécurité.
Pour votre sécurité
• Pour votre sécurité, cet appareil est conforme aux normes et réglementations applicables (Directives Basse
Tension, Compatibilité Electromagnétique, Environnement …).
• Cet appareil n’est pas prévu pour être utilisé par des personnes (y compris les enfants) dont les capacités physiques, sensorielles ou mentales sont réduites, ou des personnes dénuées d’expérience ou de
connaissance, sauf si elles ont pu bénéficier, par l’intermédiaire d’une personne responsable de leur
sécurité, d’une surveillance ou d’instructions préalables concernant l’utilisation de l’appareil. Il convient
de surveiller les enfants pour s’assurer qu’ils ne jouent pas avec l’appareil.
• Attention! la tension de votre installation électrique doit correspondre à celle du fer (220-240V).
Toute erreur de branchement peut causer un dommage irréversible au fer et annule la garantie.
• Ce fer doit être obligatoirement branché sur une prise de courant avec terre. Si vous utilisez une rallonge, vérifiez qu’elle est de type bipolaire (10A) avec conducteur de terre.
• Si le câble d’alimentation est endommagé, il doit être immédiatement remplacé par un Centre Service Agréé,
afin d’éviter un danger.
• L’appareil ne doit pas être utilisé s’il a chuté, s’il présente des dommages apparents, s’il fuit ou présente des
anomalies de fonctionnement. Ne démontez jamais votre appareil : faites-le examiner dans un Centre Service
Agréé, afin d’éviter un danger.
• Ne plongez jamais le fer dans l’eau!
• Ne débranchez pas l’appareil en tirant sur le cordon. Débranchez toujours votre appareil : avant de le remplir
ou de rincer le réservoir, avant de le nettoyer, après chaque utilisation.
• Ne laissez jamais l’appareil sans surveillance lorsqu’il est raccordé à l’alimentation électrique ; tant qu’il n’a
pas refroidi environ 1 heure.
• La semelle du fer peut être très chaude : ne la touchez jamais et laissez toujours refroidir votre fer avant de le
ranger. Votre appareil émet de la vapeur qui peut occasionner des brûlures, spécialement lorsque vous
repassez sur un angle de votre table à repasser. Ne dirigez jamais la vapeur sur des personnes ou des animaux.
• Votre fer doit être utilisé et posé sur une surface stable. Lorsque vous posez votre fer sur son repose-fer,
assurez-vous que la surface sur laquelle vous le posez est stable.
• Ce produit a été conçu pour un usage domestique uniquement. Pour tout usage inapproprié ou contraire aux
instructions, la marque décline toute responsabilité et la garantie n’est plus valable.
Préparation
Avant la première utilisation
• Avant la première utilisation de votre fer en position vapeur, nous vous
recommandons de le faire fonctionner quelques instants en position horizontale
et en dehors de votre linge.
• Durant les premières utilisations, il peut se produire un dégagement de fumée
et une odeur sans nocivité. Ce phénomène sans conséquence sur l’utilisation
disparaîtra rapidement.
8
Lisez attentivement le
mode d’emploi.
Retirez les éventuelles
étiquettes de semelle
avant de faire chauffer le
fer.
Quelle eau utiliser ?
• Votre appareil a été conçu pour fonctionner avec l’eau du robinet. Il est nécessaire
Si votre eau est très
calcaire, mélangez l’eau
de procéder 1 fois par mois à l’auto-nettoyage de l’appareil.
du robinet avec de
• N’utilisez jamais les eaux ci-dessous qui contiennent des déchets organiques ou
l’eaudéminéralisée du
des éléments minéraux et peuvent provoquer des crachements, des coulures
commerce dans les probrunes ou un vieillissement prématuré de votre appareil : eau déminéralisée du
portions suivantes :
- 50% d’eau du robinet,
commerce pure, eau des sèche-linges, eau parfumée, eau adoucie, eau des
- 50% d’eau déminéralisée.
réfrgérateurs, eau des batteries, eau des climatiseurs, eau distillée, eau de pluie,
F
eau bouillie, filtrée, eau en bouteilles…
Remplissez le réservoir
• Débranchez votre fer avant de le remplir et placez la commande Vapeur sur
(fig.1).
• Posez le fer à plat et remplissez-le (fig.2) .
Ne dépassez pas le repère
MAX du réservoir. Ne
remplissez jamais votre fer
directement sous le
robinet.
Utilisation
Réglez la température et la vapeur
Il est normal que le voyant
s’allume et s’éteigne
pendant le repassage. Afin
de ne pas risquer de
goutter sur le linge :
- coupez la vapeur pour
repasser la soie ou les
synthétiques.
- réglez-la au niveau mini
pour la laine.
Si vous baissez le
thermostat, attendez que
le voyant se rallume avant
de repasser à nouveau. Si
vous repassez un tissu fait
de fibres mélangées :
réglez la température de
repassage sur la fibre la
plus fragile. Pour les
textiles délicats, nous vous
recommandons de tester
une zone cachée du
vêtement (ex : ourlet).
Si vous désirez repasser à
sec, placez la commande
Vapeur sur .
• Sélectionnez la température (voir tableau ci-dessous ou talon du fer) en positionnant
le thermostat en face du repère (ffig.3).
• Le voyant s’allume (ffig.4). Il s’éteindra quand la semelle sera suffisamment
chaude.
• Mettez la commande vapeur (ffig.5) sur la position souhaitée, en vous reportant au
tableau ci-dessous.
TISSUS
LIN
COTON
LAINE
SOIE
SYNTHÉTIQUES
(Polyester, Acétate, Acrylique,
Polyamide)
POSITION
BOUTON
THERMOSTAT
POSITION
COMMANDE
VAPEUR
MAX
•••
••
•
=ZONE VAPEUR
• Votre fer chauffe vite : commencez d’abord par les tissus qui se repassent à basse
température, puis terminez par ceux qui demandent une température plus élevée.
9
Humidifiez le linge
• Quand vous repassez à la vapeur ou à sec, appuyez plusieurs fois de suite sur la touche
Spray
pour humidifier le linge (ffig.6) et enlever les plis résistants.
Rangez votre fer
• Placez la commande vapeur sur et débranchez le fer.
• Attendez que la semelle refroidisse et videz le réservoir. Un peu d’eau peut rester
dans le réservoir.
• Enroulez le cordon autour du talon du fer.
• Rangez le fer froid sur son talon (ffig.7).
Entretien et nettoyage
Nettoyez la tige anti-calcaire (une fois par mois)
• Débranchez votre fer et videz le réservoir.
• Ôtez la tige anti-calcaire (ffig.8).
• Laissez tremper la tige pendant 4 heures dans un verre de vinaigre blanc ou
bien du jus de citron nature. (ffig.9).
• Rincez la tige sous l’eau du robinet puis remettez-la tige en place.
Débranchez et laissez
refroidir votre fer avant de
le nettoyer. Le fer ne
fonctionne pas sans la tige
anti-calcaire. Ne touchez
jamais l’extremité de la
tige !
Faites fonctionner l’auto-nettoyage (une fois par mois)
Pour retarder l’entartrage
et prolonger la durée de
vie de votre fer, faites un
auto-nettoyage une fois
par mois.
• Débranchez votre fer, placez la commande vapeur sur et remplissez le réservoir
d’eau jusqu’au niveau MAX.
• Posez votre fer sur son talon, placez le bouton du thermostat sur MAX, branchez
votre fer et attendez que le voyant s’éteigne.
• Débranchez le fer et placez-le au dessus d’un évier à l’horizontale.
• Ôtez la tige anti-calcaire (ffig. 8).
• Secouez légèrement le fer au-dessus de l’évier, jusqu’à ce qu’une partie de l’eau
(avec les impuretés) se soit écoulée par la semelle.
• A la fin de l’opération, remettez la tige anti-calcaire en position puis rebranchez
votre fer 2 minutes sur son talon pour sécher la semelle.
Nettoyez la semelle
• Débranchez le fer et lorsque la semelle est tiède, nettoyez-la en la frottant avec N’utilisez jamais de
produits agressifs ou
une éponge humide.
abrasifs.
10
Un problème avec votre fer
PROBLEMES
CAUSES POSSIBLES
SOLUTIONS
L’eau coule par les trous de la
semelle.
La température choisie ne permet pas de faire
de la vapeur.
Vous utilisez la vapeur alors que le fer n’est pas
assez chaud.
Vous utilisez la commande Superpressing trop
souvent.
Le débit vapeur est trop important.
Vous avez rangé le fer à plat, sans le vider et
sans placer la commande vapeur sur .
Vous utilisez des produits détartrants
chimiques.
Vous n’utilisez pas le bon type d’eau.
Placez le thermostat sur la zone vapeur (de •• à MAX).
Des coulures brunes sortent de
la semelle et tachent le linge.
Des fibres de linge se sont accumulées dans
les trous de la semelle et se carbonisent.
La semelle est sale ou brune et
peut tacher le linge.
Votre linge n’a pas été rincé suffisamment ou
vous avez repassé un nouveau vêtement
avant de le laver.
Vous utilisez une température trop élevée.
Vous utilisez de l’amidon.
Attendez quelques secondes entre chaque utilisation.
Réduisez le débit.
Consultez le chapitre "Rangez votre fer".
N’ajoutez aucun produit détartrant à l’eau du réservoir.
Faites un auto-nettoyage et consultez le chapitre "Quelle eau
utiliser ?".
Faites un auto-nettoyage et nettoyez la semelle avec une
éponge humide. Aspirez de temps en temps les trous de la
semelle.
Assurez vous que le linge est suffisamment rincé pour
supprimer les éventuels dépôts de savon ou produits
chimiques sur les nouveaux vêtements.
Nettoyez la semelle comme indiqué plus haut. Consultez le
tableau des températures pour régler le thermostat.
Nettoyez la semelle comme indiqué plus haut. Pulvérisez
l’amidon à l’envers de la face à repasser.
Votre fer produit peu ou pas de
vapeur.
Le réservoir est vide.
La tige anti-calcaire est sale.
Votre fer est entartré.
Votre fer a été utilisé trop longtemps à sec.
Remplissez-le.
Nettoyez la tige anti-calcaire.
Nettoyez la tige anti-calcaire et faites un auto-nettoyage.
Faites un auto-nettoyage.
La semelle est rayée ou abîmée.
Vous avez posé votre fer à plat sur un reposefer métallique.
Posez toujours votre fer sur son talon.
Le fer vaporise en fin de remplissage du réservoir
Le curseur de commande vapeur n’est pas
sur
Le réservoir n’est pas assez rempli.
Vérifiez que la commande vapeur est sur
Le spray ne pulvérise pas d’eau.
F
Attendez que le voyant s’éteigne.
.
Rajoutez de l’eau dans le réservoir.
Pour tout autre problème, adressez-vous à un Centre Service Agréé pour faire vérifier votre
fer.
Protection de l’environnement !
Votre appareil contient de nombreux matériaux valorisables ou recyclables.
Confiez celui-ci dans un point de collecte ou à défaut dans un centre service agréé pour que
son traitement soit effectué.
11