1
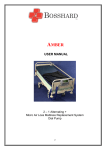
™
AltaDyne AutoFloat
Alternating Pressure Management Plus
Model # 753003
Model # 753004
OPERATORS MANUAL
Graham-Field Health Products
2935 Northeast Parkway
Atlanta, Georgia 30360
1-800-347-5678
Fax: 1-800-726-0601
www.grahamfield.com
753003-INS-LAB
P/N 12709-000 5/05
Lumex® AltaDyne AutoFloat
Warranty
Table Of Contents
1.0
Warranty························································································································· 2
2.0
Symbols ·························································································································· 3
3.0
Indications for Use········································································································ 3
4.0
Contraindication ··········································································································· 3
5.0
Safety Precautions ········································································································ 3
6.0
Description ···················································································································· 4
7.0
Features·························································································································· 4
8.0
Operator Control Panel ································································································ 5
9.0
Setting Up the System ·································································································· 6
10.0
Instructions for Use ······································································································ 6
11.0
Transferring Patients In and out of Bed ···································································· 7
12.0
CPR (Cardio Pulmonary Resuscitation)····································································· 8
13.0
System Cleaning, Care and Storage ············································································ 8
14.0
Troubleshooting············································································································ 9
15.0
Specifications, Control Unit························································································· 9
Before you begin…
Important
Before using the AutoFloat System, please read and understand this manual and all safety precautions prior
to each application.
Only qualified medical service personnel should attempt to repair this device. A Service Manual is available
for use by qualified personnel. For assistance contact your local dealer. If additional assistance is needed,
contact the Graham Field Health Products technical service department.
Domestic Customers:
Toll Free: 1-800-347-5678
Fax: 1-800-726-0601
1.0 Warranty
The Control Unit is warranted free of defects in material and workmanship for a period of two (2) years.
The Mattress is warranted free of defects in material and workmanship each for a period of one (1) year.
The Control Unit, and Mattress are warranted under the terms and conditions of the Graham Field Health Products
warranty in place at the time of purchase. A copy of the warranty is available upon request. Graham Field Health
Products disclaims all implied warranties including, but not limited to, the implied warranties of merchantability and
of fitness for a particular purpose.
Control Units may be returned to Graham Field Health Products for servicing. Contact Graham Field Health
ProductsCustomer Service for return authorization prior to return.
Please contact Graham Field Health Products Customer Service if you have warranty questions.
Toll Free: (800) 347-5678, (800) 726-0601
2
Lumex® AltaDyne AutoFloat
Indications for Use/Safety Precautions
2.0 Symbols
Attention, consult accompanying document
Dangerous voltage
Type BF equipment
Protective earth
3.0 Indications for Use
This device is intended to assist in treating and preventing pressure ulcers.
4.0 Contraindication
Air support treatment is not recommended when spinal stability is a concern.
5.0 Safety Precautions
Review the following SAFETY PRECAUTIONS prior to using the AltaDyne Auto Float™ System.
DANGER
Risk of electric shock. Refer servicing to qualified service personnel.
WARNING
• Disinfect the AltaDyne AutoFloat system between patient installations. Failure to disinfect may risk crosscontamination and infection.
• Check patient at least every 8 hours or once per shift, to assure proper system operation.
• Deflate mattress before performing CPR or CPR will be ineffective.
CAUTION
• Some medical conditions may not respond to treatment of this type. Patient’s skin condition should
be inspected regularly. Consult physician if any redness or skin breakdown occurs.
• For grounding reliability, plug only into a properly grounded outlet.
• Make certain all mattress straps are secured to the bed frame to prevent mattress from sliding
and causing patient injury.
• Lumex® mattresses are not intended to be AND DO NOT FUNCTION AS a patient fall safety device. SIDE RAILS
MUST BE USED WITH THE LUMEX® MATTRESS TO PREVENT FALLS, unless determined unnecessary based on
the facility protocol or the patient's medical needs as determined by the facility, IN WHICH CASE THE USE OF
OTHER SUITABLE PATIENT SAFETY MEASURES ARE RECOMMENDED.
• Use minimal layers of sheeting and incontinence pads. Too many layers between the patient’s skin
and the support surface will reduce the effectiveness of the system.
• Do not pull linens tightly over mattress. Tight sheets can cause “hammocking” and reduce effectiveness
of treatment.
• Medical Electrical Equipment requires special precautions regarding EMC and should be installed and put
into service according to the EMC information provided in the accompanying documents.
• Portable and RF communications equipment can affect medical electrical equipment.
• Do not use in the presence of smoking materials or open flame. Air flowing through the air mattress will
support combustion.
3
Lumex® AltaDyne AutoFloat
Description/Features
6.0 Description
The AltaDyne AutoFloat is a portable air flotation system with on-demand alternating low pressure treatment,
designed to provide benefit to patients suffering from, or at risk of, developing pressure ulcers. The system,
consisting of a Control Unit and Air Flotation Mattress with it’s Top Sheet, is designed to provide pressure
management and patient comfort.
The Control Unit inflates and maintains the Mattress to user-selected settings, and can also provide on demand
alternating low pressure treatment if desired. Featuring Active Sensor Technology, the system automatically adjusts
the Mattress to the optimal fill level ensuring complete flotation pressure management.
Mattress
The Mattress base consists of twenty transverse air cells constructed of a low shear nylon. Each of the individual
cells is a minimum of eight inches tall (inflated height) and spatially oriented above a two inch convoluted foam base.
The Active Sensor Mattress utilizes 4 specialized air cells in the center region of the Mattress which contain active
sensors for detecting patient flotation level.
Covering the entire Mattress assembly is a low-friction, low-shear producing, vapor permeable, nylon Top Sheet.
The Top Sheet surface creates a membrane impermeable to liquids, air and bacteria though still permeable to water
vapor. Quilted onto the base of the Mattress Top Sheet is a spun bonded polyester fiberfill that exhibits less frictional
resistance to nylon than that of the patient’s skin. When the patient moves, the Top Sheet tends to move relative to
the air cells rather than relative to the patient, minimizing shearing effects. Additionally, the quilting acts to provide
a diffusion layer by which the water vapor can be drawn away from the patient, resulting in more efficient
evaporation and subsequent reduced skin maceration.
7.0 Features
7.1 Control Unit
• Max inflate for easy patient transfer.
• Soft/firm comfort control adjustment for customized treatment.
• On-demand, alternating, low pressure management.
• Automatic patient flotation control via Active Sensor Technology™ to ensure optimal pressure management.
• CPR quick release providing for rapid deflation.
• Sleek and durable plastic housing is extremely compact and lightweight.
• Non-slip mounting brackets for secure placement on the foot board of bed.
• Illuminated LED control panel for easy viewing.
• Control panel Lockout Mode to prevent inadvertent patient setting changes.
• Alarm Silence feature to temporarily suspend audible alarm.
7.2 Active Sensor Air Flotation Mattress
• Horizontal, tubular cell construction for optimal comfort and pressure management.
• Individual air cells designed for maximum support and pressure distribution.
• High density foam base for additional protection.
• Low friction, low shear Top Sheet to aid in prevention of skin breakdown.
• Dimensions - base model 10" x 34" x 80" (25 cm x 86 cm x 203 cm) when fully inflated. Other sizes are available.
• The red air cells contain active sensors for automatic patient flotation control.
• Optional Footstop cell to minimize heel interface pressure while maintaining proximal positioning of feet.
• Removable cells for greater flexibility and easy maintenance.
4
Lumex® AltaDyne AutoFloat
Operator Control Panel
8.0 Operator Control Panel
4
6
Auto Float
APM Plus
5
3.2
3.4
7
3.3
9
8
3
3.1
1. ON/STANDBY switches Control Unit between On
and STANDBY modes.
10
2
1
4. SOFT (–) decreases the inflation level of the bed
while Control Unit is in manual mode only.
Pressing once will decrease the setting by one
comfort level. Pressing and holding will rapidly
change the setting.
2. POWER INDICATOR LED indicates AC power is
present to the Control Unit.
3. MODE SELECT Press repeatedly to toggle through
operating modes, Auto/Float, Auto/A/P,
Manual/Float and Manual/A/P.
5. COMFORT CONTROL INDICATOR displays
the current inflation level setpoint.
6. FIRM (+) increases inflation level of the bed while
in manual mode only. Pressing once will increase
the setting by one comfort level setting
(~2.5mmHg). Pressing and holding will rapidly
change the setting.
3.1 AUTO MODE (Sensor cord from mattress must
be connected to control unit) Mattress will
automatically inflate to optimal level based on
information received from active sensors in
mattress. The indicator adjacent to the icon,
will light while automatic mode is active.
Note: Connecting the mattress sensor cord while
the unit is not in automatic mode will cause the
Control Unit to enter automatic mode immediately.
If Sensor cord from mattress becomes
disconnected from control unit while in Auto
mode, alarm will sound.
7. MAX INFLATE selects/deselects the max inflate
mode (maximum mattress firmness). The indicator
adjacent to the button will flash while max inflate
mode is active. After 30 minutes, max inflate mode
will cancel.
3.2 MANUAL MODE Mattress inflation level user
determined by Comfort Adjust (-, +) setting.
The indicator adjacent to the icon will light
while manual mode is active.
8. LOCKOUT activates or cancels lockout mode.
Press and hold for three seconds to activate or
cancel mode. The indicator adjacent to the button
will light while lockout is active. In lockout mode,
only the MAX INFLATE button is operational.
All other buttons are temporarily inactive.
3.3 FLOAT MODE all cells within mattress will be
uniformly inflated when this icon is illuminated.
9. ALARM SILENCE silences indefinitely,
the audible alarm.
3.4 AP MODE. (Alternating Pressure) Adjacent cells
within mattress will be alternately inflated and
deflated in this mode. The indicator adjacent to the
icon will light while AP mode is active.
Note: AP mode is temporarily suspended in max
inflate mode.
10. POWER FAIL INDICATOR flashes when power
supplied from line cord is interrupted while the
Control Unit is operating. To avoid an inadvertent
power fail alarm, place the unit in STANDBY mode
before disconnecting power from Control Unit.
5
Lumex® AltaDyne AutoFloat
Setting Up the System/Instructions for Use
9.0 Setting Up the System Mattress
Mattress
1.
Place the mattress on the bed frame with the connecting hoses at the foot of the bed.
2.
Before securing the mattress straps, raise the head and foot ends of the bed frame. Raise the side rails.
Loosely, secure mattress to bed frame by looping the nylon straps on mattress through the bed frame and then
back through the D-rings on mattress. Make sure the side rails can still move up and down without interference.
3.
Lower frame to its horizontal position and tighten straps.
4.
Cover the mattress with the low-shear Top Sheet and attach to the mattress by looping the Velcro straps on the
Top Sheet through the D-rings on the mattress. Verify Top Sheet is loosely fit so as not to “hammock” patient
above mattress.
Control Unit / Linens / Patient
1.
Suspend Control Unit on footboard of bed using the mounting brackets on back of unit.
2.
Connect the dual quick-connect couplings of the mattress hoses to the mating connectors located on the side
of the Control Unit.
3.
Check that the hoses are secure by gently pulling. Ensure the hoses are not kinked or tucked under the mattress.
4.
If using an Active Sensor Mattress, connect the plug end of the mattress sensor cord into the jack on the side
of the Control Unit.
5.
Plug the AC power cord into properly grounded outlet. The Control Unit will enter STANDBY mode.
6.
Press the ON/STANDBY button on the lower right of the control panel. The mattress will begin to inflate.
This could take approximately 15 minutes for complete inflation.
7.
Apply hospital linens and/or incontinence pad over the top of the Mattress. Linens should be loose
to prevent “hammocking”.
8.
Place patient on Mattress and position along center of bed. Raise the bed side rails.
10.0 Instructions for Use
10.1 Use with Active Sensor Mattress
Automatic Mode - Float
1. Automatic mode of operation is engaged automatically at the press of the ON button (when the Mattress sensor
cord is plugged into the Control Unit). The indicator adjacent to the AUTO icon will light indicating the automatic
mode is active.
2.
To select Float, press the Mode Select button until the indicators adjacent to the Float and Auto icons are
illuminated.
3.
The automatic mode requires no user input to determine the appropriate inflation level for the patient.
The active sensors in the mattress located under the patient's pelvic region, in conjunction with the Control Unit,
automatically determine the optimal inflation level for the patient to ensure complete flotation.
Theory
While in Automatic Float mode, the Control Unit continually repeats a deflation/inflation cycle. The inflation level of
the mattress is lowered until the lowest allowable flotation height is sensed (via feedback from the active sensors in
the mattress). It is then slowly increased until the appropriate patient flotation height is sensed. This is approximately
four fingers width under the patient's pelvic region but will vary with patient weight and build.
6
Lumex® AltaDyne AutoFloat
Instructions for Use/Transferring Patients
If the patient sinks into the mattress for any reason, (such as elevation of the head section or other part of the bed)
the Control Unit will automatically increase the inflation level until the appropriate flotation height is again realized.
Disconnecting the mattress sensor cord from the Control Unit while in automatic mode will cause an audible alarm to
sound and indicators adjacent to the ALARM SILENCE and AUTO icons to flash. This alarm can be indefinitely silenced
by pressing the ALARM SILENCE button. Reconnect the mattress sensor cord to the jack on the right side of the unit,
or press the Mode Select button to disengage the automatic mode.
Connecting the mattress sensor cord to the Control Unit while the system is not in automatic mode will engage the
automatic mode automatically and light the indicator adjacent to the AUTO button.
4. To prevent accidental changes in settings, press and hold the LOCKOUT button for approximately 3 seconds.
Automatic Mode - AP
1. If alternating low pressure therapy is also desired, press the Mode Select button until the indicators adjacent to
the Auto and A/P icons are illuminated.
2.
In Auto – A/P mode, alternate cells within the mattress are inflated and deflated every 2 1/2 minutes. At the end of
each 2 1/2 minute cycle the system will evaluate the floatation level, (determined by the automatic sensors within
the mattress) and make comfort level adjustments as necessary before resuming the A/P operation.
10.2 Use With A Static Mattress
1.
Press the Mode Select button until the icons adjacent to the MANUAL and FLOAT icons are both illuminated
2.
Adjust the inflation level for patient comfort using the SOFT (-) and FIRM (+) buttons. These buttons adjust the
inflation pressures in the mattress from a minimum of 7.5 mmHg (one LED lighted on the COMFORT CONTROL
INDICATOR ) to a maximum of 30 mmHg (all LED’s lighted).
3.
Manually ensure the patient is sufficiently supported. In the mattress, place your hand between two air cells and
then under the patient’s pelvic region. For proper inflation, there should be clearance for 3-4 fingers (stacked
vertically) beneath the patient’s pelvic region.
WARNING
Check patient at least every 8 hours or once per shift, to assure proper system inflation.
4.
To prevent accidental changes in settings, press and hold the LOCKOUT button for approximately 3 seconds.
Manual Mode – A/P
5. If alternating low pressure management is desired, press the Mode Select button until the lights adjacent to the
MANUAL and A/P icons are illuminated. If A/P (alternating pressure) is selected in combination with Manual
mode, every other cell within the mattress will alternately increase and decrease pressure every 2 1/2 minutes.
11.0 Transferring Patients In and Out of Bed
1.
For patient transfer press the MAX INFLATE button. This will maximally inflate the mattress to provide a firm and
stable support surface (and suspend AP and automatic modes). Pressing the MAX INFLATE button again will
cancel this mode and return the mattress to previously chosen settings.
2.
While in the max inflate mode, the indicator adjacent to the MAX INFLATE button will flash to remind the
caregiver that the system is in this state. After approximately 30 minutes, the Control Unit will automatically
cancel the max inflate mode and return to the previously chosen settings.
7
Lumex® AltaDyne AutoFloat
CPR/Cleaning/Care/Storage
12.0 CPR (Cardio Pulmonary Resuscitation)
To deflate mattress for CPR:
1.
Disconnect the dual quick-connect couplings of the mattress hose from the Control Unit. Mattress will deflate
in approximately 15-20 seconds.
2.
Proceed with CPR procedures.
13.0 System Cleaning, Care and Storage
13.1 Cleaning
WARNING
Disconnect the AC power cord from the wall outlet before attempting to clean the Control Unit. Do not heat or
steam autoclave any component of the system.
1.
To clean, use soap, water and a clean cloth to wipe down the Control Unit, power cord, hoses and mattress. Do not use
abrasive cleaners on the mattress. Wipe dry with a clean, dry cloth. Note: Blood and other body fluids must be
thoroughly cleaned from all surfaces before applying disinfectants.
2.
Apply any EPA approved disinfectant to the external surfaces of the Control Unit, hoses and mattress. Allow contact
time according to manufacturers instructions. The solution contact time is what makes disinfection effective.
3.
Wipe down the mattress with a clean, dry cloth to remove any excess disinfectant.
4.
Top sheets of mattress may also be laundered between patient uses or as required to maintain good patient hygiene.
Fill the washing machine with warm water (70 – 140°F or 21 – 60°C). Add one cup of laundry detergent. Place no more
than four top sheets in a single extra large load capacity washing machine. When wash cycle is complete, remove
promptly from machine and ensure all excess water is drained from load. Place dryer on LOWEST heat setting,
or AIR FLUFF if available until dry. Verify top sheet is completely dry before placing under patient. Do not dry clean or
iron dry.
5.
If individual air cells of mattress become soiled, clean and disinfect as described above or simply replace air cell with
a clean replacement. Single air cell replacement can be successfully achieved with patient remaining on the mattress.
Air cells which do not contain active sensors can also be laundered. A plug is available from Lumex to prevent water
from getting inside these during laundering.
WARNING
Do not launder the Claret colored Active Sensor Technology™ air cells of the Active Sensor mattress. Damage may
result. If one or more of the Active Sensor Technology™ air cells become damaged, they can only be replaced as a
complete set.
13.2 Storage
Control Unit
1.
Check the AC power cord and plug for abrasions or excessive wear.
2.
Coil power cord up and place both cord and Control Unit in plastic bag for storage.
Mattress
1.
Check the air manifold of the mattress for kinks or breaks. Replace if necessary.
2.
To deflate, disconnect hose assembly from Control Unit.
3.
Coil the hose assembly loosely and roll the deflated air mattress starting at the head end. Use the straps for
containment. Place in plastic bag for storage.
8
Lumex® AltaDyne AutoFloat
Troubleshooting/Specifications
14.0 Troubleshooting
SYMPTOM:
CORRECTIVE ACTION
Mattress does not
inflate or is too soft.
Make certain the air hoses are not kinked, cracked, or split. Verify the hose couplings
are fully engaged to controller. Verify that all 20 air cells are connected to the air manifold
within mattress.
Power loss indicator
flashing and audible
alarm sounding
Power has been disconnected from unit while in an operational mode.
Restore power, put unit in STANDBY mode, then remove power. Unit must always be
returned to STANDBY mode before disconnecting power.
Indicator adjacent to
ALARM SILENCE
button is flashing and
audible alarm is
sounding.
If in AUTO mode, check the connection of the Active Sensor mattress sensor cord to the
jack on the side of the unit. Reconnect if necessary.
Verify hose couplings are fully engaged to controller. Verify that all 20 air cells are
connected to the air manifold within mattress.
15.0 Specifications, Control Unit
Enclosure Dimensions
10" x 12" x 4 1/2", (25 cm x 30 cm x 11 cm)
Weight
9.5 pounds (4.3 kg)
Power Cord
Detachable 14' , #18 AWG minimum, with ground wire
Overcurrent Protection
Primary 2.5A, 250V, T
Input
120 -230 VAC, 50/60Hz, 120V – 0.44A, 230V – 0.33A
Operating Ambient
Temperature Range
60 to 85°F (16 to 29°C)
Class I grounded equipment not suitable for use in the presence of a flammable
anesthetic mixture with air or with oxygen or nitrous oxide.
Type BF equipment
Classification
UL2601-1, CSA C22.2 NO. 601.1
EN 60601-1
IPXO, enclosed equipment without protection
against ingress of water.
Continuous operation
Electromagnetic
Compatibility
Meets EN60601-1-2:2001
(CISPR 11 Classified as Class B, Group 1 ISM equipment)
9