1
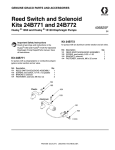
GENUINE GRACO PARTS AND ACCESSORIES
Air Valve Seal Kits
406813C
Husky® 1050 Diaphragm Pumps
EN
Kits 24B769 and 24C983
Ref. Description
206
208
209
Qty.
O-RINGS, end cap
2
U-CUPS, piston
2
SCREW
2
Kit 24B769: M3 (shorter - for metal pumps)
and #4 (longer - for plastic pumps)
Kit 24C983: M3
Ref. Description
Qty.
219
1
108
---
O-RING, for Kit 24B769 (used for DataTrak
models with runaway protection)
GASKET, air valve (not shown)
GREASE, lithium-based (not shown)
See reverse for assembly directions.
209 3
3
All other models
1
206 1
DataTrak Models
with Runaway
Protection
1
air inlet side
1 206
219
1
2
3
Apply lithium-based grease.
U-cup lips must face piston.
Apply lithium-based grease to
contact surface.
208 1 2
1
housing
208 1 2
206 1
ti14026b
Graco Inc. P.O. Box 1441 Minneapolis, MN 55440-1441
406813 Revision C - December 2012
Copyright 2009, Graco Inc. is registered to ISO 9001.
1
1
Assembly
NOTE: Apply lithium-based grease whenever instructed
to grease.
1. Use all parts in the repair kits, as applicable to your
pump. Clean other parts and inspect for damage.
Replace as needed.
2. Grease the detent cam (204) and install into
housing.
3. Grease the u-cups (208) and install on the piston
with lips facing toward the center of the piston.
7. Grease and install the detent assembly (203) into
the piston. Install the o-ring (214) on the cup (213).
Apply a light film of grease to the outside surface of
the o-ring and the inside mating surface of the base
(212). Install the cup (213) on the base (212). Install
the spring (211) onto protrusion on the cup. Install
the cup assembly. Align the small round magnet in
the base with the air inlet.
8. Grease the cup side and install the valve plate
(205). Align the small hole in the plate with the air
inlet. Tighten the screws (209) to hold it in place.
4. Grease both ends of the piston (202) and install it in
the housing, with the flat side toward the cup (213).
Be careful not to tear u-cups (208) when sliding piston into housing.
5. Standard or Pulse Count models (no runaway
protection solenoid): Grease new o-rings (206)
and install on the end caps. Install the end caps into
the housing.
DataTrak models (with runaway protection solenoid): Invert the air valve, with the air inlet facing
away from you. Grease and install new o-ring (206)
on right-side end cap. Grease and install new o-ring
(206) and the solenoid release button and o-ring
(219) on left-side end cap. Install the end caps into
the housing.
6. Install a retaining ring on each end to hold end caps
in place.
2
406813C