1
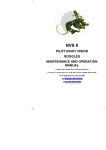
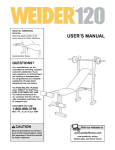
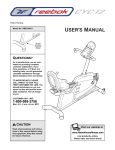
Corner Boxing Rack
Model No. GACR02
QUESTIONS?
As a manufacturer, we are committed to providing complete
customer satisfaction. If you
have questions, or if there are
missing parts, we will guarantee
complete satisfaction through
direct assistance from our factory.
TO AVOID DELAYS, PLEASE
CALL DIRECT TO OUR TOLLFREE CUSTOMER HOT LINE.
The trained technicians on our
customer hot line will provide
immediate assistance, free of
charge to you.
CUSTOMER HOT LINE:
1-800-288-4802
Mon.–Fri., 8 a.m.–5 p.m. CST
CAUTION
Read all precautions and instructions in this manual before using
this equipment. Save this manual
for future reference.
USER’S MANUAL
Corner Boxing Rack
Table of Contents
Important Precautions . . . . . . . . . . . . . . . . . . . . . . . . . . . . . . . . . . . . . . . . . . . . . . . . . . . . . . . . . . . . . . . . . . .3
Before You Begin . . . . . . . . . . . . . . . . . . . . . . . . . . . . . . . . . . . . . . . . . . . . . . . . . . . . . . . . . . . . . . . . . . . . . . .4
Assembly . . . . . . . . . . . . . . . . . . . . . . . . . . . . . . . . . . . . . . . . . . . . . . . . . . . . . . . . . . . . . . . . . . . . . . . . . . . . .5
How to Use the Corner Boxing Rack . . . . . . . . . . . . . . . . . . . . . . . . . . . . . . . . . . . . . . . . . . . . . . . . . . . . . . . .8
Part List . . . . . . . . . . . . . . . . . . . . . . . . . . . . . . . . . . . . . . . . . . . . . . . . . . . . . . . . . . . . . . . . . . . . . . . . . . . . .10
Exploded Drawing . . . . . . . . . . . . . . . . . . . . . . . . . . . . . . . . . . . . . . . . . . . . . . . . . . . . . . . . . . . . . . . . . . . . .11
Ordering Replacement Parts . . . . . . . . . . . . . . . . . . . . . . . . . . . . . . . . . . . . . . . . . . . . . . . . . . . . . .Back Cover
Limited Warranty . . . . . . . . . . . . . . . . . . . . . . . . . . . . . . . . . . . . . . . . . . . . . . . . . . . . . . . . . . . . . . .Back Cover
GOLD'S GYM is a registered trademark of Gold's Gym International, Inc. This product is manufactured and
distributed under license from Gold's Gym Merchandising, Inc.
2
Important Precautions
WARNING:
To reduce the risk of serious injury, read the following important precautions
before using the GOLD’S GYM® CORNER BOXING RACK.
1. Read all instructions in this manual before
using the CORNER BOXING RACK.
without correct technique or the proper gear
could result in serious injury.
2. Use the CORNER BOXING RACK only as
described in this manual.
7. If you feel faint, dizzy, or short of breath while
using the CORNER BOXING RACK, stop
immediately and cool down.
3. It is the responsibility of the owner to ensure
that all users of the CORNER BOXING RACK
are informed of all precautions.
8. The decal shown at
the right has been
placed on the CORNER BOXING RACK
in the location shown
on page 4. If the
decal is missing or
illegible, please call
our Customer
Service Department
toll-free at 1-800-2884802 and ask for a
free replacement
decal. Apply the
decal in the location
shown.
4. The CORNER BOXING RACK is intended for
home use only. Do not use the CORNER
BOXING RACK in a commercial, rental, or
institutional setting.
5. Keep children under the age of 12 away from
the CORNER BOXING RACK at all times.
6. Learn correct technique before using the
CORNER BOXING RACK. Always wear the
proper protective gear for your hands and
wrists while using the CORNER BOXING
RACK. Using the CORNER BOXING RACK
3
Before You Begin
Congratulations for purchasing the new GOLD’S
GYM® CORNER BOXING RACK. The CORNER
BOXING RACK is designed to be used with a punching bag or a speed bag to develop speed, accuracy,
and timing while toning the upper-body muscles.
(Note: The CORNER BOXING RACK does not
include a punching bag or a speed bag.) Used as
part of a fitness program that includes regular aerobic exercise and a proper diet, the CORNER BOXING
RACK will help you to look better, feel better, and
enjoy the benefits of better fitness.
Adjustment Knob
Bag Frame
Drum
Before using the CORNER BOXING RACK, please
read this manual carefully. If you have questions
after reading this manual, please call our Customer
Service Department toll-free at 1-800-288-4802,
Monday through Friday, 8 a.m. until 5 p.m. Central
Time (excluding holidays). Please mention the product model number (GACR02) when calling.
Swivel Hook Mount
Warning Decal
Frame
Brace
Base
4
Assembly
Assembly requires two persons. Place all parts of the CORNER BOXING RACK in a cleared area and remove
the packing materials. Do not dispose of the packing materials until assembly is completed. Assembly
requires two adjustable wrenches (not included).
M6 Nylon
Locknut (25)–6
M6 x 30mm Bolt (24)–6
M10 Nylon
Locknut (23)–17
M10 Washer
(21)–17
M10 x 63mm Carriage Bolt (27)–2
M10 x 35mm Carriage Bolt (22)–4
M10 x 70mm Bolt (18)–5
M10 x 65mm Bolt (20)–4
M10 x 95mm Bolt (26)–1
M10 x 15mm Screw (16)–8
1. Press a Large Plastic Cap (15) into the lower
end of the Lower Frame (2). Press a 50mm
Square Plastic Cap (14) into each Base (5, 6).
1
Hold the Left and Right Bases (5, 6) against the
Lower Frame (2) as shown. Attach the Bases to
the Lower Frame with an M10 x 70mm Bolt (18)
and an M10 Nylon Locknut (23). Do not tighten
the Nylon Locknut yet.
2
23
See the inset drawing. The CORNER BOXING
RACK is designed to be placed in the corner of
a room. If you do not plan to use the CORNER
BOXING RACK in a corner, the Rear Base (19)
should be attached. Position the Rear Base
against the Lower Frame (2) as shown. Attach
the Rear Base to the Lower Frame with the M10
x 95mm Bolt (26), an M10 Washer (21), and an
M10 Nylon Locknut (23). Do not tighten the
Nylon Locknut yet. Next, attach the Rear Base
to the Left and Right Bases (5, 6) with two M10
x 70mm Bolts (18), two M10 Washers (21), and
two M10 Nylon Locknuts (23). Do not tighten
the Nylon Locknuts yet. Press two 50mm
Square Plastic Caps (14) into the Rear Base.
14
5
18
5
14
18
2
26
19
21
21
18
6
14
14
23
21
5
15
6
2. Press a Small Plastic Cap (31) into the Center
Base (7). Attach the Eyebolt (17) to the Center
Base with an M10 Nylon Locknut (23) and two
M10 Washers (21) as shown.
2
20
21
5
21
Attach the Center Base (7) to the Left and Right
Bases (5, 6) with the four M10 x 65mm Bolts
(20), four M10 Washers (21), and four M10
Nylon Locknuts (23). Do not tighten the Nylon
Locknuts yet.
6
17
21
21
7
20
23
23
23
3. Hold the Left and Right Braces (3, 4) against the
Lower Frame (2) and the Left and Right Bases
(5, 6). Attach the Braces to the Lower Frame with
two M10 x 70mm Bolts (18) and two M10 Nylon
Locknuts (23). Do not tighten the Nylon
Locknuts yet.
21
21
31
3
23
3
Tip the Lower Frame (2) and attach the Braces
(3, 4) to the Bases (5, 6) with the two M10 x
63mm Carriage Bolts (27) and two M10 Nylon
Locknuts (23).
2
18
23
Tighten all of the M10 Nylon Locknuts (23)
used in steps 1, 2, and 3.
4
5
23
27
6
27
4. See the inset drawing. Press the Large Plastic
Cap (15) into the top of the Upper Frame (1).
4
1
Hold one of the Large Plates (11) inside of the
Lower Frame (2) as shown. Insert two M10 x
15mm Screws (16) with M10 Washers (21) into
the right side of the Lower Frame and finger
tighten them into the Large Plate. Attach the
other Large Plate (11) inside of the Lower Frame
in the same way.
15
16
21
1
21
16
11
11
16
Slide the Upper Frame (1) onto the two Large
Plates (11). Insert four M10 x 15mm Screws (16)
with M10 Washers (21) into the Upper Frame
and finger tighten them into the Large Plates.
21
21
2
Tighten all eight M10 x 15mm Screws (16).
6
16
5. Fit the two Drum Sections (9, 32) together as
shown. Orient the Drum Sections so that the
chamfered holes are facing down. Connect the
Drum Sections with the six M6 x 30mm Bolts
(24), the two Small Plates (12), and the six M6
Nylon Locknuts (25) as shown.
5
25
12
25
12
9
32
24
6. Attach the Swivel Hook Mount (10) and the Drum
Sections (9, 32) to the Bag Frame (8) with the
four M10 x 35mm Carriage Bolts (22) and four
M10 Nylon Locknuts (23).
6
24
23
Press a Small Plastic Cap (31) into the Bag
Frame (8).
8
31
9, 32
10
22
22
7. Slide the Bag Frame (8) onto the desired pins on
the Upper Frame (1). Insert the Adjustment Knob
(13) into the Bag Frame and tighten it into one of
the adjustment holes in the Upper Frame.
7
1
8
Make sure that all parts are properly tightened
before the CORNER BOXING RACK is used.
If the CORNER BOXING RACK does not sit
evenly on your floor, attach one or both of the
included rubber feet (not shown) to the base.
13
7
How to Use the Corner Boxing Rack
PROTECTING YOUR HANDS
WARNING:
Before beginning any
exercise program, consult your physician. This
is especially important for persons over the
age of 35 or persons with pre-existing health
problems. ICON assumes no responsibility for
personal injury or property damage sustained
by or through the use of this product.
When using a speed bag or a punching bag, protect
your hands with a good pair of boxing gloves or bag
gloves. Do not skimp—purchase the best you can
afford. It is not worth saving a few dollars and ending
up with an injury. A pair of 16-ounce boxing gloves is
recommended. The additional padding will protect your
hands and will reduce the trauma to your wrist, elbow,
and shoulder joints. For added protection, some people wrap their hands with cotton wraps like those used
by boxers. Other people feel that if they need to wrap
their hands, they are hitting too hard.
HOW TO ADJUST THE CORNER BOXING RACK
To adjust the height of the CORNER BOXING RACK,
first remove the adjustment knob. Next, raise the drum
and the bag frame and slide the bag frame off the pins
on the upper frame. Raise or lower the bag frame to
the desired height, and slide the bag frame onto the
desired pins on the upper frame. Then, reattach and
tighten the adjustment knob.
HOW TO USE A SPEED BAG
Among the best equipment for developing speed, accuracy, and timing is the time-tested speed bag. However,
learning to use a speed bag requires practice and
patience.
To use a speed bag, stand with your feet parallel to
each other at a comfortable distance apart. Start by hitting the bag with one hand. A backhand punch is recommended (the backhand punch is applied with the
meaty part of the hand between the wrist and the base
of the little finger). Make sure to hit the bag straight.
One of the most valuable features of the bag is that it
forces you to hit it directly and crisply so that it returns
to you. After you strike the bag, let it hit the far side of
the drum, then let it hit the near side of the drum, and
then hit it again when it is halfway back to the far side
of the drum. Try to keep your body still, with your striking hand making smaller and smaller circles after each
strike. If desired, use both hands to punch the bag the
first few times you use it.
Adjustment Knob
Pins
Bag Frame
Drum
Swivel Hook
For an alternate rhythm, strike the speed bag, allow it
to hit the drum three times, and then strike it again as it
comes off the far side of the drum. From there, work up
to striking the bag every time it hits the drum. Once you
have established a steady rhythm, increase your pace.
When you can comfortably maintain a faster pace, start
switching rhythms. For example, strike the speed bag
three times with your left hand and then once with your
right hand. As you become more skillful at switching
rhythms, you will find your body moving with the
rhythms.
HOW TO ATTACH A SPEED BAG OR A PUNCHING
BAG
Slide your speed
bag or punching
bag securely onto
the swivel hook
(see the drawing
above). If there is
a bungee on the
bottom of your
punching bag,
attach it to the
eyebolt on the
CORNER BOXING RACK.
Attach
bungee
here
Remember to keep your hands up. You cannot hit the
speed bag if you punch from your hips because you
cannot react quickly enough. In addition, you will not be
able to protect your face from the oncoming bag.
8
HOW TO USE A PUNCHING BAG
Learning to snap your punches teaches you to control
your power and allows you to get greater fitness
rewards from your workout. Focus on technique and
form. Make sure that your feet are in the correct
stance, that your shoulders are back and down, and
that your hips are underneath your shoulders. Do not
lean forward from your waist to punch. Instead, consciously bring your shoulder blades together. This will
help you learn to punch from your back, thus strengthening those muscles. Maintain conscious contact with
the floor through your feet. Snap your punches at the
bag, trying to get power from your body, hips, and legs
rather than from just your shoulders. Practice punching
as fast as you can without compromising technique.
A punching bag is for building upper-body strength and
power as well as for learning proper technique. There
are many important things to remember when using a
punching bag. In the beginning, combining all aspects
will be a challenge. Try to master one aspect at a time.
Hang your punching bag so that the top is slightly
higher than the top of your head. This will allow you to
practice your punches from a crouch and practice
punching a target that is taller than you.
When throwing a punch, keep your muscles loose and
“snap” your punches out. Do not tighten your muscles;
doing so will tire you and decrease your speed. Keep
your power at the ends of your punches—when your
fist strikes the bag, your arm should be fully extended.
Doing this will give your punches more leverage and
therefore more power.
Do a set number of rounds when working out with a
punching bag. Each round can be one, two, or three
minutes long. Play music that is about the length of a
round or use a timer. Do not look at a clock because
doing so will distract you. To get the most out of each
workout, focus on a different skill during each round.
Remember to use the whole bag—punch high, punch
low, throw hooks to the side, and, if the bag is a smaller one, deliver uppercuts. Give the punching bag
everything you have—hit it with quick punches, move
around it, push it, slip it, let it hit you, release stored
emotion with hard punches—there are endless possibilities.
Hit the bag with your top knuckles rather than your finger knuckles. This will make your punches more solid
and will decrease the chances of injury. Many boxers
make the mistake of slapping their punches, hitting
with the knuckles of their fingers. Their fingers then act
as shock absorbers, and their punches are not solid.
Stay on the balls of your feet to maintain balance.
Never rest on your heels, because if you receive a
solid blow, you will be knocked backwards or even
down.
There are many drills that can be done with a punching bag. For example, move around the bag with your
jab. When you move left, step first with your left foot;
when you move right, step first with your right foot. Jab
every time you take a step, or every other time. Jab
low and high. Or, move around the bag with a one-two
combination. Move in on the bag with your jab, and
then move away from the bag with your jab. While you
are inside, keep your hands up, guarding your head
and face. Do a series of hooks and short, powerful
straight punches, keeping your hands up between
punches.
Always vary your combinations of punches. If a boxer
throws the same combination of punches every time,
an opponent could anticipate this and form a counter
combination. Try to be unpredictable.
When you are starting out, two useful methods of
punching are gut-level punching and using technique,
or snapping your punches. Alternate between these
methods.
Another drill is to deliver rapid-fire punches for 15 to
30 seconds, rest for the same length of time, and then
repeat. Or, make the bag swing back and forth or side
to side. Either stop its momentum with your punches
or slip its impact and catch it from the side with welltimed hooks. Practice shifting your weight correctly
between punches.
Gut-level punching is one of the best ways to access
your power. Keep your wrists absolutely straight, and
punch the bag as hard as you can, without thinking
about technique. Try to punch through the bag, instead
of punching at it or pushing it with punches. Use gutlevel punching to find out how much power you have
and how it feels to use power.
9
When a person first stands in front of a punching bag,
technique is often ignored. The person hurls himself at
the bag, trying to give it everything he has—sometimes missing completely. Following are habits to
avoid:
Exaggerating movements in order to hit harder—
Always concentrate on clean, proper body mechanics
while practicing. Careless movements will not allow
you to hit harder; they will only increase the likelihood
of injury and keep you from landing punches effectively. Do not focus only on hitting hard; hit properly and
power will come naturally.
Telegraphing your intentions—Avoid giving obvious
signals prior to throwing a punch. For example, do not
cock your fist back before throwing a punch.
Not protecting yourself at all times—Because the
punching bag is a large, defenseless target, it is easy
for you to develop bad habits. Remember to keep your
hands up and to protect yourself at all times. Move
into range, hit the bag, and then move out of range.
Imagine that the bag is an opponent trying to hit you.
Pushing the bag instead of hitting it—A common mistake when hitting a punching bag is following through
too deeply and pushing the bag rather than hitting it. A
punch accelerates from the time you start it until the
time your arm is fully extended. The farther your arm
moves, the faster and more powerful your punch will
be. Strike the bag at a point near full extension, penetrating the surface of the bag no more than a few inches so that a popping sound is heard on impact. Be
careful never to lock out or hyperextend your
joints upon impact or upon missing the bag.
Holding your breath—When people exert themselves,
they often hold their breath. However, doing this
reduces endurance by starving the body of oxygen
when it needs it the most. In addition, holding the
breath increases thoracic pressure and can cause
injuries. Exhale as you hit. This will prevent you from
holding your breath and will enhance your power
because you will be tensing your torso muscles.
Part List—Model No. GACR02
Key No. Qty.
1
2
3
4
5
6
7
8
9
10
11
12
13
14
15
16
17
18
19
1
1
1
1
1
1
1
1
1
1
2
2
1
4
2
8
1
5
1
Description
Upper Frame
Lower Frame
Left Brace
Right Brace
Left Base
Right Base
Center Base
Bag Frame
Drum Section, Upper
Swivel Hook Mount
Large Plate
Small Plate
Adjustment Knob
50mm Square Plastic Cap
Large Plastic Cap
M10 x 15mm Screw
Eyebolt
M10 x 70mm Bolt
Rear Base
R1002A
Key No. Qty.
20
21
22
23
24
25
26
27
28
29
30
31
32
33
*
*
4
17
4
17
6
6
1
2
1
1
1
2
1
1
2
1
Description
M10 x 65mm Bolt
M10 Washer
M10 x 35mm Carriage Bolt
M10 Nylon Locknut
M6 x 30mm Bolt
M6 Nylon Locknut
M10 x 95mm Bolt
M10 x 63mm Carriage Bolt
M10 Spring Washer
M8 Nylon Locknut
Swivel Hook
Small Plastic Cap
Drum Section, Lower
Swivel
Rubber Foot
User’s Manual
*Non-illustrated part.
Specifications are subject to change without notice.
10
Exploded Drawing—Model No. GACR02
15
23
25
R1002A
8
12
13
25
31
9
1
32
12
16
21
11
24
16
29
33
28
10
21
21
16
23
21
30
11
24
16
3
22
2
20
23
18
14
20
4
18
21
14
21
5
26
23
19
14
21
21
27
15
23
17
18
18
23
7
23 21
23
21
20
31
23
27
21
6
14
11
Ordering Replacement Parts
To order replacement parts, call our Customer Service Department toll-free at 1-800-288-4802, Monday through
Friday, 8 a.m. until 5 p.m. Central Time (excluding holidays). To help us assist you, please be prepared to provide the following information:
• The MODEL NUMBER of the product (GACR02)
• The NAME of the product (GOLD’S GYM® CORNER BOXING RACK)
• The KEY NUMBER and DESCRIPTION of the part(s) (see the Part List on page 10 and the Exploded Drawing
on page 11)
Limited Warranty
ICON Health & Fitness, Inc. (ICON), warrants this product to be free from defects in workmanship and material, under normal use and service conditions, for a period of ninety (90) days from the date of purchase.
This warranty extends only to the original purchaser. ICON's obligation under this warranty is limited to
replacing or repairing, at ICON's option, the product through one of its authorized service centers. All repairs
for which warranty claims are made must be pre-authorized by ICON. This warranty does not extend to any
product or damage to a product caused by or attributable to freight damage, abuse, misuse, improper or
abnormal usage or repairs not provided by an ICON authorized service center; products used for commercial or rental purposes; or products used as store display models. No other warranty beyond that specifically set forth above is authorized by ICON.
ICON is not responsible or liable for indirect, special or consequential damages arising out of or in connection with the use or performance of the product or damages with respect to any economic loss, loss of property, loss of revenues or profits, loss of enjoyment or use, costs of removal or installation or other consequential damages of whatsoever nature. Some states do not allow the exclusion or limitation of incidental or
consequential damages. Accordingly, the above limitation may not apply to you.
The warranty extended hereunder is in lieu of any and all other warranties and any implied warranties of
merchantability or fitness for a particular purpose is limited in its scope and duration to the terms set forth
herein. Some states do not allow limitations on how long an implied warranty lasts. Accordingly, the above
limitation may not apply to you.
This warranty gives you specific legal rights. You may also have other rights which vary from state to state.
ICON HEALTH & FITNESS, INC., 1500 S. 1000 W., LOGAN, UT 84321-9813
Part No. 80-00028 R1002A
Printed in USA © 2002 ICON Health & Fitness, Inc.