1
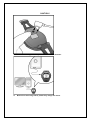
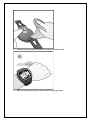
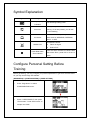
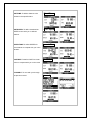
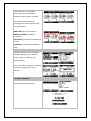
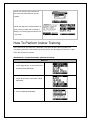
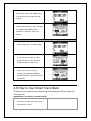
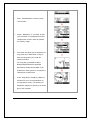
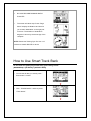
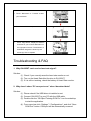
Wrist GPS Training Device GH-625XT Quick Start Guide Version 3.0 Power / Light Up Page Esc/Lap Down Enter This version is usage for Firmware Version 2.02 or above http://www.gs-sport.com What is GPS? GPS stands for Global Positioning System. For 3D fix, we need at least four satellites. Normally the accuracy of GPS under open sky which means no tall building and clear sky is within 10 meters per second. Therefore, if the device shift 10 meter at that second, the device may shows 36 kilometer per hour instant speed. Nowadays, the GPS consumer product has built in adjust algorithm and assisted method to extend capability of GPS. What is IPX7? Protected against the effects of temporary immersion in water. Under specific conditions of pressure and duration, water must not enter a temporarily submerged headlamp in quantities that would cause adverse operational effects. The IPX7 waterproof standard is for device one meter under water within 30 minutes protection. Waterproof standards usually measure by the pressure of water. IPX7 standard provides device protection to be exposed the rain and sprayed over water. However, the pressure of swimming or diving should exceed IPX7 standard. Note for Upgrading Firmware Do not interrupt during upgrading the firmware When the upgrading firmware fail, please go over the process again Choose the firmware file carefully CAUTION ! Before connecting to device, please be aware of the direction Before first time using watch, please fully charge the device. Please dry the clip before connection of charging or data transfer. Before start training, please let antenna face to sky to get 3D fix Symbol Explanation Icon picture Description Battery capacity indication Indication The remaining battery power When you stop the timer, the icon will be timer icon flashing. If it is auto paused, you will see the icon flashing This icon will show up when you set the Clock alert alarm clock for WEEKEND, WEEKDAY, DAILY…or OFF GPS status indicator satellite icon Heart Rate Alarm Zone indicator Flash: No signal Solid: 3D fix There are three numbers to indicate Heart Rate Alarm Zone, press PG for 5 sec to switch. Configure Personal Setting Before Training Before get training, you may configure your personal parameter to get more accurate result. Or you may set it through PC software. [MAIN MENU] > [CONFIGURATION] > [PAGE SETTING ] 1. Press ‘’Page button’’ to select CONFIGURATION menu. 2. Chose ‘’USER PROFILE’’ then press ‘’Enter button’’. Press “ESC button” to escape once finish. How To Set Up Custom Page Set up the custom page and function list before your training. [MAIN MENU] > [CONFIGURATION] > [PAGE SETTING ] 1. Press ‘’Page button’’ to select CONFIGURATION menu. 2. Chose ‘’PAGE SETTING’’ then press ‘’Enter button’’. 3. To define the interest page to set how many windows to show information. 4. Select the function coefficient you want then press ’Enter button’’ to save setting. Press ‘’ESC/LAP button’’ to exit or ‘’Page button’’ to go back to main menu How To Start Your Training And Save Data 1. In speedometer page or custom pages, pressing “ENTER” to start timer 2. Pressing “LAP” button to split a Lap. 3. Pressing “ENTER” to pause your training 4. Pressing “ESC” to save data when in PAUSE 5. Select YES and pressing “ENTER” To save data How To Use Gym As A Personal Coach In order to improve your training performance, GH-625XT provides GYM to pretend your coach to improve your performance through mutual training and reaction. [MAIN MENU] > [GYM] There are three major subjects for personal training Trainer Mutisport Interval Training TRAINER There are five types to set your training partner. Dist / Time Dist / Speed Speed / Time Pace / Dist Yourself You may select either one to race with you. To set up your target trainer parameters through setting for distance, time, speed, pace or specified training file accordingly. The trainer will be according to the setting to race with you. Finished setting, press ‘’Up or Down button’’ to select ‘’Start’’ and then press ‘’Enter button’’ to start. DIST/TIME: To define distance to be Dist / Time finished in the specified time. DIST/SPEED: To define virtual trainer Dist / Speed SPEED to race with you in defined distance. SPEED/TIME: To define SPEED for Speed / Time virtual trainer to compete with you in the duration. PACE/DIST: To define PACE for virtual Pace / Dist trainer to compete with you on the road. YOURSELF: To race with your through the previous record. Yourself System will give you a message according to current performance compare to trainer if alarm is actived. If race was finished, system will according to the current result to judge your performance. [REST DIST] The rest of distance [BEHINE /AHEAD] The status of competition [YOURSELF] The finished percentage of yourself [TRAINER] The finished percentage of trainer MUTISPORT Mutisport could be used on composite activities competition; you could set running, biking, or others for your personal training. Trainer can make a Transition or switch to next sport by pressing “UP” key 3 seconds. INTERVAL TRAINING Several activities likes hockey or soccer need this kind particular training. Trainer can create a new workout and then insert interested session into the program. Trainer may select the interest workout to go for training. System will according to setting to run the program as well as LAP is functional. How To Perform Indoor Training Some exercise is only interest on Heart Rate verse time variation with long battery life. This setting proposes to this behavior as a timer watch. And the battery life will up to 3 days. There are two ways to perform: [MAIN MENU] > [CONFIGURATION] >[WATCH SETTINGS] Method 1 1. Press “Page button” to select ACTIVITY and then select SETTING. 2. Press “Down button” and select “DATA RECORD”. 3. Select “INDOOR TRAINING” 4. Press “ESC” button and “PAGE button” to go back to training page and start training. 5. System will confirm you with a message as “INDOOR TRAINING START ANYWAY?” and select YES to get starting. Method 2 1. Press “Page button” to training page. 2. Press “OK button” under no 3D fix, system will ask you “NO GPS FIX! START ANYWAY?” Select “NO” 3. System will confirm you with a message as “INDOOR TRAINING START ANYWAY?” and select YES to get starting. 4.6 How to Use Smart Track Back To use track can guide you go back along your training record and make you never get lost. [MAIN MENU] > [ACTIVITY] > [ACTIVITY INFO] 1. You will see all data you saved, press ‘’ Enter button’’ to enter. 2. Click ‘’ TRACK BACK?’’ and then press ‘’Enter button’’. 3. Chose ‘’ Backward’’ or ‘’ Forward’’ to start your track back. It will take some times to compress the record in order to optimize the memory usage. 4. The screen will show map. Sometimes you may press OK or ESC button to skip or back the waypoints if you locate the intercross section You may also go to MENU mode to NAVIGATION>ROUTES> ROUTES SETTING to enable AUTO JUMP, if you would like to have system to recognize the closest point to switch then. 5. Press ‘’Page button’’ display the distance and time for you to reach destination on the right part of screen. The direction of destination waypoint is shown by the arrow sign of the compass. How To Create Waypoint And Save it Before Start Route - Create Waypoint [MAIN MENU] > [NAVIGATION] >[SAVE WAYPOINT] 1. You can save the current position. If the GPS position is fixed, it shows the longitude, latitude and elevation on the screen. 2. Use Up and Down button to scroll to the item you wish to modify and then use the ‘’Enter button’’ to select and confirm. 3. When you finish the modification, input a “enter sign” character or press the ‘’Esc /Lap button’’ to exit. 4. Move highlight to "CONFIRM?" and press ‘’Enter button’’ . The location data will be stored in the memory How to Use Find Waypoints If you want to find the place which you have saved the waypoint, you can use this function to find your waypoint and track it. [MAIN MENU] > [NAVIGATION] >[FIND WAYPOINT] >[LIST ALL] 1. Use Up and Down button to scroll to the Waypoint you wish to go to and press ‘’Enter button’’. 2. Highlight "GOTO?" item and press ‘’Enter button’’. 3. You will see your current position and destination point on the screen, and those nearby waypoints are also displayed. 4. Press ‘’Page button’’ display the distance and time for you to reach destination on the right part of screen. The direction of destination waypoint is shown by the arrow sign of the compass. How to use Route Navigation [MAIN MENU] > [NAVIGATION] > [ROUTES] > [LIST ALL]] 1. Get routes data from software ‘’Training Gym Pro 2. The map information of routes will show on the display for your guiding. Select ‘’FOLLOW’’ to get training. It will guide you automatically. You may press ’’ENTER’’ or ‘’ESC’’ to go next or last waypoint 3. Chose ‘’ Backward’’ or ‘’ Forward’’ to start your route. 4. DO YOU RECORD RUNNING DATA ? Press YES 5. The screen will show map. Press ‘’Page button’’ display the distance and time for you to reach destination on the right part of screen. The direction of destination waypoint is shown by the arrow sign of the compass. NOTE: Please use Training Gym Pro Ver 1.6.7 or above to transfer ROUTE to device. How to Use Smart Track Back To use track can guide you go back along your training record. [MAIN MENU] > [ACTIVITY] >[ACTIVITY INFO] 1. You will see all data you saved, press ‘’ Enter button’’ to enter. 2. Click ‘’ TRACK BACK?’’ and then press ‘’Enter button’’. 3. Chose ‘’ Backward’’ or ‘’ Forward’’ to start your track back. 4. 5. The screen will show map Press ‘’Page button’’ display the distance and time for you to reach destination on the right part of screen. The direction of destination waypoint is shown by the arrow sign of the compass. Troubleshooting & FAQ 1. Why GH-625XT can’t receive heart rate signal? Solution: (1). Check if you correctly wear the heart rate monitor or not. (2). Turn on the Heart Rate Alert function in GH-625XT. (3). If it is still not working, check the battery of Heart Rate monitor. 2. Why does it show “PC com port error” when I download data? Solution: (1). Please check if the USB driver is installed or not. (2). Connect GH-625XT to your PC with the USB cable. (3). Double click the “GS-Sport Training GYM Pro” icon from desktop to start the application. (4). From menu bar click “Settings” / “Configurations”, and click “Scan COM Port” button. COM port will be automatically scanned.