1
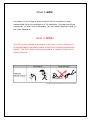
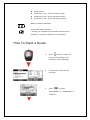
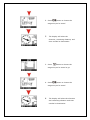
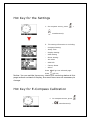
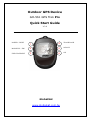
Outdoor GPS Device
GH-561 GPS Trek Pro
Quick Start Guide
V 3.0
POWER / LIGHT
1
4
TRACK BACK
MARK W.P. / ESC
2
5
SCROLL
FIND WAYPOINT
3
6
OK
GlobalSat
www.globalsat.com.tw
What is GPS?
A system for providing precise location which is based on data
transmitted from a constellation of 24 satellites. It comprises three
segments: (a) the Control Segment, (b) the Space Segment, and (c)
the User Segment.
What is IPX4?
The IPX4 water resistant standard is the level in which a device is
protected against splashing water without any adverse operational
effects. The IPX4 water resistant standard is usually measured by
water pressure.
Note!!
To prevent damage or injury do not place
the e-compass near an open flame or lay on
a magnetic source.
Please fully charge the device before first
use.
Symbol Explanations
GPS status indicator
z
None: No signal
z
Solid: 3D fix
z
Solid with 1 bar: 3D fix with poor signal
z
Solid with 2 bar: 3D fix with good signal
z
Solid with 3 bar: 3D fix with strong signal
Battery capacity indication
E-Compass status indicator
- Blinking: E-Compass got magnetic interference or
unstable, it needs to calibrate at this situation.
How To Start a Route
1.
Press
button to select the
route you’ve planed on PC
software( Travel Manager)
2.
To select the route files for
traveling.
3.
Press
to select
‘’BACKWARD’’ or ‘’ FORWARD’’ or
‘’DELETE’’
4.
The display will show direction,
remaining distance, and needed
time till you arrive at your
destination.
-
A solid arrow means the system has
a 3D fix
-
A blank arrow means system has no
fix and in e-compass navigation
mode.
5.
By pressing the ‘’OK’’ button, the
device will display the map page.
6. Pressing the
button will go back
to the direction display.
7. When near your destination, the
system will advise you, if you want
to stop, pressing the
button
will ask if you want to exit route or
not
How To Find Waypoint
1. Press
button to choose the
waypoint you’ve saved to go.
2. Press
button to choose the
waypoint you’ve saved.
3.
The display will show the
direction ,remaining distance, and
time needed to destination.
3. Press
button to choose the
waypoint you’ve saved to go.
4. Press
button to choose the
waypoint you’ve saved.
4.
The display will show the direction
and remaining distance and time
needed to destination.
Hot Key for the Settings
1. On compass screen, press
+
simultaneously
2. The setting information is including
-
Compass Setting
-
Setup Time
-
Set Units
-
GPS Info
Display Setting
GPS Setting
Route Setting
Factory Reset
About
Press
Press
will go into selected page
will exit
Notice: You can set the time zone, check GPS receiving status at this
page and set contrast of display, the most items are not necessary to
change.
Hot Key for E-Compass Calibration
1. On compass screen, press
+
simultaneously
2. Follow the instruction to
calibrate X & Y axis first
3. Calibrated X & Y axis, continue
to calibrate Z axis
3. When you finished X/Y/Z axis
calibration, the display will
show ‘’ Calibration OK’’.
4. Press
will return to
compass display’.
Notice: Usually, system will calibrate e-compass automatically after
power on. It doesn’t need to have a calibration every time, unless got
magnetic interference or base on particular request.