1
LAMP INSTALLATION –
INDUCTIVE TECHNOLOGY LAMP
PHOTOELECTRIC CONTROL
CAUTION
Risk of burn
• Allow lamp/fixture to cool before
handling
NOTE: Use only lamps specified on nameplate.
Observe lamp manufacturer’s recommendations
and restrictions on lamp operation, particularly
ballast type, burning position, etc.
Damage may occur to the fixture if the lamp is inserted
while the power is on.
The inductively coupled electrodeless lamps are factory
supplied with the lamp installed. To replace the lamp,
remove the four screws holding the mounting brackets to
the reflector (Figure 1). Disconnect the lamp wiring
harness and attach the new lamp. Secure the new lamp with
the four screws through the mounting bracket and close the
fixture. Use one of the following lamps: OSI 26100 or
OSI 26101.
When a photoelectric control is used, the photoelectric
receptacle should be oriented so that the word “North’’ is
directed toward the true north direction. This can be easily
done by seating a photoelectric control into the receptacle,
lifting upward on the photoelectric control (which will lift
the photoelectric receptacle also), and rotating them
clockwise until the word “North’’ is directed toward the true
north direction. Lower the photoelectric control and
receptacle to firmly seat them into position. No tools are
required to make this orienting adjustment.
Alternatively, the photoelectric receptacle can be oriented before the photoelectric control is installed. This is
done by lifting up on the rim of the photoelectric receptacle
and rotating it until the word “North’’ is directed toward
the true north direction. Lower the photoelectric receptacle
to firmly seat it in this position. Install the photoelectric
control.
Because of the shielding of the cupola window by the
cupola top it may be necessary to adjust for an earlier turnon time of the photoelectric control.
ONE PIECE REFRACTOR REPLACEMENT
To remove a textured refractor on this luminaire, loosen
the canopy captive screw or latch and tilt back the canopy.
Remove the refractor assembly unit. To replace refractor
reverse this procedure.
FOUR PIECE REFRACTOR REPLACEMENT
To replace a prismatic refractor on this luminaire,
loosen the canopy captive screw or latch and tilt back the
canopy. Disconnect the photoelectric receptacle plug and
unclip the leads form the house side panel. Remove the
refractor panels as a unit. Release the defective panel from
the tongue and groove. To replace the assembly reverse this
procedure.
MAINTENANCE AND CLEANING
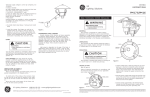
Figure 1
g
WARNING: MAKE CERTAIN POWER IS OFF
BEFORE ATTEMPTING ANY MAINTENANCE.
It will occasionally be necessary to clean the optical parts
in order to maintain the light level. Frequency of cleaning
will depend on the dirt level in the area and the minimum
light level which is acceptable. Wash with non-abrasive
soap, cleaner or detergent solutions and rinse with cool
water.
GE Lighting Solutions • 1-888-MY-GE-LED • www.gelightingsolutions.com
1-88 8 - 6 9 - 4 3 -5 3 3
GE Lighting Solutions is a subsidiary of the General Electric Company. Evolve and other trademarks belong to GE Lighting Solutions. The GE brand and logo are trademarks of the General Electric Company.
© 2011 GE Lighting Solutions. Information provided is subject to change without notice. All values are design or typical values when measured under laboratory conditions.
35-201578-E9 (8/01)