1
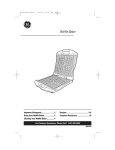
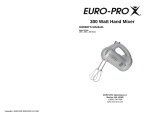
Stand Mixer
Item Stock Number
168949
UPC:
681131689496
www.gehousewares.com
For Product Service, Call Customer Assistance at 1-877-207-0923
168949 • UPC 681131689496
IMPORTANT SAFEGUARDS
When using electrical appliances, basic safety precautions should always be
followed, including the following:
1. Read all instructions.
2. To protect against risk of electrical
shock, do not put cord, plug, or
Mixer body in water or other liquid.
This may cause personal injury or
damage to the product.
3. Close supervision is necessary when
Mixer is used by or near children.
4. Unplug from outlet when not in use,
before putting on or taking off parts
and before cleaning.
5. Avoid contacting moving parts. Keep
hands, hair, clothing, as well as spatulas
and other utensils, away from beaters
during operation to reduce the risk
of injury to persons, and/or damage
to the Mixer.
6. Do not operate Mixer with a damaged
cord or plug, or after the appliance
malfunctions, or is dropped or
damaged in any manner. Call our
toll-free Customer Assistance
Number for information on
examination, repair or electrical
or mechanical adjustment.
7. The use of attachments not
recommended or sold by the appliance
manufacturer for use with this model
may cause fire, electrical shock or
injury.
8. Do not use outdoors or for commercial
purposes.
9. Do not let cord hang over edge of
table or countertop, or touch hot
surfaces, including stove.
10. Remove beaters from Mixer before
washing.
11. Do not place Mixer or bowls on or
near a hot gas or electric burner, or
in a heated oven.
12. Check that control is off before
plugging cord into wall outlet. To
disconnect, turn control to OFF,
then remove plug from wall outlet.
13. Do not use Mixer for other than
intended use.
14. Do not leave Mixer unattended
while it is operating.
SAVE THESE INSTRUCTIONS!
Consumer Safety Information
THIS UNIT IS FOR HOUSEHOLD USE ONLY.
When your GE® Mixer is first used, you
may experience an odor and possibly a
slight wisp of smoke from your mixer’s
motor. This is caused by the heat curing
of the insulation, which protects the
motor and is normal. After the first few
uses, this will no longer occur.
try reversing the plug. If the plug should
still fail to fit, contact a qualified electrician
to replace the obsolete outlet. Do not
attempt to defeat the safety purpose of
the polarized plug by modifying the plug
in any way.
WARNING: To reduce risk of personal
injury, always unplug Mixer before inserting
or removing beaters or dough hooks.
This appliance is equipped with a polarized
plug. This type of plug has one blade wider
than the other. The plug will fit into an
electrical outlet only one way. This is a
safety feature intended to help reduce
the risk of electrical shock. If you are
unable to insert the plug into the outlet,
BEFORE FIRST USE: Wash bowl, beaters,
and dough hooks in hot, soapy water.
Then rinse and dry.
2
Mixing Tips
Cookie dough is one of the thickest doughs to mix. Make it easier by following
these tips:
• Use a large mixing bowl so that the
ingredients spread out for easier mixing.
• Have butter or margarine at room
temperature.
• Add ingredients one at a time and
thoroughly mix after each addition.
• Add flour one cup at a time.
• To add chocolate chips or nuts to a very
thick dough or batter, we recommend
stirring them in by hand at the very
end of the recipe.
Parts and Features
1. Beater Ejector Button
2. Power Boost Button
3. Speed Control Dial
4. Mixer-Release Trigger
5. Head lock Button
6. Stand
7. Dough Hooks
8. Base
9. Dual Position Turntable
10. Bowl-Fit Beaters
11. Large Stainless Steel Mixing Bowl
12. Small Glass Mixing Bowl
13. Handle
3
Using Your Mixer
How to Assemble the Stand Mixer
Before assembling the Mixer, make sure the speed control dial is in the OFF
position and the electric cord is unplugged.
Attaching the Turntable
To assure the proper positioning of the mixing bowl with relation to the beaters, the
turntable has two positions. Before adjusting the turntable, decide which bowl will be
used. To adjust the turntable, remove it from the base. There are icons on the base
depicting a large (stainless steel)bowl and a small (glass)bowl. Place the turntable in
the hole with the icon corresponding to the bowl that will be used.
Attaching the Mixer Head
To attach the mixing head, press in on the Mixer release trigger, located at the rear
of the stand.
Place the Mixer head on the stand so that the metal pivot on the bottom of the
Mixer head goes into the latched opening on the top of the stand.
As you release pressure from the Mixer-release trigger, the top of the latch should
clamp around the metal pivot. Once the mixing head is lowered into position, it
will lock into place.
To tilt the mixing head, upward, press the head lock button inward while pulling up
on the handle of the mixing head.
NOTE: This Mixer is NOT intended for use away from the stand.
4
Adding the Mixing Bowl
When using the large bowl, the turntable should be placed in the off-center position,
where the large bowl icon is located. Similarly, when using the small bowl, the turntable
should be placed in the center position where the small bowl icon is located.
Mixing bowls should NEVER be used in a conventional oven, microwave oven, on
top of the range or on any other heated surface. If mixing bowls are scratched or
chipped, do not use. Mixer bowl should not be used to blend in hot liquids.
Inserting the Beaters
NOTE: It is important that the beaters go into the correct sockets. Otherwise the
Mixer will not give you the proper mixing action. Do not risk ruining a recipe or
damaging your Mixer. Read the following instructions carefully.
1. Make sure the Mixer is unplugged and speed control dial is set to 0 (OFF) position.
Lift Mixer head up and back to pull it out of the way of the bowl.
The beater with the small washer (has a plastic button on the bottom) goes into the
socket on the side of the mixer nearest the side of the bowl. The beater with the
larger washer (square-shaped) goes into the socket nearest the center of the bowl.
Because each beater only fits in it’s proper socket, please follow the above instructions
when you inserting beaters. Please refer to the icons beside the sockets.
1. Small Washer Beater
2. Big Washer Beater
2. Insert the beaters one at a time by aligning the notches on the beater with the
slots on the Mixer head. Use a combination of pressing and twisting motion until
the beaters snap into position.
If a beater should not properly snap into place, pull it out of the socket and rotate it
one quarter turn. Reinsert the beater into the socket until it snaps into position.
5
Inserting Dough Hooks
NOTE: The dough hooks must go into the correct sockets. The Mixer will operate
with the dough hooks in the wrong position. However, you will not get proper
kneading action and you could risk ruining a recipe. Read the following
instructions carefully.
1. Make sure Mixer is unplugged and speed control dial is set to OFF. Lift Mixer
head up and back to tilt it out of the way of the bowl, while holding it in an
upright position.
2. The dough hook with the small washer and foot goes into the socket on the side
of the Mixer nearest the side of the bowl. The other dough hook with the large
washer goes into the socket nearest the center of the bowl. Insert the dough hooks
one at a time by aligning the notches on the hooks with the slots on the Mixer
head. Use a combination of pressing and twisting motions until the dough hooks
snap into position. Please refer to the icons beside the sockets.
1. Small Washer Hook
2. Big Washer Hook
6
Operating Instructions
ABOUT THE SPEED CONTROL DIAL
The speed control dial is used for turning the Mixer ON and OFF and for selecting
its 12 mixing speeds.
Rotate the speed control dial in a clockwise direction to increase mixing speed; and
in a counterclockwise direction to decrease mixing speed.
As you rotate the speed control dial, notice that a numbered speed is aligned with
the indicator on top of the Mixer head. This numbered speed indicates the speed
at which the Mixer is operating.
Rotate the speed control dial until the indicator is opposite the numbered speed
you wish to use.
POWER BOOST FEATURE
NOTE: Do not use Power Boost for more than two minutes at a time or motor
may overheat.
Press down on the Power Boost button located beside the top handle to automatically
increase the beater speed by 200 RPM for an immediate boost of power.
HEAD LOCK FEATURE
The head lock feature locks the mixing head in the down position for added control
while mixing and locks it in the up position for added convenience while cleaning.
To unlock, press in on the head lock button located on the side of the stand.
To lock, lower/raise mixing head until it automatically locks in place.
7
Mixing Guide
SPEED SETTING
MIXING GUIDE
EXAMPLE
1
Fold-Kneaded
Use when mixing dry ingredients or when
folding two portions of a recipe together,
such as a beaten egg white into a batter.
Use when directions call for LOW speed.
Use for kneading bread.
2
Stir
Use when stirring liquid ingredients or
when gentle action is needed to moisten
dry ingredients.
3
Blend
Use when quick breads require a brisk
action, just enough to blend ingredients but
not enough to develop a smooth batter.
4
Mix
Use when mixing dry ingredients and
liquid ingredients together alternately in
a recipe.
5
Combine
Use when recipe calls for combining
ingredients together.
6
Cake Mixes
Use when preparing packaged cake mixes
or when directions call for MEDIUM speed.
7
Cream
Use when creaming sugar and butter
together.
8
Whip
Use to whip potatoes or to develop a
smooth batter.
9
Whip/Cream
Use to whip whipping cream or to develop
a light, fluffy texture.
10
Desserts
Use to beat air into whipped desserts.
11
Frostings
Use when preparing light, fluffy frostings
and candies.
12
Egg Whites
Use when aerating eggs and egg whites.
Use when directions call for HIGH speed.
NOTE: Due to variations in ingredient temperatures and quantities, the Mixing
Guide speeds are only suggested. If necessary, adjust speeds as needed to achieve
desired results.
8
Caring For Your Mixer
EJECTING THE BEATERS OR DOUGH HOOKS
After you’ve finished mixing, turn the speed control dial to OFF and unplug the
electric cord from the electrical outlet. Push the ejector button located beside the
handle to remove beaters or dough hooks.
Scrape excess batter off the beaters using a rubber or plastic spatula. Do not strike
beaters on the rim of the bowl.
Cleaning Your Mixer
1. Always turn off and unplug Mixer from electrical outlet before ejecting the
attachments.
2. Wash attachments in hot, soapy water; rinse and dry.
3. Wipe the Mixer body and cord with a clean, damp cloth.
NOTES:
• Do not use abrasive cleaners or scouring pads as they may mar the finish of the Mixer.
• To reduce the risk of electrical shock, do not immerse the Mixer body or cord in
water or other liquid.
• Beaters and bowls may also be washed in an automatic dishwasher.
Storing Your Mixer
Store the Mixer in a dry location, such as on a countertop or table top, or in a closet
or cupboard. Insert the beaters into the proper sockets. Place the dough hooks in
the mixing bowl.
Store the bowl(s) on the turntable. The beaters will help hold the bowl in position.
9
MAINTENANCE
The motor of your stand Mixer has been carefully lubricated at the factory and
does not require any additional lubricant. Other than the recommended cleaning,
no further user maintenance should be necessary. There are no user serviceable
component in this Mixer. Do not attempt to disassemble.
Helpful Hints
MIXING AND BAKING SUGGESTIONS
• Ingredients should be added to the mixing bowl as they are specified in the recipe.
When combining dry and wet ingredients, you may wish to moisten ingredients on
Speed 1 or 2, then turn to the desired mixing speed.
• Use the mixing speed that is recommended in the recipe. Use the handy mixing
guide on the speed control dial of the Mixer to help you find the correct speed
to use.
• If times are specified in the recipe, use them. BE CAREFUL NOT TO OVER MIX.
Over mixing can cause the mixture to become very tough.
• Should an object, such as a spatula, fall into the bowl while the Mixer is operating,
turn the mixer OFF immediately. Then, remove the object.
• Remove beaters and place in sink for easy clean up.
• DO NOT exceed 3-1/2 cups of flour in any recipe as this will exceed the capacity
of several unit components and may cause the motor to overheat.
Breads
SPECIAL INSTRUCTIONS FOR MAKING KNEADED BREADS
When making kneaded breads, your Mixer will require more care than when making
ordinary mixtures, such as cake batter and cookie dough. The elasticity of the bread
dough and the shape of the dough hooks may cause your Mixer to do some unusual
things.
The bowl may tend to rock back and forth. We suggest that you guide the outside of
the bowl with one hand to help control the rocking action. AVOID GETTING YOUR
HANDS TOO NEAR THE DOUGH HOOKS.
The kneading action may cause the Mixer to slide on a slippery work surface. Be
sure the work surface and rubber feet on the bottom of the Mixer are clean and dry.
CAUTION: DO NOT use the mixer too near the edge of a table or counter top,
where it could fall off.
10
Using Dough Hooks
DO NOT LEAVE YOUR MIXER UNATTENDED WHILE USING THE DOUGH HOOKS.
Ingredients should be added to the mixing bowl as they are specified in the recipe.
Combine a small portion of the dry ingredients with the wet ingredients. Mix on
Speed 6. Continue adding dry ingredients until the mixture becomes sticky, then
turn to Speed 1. Gradually add remaining dry ingredients.
If there is high humidity in the air, it may be necessary to add additional flour to the
recipe. The high humidity could also extend the amount of time necessary for baking.
Guide the mixing bowl with your hands. Use caution to keep hands out of the way
of the dough hooks.
DO NOT attempt to scrape the bowl while the Mixer is operating. Stop the Mixer
and scrape the sides of the bowl as necessary. Use a rubber or plastic spatula only.
DO NOT attempt to feed dough into the dough hooks with your hands, a spatula
or any other utensil while the Mixer is plugged into an outlet or in operation.
If times are specified in the recipe, use them. BE CAREFUL NOT TO OVER MIX.
Over mixing can cause the mixture to become tough. We suggest the maximum
mixing time should be 6-8 minutes.
Should an object, such as a spatula, fall into the bowl while the mixer is operation,
turn the mixer OFF immediately. Then remove the object. Remove dough hooks
and place in sink for easy clean up.
DOUGH RISING TIPS
A large, well-greased, glass mixing bowl is an excellent container in which to raise
yeast dough. The ideal temperature is 85°F/30°C in an area that is draft free. Cover
with a light cloth. The final rising should be after the dough has been shaped and
placed on a greased baking sheet or pan recommended in the recipe. Again, cover
the rising dough and place in a warm, draft-free area. If you live in a high altitude
area, yeast breads will require a shorter rising time. Allow the dough to rise only
until it has doubled in size. Slightly less flour should be used because flour is dryer
at higher altitudes.
11
Customer Assistance
If you have a claim under this warranty, please call our Customer Assistance Number.
For faster service please have model, series, and type numbers ready for operator to
assist you. These numbers can be found on the bottom of your Stand Mixer.
MODEL: _________________ TYPE: _______________ SERIES: _________________
Customer Assistance Number 1-877-207-0923
Keep this number for future reference!
TWO-YEAR LIMITED WARRANTY
What does your warranty cover?
• Any defect in material or workmanship.
For how long after the original purchase?
• Two years.
What will we do?
• Provide you with a new one.
How do you make a warranty claim?
• Save your receipt.
• Properly pack your unit. We
recommend using the original
carton and packing materials.
• Return the product to your nearest
WAL★MART store or call Customer
Assistance at 1-877-207-0923.
What does your warranty not cover?
• Glass parts, glass containers, cutter/
strainer, blades and/or agitators.
• Commercial use or any other use not
found in printed directions.
• Damage from misuse, abuse, or neglect.
• Products purchased or serviced outside
the USA.
How does state law relate to this warranty?
• This warranty gives you specific legal
rights, and you may also have other
rights which vary from state to state.
• WAL★MART expressly disclaims all
responsibility for consequential damages
or incidental losses caused by use of
this appliance. Some states do not
allow this exclusion or limitation of
incidental or consequential losses so
the foregoing disclaimer may not
apply to you.
What if you purchased your product
in the U.S., Canada or Mexico and
encounter a problem while using it
outside the country of purchase?
• The warranty is valid only in the country
of purchase and if you follow the
warranty claim procedure as noted.
is a trademark of
General Electric Company
and is used under the license by
WAL✭MART Stores Inc.
Bentonville, AR 72716
WAL★MART Stores, Inc.
Bentonville, AR 72716