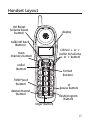
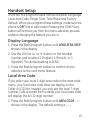
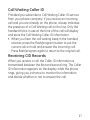
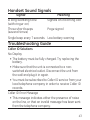
1
Model 27906
2.4 GHz Cordless
Telephone System
User’s Guide
Equipment Approval Information
Your telephone equipment is approved for connection
to the Public Switched Telephone Network and is
in compliance with parts 15 and 68, FCC Rules and
Regulations and the Technical Requirements for Telephone
Terminal Equipment published by ACTA.
1Notification to the Local Telephone Company
On the bottom of this equipment is a label indicating,
among other information, the US number and Ringer
Equivalence Number (REN) for the equipment. You must,
upon request, provide this information to your telephone
company.
The REN is useful in determining the number of devices
you may connect to your telephone line and still have
all of these devices ring when your telephone number is
called. In most (but not all) areas, the sum of the RENs of all
devices connected to one line should not exceed 5. To be
certain of the number of devices you may connect to your
line as determined by the REN, you should contact your
local telephone company.
A plug and jack used to connect this equipment to the
premises wiring and telephone network must comply
with the applicable FCC Part 68 rules and requirements
adopted by the ACTA. A compliant telephone cord and
modular plug is provided with this product. It is designed
to be connected to a compatible modular jack that is also
compliant. See installation instructions for details.
Notes
• This equipment may not be used on coin service
provided by the telephone company.
• Party lines are subject to state tariffs, and therefore,
you may not be able to use your own telephone
equipment if you are on a party line. Check with your
local telephone company.
• Notice must be given to the telephone company upon
permanent disconnection of your telephone from your
line.
• If your home has specially wired alarm equipment
connected to the telephone line, ensure the installation
of this product does not disable your alarm equipment.
If you have questions about what will disable alarm
equipment, consult your telephone company or a
qualified installer.
US Number is located on the cabinet bottom.
REN Number is located on the cabinet bottom.
2Rights of the Telephone Company
Should your equipment cause trouble on your line which
may harm the telephone network, the telephone company
shall, where practicable, notify you that temporary
discontinuance of service may be required. Where prior
notice is not practicable and the circumstances warrant
such action, the telephone company may temporarily
discontinue service immediately. In case of such
temporary discontinuance, the telephone company must:
(1) promptly notify you of such temporary discontinuance;
(2) afford you the opportunity to correct the situation; and
(3) inform you of your right to bring a complaint to the
Commission pursuant to procedures set forth in Subpart E
of Part 68, FCC Rules and Regulations.
The telephone company may make changes in its
communications facilities, equipment, operations or
procedures where such action is required in the operation
of its business and not inconsistent with FCC Rules and
Regulations. If these changes are expected to affect the
use or performance of your telephone equipment, the
telephone company must give you adequate notice, in
writing, to allow you to maintain uninterrupted service.
Interference Information
This device complies with Part 15 of the FCC Rules.
Operation is subject to the following two conditions: (1) This
device may not cause harmful interference; and (2) This
device must accept any interference received, including
interference that may cause undesired operation.
This equipment has been tested and found to comply
with the limits for a Class B digital device, pursuant to Part
15 of the FCC Rules. These limits are designed to provide
reasonable protection against harmful interference in a
residential installation.
This equipment generates, uses, and can radiate radio
frequency energy and, if not installed and used in
accordance with the instructions, may cause harmful
interference to radio communications. However, there is no
guarantee that interference will not occur in a particular
installation.
Privacy of Communications may not be ensured when
using this product.
If this equipment does cause harmful interference to
radio or television reception, which can be determined by
turning the equipment off and on, the user is encouraged
to try to correct the interference by one or more of the
following measures:
• Reorient or relocate the receiving antenna (that is, the
antenna for radio or television that is “receiving” the
interference).
• Reorient or relocate and increase the separation
between the telecommunications equipment and
receiving antenna.
• Connect the telecommunications equipment into an
outlet on a circuit different from that to which the
receiving antenna is connected.
If these measures do not eliminate the interference,
please consult your dealer or an experienced radio/
television technician for additional suggestions. Also, the
Federal Communications Commission has prepared a
helpful booklet, “How To Identify and Resolve Radio/TV
Interference Problems.” This booklet is available from the
U.S. Government Printing Office, Washington, D.C. 20402.
Please specify stock number 004-000-00345-4 when
ordering copies.
Notice: The changes or modifications not expressly
approved by the party responsible for compliance could
void the user’s authority to operate the equipment.
Hearing Aid Compatibility (HAC)
This telephone system meets FCC standards for Hearing
Aid Compatibility.
Licensing
Licensed under US Patent 6,427,009.
FCC RF Radiation Exposure Statement
This equipment complies with FCC RF radiation exposure
limits set forth for an uncontrolled environment. This
equipment should be installed and operated with a
minimum distance of 20 centimeters between the radiator
and your body. This transmitter must not be co-located
or operated in conjunction with any other antenna or
transmitter.”
For body worn operation, this phone has been tested
and meets the FCC RF exposure guidelines when used
with the belt clip supplied with this product. Use of other
accessories may not ensure compliance with FCC RF
exposure guidelines.
Table of Contents
Equipment Approval Information..................................... 2
Interference Information. ............................................... 4
Hearing Aid Compatibility (HAC)..................................... 6
Licensing......................................................................... 6
FCC RF Radiation Exposure Statement............................ 7
Introduction................................................................. 11
Before You Begin.......................................................... 11
Parts Checklist........................................................................11
Telephone Jack Requirements...............................................12
Installation .................................................................. 12
Digital Security System..........................................................12
Important Installation Guidelines........................................14
Handset Layout............................................................. 15
Installing the Phone. .................................................... 16
Installing the Handset Battery............................................16
Base Station. ............................................................................17
Wall Mounting.......................................................................18
Handset Setup. ............................................................. 19
Display Language. ...................................................................19
Local Area Code.....................................................................19
Ringer Tone..............................................................................20
Tone/Pulse...............................................................................20
Factory Default.......................................................................21
Cordless Phone Basics.................................................. 21
Making a Call..........................................................................21
Receiving a Call.......................................................................21
Table of Contents
Redial.........................................................................................22
In Use Indicator.......................................................................22
Flash..........................................................................................22
Volume.......................................................................................23
Channel Button......................................................................23
Temporary Tone.......................................................................23
Exit.............................................................................................24
Ringer On/Off . ......................................................................24
Paging the Handset................................................................25
Volume Boost .........................................................................25
Caller ID (CID)............................................................. 26
Call Waiting Caller ID..........................................................27
Receiving CID Records...........................................................27
Storing CID Records (In CID Memory)...............................28
Reviewing CID Records. ........................................................28
Dialing a CID Number............................................................29
Storing CID Records in Internal Memory.........................30
To Replace a Stored CID Record. .......................................31
Deleting a CID Record..........................................................31
Deleting All CID Records....................................................32
Memory......................................................................... 33
Storing a Name and Number in Memory.............................33
Storing the Last Number Dialed..........................................35
Inserting a Pause in the Dialing Sequence of a Stored
Number..................................................................................36
Changing a Stored Number. .................................................36
Table of Contents
Reviewing and Deleting Stored Numbers...........................36
Dialing a Stored Number.......................................................37
Chain Dialing from Memory..................................................38
Changing the Battery.................................................... 39
Battery Safety Precautions...................................................39
Display Messages........................................................... 40
Handset Sound Signals................................................. 43
Troubleshooting Guide. ................................................ 43
Causes of Poor Reception............................................. 46
General Product Care.................................................. 47
Service.......................................................................... 47
Index............................................................................. 49
Limited Warranty. ........................................................ 52
Accessory Information.................................................. 56
CAUTION:
RISK OF ELECTRIC SHOCK
DO NOT OPEN
WARNING: TO
PREVENT FIRE OR
ELECTRICAL SHOCK
HAZARD, DO NOT
EXPOSE THIS
PRODUCT TO RAIN
OR MOISTURE.
10
THE LIGHTNING
FLASH AND ARROW
HEAD WITHIN THE
TRIANGLE IS A
WARNING SIGN
ALERTING YOU OF
“DANGEROUS
VOLTAGE” INSIDE
THE PRODUCT.
CAUTION: TO REDUCE THE
RISK OF ELECTRIC SHOCK, DO
NOT REMOVE COVER (OR
BACK). NO USER
SERVICEABLE PARTS INSIDE.
REFER SERVICING TO
QUALIFIED SERVICE
PERSONNEL.
THE EXCLAMATION
POINT WITHIN THE
TRIANGLE IS A
WARNING SIGN
ALERTING YOU OF
IMPORTANT
INSTRUCTIONS
ACCOMPANYING
THE PRODUCT.
SEE MARKING ON BOTTOM / BACK OF PRODUCT
Introduction
CAUTION: When using telephone
equipment, there are basic safety
instructions that should always be
followed. Refer to the IMPORTANT SAFETY
INSTRUCTIONS provided with this product
and save them for future reference.
IMPORTANT: Because cordless phones
operate on electricity, you should have at
least one phone in your home that isn’t
cordless, in case the power in your home
goes out.
Before You Begin
Parts Checklist
Make sure your package includes the items shown here.
AC power
adaptor
Base
Belt clip
Handset
battery pack
Telephone
line cord
Handset
11
Telephone Jack Requirements
To use this phone, you need an RJ11C
Wall plate
type modular telephone jack, which
Modular
might look like the one pictured here,
telephone
installed in your home. If you don’t have
line jack
a modular jack, call your local phone
company to find out how to get one installed.
Installation
Digital Security System
Your cordless phone uses a digital security system to
protect against false ringing, unauthorized access, and
charges to your phone line.
INSTALLATION NOTE: Some cordless
telephones operate at frequencies that
may cause or receive interference with
nearby TVs, microwave ovens, and VCRs. To
minimize or prevent such interference, the
base of the cordless telephone should not
be placed near or on top of a TV, microwave
ovens, or VCR. If such interference continues,
move the cordless telephone farther away
from these appliances.
12
Certain other communications devices
may also use the 2.4 GHz frequency for
communication, and, if not properly set,
these devices may interfere with each
other and/or your new telephone. If you are
concerned with interference, please refer
to the owner’s manual for these devices
on how to properly set channels to avoid
interference. Typical devices that may use
the 2.4 GHz frequency for communication
include wireless audio/video senders,
wireless computer networks, multi-handset
cordless telephone systems, and some longrange cordless telephone systems.
13
Important Installation Guidelines
• Avoid sources of noise and heat, such as motors,
fluorescent lighting, microwave ovens, heating
appliances and direct sunlight.
• Avoid areas of excessive dust, moisture and low
temperature.
• Avoid other cordless telephones or personal
computers.
• Never install telephone wiring during a lightning
storm.
• Never install telephone jacks in wet locations unless
the jack is specifically designed for wet locations.
• Never touch non-insulated telephone wires or
terminals, unless the telephone line has been
disconnected at the network interface.
• Use caution when installing or modifying telephone
lines.
14
Handset Layout
Vol Boost
(volume boost
button)
display
talk/call back
(button)
CID/vol 5 or 6
(caller ID/volume
5 or 6 button)
mem
(memory button)
redial
(button)
format
(button)
TONE*/exit
(button)
#
(pause button)
delete/channel
(button)
flash/program
(button)
ringer (button)
15
Installing the Phone
Installing the Handset Battery
NOTE: You must connect the handset battery
before use.
CAUTION: To reduce the risk of fire or
personal injury, use only the Thomson Inc.
approved Nickel-Cadmium (Ni-Cd) battery
model 5-2459 or Nickel Metal Hydride
battery model 5-2522 that is compatible
with this unit.
1.Locate battery and battery door which are packaged
together inside a plastic bag and are separate from
the handset.
2.Locate the battery compartment on the back of the
handset.
3.Plug the battery pack cord into the jack inside the
compartment.
battery
pack
PRESS DOWN
FIRMLY
16
black wire
red wire
NOTE: To ensure proper battery installation,
the connector is keyed and can be inserted
only one way.
4.Insert the battery pack.
5. Close the battery compartment by pushing the door
up until it snaps into place.
Base Station
1.Choose an area near an electrical outlet and a
telephone wall jack (RJ11C), and place your cordless
telephone on a level surface, such as a desktop or
tabletop, or you may mount it on the wall.
2. Plug one end of the telephone line cord into the TEL
LINE jack on the bottom of the base and the other end
into a modular jack.
3. Plug the AC power converter into the electrical outlet
and the DC connector into the jack on the bottom of
the base.
17
4.Set the ringer switch (on the handset) to ON, and place
the handset in the cradle on the base.
5. The charge/in use indicator turns on, verifying the
battery is charging. The unit will take 20 seconds to
register and verify its security code.
6.Allow the phone to charge for 16 hours prior to first
use. If you don’t properly charge the phone, battery
performance is compromised.
CAUTION: To reduce risk of personal injury,
fire, or damage use only the 5-2617 or
5-2748 power adaptor listed in the user’s
guide. This power adaptor is intended to
be correctly orientated in a vertical or
floor mount position.
Wall Mounting
If you want to mount the phone on a wall, slip the
mounting holes (on the back of the base) over the wall
plate posts, and slide the unit down into place. (Wall
plate not included.)
18
Handset Setup
There are five programmable menus available: Language,
Local Area Code, Ringer Tone, Tone/Pulse and Factory
Default. When you program these settings, make sure the
phone is OFF (not in talk mode). Pressing the TONE*/exit
button will remove you from the menu selection process
without changing the feature you are in.
Display Language
1.Press the flash/program button until 1ENG 2FRA 3ESP
shows in the display.
2.Use the CID/vol (5 or 6) button or the handset
number pad to select 1 (English), 2 (French), or 3
(Spanish). The default setting is 1ENG.
3.Press the flash/program button to confirm and to
advance to the next menu feature.
Local Area Code
If you enter your local 3-digit area code in the area code
menu, your local area code does not display on the
Caller ID (CID) list. Instead, you only see the local 7-digit
number. Calls received from outside your local area code
will display the full 10-digit number.
1.Press the flash/program button until AREA CODE - - shows in the display. The default setting is - - -.
19
2.Use the handset number pad to enter your 3-digit
area code.
NOTE: If you make a mistake, press the
delete/channel button to erase the incorrect
area code and repeat step 2.
3.Press the flash/program button to confirm and to
advance to the next menu feature.
Ringer Tone
1.Press the flash/program button until RINGER TONE
shows in the display.
2.Use the CID/vol (5 or 6) button or the handset
number pad (1-3) to enter your selection from Ringer
Tone 1, 2, or 3. The default setting is RINGER TONE 1.
3.Press the flash/program button to confirm and to
advance to the next menu feature.
Tone/Pulse
1. Press the flash/program button until 1 TONE 2 PULSE
shows in the display.
2.Use the CID/vol (5 or 6) button or the handset
number pad to enter your selection. The default
setting is 1 TONE.
3.Press the flash/program button to confirm and to
advance to the next menu feature.
20
Factory Default
This feature allows you to restore the unit’s original
features.
1.Press the flash/program button until DEFAULT shows
in the display.
2.Use the CID/vol (5 or 6) button to scroll to YES o NO.
The default setting is NO.
3.Press flash/program to confirm. You will hear a
confirmation tone.
Cordless Phone Basics
Making a Call
1.Press the talk/call back button and dial the desired
number.
-OR To perform preview dial, dial the number first then
press the talk/call back button.
2.To hang up, press the talk/call back button or place
the handset in the cradle.
Receiving a Call
1.To answer a call press the talk/call back button on the
handset before you begin speaking.
2.To hang up, press the talk/call back button or place
the handset in the cradle.
21
Redial
Press the redial button to quickly dial the last number
you called (up to 32 digits).
If you get a busy signal, and want to keep dialing the
number, press redial to dial the number again.
In Use Indicator
When the charge/in use indicator on the base is lit, the
handset is either in use or charging. The charge/in use
indicator on the base and the incoming-call-alarm at the
base front cradle flash when you receive a call.
Flash
If you subscribe to the combined Call Waiting Caller
ID service from your local telephone company you
will receive Caller ID information (if available) on Call
Waiting calls. During a phone call, you will hear a beep
to indicate another call is waiting on the line and Caller
ID information for the waiting call shows on the handset
display. To connect the waiting call, press the flash/
program button on the handset and your original call is
put on hold. You may switch back and forth between the
two calls by pressing the flash/program button.
TIP: Do not use the talk/call back button to
activate custom calling services such as call
waiting, or you’ll hang up the phone.
22
Volume
When the phone is ON, press the CID/vol (5 or 6) on the
handset to adjust the volume of the handset’s earpiece.
There are four settings. Press the CID/vol 5 to increase
the volume and CID/vol 6 arrow to decrease the volume.
You will see the volume setting on the handset display.
VOL 4 is the maximum and VOL 1 is the minimum.
Channel Button
While talking on the phone, you might need to manually
change the channel in order to reduce static caused
by appliances, such as baby monitors, garage door
openers, microwave ovens, or other cordless phones.
Press and release the delete/channel button to move to
the next clear channel.
Temporary Tone
This feature is useful only if you have pulse (rotary)
service. Temporary Tone Dialing enables pulse (rotary)
service phone users to access touchtone services
offered by banks, credit card companies, etc.
For example, when you call your bank you may need to
enter your bank account number. Temporarily switching
to touchtone mode allows you to send your number.
23
1.Dial the telephone number and wait for the line to
connect.
2.When your call is answered, press the TONE*/exit
button on the handset to temporarily change from
pulse dialing to tone dialing.
3.Follow the automated instructions to get the
information you need.
4.Hang up the handset and the phone automatically
returns to pulse (rotary) dialing mode.
Exit
Press the TONE*/exit button to cancel any command you
initiated.
Ringer On/Off
1. Press ringer button to enter the ringer on/ off setting
menu and current setting will show in display.
2. Press ringer button again to select the setting and you
will hear the confirmation tone.
NOTE: If you turn the ringer OFF, RINGER OFF
shows in the display.
24
Paging the Handset
This feature helps to locate a misplaced handset.
Press the page button on the base. The handset will beep
for about two minutes or until you press talk/call back on
the handset or press the page button on the base.
NOTE: You can still page the handset if the
ringer is turned off. If the battery is dead, the
Paging feature will not work.
Volume Boost
During a conversation, you may increase the volume by
pressing the Vol Boost button, AUDIO BOOST will show in
display. The volume will return to its original setting when
you hang up the phone or if you press the vol Boost
button again during conversation.
NOTE: The Volume Boost feature can be
turned on at any Volume Level setting during
conversation. Also, the volume level can still
be adjusted after the Audio Boost Feature is
enabled by using the CID/vol (5 or 6) button.
25
Caller ID (CID)
IMPORTANT: In order to use this unit’s Caller
ID features, you must subscribe to either the
standard Name/Number Caller ID Service
or Call Waiting Caller ID Service. To know
who is calling while you are on the phone,
you must subscribe to Call Waiting Caller ID
Service.
This unit receives and displays information transmitted
by your local phone company. This information can
include the phone number, date, and time; or the name,
phone number, date, and time.
Time
Date
Number of calls
Caller ID
phone number
Caller ID name
26
Call Waiting Caller ID
Provided you subscribe to Call Waiting Caller ID service
from your phone company; if you receive an incoming
call and you are already on the phone, a beep indicates
the presence of a Call Waiting call on the line. Only the
handset that is in use at the time of the call will display
and store the Call Waiting Caller ID information.
• When you hear the call waiting beep in the handset
receiver, press the flash/program button to put the
current call on hold and answer the incoming call.
Press flash/program again to return to the original call.
Receiving CID Records
When you receive a call, the Caller ID information is
transmitted between the first and second ring. The Caller
ID information appears on the display while the phone
rings, giving you a chance to monitor the information
and decide whether or not to answer the call.
27
Storing CID Records (In CID Memory)
If you are not at home or cannot answer, your
telephone’s Caller ID memory stores the data for the
40 most recent calls you received so you can see who
called while you were unavailable. When the 41st
call is received, the oldest Caller ID record (1st call) is
automatically deleted.
You may review the stored information at any time. Calls
received since your last review show as NEW in the
display. Calls that have not been previously reviewed but
were received from the same number more than once
show as REPT in the display.
Reviewing CID Records
As calls are received and stored, the display is updated
to let you know how many calls have been received. To
scroll CID records:
1. Make sure the phone is OFF (not in TALK mode).
2. Press the CID/vol (6) button to review the newest CID
record.
3.Press the CID/vol (5) button to review the oldest CID
record first.
28
Dialing a CID Number
1.Make sure the phone is OFF (not in TALK mode).
2.Use the CID/vol (5 or 6) button to display the desired
record.
3.Press the talk/call back button. The number dials
automatically.
NOTE: Depending on (a) how the incoming
caller’s phone number is formatted when
it is received, and (b) whether or not you
previously pre-programmed your local area
code into the set up menu, you may need to
adjust the format of the incoming caller’s
stored phone number before making the
call, press the format button to adjust the
number, and try again.
Available formats include:
Number of digits Explanation Eleven digits
long distance code “1 ”
+3-digit area code
+7-digit telephone number.
Example: 1-317-888-8888
Ten digits3-digit area code
+7-digit telephone number.
Example: 317-888-8888
29
Seven digits
Example: 888-8888
7-digit telephone number.
Storing CID Records in Internal Memory
You may also store CID information in the phone’s
internal memory.
NOTE: It is important that you format CID
records correctly BEFORE storing in internal
memory as you cannot reformat CID records
stored in memory.
1. Make sure the phone is OFF (not in TALK mode).
2.Use the CID/vol (5 or 6) button to scroll to the
desired CID record.
3.Press the mem button.
4.Use the touch-tone pad to enter a memory location
(0-9) to store the number in that memory location. You
will hear a confirmation tone.
NOTE: If the memory location is occupied,
REPLACE MEMO? is displayed, and you must
confirm replacement by pressing the mem
button.
30
NOTE: Press the TONE*/exit button once
to keep the previous setting (making no
changes) and return to the menu.
NOTE: If the selected CID record contains
any information that is non-numeric, the
unit will not allow this record to transfer to
the internal user memory. The handset will
display UNABLE TO STORE.
To Replace a Stored CID Record
1. Repeat steps 1 through 3 in Storing CID Records in
Internal Memory. After you enter the memory location,
REPLACE MEMO? shows in the display.
2. Press the mem button again, and the new CID record
replaces the old memory in that location. You will hear
a confirmation tone.
Deleting a CID Record
1.Make sure the phone is OFF (not in TALK mode).
2.Use the CID/vol (5 or 6) button to display the CID
record you want to delete.
3.Press delete/channel. The display shows DELETE CALL
ID?.
31
4.Press delete/channel again to erase the record and
the next Caller ID record shows in the display. You will
hear a confirmation tone.
NOTE: Press the TONE*/exit key to return to
the standby mode.
Deleting All CID Records
1.Make sure the phone is OFF (not in TALK mode).
2.Use the CID/vol (5 or 6) button to display any Caller
ID record.
3.Press and hold the delete/channel button until DELETE
ALL? shows in the display.
4.Press delete/channel again to erase all records. You
will hear a confirmation tone. The display shows NO
CALLS.
NOTE: Press the TONE*/exit key to return to
the standby mode.
32
Memory
Each handset can store up to ten 24-digit numbers with
up to 15-character names in memory for quick dialing.
This memory feature is in addition to the CID memory
log, which stores up to 40 CID records in each handset.
Storing a Name and Number in Memory
1.Make sure the phone is OFF (not in TALK mode).
2.Press the mem button.
3.Press the desired memory location (0 through 9) or
use CID/vol (5 or 6) to scroll to the desired memory
location.
NOTE: If the memory location is occupied, the
memory location number and stored name
and telephone number shows in the display.
If the memory location is empty. EMPTY
shows in the display.
4.Press the mem button again. The display shows
ENTER NAME.
NOTE: If you don’t want to enter the name,
skip step 5.
33
5.Use the touch-tone pad on the handset to enter the
name (up to 15 characters) and press the mem button
to save. More than one letter is stored in each of the
number keys. For example, to enter the name Bill
Smith, press the 2 key twice for the letter B. Press the
4 key 3 times for the letter I. Press the 5 key 3 times
for the letter L. Wait for one second. Press the 5 key 3
times for the second letter L. Press the 1 key to insert a
space between the L and the S. Press the 7 key 4 times
for the letter S; press the 6 key once for the letter M;
press the 4 key 3 times for the letter I; press the 8 key
for the letter T; press the 4 key twice for the letter H.
NOTE: If you make a mistake press the
delete/channel button to backspace and
erase the wrong character(s) or number(s).
6.Press the mem button to save the name. The display
shows ENTER TEL NUMBR.
7. Use the touch-tone pad to enter the telephone
number you want to store (up to 24 digits).
NOTE: The system treats PAUSES as delays or
spaces in the dialing sequence.
34
8. Press mem again to store the number. You will hear a
confirmation tone.
Storing the Last Number Dialed
1. Repeat steps 1 through 6 in Storing a Name and
Number in Memory.
2. Press the redial button.
3.Press the mem button to store the number. You will
hear a confirmation tone.
To replace an old number with a new redial number:
1. Repeat steps 1 through 6 in Storing a Name and
Number in Memory.
2. Press the redial button.
3. Press the mem button, and REPLACE MEMO? shows in
the display.
4. Press the mem button again to replace the old
number with the new number. You will hear a
confirmation tone.
35
Inserting a Pause in the Dialing Sequence
of a Stored Number
If a pause is needed to wait for a dial or access tone,
press the # button to insert a delay in dialing sequence
of a stored number (for example, after you dial 9 for
an outside line, or to wait for a computer access tone).
Pause shows in the display as a P, and each pause
counts as one digit in the dialing sequence.
Changing a Stored Number
1. Repeat steps 1 through 7 in Storing a Name and
Number in Memory.
2.Press the mem button, and REPLACE MEMO? shows in
the display.
3.Press the mem button to store the number. You will
hear a confirmation tone.
Reviewing and Deleting Stored Numbers
1.To review stored numbers, press the mem button,
and use the CID/vol (5 or 6) button to scroll to the
memory location, or press the corresponding number
key for a desired memory location (0-9).
36
2.When the data shows in the display, press the delete/
channel button. The display shows DELETE? .
3.Press delete/channel again to delete the data. The
display shows DELETED.
Dialing a Stored Number
1.Make sure the phone is ON by pressing the talk/
call back button.
2.Press the mem button.
3.Press the memory location (0-9). The number dials
automatically.
- OR 1.Make sure the phone is OFF (not in TALK mode).
2.Press the mem button.
3.Use the touch-tone pad or the CID/vol (5 or 6)
button to scroll to the number you want to dial.
4.Press the talk/call back button. The number dials
automatically.
37
Chain Dialing from Memory
Use this feature to make calls which require a sequence
of numbers, such as calling card calls to a frequently
called long distance number. Each part of the sequence
is dialed from memory. The following example shows you
how to use chain dialing to make a call through a long
distance service:
The Number For
Memory Location
Long distance access number
7
Authorization code
8
Frequently called long distance number
9
1.Make sure the phone is ON (in TALK mode).
2.Press the mem button and then press 7.
3.When you hear the access tone, press the mem
button and then press 8.
4.At the next access tone, press the mem button and
then 9.
TIP: Wait for the access tones before
pressing the next mem button, or your call
may not go through.
38
Changing the Battery
CAUTION: To reduce the risk of fire or
personal injury, use only the Thomson Inc.
approved Nickel-Cadmium (Ni-Cd) battery
model 5-2459 or Nickel Metal Hydride
battery model 5-2522, that is compatible
with this unit.
1.Make sure the telephone is OFF (not in TALK mode)
before you replace battery.
2.Remove the battery compartment door.
3.Disconnect the cord attached to the battery pack and
remove the battery pack from the handset.
4.Insert the new battery pack and connect the cord to
the jack inside the battery compartment.
5.Put the battery compartment door back on.
6.Place handset in the base to charge. Allow the
handset battery to properly charge (for 16 hours)
prior to first use or when you install a new battery
pack. If you do not properly charge the phone,
battery performance will be compromised.
39
Battery Safety Precautions
• Do not burn, disassemble, mutilate, or puncture. Like
other batteries of this type, toxic materials could be
released which can cause injury.
• To reduce the risk of fire or personal injury, use only
the Nickel-Cadmium or Nickel-Metal Hydride
battery listed in the User’s Guide.
• Keep batteries out of the reach of children.
• Remove batteries if storing over 30 days.
NOTE: The RBRC seal on the battery used in your
Thomson Inc. product indicates that we are
participating in a program to collect and recycle
the rechargeable battery (or batteries).
For more information go to the RBRC web site at
www.rbrc.org or call 1-800-8-BATTERY or contact
a local recycling center.
Display Messages
The following indicators show the status of a message or
of the unit.
BLOCKED CALL The person is calling from a number
that has been blocked from
transmission.
40
BLOCKED NAME
The persons name is blocked from
transmission.
BLOCKED NUMBER The person is calling from a number
that has been blocked from
transmission.
CALL WAITING Indicates a call is waiting on the line.
DELETE ALL? Prompt asking if you want to erase
all Caller ID records.
DELETE CALL ID? Prompt asking if you want to erase
a Caller ID record.
DELETED Prompt confirming the Caller ID
record is erased.
EMPTY Indicates a memory location is
vacant.
END OF LIST Indicates that there is no additional
information in Caller ID memory.
ENTER NAME Prompt telling you to enter the
name for one of the 10 memory
locations.
ENTER NUMBER Prompt telling you to enter the
telephone number for one of the 10
memory locations.
41
INCOMPLETE DATA Caller information has been
interrupted during transmission or
the telephone line is excessively
noisy.
LOW BATTERY Indicates the battery needs to be
charged.
NEW Indicates call or calls have not been
reviewed.
NO CALLS Indicates no calls have been received.
NO DATA No Caller ID information was
received.
PAGING The PAGE button has been pressed
on the base.
PRESS TALK KEY Indicates the CID number is a Direct
Dial Number (DDN) and cannot be
formatted.
REPT Repeat call message. Indicates that
a new call from the same number
was received more than once.
AUDIO BOOST Indicates the VOLUME BOOST
feature is currently turned on.
UNKNOWN NAME The incoming call is from an area
CALLER/NUMBER serviced by Caller ID or the information was not sent.
42
Handset Sound Signals
Signal
Meaning
A long warbling tone
Signals an incoming call
(with ringer on)
Three short beeps
Page signal
(several times)
Single beep every 7 seconds Low battery warning
Troubleshooting Guide
Caller ID Solutions
No Display
• The battery must be fully charged. Try replacing the
battery.
• Make sure that the unit is connected to a nonswitched electrical outlet. Disconnect the unit from
the wall and plug it in again.
• You must be subscribed to Caller ID service from your
local telephone company in order to receive Caller ID
records.
Caller ID Error Message • This message indicates either the presence of noise
on the line, or that an invalid message has been sent
from the telephone company.
43
Cordless Phone Solutions
No dial tone
• Check installation:
Make sure the base power cord is connected to a
working electrical outlet.
Make sure the telephone line cord is connected to the
base unit and the wall phone jack.
• Connect another phone to the same modular jack; if
the second phone doesn’t work, the problem might
be with your wiring or local service.
• The handset may be out of range of the base. Move
closer to the base.
• Make sure the battery is properly charged (for 16
hours).
• Ensure the battery pack is installed correctly.
• Did the handset beep when you pressed the talk/
call back button? Did the in use/charge indicator
come on? The battery may need to be charged.
• Place the handset in the base for at least 20 seconds.
Handset does not ring
• Make sure the RINGER switch on the handset is
turned ON.
44
• Move closer to the base. The handset may be out of
range.
• You may have too many extension phones on your
line. Try unplugging some phones.
• Check for a dial tone.
You experience static, noise, or fading in and out • Change channels. • Move closer to base. The handset might be out of
range.
• Relocate the base. Make sure base is not plugged into
an electrical outlet with another household appliance.
• Charge the battery.
Unit beeps
• Place handset in base for 20 seconds; if it still beeps,
charge battery for 16 hours.
• Clean the charging contacts on handset and base
with a soft cloth.
• See solutions for “No dial tone.”
• Replace the battery.
Memory Dialing doesn’t work
• Make sure you programmed the memory location
keys correctly.
45
• Did you follow proper dialing sequence?
Phone dials in pulse with tone service
• Make sure phone is in tone dialing mode.
Phone won’t dial out with pulse service
• Make sure phone is in pulse dialing mode.
Causes of Poor Reception
• Aluminum siding.
• Foil backing on insulation.
• Heating ducts and other metal construction that can
shield radio signals.
• You’re too close to appliances such as microwaves,
stoves, computers, etc.
• Atmospheric conditions, such as strong storms.
• Base is installed in the basement or lower floor of the
house.
• Base is plugged into AC outlet with other electronic
devices.
• Baby monitor is using the same frequency.
• Handset battery is low.
• You’re out of range of the base.
• Microwave oven is using the same frequency.
46
General Product Care
To keep your telephone working and looking good, follow
these guidelines:
• Avoid putting the phone near heating appliances and
devices that generate electrical noise (for example,
motors or fluorescent lamps ).
• DO NOT expose to direct sunlight or moisture.
• Avoid dropping the unit and other rough treatment.
• Clean with a soft cloth.
• Never use a strong cleaning agent or abrasive powder
because this will damage the finish.
• Retain the original packaging in case you need to ship
the phone at a later date.
• Periodically clean the charge contacts on the handset
and base with a soft cloth.
Service
If trouble is experienced with this equipment, for repair
or warranty information, please contact customer
service at 1-800-448-0329. If the equipment is causing
harm to the telephone network, the telephone company
may request that you disconnect the equipment until the
problem is resolved.
47
This product may be serviced only by the manufacturer
or its authorized service agents. Changes or
modifications not expressly approved by Thomson Inc.
could void the user’s authority to operate this product.
For instructions on how to obtain service, refer to the
warranty included in this guide or call customer service
at 1-800-448-0329.
Or refer inquiries to:
Thomson Inc.
Manager, Consumer Relations
P O Box 1976
Indianapolis, IN 46206
Attach your sales receipt to the guide for future
reference or jot down the date this product was
purchased or received as a gift. This information will
be valuable if service should be required during the
warranty period.
Purchase date ___________________________________
Name of store ___________________________________
48
Index
A
Accessory Information
56
B
Base Station 17
Battery Safety
Precautions 39
Before You Begin 11
Cordless Phone Basics
21
Cordless Phone Solutions
44
D
Deleting a CID Record 31
Deleting All CID Records
32
Dialing a CID Number 29
C
Dialing a Stored Number
Caller ID (CID) 26
37
Caller ID Solutions 43
Digital Security System
Call Waiting Caller ID 27
12
Causes of Poor Reception Display Language 19
46
Display Messages 40
Chain Dialing from
E
Memory 38
Equipment Approval
Changing a Stored
Information 2
Number 36
Changing the Battery 39 Exit 24
Channel Button 23
49
F
Factory Default 21
FCC RF Radiation
Exposure Statement
7
Flash 22
G
General Product Care 47
H
Handset Layout 15
Handset Setup 19
Handset Sound Signals
43
Hearing Aid Compatibility
(HAC) 6
I
Important Installation
Guidelines 14
Inserting a Pause in the
Dialing Sequence of a
Stored Number 36
Installation 12
50
Installing the Handset
Battery 16
Installing the Phone 16
Interference Information
4
Introduction 11
In Use Indicator 22
L
Licensing 6
Limited Warranty 52
Local Area Code 19
M
Making a Call 21
Memory 33
P
Paging the Handset 25
Parts Checklist 11
R
Receiving a Call 21
Receiving CID Records
27
Redial 22
Reviewing and Deleting
Stored Numbers 36
Reviewing CID Records
28
Ringer On/Off 24
Ringer Tone 20
S
Service 47
Storing a Name and
Number in Memory
33
Storing CID Records (In
CID Memory) 28
Storing CID Records in
Internal Memory 30
Storing the Last Number
Dialed 35
T
Telephone Jack
Requirements 12
Temporary Tone 23
Tone/Pulse 20
To Replace a Stored CID
Record 31
Troubleshooting Guide
43
V
Volume 23
Volume Boost 25
W
Wall Mounting 18
51
Limited Warranty
What your warranty covers:
• Defects in materials or workmanship.
For how long after your purchase:
• One year, from date of purchase.
(The warranty period for rental units begins with the
first rental or 45 days from date of shipment to the
rental firm, whichever comes first.)
What we will do:
• Provide you with a new or, at our option, a refurbished
unit. The exchange unit is under warranty for the
remainder of the original product’s warranty period.
How you get service:
• Properly pack your unit. Include any cables, etc.,
which were originally provided with the product. We
recommend using the original carton and packing
materials.
• ”Proof of purchase in the form of a bill of sale or
receipted invoice which is evidence that the product
is within the warranty period, must be presented to
obtain warranty service.” For rental firms, proof of
first rental is also required. Also print your name and
address and a description of the defect. Send via
standard UPS or its equivalent to:
52
Thomson, Inc.
11721 B Alameda Ave.
Socorro, Texas 79927
• Pay any charges billed to you by the Exchange Center
for service not covered by the warranty.
• Insure your shipment for loss or damage. Thomson
Inc. accepts no liability in case of damage or loss.
• A new or refurbished unit will be shipped to you freight
prepaid.
What your warranty does not cover:
• Customer instruction. (Your Owner’s Manual provides
information regarding operating instructions and
user controls. Any additional information, should be
obtained from your dealer.)
• Installation and setup service adjustments.
• Batteries.
• Damage from misuse or neglect.
• Products which have been modified or incorporated
into other products.
• Products purchased or serviced outside the USA.
• Acts of nature, such as but not limited to lightning
damage.
53
Product Registration:
• Please complete and mail the Product Registration
Card packed with your unit. It will make it easier to
contact you should it ever be necessary. The return of
the card is not required for warranty coverage.
Limitation of Warranty:
• The warranty stated above is the only warranty
applicable to this product. All other warranties,
express or implied (including all implied warranties
of merchantability or fitness for a particular
purpose) are hereby disclaimed. No verbal or
written information given by Thomson Inc., its
agents, or employees shall create a guaranty or in
any way increase the scope of this warranty.
• Repair or replacement as provided under this
warranty is the exclusive remedy of the consumer.
Thomson Inc. shall not be liable for incidental or
consequential damages resulting from the use of
this product or arising out of any breach of any
express or implied warranty on this product. This
disclaimer of warranties and limited warranty are
governed by the laws of the state of Indiana. Except
to the extent prohibited by applicable law, any
implied warranty of merchantability or fitness for a
particular purpose on this product is limited to the
applicable warranty period set forth above.
54
How state law relates to this warranty:
• Some states do not allow the exclusion nor limitation
of incidental or consequential damages, or limitations
on how long an implied warranty lasts so the above
limitations or exclusions may not apply to you.
• This warranty gives you specific legal rights, and you
also may have other rights that vary from state to
state.
If you purchased your product outside the USA:
• This warranty does not apply. Contact your dealer for
warranty information.
55
Accessory Information
DESCRIPTION
AC Power adaptor
Handset Replacement Battery
MODEL NO.
5-2617 or 5-2748
5-2459 or 5-2522
To place order, have your Visa, MasterCard, or
Discover Card ready and call toll-free
1-800-338-0376.
A shipping and handling fee will be charged upon
ordering.
We are required by law to collect appropriate sales
tax for each individual state, country, and locality to
which the merchandise is being sent.
Items are subject to availability.
*Prices are subject to change without notice.
Model 27906
00016324 (Rev. 2 Dom E/S)
07-22
Printed in China
Thomson Inc.
101 West 103rd Street
Indianapolis, IN 46290-1102
© 2007 Thomson Inc.
Trademark(s) ® Registered
Marca(s) Registrada(s)
Modelo 27906
2.4 GHz Sistema de
Auricular Inalámbrico
Guía del Usuario
Información sobre la Aprobación de
Equipo
El equipo de su teléfono esta aprobado para la conexión
con la red Telefónica Pública (Public Switched Telephone
Network) y cumple con los requisitos establecidos en las
secciones 15 y 68 de las Reglas y Regulaciones de la FCC y
con los Requerimientos Técnicos para Equipos de Terminales
Telefónicas (Technical Requirements for Telephone Terminal
Equipment), publicado por ACTA.
1Notificación a la Compañía Telefónica Local
En la parte de abajo de este equipo hay una etiqueta
que indica, entre otra información, el número de US y
el Número de Equivalencia de Timbres (REN) para este
equipo. Usted debe, cuando sea requerido, proveer esta
información a su compañía telefónica.
El REN es útil para determinar el número total de artefactos
que Ud. puede conectar a su línea telefónica, todavía
asegurando que todos estos artefactos sonarán cuando
se llame su número telefónico. En la mayoría de las áreas
(pero no en todas), el total de los números REN de todos los
artefactos conectados a una línea no debe exceder 5. Para
estar seguro del número total de artefactos que Ud. pueda
conectar a su línea (determinado por el REN), Ud. deberá
ponerse en contacto con su compañía telefónica local.
Cualquier enchufe y conexión que se utilice para conectar
este equipo al cableado del edificio y a la red telefónica,
debe estar en conformidad con el reglamento de la FCC
Parte 68 que ha sido adoptado por la ACTA. Un cable
telefónico y un enchufe modular que han sido aprobados
y están en conformidad con dicho reglamento han sido
provistos con este producto. Están diseñados para ser
conectados a un enchufe modular compatible, que
también esté en conformidad. Para más detalles, vea las
instrucciones para la instalación.
Notes
• No se puede usar este equipo con un teléfono de previo
pago proveído por la compañía telefónica.
• Las líneas compartidas son sujetas a las tarifas del
estado, y por eso, es posible que Ud. no pueda usar su
propio equipo telefónico si Ud. estuviera compartiendo
la misma línea telefónica con otros abonados.
• Se debe notificar la compañía telefónica cuando se
desconecte permanentemente su teléfono de la línea.
• Si su casa tiene algún equipo de alarma especial
conectado a la línea telefónica, asegúrese que la
instalación de este producto no desactive su equipo de
alarma. Si usted tiene alguna pregunta sobre qué puede
desactivar su equipo de alarma, consulte a su compañía
telefónica o a un instalador calificado.
El número de la US está ubicado en el fondo de la base.
El numero REN esta ubicado en el fondo de la base.
2Derechos de la Compañía Telefónica
Si su equipo causase algún problema en su línea que
pudiera dañar la red telefónica, la compañía telefónica
siempre que sea posible le avisará de la posible
interrupción temporal de su servicio. En caso que la
compañía no pudiera avisarle de antemano y hubiera
necesidad de tomar tal acción, la compañía telefónica
podrá interrumpir su servicio inmediatemente. En caso
de tal interrupción telefónica temporal la compañía debe
: (1) darle aviso al momento de tal interrupción temporal
de servico, (2) concederle a Ud. la oportunidad de corregir
la situación, (3) informarle a Ud. de sus derechos de
presentar una questa a la Comisión de acuerdo con los
procedimientos dictados en la Subparte E de la Parte 68 de
las Regulaciones y Reglas de la FCC.
La compañía telefónica puede hacer los cambios en
sus instalaciones de comunicación, en equipos, en
sus funcionamientos o procedimientos que digne
necesarios para el manejo de sus negocios y que no sean
incompatibles con las Reglas y Regulaciones de l a FCC. Si
estos cambios pudieran alterar el uso o el funcionamiento
de su equipo telefónico, la compañía telefónica deberá
darle aviso adecuado en escrito para que Ud. goce de un
servico ininterrumpido.
Información de Interferencias
Este artefacto cumple con la Parte 15 de las Reglas de la
FCC. Su funcionamiento es sujeto a las dos condiciones
siguientes: (l) Este artefacto no puede causar interferencia
dañosa, y (2) Este artefacto debe aceptar cualquier
interferencia recibida, incluyendo interferencia que puede
causar un funcionamiento no deseado.
Este equipo ha sido probado y cumple con los límites para un
artefacto digital de la Clase B, de conformidad con la Parte
15 de las Reglas de la FCC. Estos límites han sido diseñados
para proporcionar una protección razonable contra una
interferencia dañosa que pueda existir en una instalación
doméstica.
Este equipo genera, usa y puede radiar la energía de
frecuencia de una radio y, si no fuera instalado y usado de
acuerdo con las instrucciones, puede causar interferencia
dañosa a las transmisiones radiales. Sin embargo, no hay
garantía que la interferencia no ocurrirá en una instalación
en particular.
La aislamiento de comunicaciones no puede ser asegurada
al usar este producto.
Si este equipo causa en efecto una interferencia dañosa a
la recepción de la radio o de la televisión, lo cual puede ser
determinado apagando y prendiendo el equipo, le animamos
a Ud. de tratar de corregir la interferencia por medio de una
(o más) de las sugerencias siguientes:
• Cambie la posición o la ubicación de la antena (quiere
decir la antena de la radio o de la televisión que está
recibiendo la interferencia).
• Cambie la posición o cambie la ubicación y aumente
la distancia entre el equipo de telecomunicaciones y la
antena receptora de la radio o de la televisión que está
recibiendo la interferencia.
• Conecte el equipo de telecomunicaciones a una toma
en un circuito diferente del circuito al cual la antena
receptora esté conectada.
Si estas medidas no eliminan la interferencia, favor de
consultar a su distribuidor o a un técnico de radio/televisión
experto por otras sugerencias. También, la Comisión Federal
de Comunicaciones (FCC) ha preparado un folleto muy
útil, “How To Identify and Resolve Radio/TV Interference
Problems” (“Como Identificar y Resolver Problemas de
Interferencia de Radio/Televisión”). Este folleto se puede
obtener del U.S. Goverment Printing Office, Washington, D.C.
20402. Favor de especificar el número 004‑000‑00345‑4
cuando haga su pedido.
Aviso: Los cambios o las modificaciones no no expreso
aprobados por el partido responsable de conformidad
podían anular la autoridad del usuario para funcionar el
equipo.
Compatibilidad con Audífonos (CCA)
Se juzga que este teléfono es compatible con audífonos, en
base a las normas de la FCC.
Licensing
Con licencia bajo la patente US 6,427,009.
Declaración de la FCC sobre Exposición a
la Radiación RF
Este equipo cumple con los límites a la exposición de
radiación RF de la FCC establecidos para un ambiente no
controlado. Este equipo deberá ser instalado y operado a
una distancia mínima de 20 centímetros entre el radiador
y su cuerpo. Este transmisor no debe de ser colocado u
operado en conjunto con alguna otra antena o transmisor”.
Para la operación del aparato en el cuerpo, este teléfono
ha sido sujeto a prueba y satisface los requerimientos para
exposición de la FCC y RF cuando se utiliza con el gancho
del cinturón que viene provisto con este producto. El uso de
otros accesorios puede no garantizar el cumplimiento de los
requerimientos para exposición de la FCC y RF.
Tabla de Contenido
Información sobre la Aprobación de Equipo.................... 2
Información de Interferencias......................................... 5
Compatibilidad con Audífonos (CCA)............................... 7
Licensing......................................................................... 7
Declaración de la FCC sobre Exposición a la Radiación.. 7
Introducción................................................................. 11
Antes de Comenzar. ...................................................... 11
Lista de Partes.........................................................................11
Requerimientos Para Enchufe Telefónico..........................12
Instalación ................................................................... 12
Sistema Digital de Seguridad. ...............................................12
Pautas Importantes de la Instalación..................................14
Formato del Auricular.................................................. 15
Instalar el Teléfono...................................................... 16
Instalar la Batería del Auricular. .......................................16
Estación para la Base.............................................................17
Montaje en la Pared...............................................................18
Programación. .............................................................. 19
Idioma en Pantalla..................................................................19
Código de Area Local............................................................19
Tono de Timbre.........................................................................20
Tono/Pulso..............................................................................20
Selecciones de Fábrica...........................................................21
Información Básica del teléfono Inalámbrico................ 21
Para Hacer una Llamada.......................................................21
Para recibir una Llamada.......................................................21
Tabla de Contenido
Volver a Marcar......................................................................22
Indicador en Uso.....................................................................22
Flash..........................................................................................22
Volumen....................................................................................23
Botón de Canal.......................................................................23
Tono Temporal.........................................................................23
Pasa Salir.................................................................................24
Timbre On/Off.........................................................................24
Búsqueda del Auricular. .......................................................25
Realce de volumen . ................................................................25
Identificador de Llamadas (CID).................................... 26
Llamada en Espera con Identificador de Llamadas...........27
Recibir Archivos del Identificador de Llamadas................27
Almacenar Archivos del Identificador de Llamadas (en la
Memoria de CID)..................................................................28
Revisar los Archivos de Identificador (CID)......................28
Marcar un Número del Identificador de Llamadas..........29
Almacenar Archivos del Identificador de Llamadas en la
Memoria Interna..................................................................30
Para Reemplazar un Registro CID Almacenado ..............31
Borrar un Archivo del Identificador de Llamadas...........31
Borrar Todos los Archivos del Identificador de
Llamadas...............................................................................32
Memoria........................................................................ 33
Almacenar un Nombre y Número en la Memoria..............33
Guardar el Ultimo Número Marcado.................................35
Tabla de Contenido
Introducir una Pausa en la Secuencia de Marcado de un
Número Almacenado. .........................................................36
Cambiar un Número Almacenado.........................................36
Revisar y Borrar Números Almacenados...........................36
Marcar un Número Almacenado. ........................................37
Marcado en Cadena desde la Memoria...............................38
Instalar la Batería del Auricular.................................. 39
Precauciones de Seguridad para la Batería........................39
Indicadores de Mensajes del Identificador de Llamadas40
Señales Sonoras del Auricular..................................... 43
Solución de Problemas.................................................. 43
Causas de una Mala Recepción...................................... 46
Cuidado General del Producto..................................... 47
Cómo Obtener Servicios de Mantenimiento. .................. 47
Índice............................................................................ 49
Garantía Limitada.......................................................... 52
Información de Accesorios............................................ 56
ADVERTENCIA: PARA
PREVENIR
EL RIESGO DE
UNFUEGO O DE UNA
SACUDIDA
ELECTRICA, NO
EXPONGA
ESTE APARATO A LA
LLUVIA O A LA
HUMEDAD.
10
ATTENTION:
RIESGO DE SACUDIDA
ELÉCTRICA NO ABRA
EL RELÁMPAGO Y LA
PUNTA DE FLECHA
DENTRO DEL TRIÁNGULO
ES UNA SEÑAL DE
ADVERTENCIA,
ALERTÁNDOLE A UD. DE
QUE HAY "VOLTAJE
PELIGROSO" DENTRO DEL
PRODUCTO.
CUIDADO: PARA REDUCIR
EL RIESGO DE UNA SACUDIDA
ELÉCTRICA, NO QUITE LA
CUBIERTA (O PARTE
POSTERIOR) NO USE PARTES
DE REPUESTO DENTRO.
CONSULTE A ALGUNA
PERSONA CALIFICADA DEL
SERVICIO DE REPARACIONES.
EL SIGNO DE
EXCLAMACIÓN DENTRO
DEL TRIÁNGULO ES UNA
SEÑAL DE
ADVERTENCIA,
ALTERTÁNDOLE A UD. DE
QUE EL PRODUCTO, TRAE
INCLUCIDO,
INSTRUCTIONES MUY
IMPORTANTES.
VEA ADVERTENCIA EN LA PARTE POSTERIOR/BASE DEL PRODUCTO.
Introducción
CUIDADO: Cuando utilice equipo telefónico,
hay instrucciones básicas de seguridad
que siempre deben seguirse. Refiérase a
la guía de INSTRUCCIONES DE SEGURIDAD
IMPORTANTES provista con este producto y
guárdela para referencia futura.
IMPORTANTE: Como los teléfonos inalámbricos
operan con electricidad, usted debe tener por
lo menos un teléfono en su casa que no sea
inalámbrico, en caso de una interrupción de
corriente.
Antes de Comenzar
Lista de Partes
Asegúrese de que su paquete incluye los artículos mostrados
aquí.
Base
Adaptador de
corriente CA
Broche de
cinturón
Paquete de
baterías del
auricular
Cable de línea
telefónica
Auricular
11
Requerimientos Para Enchufe Telefónico
Para utilizar este teléfono, usted puede
Placa de pared
necesitar un enchufe modular telefónico
tipo RJ11C como el ilustrado aquí, instalado Enchufe
en su hogar. Si usted no tiene este tipo de telefónico
enchufe, llame a su compañía telefónica modular
local para preguntar cómo conseguirlo.
Instalación
Sistema Digital de Seguridad
Su teléfono inalámbrico usa un sistema de seguridad digital
para evitar el timbrado falso, el uso no autorizado y cargos a
su línea telefónica.
NOTA SOBRE LA INSTALACIÓN: Algunos teléfonos
inalámbricos operan a frecuencias que pueden
causar o recibir interferencia con aparatos de
televisión, hornos de microondas, hornos, o
videocaseteras que se encuentren cerca de este
aparato. Para minimizar o evitar dicha interferencia,
la base del teléfono inalámbrico no debe ser
colocada cerca o encima de la televisión, de un
horno de microondas, o de la videocasetera. Si dicha
interferencia continúa, mueva el teléfono lejos del
aparato eléctrico causante de la interferencia.
12
Algunos otros accesorios para la comunicación
pueden utilizar frecuencias de 5.8 GHz para
comunicarse, y si no están adecuadamente
instalados, estos aparatos pueden interferir entre sí,
o con su aparato de teléfono nuevo. Si usted teme
tener problemas con esta interferencia, refiérase
al manual de instrucciones de dichos accesorios
para ver cómo puede programar los canales para
evitar esta interferencia. Los accesorios típicos
que pueden utilizar la frecuencia de 5.8 GHz para
comunicarse incluyen transmisores inalámbricos
de audio o video, redes inalámbricas para
computadoras, sistemas telefónicos inalámbricos
con varios auriculares, y algunos teléfonos
inalámbricos de largo rango.
13
Pautas Importantes de la Instalación
• Evite fuentes de ruido y calor, como motores, hornos de
micro ondas, o lámparas de luz fluorescente, radiadores
eléctricos o luz de sol directa.
• Evite áreas con polvo, humedad excesiva o temperaturas
demasiado bajas.
• Evite colocar cerca de otros teléfonos o computadoras
personales.
• Nunca instale cableado telefónico durante una tormenta
de relámpagos.
• Nunca instale enchufes telefónicos en localizaciones
mojadas a menos que el enchufe haya sido diseñado
específicamente para localizaciones mojadas.
• Nunca toque cables o terminales no aislados, a menos
que la línea telefónica haya sido desconectada en la
interfaz de la red.
• Utilice precaución cuando instale o modifique líneas
telefónicas.
14
Formato del Auricular
Realce de
volumen
talk/call back
(botón llamar/
regresar llamada)
memory
(botón memoria)
redial (botón
volver a marcar)
TONE*/exit
(botón tono/salir)
pantalla
CID/vol (5 ó 6)
(botón del
identificador/
volumen)
format (botón
formato)
PAUSE#
(bóton pausa)
delete/channel
(botón canales/
borrar)
flash/program
(bóton colgar y
servicios especiales/
ringer/on-off
programa)
(activar la función timbre)
15
Instalar el Teléfono
Instalar la Batería del Auricular
NOTA: Usted debe conectar la batería del
auricular antes de utilizar el aparato.
PRECAUCION: Para reducir el riesgo de fuego
o lastimaduras personales, use solamente
la batería de Ni’quel-Cadmio (Ni-Cd) modelo
5-2459 ó de Níquel-Hidruro Metálico (Ni-MH)
modelo 5-2522 aprobado por Thomson Inc. eso
es compatible con esta unidad.
1. Localice la puerta de la batería y la batería que vienen
empacadas juntos dentro de una bolsa de plástico y están
separados del auricular.
2. Localice el compartimento de la batería en la parte
posterior del auricular.
3. Conecte el cable de la batería en el conector dentro del
compartimento. REGISTRAR aparezca en la pantalla.
paquete de
baterías
del auricular
OPRIMA FIRMEMENTE
HACIA ABAJO
16
cable rojo
cable negro
NOTA: Para asegurar la instalación apropiada de
la batería, el conector está diseñado de forma que
puede ser insertado solamente de una manera.
4. Inserte la batería.
5. Cierre el compartimento de la batería empujando la
puerta hacia arriba hasta que embone en su lugar.
Estación para la Base
1. Escoja un área cerca de un enchufe eléctrico y un
enchufe modular telefónico (RJ11C), y coloque su teléfono
inalámbrico sobre una superficie plana y nivelada como
una mesa o un escritorio, o usted puede montarlo sobre la
pared.
2. Conecte un extremo de la línea telefónica dentro del
enchufe marcado TEL LINE en la parte inferior de la base y
el otro extremo dentro de un enchufe modular de pared.
3. Conecte el convertidor de la corriente eléctrica AC dentro
del enchufe eléctrico y el conector DC dentro del enchufe
en la parte inferior de la base.
17
4. Seleccione el conmutador de timbre (en el auricular) en
ON, y coloque el auricular en la base.
5. El indicador del en uso /carga se ilumina para verificar que
el aparato está cargando. La unidad tardará 20 segundos
para registrar y verificar su código de seguridad.
6. Deje que el teléfono se cargue durante 16 horas
antes de utilizarlo por primera vez. Si usted no carga
adecuadamente el teléfono, el funcionamiento de la
batería podría deteriorarse.
CUIDADO: Para reducir el riesgo de lesión
personal, fuego, o daño use solamente el
adaptador de corriente 5-2617 ó 5-2748 listado
en la guia del usuario. Este adaptador de
corriente es diseñado para estar orientado
correctamente en una posición de montaje
vertical o en el piso.
Montaje en la Pared
Si usted desea montar el teléfono en una pared, deslice los
agujeros de montaje (en la parte posterior de la base) sobre
los postes de la placa de pared, y deslice hacia abajo la
unidad en su sitio. (No se incluye la placa para la pared).
18
Programación
Hay cinco menús disponibles: Idioma de la Pantella, Clave de
Área, Tono del Timbre, Tono/Pulso, o Programacion de Fábrica.
Cuando se programe estas opciones, asegúrese de que el
teléfono esté en OFF (no en el modo hablar). Presionar el
botón TONE*/exit lo hará salir del proceso de selección de
menú sin cambiar la característica en la que usted está.
Idioma en Pantalla
1. Presione el botón flash/program hasta que 1ENG 2FRA
3ESP se muestre en la pantalla.
2. Use el botón CID/vol (5 o 6) o el teclado numérico del
auricular para seleccionar 1 (Inglés), 2 (Francés), ó 3
(Español). La selección de fábrica es 1ENG.
3. Presione el botón flash/program para confirmar y avanzar
a la siguiente opción de menú.
Código de Area Local
Si usted ingresó un código de área local de tres dígitos en
el menú del código de área, su código de área local no se
muestra en la lista del Identificador de Llamadas (CID). En su
lugar, usted solamente verá el número de siete dígitos local.
Las llamadas recibidas de fuera de su código de área local
mostrarán el número de 10 dígitos completo.
1. Presione el botón flash/program hasta que AREA LOCAL
- - - se muestre en la pantalla. La selección de fábrica es
- - -.
19
2. Use el teclado numérico del auricular para ingresar su
código de área de tres dígitos.
NOTA: Si comete un error, presione el botón
delete/channel para borrar el código de área
incorrecto y repita el paso 2.
3. Presione el botón flash/program para confirmar y avanzar
a la siguiente opción del menú.
Tono de Timbre
1. Presione el botón flash/program hasta que TONO TIMBR
se muestre en la pantalla.
2. Use el botón CID/vol (5 o 6) o el teclado numérico del
auricular para ingresar su selección. La selección de fábrica
es TONO TIMBR 1.
3. Presione el botón flash/program para confirmar y avanzar
a la siguiente opción del menú.
Tono/Pulso
1. Presione el botón flash/program hasta que 1 TONO
2 PULSO se muestre en la pantalla.
2. Use el botón CID/vol (5 o 6) o el teclado numérico del
auricular para ingresar su selección. la selección de fábrica
es 1 TONO.
3. Presione el botón flash/program para confirmar y avanzar a
la siguiente opción del menú.
20
Selecciones de Fábrica
Esta opción le permite restaurar las modalidades originales
de la unidad.
1. Presione el botón flash/program hasta que DE FABRICA se
muestre en la pantalla.
2. Use el botón CID/vol (5 o 6) para desplazarse a SI o NO.
La selección de fábrica es NO.
3. Presione flash/program para confirmar. Usted escuchará
un tono de confirmación.
Información Básica del teléfono
Inalámbrico
Para Hacer una Llamada
1. Presione el botón talk/call back y marque el número
deseado.- o Para efectuar una marcación de previsualización, marque
el número luego presione el botón talk/call back.
2. Para colgar, presione el botón talk/call back o coloque el
auricular en la base o en la base de carga.
Para recibir una Llamada
1. Para responder una llamada presione el botón talk/
call back en el auricular antes de comenzar a hablar.
2. Para colgar, presione el botón talk/call back o coloque el
auricular en la base.
21
Volver a Marcar
Presione el botón redial para volver a marcar rápidamente el
último número al que usted llamó (hasta 32 dígitos).
Si usted obtiene una señal de ocupado, y quiere seguir
marcando el número, presione redial para marcar el número
directament.
Indicador en Uso
Cuando el indicador carga/en uso en la base esté iluminado,
el auricular está en uso o cargando. El indicador charge/in
use en la base y la alarma de llamada entrante al frente de
la base parpadean cuando usted recibe una llamada.
Flash
Si usted se suscribe al servicio combinado de Llamada en
Espera e Identificador de Llamada con la compañía de
telefonía local usted recibirá información de Identificador de
Llamada (si está disponible) en las llamadas con la opción
de Llamada en Espera. Durante una llamada telefónica,
usted escuchará un bip para indicar que otra llamada está
esperando en la línea y la información de Identificador de
Llamada para la llamada en espera se muestra en la pantalla
del auricular. Para conectar la llamada en espera, presione
el botón flash/program en el auricular y su llamada original
es colocada en retención. Usted puede alternar entre las dos
llamadas presionando el botón flash/program.
22
TIP: No use el botón talk/call back para activar los
servicios de llamada personalizada tales como
llamada en espera, o usted colgará el teléfono.
Volumen
Cuando el teléfono esté en ON, presione CID/vol (5 o 6) en el
auricular para ajustar el volumen de escucha en el auricular.
Hay cuatro selecciones. Presione el botón CID/vol 5 para
aumentar el volumen y el botón CID/vol 6 para disminuir el
volumen. Usted verá la selección de volumen en la pantalla
del auricular.VOL 4 es el máximo y VOL 1 es el mínimo.
Botón de Canal
Mientras habla en el teléfono, usted tal vez necesite cambiar
manualmente de canal para reducir la estática causada
por electrodomésticos, tales como monitores de bebé,
mecanismos de apertura de puertas de garage, hornos de
microondas, u otros teléfonos inalámbricos. Presione y suelte
el botón delete/channel para moverse al siguiente canal
limpio.
Tono Temporal
La modalidad es útil solamente si usted tiene servicio
de pulsos (rotatorio). La Marcación de Tonos Temporal
permite a los usuarios de teléfonos de servicio por pulsos
(rotatorio) accesar a servicios activados por tonos ofrecidos
por bancos, compañía de tarjetas de crédito, etcétera.
23
Por ejemplo, cuando usted llama a su banco usted puede
necesitar ingresar su número de cuenta bancaria. Alternar
temporalmente al modo de tonos le permite enviar su
número.
1. Marque el número telefónico y espere la conexión con la
línea.
2. Cuando su llamada sea respondida, presione el botón
TONE*/exit en el auricular para cambiar temporalmente
de marcación por pulsos a marcación por tonos.
3. Siga las instrucciones automatizadas para obtener la
información que necesita.
4. Cuelgue el auricular y el teléfono automáticamente
regresa al modo de marcación por pulsos (rotatorio) .
Pasa Salir
Presione el botón TONE*/exit para cancelar cualquier
comando que usted inició.
Timbre On/Off
1. Presione el botón ringer para entrar al menú de
configuración de timbre on/ off y la configuración actual
se mostrará en pantalla.
2. Presione el botón ringer otra vez para seleccionar la
configuración y usted escuchará al tono de confirmación.
NOTA: Si usted apaga el timbre OFF, RINGER OFF
se muestra en la pantalla.
24
Búsqueda del Auricular
Esta opción le ayuda a localizar un auricular extraviado.
Presione el botón page en la base. El auricular emitirá un bip
por dos minutos o hasta que usted presione talk/call back en
el auricular o presione el botón page en la base.
NOTA: Usted puede todavía buscar el auricular
si el timbre está desactivado. Si la batería está
muerta, la opción de Búsqueda no funcionará.
Realce de volumen
Durante la conversación, usted puede aumentar el volumen
presionando el botón Vol Boost, AUDIO BOOST se mostrará
en la pantalla. El volumen regresará a su nivel original
cuando usted cuelgue el teléfono o si usted presiona el
botón Vol Boost otra vez durante la conversación.
NOTA: La característica de Realce de Volumen
puede ser activada en cualquier selección de Nivel
de Volumen durante la conversación. También,
el nivel de volumen puede todavía ser ajustado
después de que la característica Realce de Audio
es activada usando el botón CID/vol (5 o 6).
25
Identificador de Llamadas (CID)
IMPORTANTE: Para utilizar las características
de la identificación de llamador de esta unidad,
usted debe suscribirse ya sea al Servicio Estándar
de Identificador de Llamadas de Nombre/
Número, o al Servicio de Identificador de Llamada
en Espera (Caller ID con Call Waiting). Para saber
quién llama mientras usted está en el teléfono,
usted debe suscribirse al Servicio de Identificador
de Llamada en Espera (Caller ID con Call Waiting).
Este aparato recibe y muestra información transmitida por
su compañía telefónica local. La información puede incluir
el número telefónico, fecha y hora; o el nombre, número
telefónico, fecha y hora. Cada auricular puede guardar en
memoria hasta 40 llamadas para ser revisadas después.
Hora
Fecha
Número de llamadas nuevas
Número telefónico de la
persona que llamada
26
Nombre del Identificador
de Llamada
Llamada en Espera con Identificador de
Llamadas
Suponiendo que usted está suscrito al servicio de
Identificador de Llamada en Espera a través de su compañía
telefónica; si usted recibe una llamada entrante y usted
está utilizando la GE multi fija a mano el sistema, una señal
sonora indica que la presencia de Llamada en Espera
llamada invita la línea. La información de Identificador
de Llamada en Espera será exhibida y almacenada en la
historia de todos los auriculares en el sistema.
• Cuando usted escuche el tono de llamada en espera en
la bocina del auricular, prima el botón flash/program para
poner la llamada actual en espera y poder contestar la
llamada entrante. Presione flash/program otra vez para
volver a la llamada original.
Recibir Archivos del Identificador de Llamadas
Cuando usted recibe una llamada, la información es
transmitida entre el primero y el segundo timbre. La
información del Identificador de Llamadas aparece en la
pantalla mientras el teléfono timbra, dándole a usted la
oportunidad de ver la información y decidir si quiere o no
contestar la llamada.
27
Almacenar Archivos del Identificador de
Llamadas (en la Memoria de CID)
Si usted no está en casa o no puede contestar, la
memoria del Identificador de Llamadas de su teléfono
automáticamente almacena la información de las 40 últimas
llamadas para que sepa quién llamó mientras usted no
estuvo disponible. Cuando la llamada número 41 es recibida,
el último archivo del Identificador de Llamadas (la primera
llamada) se borra automáticamente.
Usted puede revisar la información almacenada en cualquier
momento. Las llamadas recibidas desde la última revisión,
se mostrarán NUEVA en la pantalla. Llamadas que no han
sido revisadas previamente pero fueron recibidas desde el
mismo número más de una vez se muestran como REPT en
la pantalla.
Revisar los Archivos de Identificador (CID)
A medida que se reciben y se almacenan archivos del
Identificador de Llamadas, la pantalla se actualiza para
hacerle saber cuántas llamadas se han recibido. Para
recorrer los archivos del identificador de Llamadas:
1. Asegúrese que el teléfono esté desactivado OFF (no en el
modo hablar).
2. Presione el boton CID/vol (6) para revisar el archivo más
nuevo del Identificador (CID).
3. Presione el boton CID/vol (5) para revisar primero el
archivo más viejo del Identificador (CID).
28
Marcar un Número del Identificador de
Llamadas
1. Asegúrese que el teléfono esté desactivado OFF (no en el
modo hablar).
2. Utilice le botón CID/vol (5 o 6) para llegar al archivo
deseado.
3. Presione el boton talk/call back. El número se marca
automáticamente.
NOTA: Dependiendo de (a) cómo estaba
formateado cuando se recibió el número
telefónico de la persona que llamó y (b) si
usted había o no programado su clave de área
anteriormente en el menú de programación,
usted puede necesitar ajustar el formato del
número telefónico de la persona que llamó antes
de contestar la llamada, presion el botón FORMAT
para ajustar el número, e intente otra vez.
Los formatos disponibles incluyen:
Número de dígitos Explicación
Once dígitos clave de larga distancia “1”
+3-dígitos de clave de área
+7-dígitos de número telefónico.
Ejemplo: 1-317-888-8888
Ten dígitos3-dígitos de clave de área +
7-dígitos de número telefónico.
Ejemplo: 317-888-8888
29
Seven dígitos7-dígitos de número telefónico.
Ejemplo: 888-8888
Almacenar Archivos del Identificador de
Llamadas en la Memoria Interna
Usted puede almacenar información del Identificador de
Llamadas en la memoria interna del teléfono.
NOTA: Es importante que usted formatee los
registros CID correctamente ANTES de almacenar
en memoria interna ya que usted no puede
reformatear registros CID almacenados en
memoria.
1. Asegúrese que el teléfono esté desactivado OFF (no en el
modo hablar).
2. Utilice los botones CID/vol (5 o 6) para llegar al archivo
deseado.
3. Presione el botón mem.
4. Utilice el teclado numérico para inscribir un número de
localización de memoria (0-9) para almacenar el archivo
en la localización de memoria. Usted escuchará un tono
de confirmación.
NOTA: Si esa localización de memoria está
ocupada, el aparato le pregunta REMPLAZAR
MEMO?, y usted debe confirmar el reemplazo
oprimiendo el botón de mem.
30
NOTA: Presione el botón TONE*/exit una vez para
mantener la programación anterior (sin hacer
cambios) y regrese al menú.
NOTA: Si el registro CID seleccionado contiene
alguna información que no sea numérica,
la unidad no permitirá que este registro sea
transferido a la memoria del usuario interna. El
auricular mostrará NO PUEDE ALMACE.
Para Reemplazar un Registro CID Almacenado
1. Repita los pasos 1 al 3 en la sección Almacenar Archivos
del Identificador de Llamadas en la Memoria Interna.
Después de inscribir la localización de memoria, el
aparato le pregunta si quiere reemplazar el mensaje
REMPLAZAR MEMO? en la pantalla.
2. Oprima nuevamente el botón mem, y el archivo nuevo
del Identificador de Llamadas reemplaza al viejo en esa
localización de memoria. Usted escuchará un tono de
confirmación.
Borrar un Archivo del Identificador de
Llamadas
1. Asegúrese que el teléfono esté desactivado OFF (no en el
modo hablar).
2. Utilice los botones CID/vol (5 o 6) para mostrar el
archivo deseado.
3. Presione el botón delete/channel. La pantalla pregunta
BORR LLAMADA ID?
31
4. Presione nuevamente el botón delete/channel y borre el
archivo actual, y el siguiente archivo se mostrará en la
pantalla. Usted escuchará un tono de confirmación.
NOTA: Presione el botón TONE*/exit para regresar
a la modalidad de alerta.
Borrar Todos los Archivos del Identificador de
Llamadas
1. Asegúrese que el teléfono esté desactivado OFF (no en el
modo hablar).
2. Utilice los botones CID/vol (5 o 6) ara mostrar el archivo
deseado. para mostrar cualquier archivo del Identificador
de Llamadas.
3. Presione y sostenga el botón delete/channel hasta que el
BORRAR TODO? muestra en la pantalla.
4. Presione nuevamente el botón delete/channel para borrar
todos los archivos del Identificador de Llamadas de la
memoria. Usted escuchará un tono de confirmación y la
pantalla demonstraciones NO LLAMADAS.
NOTA: Presione el botón TONE*/exit para regresar
a la modalidad de alerta.
32
Memoria
Cada auricular puede guardar en memoria hasta 10
números de 24 dígitos con nombres de hasta 15 caracteres
para marcación rápida. Esta opción de memoria es además
del registro en memoria CID, que almacena hasta 40
registros CID en cada auricular.
Almacenar un Nombre y Número en la
Memoria
1. Asegúrese que el teléfono esté desactivado OFF (no en el
modo hablar).
2. Presione el botón mem.
3. Oprima el número deseado de la localización de memoria
(0 al 9), o utilice los botones CID/vol (5 o 6) para llegar a
la localizaci’on deseada.
NOTA: Si la localización de memoria está
ocupada, el número de esa localización de
memoria y lo que contiene aparecerán en la
pantalla. Si la localización de memoria está vacía,
la indicación VACIO aparece en la pantalla.
4. Presione nuevamente el botón mem. La pantalla le indica
que INSCRIBA NOMBRE.
NOTA: Si usted no quiere inscribir el nombre,
salte el paso 5.
33
5. Utilice el teclado numérico en el auricular para inscribir
el nombre (hasta 15 caracteres) y oprima el número de
la localización de memoria para salvar. Más de una letra
está almacenada en cada tecla numérica. Por ejemplo,
para inscribir “Bill Smith”, oprima la tecla del 2 dos veces
para la letra B. Oprima la tecla del 4 tres veces para la
letra I. Oprima la tecla del 5 tres veces para la L. Después
de un segundo, oprima la tecla del 5 tres veces para la
segunda L y oprima la tecla del 1 para inscribir un espacio
entre las letras L y S. Oprima la tecla del 7 cuatro veces
para la letra S. Oprima la tecla del 6 una vez para la M;
oprima el 4 tres veces para la I; oprima el 8 para la T; y el 4
dos veces para la H.
NOTA: Si usted comete un error al marcar el
número, utilice el botón para borrar DELETE/
Channel para retrodeder, borrar el (los) número(s)
equivocado e inscribir el (los) número(s) o
carácter(es) correcto(s).
6. Presione el botón mem para salvar el nombre. La pantalla
le indica que inscriba el número telefónico INSCRIB NUM
TEL.
7. Utilice el teclado numérico para inscribir el número
telefónico que usted quiera almacenar (hasta 24 dígitos).
NOTA: El sistema trata las PAUSAS como retrasos
o espacios en la secuencia de marcado.
34
8. Presione nuevamente el botón mem para almacenar el
número. Usted escuchará un tono de confirmación.
Guardar el Ultimo Número Marcado
1. Repita los pasos del 1 al 6 de la sección “Almacenar un
Nombre y Número en la Memoria.”
2. Presione el botón redial.
3. Presione el botón mem para almacenar el número. Usted
escuchará un tono de confirmación.
Para remplazar un número viejo que va a volverse a
marcar con uno nuevo:
1. Repita los pasos del 1 al 6 de la sección “Almacenar un
Nombre y Número en la Memoria.”
2. Presione el botón redial.
3. Presione el botón mem y el aparato le pregunta si quiere
reemplazar el archivo REMPLAZAR MEMO?.
4. Presione nuevamente el botón mem para reemplazar el
número viejo con el nuevo. Usted escuchará un tono de
confirmación.
35
Introducir una Pausa en la Secuencia de
Marcado de un Número Almacenado
Oprima el botón #PAUSEuna vez para introducir un retraso
en la secuencia de marcado de un número telefónico
almacenado cuando una pausa es necesaria para esperar
al tono de marcar (por ejemplo después de que usted marca
9 para obtener línea externa, o para esperar e tono de
acceso en una computadora). La pausa se representa en la
pantalla con una “P.” Cada pausa cuenta como 1 dígito en la
secuencia de marcado
Cambiar un Número Almacenado
1. Repita los pasos 1 al 7 de la sección “Almacenar un
Nombre y Número en la Memoria.”
2. Presione el botón mem. El aparato le pregunta si reemplaza
el mensaje REMPLAZAR MEMO?.
3. Presione nuevamente el botón mem para almacenar el
número. Usted escuchará un tono de confirmación.
Revisar y Borrar Números Almacenados
1. Para revisar números almacenados, oprima el botón mem
y después utilice el botón CID/vol (5 o 6) para llegar a
la localización de memoria, u oprima la tecla del número
correspondiente de la localización de memoria (0-9).
36
2. Cuando la información del Identificador de Llamadas
aparece en la pantalla, oprima el botón delete/channel. La
pantalla le pregunta si quiere BORRAR?
3. Presione nuevamente el botón delete/channel a
información del Identificador de Llamadas. La indicación
de borrado BORRADO aparece en la pantalla.
Marcar un Número Almacenado
1. Asegúrese de que el teléfono esté activado (ON),
oprimiendo el botón talk/call back.
2. Presione el botón mem.
3. Presione el número (0-9) para la localización de memoria
deseada. El número se marca automáticamente.
- O 1. Asegúrese de que el teléfono esté desactivado (OFF), (no
en modalidad para hablar –“TALK”)
2. Presione el botón mem.
3. Utilice el teclado numérico o el botón CID/vol (5 o 6)
para recorrer los archivos hasta llegar al archivo deseado.
4. Presione el botón talk/call back. El número se marca
automáticamente.
37
Marcado en Cadena desde la Memoria
Use esta función para hacer llamadas que requieren una
secuencia de números como el usar una tarjeta para llamar
por teléfono o un número de larga distancia al que usted
llama frecuentemente. Cada parte de la secuencia se marca
desde la memoria. El siguiente ejemplo le muestra cómo
puede usted utilizar el marcado en cadena para hacer una
llamada a través de un servicio de larga distancia:
El Número para Localización de Memoria
Número de Acceso de Larga Distancia7
Código de Autorización
8
Número de large distancia llamado frecuentemente 9
1. Asegúrese de que el teléfono esté activado (ON) (no en
modalidad para hablar -TALK).
2. Presione el botón mem y después oprima el 7.
3. Cuando usted escuche el tono de acceso, oprima
nuevamente el botón mem y después oprima el 8.
4. Al siguiente tono de acceso, oprima el botón mem y
después oprima el 9.
NOTA: Espere a los tonos de acceso antes de
oprimir el siguiente botón mem, o su llamada
puede no pasar.
38
Instalar la Batería del Auricular
PRECAUCION: Para reducir el riesgo de fuego
o lastimaduras personales, use solamente
la batería de Ni’quel-Cadmio (Ni-Cd) modelo
5-2459 ó de Níquel-Hidruro Metálico (Ni-MH)
modelo 5-2522 aprobado por Thomson Inc.
eso es compatible con esta unidad.
1. Asegúrese que el teléfono esté desactivado (no en
modalidad para hablar) antes de cambiar la batería.
2. Quite la tapa del compartimiento de la batería.
3. Desconecte el enchufe de la batería en la conexión dentro
del compartimiento y saque la batería del auricular.
4. Introduzca el nuevo paquete de baterías y vuelva
a conectar la batería dentro del enchufe en el
compartimiento.
5. Ponga la tapa del compartimiento de la batería en su sitio.
6. Coloque el auricular sobre el cargador para que se
cargue. Deje que el teléfono se cargue (durante 16
horas) antes de utilizarlo por primera vez. Si usted no
carga adecuadamente el teléfono, el funcionamiento de
la batería podría deteriorarse.
Precauciones de Seguridad para la Batería
• No queme, desarme, mutile, o agujere. Igual que
otras baterías de este tipo, materiales tóxicos pueden
escaparse y causarle daño.
39
• Para reducir el riesgo de fuego o daño personal, use
unicamente la batería del Ni’quel-Cadmio ó NíquelHidruro Metálico indicada en la Guía del Usuario
• Mantenga las baterías fuera del alcance de los niños.
• Quite las baterías si va a guardar el aparato durante más
de 30 días.
NOTA: El sello RBRC en la batería utilizada en su
producto Thomson Inc. indica que estamos
participando en un programa para recolectar y
reciclar batería(s) recargable(s).
Para más información vaya al sitio web de RBRC
en www.rbrc.org o llame al 1-800-8-BATTERY o
contacte a su centro de reciclado local.
Indicadores de Mensajes del
Identificador de Llamadas
Los siguientes indicadores le indican el estado actual de su
tel’efono o le ayudan a programarlo y a utilizarlo.
LLAMADA La información de la persona haciendo la
PRIVADA llamada ha sido bloqueada.
NOMBRE/
El nombre y número de la persona ha sido
NUMERO bloqueado y no se transmitirá.
PRIVADAO
LLAMD EN Indica que una llamada está esperando en
ESPERA la línea.
40
BORRA TODO? Indicación preguntándole si quiere borrar
todos los archivos del Identificador de
Llamadas.
BORR Indicación preguntándolo se quiere borrar
LLAMADA ID el archivo del Identificador que se muestra
actualmente en la pantalla.
BORRADO
Indicación confirmando que el archivo del
Identificador ha sido borrado.
VACIO
Indica que la localización de memoria está
vacía.
FIN DE LISTA Indica que no hay más información en el
registro de memoria del Identificador de
Llamadas.
NSCRIBA Indicación indicándole que inscriba un
NOMBRE nombre en una de las 10 localizaciones de
memoria.
INSCRIB Indicación pidiéndole que ingrese el
NUM TEL número telefónico para una de las 10
ubicaciones en memoria.
NFO La información sobre la persona que llama
INCOMPLETA ha sido interrumpida durante la transmisión
o el teléfono es excesivamente ruidoso.
BAJA BATERIA Indica que la batería del auricular está baja
y necesita ser cargada.
41
MENS EN ESPERA NUEVA
Indica que un mensaje está esperando para
ser oído.
Indica una llamada o llamadas nuevas que
no han sido revisadas.
NO ENVIADO No se recibió información sobre el
Indentificador de Llamadas.
NO LLAMADA Indica que no se han recibido llamadas.
LOCALIZAR
Alquien ha oporimido el botón localizador
en la base.
OPR BOTON Indica qe el Indentificador de Llamadas es
TALK un Número de Marcado de Directorio (DDN)
y no se puede formatear.
REPT
Mensaje de llamada repetido. Indica que
hay una llamada nueva fue recibida más de
una vez desde el mismo número.
REALCE DE Indica que la característica REALCE DE
AUDIO VOLUMEN está actualmente activada.
NOM La llamada entrante viene de un área en
DESCONOCIDO/donde el servicio del Identificador de
NUM
Llamadas (Caller ID) no está disponible, o la
DESCONOCIDO información no fue enviada.
42
Señales Sonoras del Auricular
Señal
Significado
Un tono de gorgeo largo Señala una llamada entrante
(con el timbre activado)
Tres tonos cortos
Señal del Localizador
(varias veces)
Un tono corto Advertencia de baja bateria
cada 7 segundos cada 7 segundos
Solución de Problemas
Soluciones para el Identificador de Llamadas
No aparece nada en la pantalla
• Cargue (por 16 horas) o substituya completamente la
batería.
• Si usted está utilizando corriente AC (eléctrica), asegúrese
que la base no esté conectada en un enchufe que pueda
desactivarse con un apagador. Desconecte el cable de
corriente de la base y vuelva a conectarlo.
• Si usted quiere recibir información del Identificador de
Llamadas, usted necesita estar suscrito al servicio de
Identificador de Llamadas a través de su compañía local
Información.
Incompleta del Identificador de Llamadas
• La unidad muestra este mensaje si detecta algo distinto
que información válida de Identificador de Llamada
durante el período de silencio después del primer timbre.
43
Soluciones para el Teléfono
No hay tono de marcar
• Verifique o repita los pasos para la instalación.
• Asegúrese que el cable de la base esté conectado a un
contacto que sirve.
• Asegúrese que el cable telefónico esté conectado a la
base del aparato y a un enchufe modular de pared?
• Desconecte la base del enchufe de pared y conecte otro
teléfono al mismo enchufe. Si continúa sin haber tono de
marcar en el segundo teléfono, el problema puede estar
en el cableado o en el servicio local.
• El auricular puede estar fuera del rango de la base.
Acérquese a la base.
• Asegúrese de que la batería ha sido cargada
adecuadamente (16 horas).
• Asegúrese que el paquete de la batería esté instalado
adecuadamente.
• ¿El auricular emitió un tono cuando usted oprimió el
botón talk/call back? ¿Se iluminó el indicador? La batería
puede necesitar ser recargada.
El auricular no timbra
• Asegúrese que el selector RINGER esté en la posición de
activado (ON).
44
• Usted puede tener demasiadas extensiones de teléfono
en su línea. Intente desconectar algunos teléfonos.
• El auricular puede estar fuera de rango. Acérquese a la
base.
• Vea las soluciones para “No hay tono de marcar”.
sted experimenta estática, debilitamiento del sonido entrante
o saliente.
• Cambie el canal.
• El auricular puede estar fuera de rango. Acérquese a la
base.
• Coloque la base en otra localización.
• Cargue la batería.
• Asegúrese de que la base no esté conectada en un
enchufe con otro aparato eléctrico.
El aparato emite tonos
• Coloque el auricular en la base durante 20 segundos
para volver a programar el código de seguridad. Si eso
no funciona, cargue la batería durante 16 horas.
• Vea las soluciones para “No hay tono de marcar.”
• Cambie la batería.
Marcado desde la Memoria
• Asegúrese que usted haya programado adecuadamente
las teclas de las localizaciones de memoria.
45
• Asegúrese de seguir la secuencia para marcar adecuada.
El teléfono con servicio del tono marca hacia fuera en modo
del pulso
• Verifique de que el teléfono esté en modo que marca del
tono.
El teléfono no marcará hacia fuera con servicio del pulso
• Verifique de que el teléfono esté en modo que marca del
pulso.
Causas de una Mala Recepción
• Recubrimiento externo de la casa con aluminio.
• Aislación con revestimiento de papel de aluminio.
• Conductos de calefacción y otras construcciones de
metal que paran las señales de radio.
• Está demasiado cerca de los aparatos eléctricos como
microondas, cocina, computadoras, etc.
• Condiciones atmosféricas, como una tormenta eléctrica.
• La base está instalada en el sótano o en un piso más
bajo de la casa.
• La base está enchufada en un tomacorriente con otros
aparatos electrónicos.
• El monitor del bebé está usando la misma frecuencia.
• La pila del auricular está descargada.
• Está fuera del ámbito de la base.
• El horno de microonda está usando la misma frecuencia.
46
Cuidado General del Producto
Para mantener su teléfono funcionando bien y con buena
apariencia, observe las
siguientes pautas:
• Evite poner el teléfono cerca de calentadores
(calefactores) de ambiente y dispositivos que generen
interferencia eléctrica ejemplo, motores o lámparas
fluorescentes).
• No lo exponga a la luz solar directa o a la humedad.
• No deje caer la extensión móvil y no maltrate el teléfono.
• Limpie el teléfono con un trapo suave
• Nunca use un agente de limpieza fuerte ni un polvo
abrasivo, ya que esto dañará el acabado.
• Retenga el empaque original en caso de que necesite
embarcar el auricular en el futuro.
Cómo Obtener Servicios de
Mantenimiento
Si usted experimenta problemas con este equipo, para
reparaciones o para información de garantía, comuníquese
con el departamento de servicio al cliente al 1-800-448-0329. Si el equipo está causando daños a la
red telefónica, la compañía telefónica puede pedirle que
desconecte su equipo hasta que el problema haya sido
resuelto.
47
Este producto puede únicamente ser reparado por el
fabricante o sus agentes de reparación autorizados.
Cualquier cambio o modificación no aprobados
expresamente por Thomson Inc. podría ser motivo de
anulación de la autoridad del usuario para operar este
producto. Para recibir instrucciones sobre cómo obtener
servicios de mantenimiento, por favor consulte la garantía
incluida en esta Guía, o llame a Información para el Usuario,
1-800-448-0329.
O envíe sus preguntas a:
Thomson Inc.
Gerente, Servicio al Consumidor
P.O. Box 1976
Indianápolis, IN 46206
Adjunte su recibo al folleto, para futura referencia, o anote
la fecha en la que se compró o recibió este producto como
regalo. Esta información será valiosa si se llegase a requerir
durante el período de garantía.
Fecha de compra___________________________________
Nombre de la tienda_________________________________
48
Índice
A
C
Almacenar Archivos
del Identificador
de Llamadas (en la
Memoria de CID) 28
Almacenar Archivos
del Identificador
de Llamadas en la
Memoria Interna 30
Almacenar un Nombre
y Número en la
Memoria 33
Antes de Comenzar 11
Cambiar un Número
Almacenado 36
Código de Area Local 19
Cómo Obtener Servicios
de Mantenimiento 47
Compatibilidad con
Audífonos (CCA) 7
B
Borrar Todos los Archivos
del Identificador de
Llamadas 32
Borrar un Archivo del
Identificador de
Llamadas 31
Botón de Canal 23
Búsqueda del Auricular
25
D
Declaración de la FCC
sobre Exposición a la
Radiación RF 7
E
Estación para la Base 17
F
Flash 22
Formato del Auricular 15
G
Garantía Limitada 52
Guardar el Ultimo
Número Marcado 35
49
I
Identificador de
Llamadas (CID) 26
Idioma en Pantalla 19
Indicador en Uso 22
Indicadores de Mensajes
del Identificador de
Llamadas 40
Información Básica del
teléfono Inalámbrico
21
Información de
Accesorios 56
Información de
Interferencias 5
Información sobre la
Aprobación de Equipo
2
Instalación 12
Instalar el Teléfono 16
Instalar la Batería del
Auricular 16, 39
Introducción 11
Introducir una Pausa
50
en la Secuencia
de Marcado de un
Número Almacenado
36
L
Licensing 7
Lista de Partes 11
Llamada en Espera
con Identificador de
Llamadas 27
M
Marcado en Cadena
desde la Memoria 38
Marcar un Número
Almacenado 37
Marcar un Número del
Identificador de
Llamadas 29
Memoria 33
Montaje en la Pared 18
P
Para Hacer una Llamada
21
Para recibir una Llamada
21
Para Reemplazar
un Registro CID
Almacenado 31
Para remplazar un
número viejo que va a
volverse a marcar con
uno nuevo: 35
Pasa Salir 24
Pautas Importantes de la
Instalación 14
Precauciones de
Seguridad para la
Batería 39
Programación 19
R
Realce de volumen 25
Recibir Archivos del
Identificador de
Llamadas 27
Requerimientos Para
Enchufe Telefónico
12
Revisar los Archivos de
Identificador (CID) 28
Revisar y Borrar Números
Almacenados 36
S
Selecciones de Fábrica
21
Señales Sonoras del
Auricular 43
Sistema Digital de
Seguridad 12
Solución de Problemas
43
T
Tabla de Contenido 8
Timbre On/Off 24
Tono/Pulso 20
Tono de Timbre 20
Tono Temporal 23
V
Volumen 23
Volver a Marcar 22
51
Garantía Limitada
Lo que cubre su garantía:
• Defectos de materiales o de trabajo.
Por cuánto tiempo después de la compra:
• Un año, a partir de la fecha de compra.
(El periodo de garantía para unidades arrendadas se
inicia con la primera renta o 45 días de la fecha del
embarque a la firma de arrendamiento, lo que ocurra
primero).
Lo que haremos:
• Proporcionarle una unidad nueva o, a nuestra opción,
una reacondicionada. La unidad de intercambio quedará
bajo garantía por el resto del periodo de garantía del
producto original.
Cómo obtener servicio:
• Empaque bien la unidad, incluyendo todos los cables,
etc., que originalmente venían con el producto. Se
recomienda usar el cartón y materiales de empaque
originales.
• “Prueba de compra como factura o recibo de compra,
que ofrezca evidencia de que el producto está dentro
del periodo de garantía, debe ser presentado para
obtener servicio bajo garantía.” Para compañías de
arrendamiento, se requiere como evidencia el primer
contrato de renta. También escriba claramente su
nombre, dirección y la descripción del defecto. Mande
vía UPS o un servicio de paquetería equivalente a:
52
Thomson Inc.
11721 B Alameda Ave.
Socorro, Texas 79927
• Pague cualquier cargo que le facture el Centro de
Intercambio por servicio que no esté cubierto por
garantía.
• Asegure su empaque para prevenir pérdida o daño.
Thomson Inc. no acepta responsabilidad en caso de
pérdida o daño.
• Un aparato nuevo o uno remozado se le enviará con los
cargos pagados.
Lo que no cubre la garantía:
• Instrucciones al cliente. (Su manual de propietario
le proporciona la información con respecto a las
instrucciones de operación y los controles del usuario.
Cualquier información adicional debe obtenerse con su
agente de ventas.
• Ajustes de instalación y de preparación del servicio.
• Baterías.
• Daño por mal uso o negligencia.
• Productos que han sido modificados o incorporados a
otros productos.
• Productos comprados o que han recibido servicio fuera
de los Estados Unidos.
• Desastres naturales, por ejemplo y sin limitarse a ellos,
daños por relámpagos.
53
Registro del Producto:
• Por favor llene y envíe por correo la Tarjeta de Registro
del Producto que se embarcó con su producto. Hará
más fácil que hagamos contacto con usted si fuera
necesario. No se requiere la devolución de la tarjeta para
tener la cobertura de la garantía.
Limitaciones sobre la Garantía:
• LA GARANTÍA ESPECIFICADA ANTERIORMENTE ES
LA ÚNICA GARANTÍA APLICABLE A ESTE PRODUCTO.
CUALQUIER OTRA GARANTÍA, EXPRESA O IMPLÍCITA
(INCLUYENDO TODAS LAS GARANTÍAS IMPLÍCITAS DE
MERCADO O DE SALUD PARA CUALQUIER PROPÓSITO)
SON CONSIDERADAS NO VÁLIDAS. NINGUNA
INFORMACIÓN VERBAL O ESCRITA OTORGADA POR
THOMSON INC., SUS AGENTES, O EMPLEADOS SERÁ
CONSIDERADA PARA CREAR UNA GARANTÍA NI PARA
AUMENTAR BAJO NINGUNA CIRCUNSTANCIA LA
COBERTURA DE ESTA GARANTÍA.
• LA REPARACIÓN O REEMPLAZO DE UN PRODUCTO
COMO SE ESPECIFICA BAJO ESTA GARANTÍA ES
EL REMEDIO EXCLUSIVO DEL CONSUMIDOR.
THOMSON INC. NO SE HACE RESPONSIBLE POR
DAÑOS INCIDENTALES, DAÑOS DERIVADOS COMO
CONSECUENCIA DEL USO DE ESTE PRODUCTO,
O COMO RESULTADO DEL INCUMPLIMIENTO DE
CUALQUIER GARANTÍA IMPLÍCITA O EXPRESA DE ESTE
PRODUCTO. LA INVALIDEZ DE LAS GARANTÍAS O LAS
54
GARANTÍAS LIMITADAS ESTÁN REGLAMENTADAS POR
LAS LEYES DEL ESTADO DE INDIANA. EXCEPTO POR EL
ALCANCE ESTABLECIDO POR LAS LEYES APLICABLES,
CUALQUIER GARANTÍA IMPLÍCITA DE MERCADO O
DE SALUD PARA CUALQUIER PROPÓSITO, EN ESTE
PRODUCTO ES LIMITADA AL PERÍODO DE GARANTÍA
ESPECIFICADO ANTERIORMENTE.
Cómo se Relaciona la Ley Estatal a esta Garantía:
• Algunos estados no permiten la exclusión ni limitación
de daño incidental o derivado de alguna consecuencia,
o la limitación con respecto al período de tiempo que
debe aplicarse para garantías implícitas, por lo tanto las
limitaciones y exclusiones mencionadas anteriormente
pueden no ser aplicables para usted.
• Esta garantía le ofrece derechos legales específicos, y
usted puede tener otros derechos legales que varían de
estado a estado.
Si compró su producto fuera de los Estados Unidos:
• Esta garantía no se aplica. Vea a su distribuidor para
información sobre la garantía.
55
Información de Accesorios
DESCRIPTION
NÚMERO DE CATÁLOGO
Cable de corriente AC
5-2617 ó 5-2748
Batería de Repuesto del Auricular
5-2459 ó 5-2522
Para ordenar, tenga lista su tarjeta Visa, Mastercard o
Discover y llame al 1-800-338-0376.
Se aplicará un cargo por envío al ordenar. La ley nos requiere
que cobremos el impuesto sobre la venta apropiado para
cada estado, condado y área individuales a las cuales se
envíe la mercancía.
Los artículos están sujetos a disponibilidad.
Thomson Inc.
Modelo 27906
00016324 (Rev. 2 DOM E/S)
07-22
Impreso en China
101 West 103rd Street
Indianapolis, IN 46290-1102
© 2007 Thomson Inc.
Trademark(s) ® Registered
Marca(s) Registrada(s)