Transcript
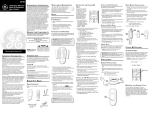
2-9016 / 2-9023
INTRODUCTION
Your Caller ID unit stores and displays specific information, provided by your local
telephone company, to subscribers of Caller ID or similar caller identification
services. You must subscribe to one of these services in order to use this unit.
Caller ID User’s Guide
Your Caller ID unit enables you to:
•
Identify callers before you answer the phone.
•
View the time and date of each incoming call.
•
Record up to 80 incoming calls sequentially.
•
Know who called while you were away.
REMINDER: This product
requires a subscription to Caller
ID service from your telephone
company.
INSTALLATION WITH A STAND-ALONE ANSWERING MACHINE
MESSAGE INDICATORS
The answering machine must be set to answer calls after at least 2 rings to properly
receive Caller ID information. To use your Caller ID unit with an answering machine:
The following special messages indicate the status of a message or the unit:
NO CALL
The caller memory is empty.
1. Plug a telephone line cord into either jack on the back of the Caller ID unit and into
the Modular Jack on the wall.
UNKNOWN CALL
2. Plug another telephone line cord into the remaining jack on the back of the unit into
the answering machine Input/Line jack.
3. Plug a third telephone line cord into the answering machine Phone jack and into the
telephone.
BEFORE YOU BEGIN
1. Plug the triplex adapter into your two-line modular wall
jack.
PARTS CHECKLIST
2. Plug your two-line phone into the two-line receptacle
on the triplex adapter.
Make sure your package includes the following items:
Before installing this equipment, users should ensure that it is permissible to be connected to the facilities of the
local telecommunications company. The equipment must also be installed using an acceptable method of
connection. The customer should be aware that compliance with the above conditions may not prevent
degradation of service in some situations.
Repairs to certified equipment should be made by an authorized Canadian maintenance facility designated by
the supplier. Any repairs or alterations made by the user to this equipment, or equipment malfunctions, may give
the telecommunications company cause to request the user to disconnect the equipment.
Users should ensure for their own protection that the electrical ground connections of the power utility, telephone
lines and internal metallic water pipe systems, if present, are connected together. This precaution may be
particularly important in rural areas.
.
Should your equipment cause trouble on your line which may harm the telephone network, the telephone
company, where practicable, may notify you that temporary discontinuance of service may be required. Where
prior notice is not practicable and the circumstances warrant such action, the telephone company may
temporarily discontinue service immediately.
INDUSTRY CANADA NUMBER IS LOCATED ON THE CABINET BOTTOM
REN NUMBER IS LOCATED ON THE CABINET BOTTOM
Model 2-9016C / 2-9023
15377150 ( Rev. 0 E/F)
98-04
Printed in China
© 1998 Thomson Consumer Electronics, Inc.
Trademark(s) ® Registered
Marque(s) ® déposée(s)
NO INFORMATION IS SHOWN AFTER THE PHONE RINGS
•
NO DATA appears in the display if no Caller ID signal has been detected, or Caller ID
service has not been activated by your local telephone company.
•
Be sure to wait until the second ring before answering.
You need an RJ11 (CA11A) type modular jack, which is the most
common type of phone jack and might look like the one pictured
here. If you don’t have a modular jack, call your local phone
company to find out how to get one installed.
4. Press the REVIEW
or
to scroll through the language options.
5. Press the DELETE button once to save your selection.
ADJUSTING THE CONTRAST/VIEWING ANGLE
This unit can adjust the Contrast/Viewing angle of the display for better readability at
certain viewing angles. To adjust the Contrast/Viewing angle:
INSTALLING THE BATTERIES
2. Then press the REVIEW
Disconnect the line cords from the back of the unit and wait a
few seconds for the unit to go into standby.
1. Use a screwdriver or other flat tool to open the battery
compartment door.
2. Insert 3 “AAA” size batteries as shown on the diagram in the
battery compartment.
3. Close the battery compartment door securely.
3. Release both buttons when the display shows the current Contrast level.
If the LOW BATTERY Text and Indicator appears in the
display, you need to replace the batteries. It is important
that you replace the batteries as soon as possible to
guarantee reception of the Caller ID signals.
+
-
When you replace the batteries, your Caller ID unit retains
stored information for up to 60 seconds. It is still a good idea
to write down information that you do not want to lose.
INSTALLATION
IMPORTANT INSTALLATION INFORMATION
•
Never install telephone wiring during a lightning storm.
•
Never touch uninsulated telephone wires or terminals, unless the telephone line has
been disconnected at the network interface.
•
Use caution when installing or modifying telephone lines.
On the bottom of this equipment is a label indicating, among other information, the FCC
Registration number and Ringer Equivalence Number (REN) for the equipment. You
must, upon request, provide this information to your telephone company.
SUMMARY SCREEN
SERVICE
to scroll through the Contrast levels,levels available
NOTE: The number of new calls is displayed until
any new calls have been reviewed.
LOW
+
+
REN NUMBER
5. Press the DELETE button once to save your selection.
or
The Summary Screen shows the current time, current
date and number of new calls to be reviewed. The
Summary Screen is displayed until any button is
pressed. After the new call is received, the Summary
Screen is displayed after 10 seconds and the New Call
LED will flash on.
LOW BATTERY INDICATOR
AM
PM
button.
ERROR appears in the display if the unit detects anything other than valid Caller ID
information during the silent period after the first ring. This message indicates either
the presence of noise on the line, or that an invalid message has been sent from the
telephone company.
The REN is useful in determining the number of devices you may connect to your
telephone line and still have all of these devices ring when your telephone number is
called. In most (but not all) areas, the sum of the RENs of all devices connected to one
line should not exceed 5. To be certain of the number of devices you may connect to your
line as determined by the REN, you should contact your local telephone company.
4. Press either REVIEW
are 1-5.
The telephone company may make changes in its communications facilities, equipment, operations or
procedures where such action is required in the operation of its business. If these changes are expected to affect
the use or performance of your telephone equipment, the telephone company will likely give you adequate notice
to allow you to maintain uninterrupted service.
Notice must be given to the telephone company upon termination of your telephone from your line.
Check for proper battery installation.
ERROR MESSAGE IS DISPLAYED
Party lines are subject to telephone company tariffs and, therefore, you may not be able to use your own
telephone equipment if you are on a party line. Check with your local telephone company.
TELEPHONE NETWORK INFORMATION
Check all cabling to make sure that all connections are secure.
•
NOTES: This equipment may not be used on coin service provided by the telephone company.
This equipment generates and uses radio frequency energy which may interfere with residential radio and
television reception if not properly installed and used in accordance with instructions contained in this manual.
Reasonable protection against such interference is ensured, although there is no guarantee this will not occur in
a given installation. If interference is suspected and verified by switching this equipment on and off, the user is
encouraged to try to correct the interference by one or more of the following measures: Reorient the radio/
television receiver’s antenna, relocate the equipment with respect to the receiver, plug the equipment and
receiver into separate circuit outlets. The user may also wish to consult a qualified radio/television technician for
additional suggestions. This equipment has been fully tested and complies with all limits for Class B computing
devices pursuant to part 15 FCC Rules and Regulations. This apparatus does not exceed the class B limits for
RF noise emissions specified in the RFI regulations of the Industry Canada.
The Caller ID memory log is at the START/END of the point.
3. Release both buttons when the display shows the current language.
CAUTION: Users should not attempt to make such connections themselves, but should contact the appropriate
electric inspection authority, or electrician, as appropriate.
INTERFERENCE INFORMATION
START/END
•
1. Press and hold the DELETE button.
NOTICE: The Industry Canada label identifies certified equipment. This certification means that the equipment
meets certain telecommunications network protective, operational and safety requirements. The Industry Canada
does not guarantee the equipment will operate to the user’s satisfaction.
No Caller ID signal has been detected, or Caller ID service has not
been activated.
MODULAR JACK REQUIREMENTS
POWERING THE CALLER ID UNIT
IMPORTANT INFORMATION
NO DATA
1. Press and hold DELETE button.
2. Then press the REVIEW
We bring good things to life.
Caller ID information has been corrupted during transmission.
NO DISPLAY
This unit can display the message indicators in English (default upon initial battery
installation), Spanish, or French. To select a language:
Caller ID unit
ERROR
•
CHOOSING A LANGUAGE
Telephone line cord
The caller of the incoming call is registered as “Private Number”
and their Caller ID information is withheld.
NO DIAL TONE ON THE PHONE ATTACHED TO THE CALLER ID UNIT
OPERATION
REVIEW
BLOCKED CALL
TROUBLESHOOTING TIPS
3. Plug each Caller ID unit into a single-line receptacle
on the triplex adapter.
DELETE
REPLACE BATTERY Battery power level is low and batteries must be replaced.
TWO-LINE SYSTEM INSTALLATION
You must use two Caller ID units if you want to use Caller
ID for both lines. You must also purchase a special two
line triplex adapter.
The incoming call does not have Caller ID service or their service area
is not linked to yours. If UNKNOWN NAME appears with a calling
number, the name information was not available for that number.
The time and date will be programmed automatically when
the first caller ID information is successfully received.
Thomson Consumer Electronics Canada, Inc. warrants to the purchaser or gift recipient
that if any manufacturing defect becomes apparent in this product within
1 year from the original date of purchase, it will be replaced free of charge, including
return transportation.
AM
PM
This warranty does not include damage to the product resulting from accidents, misuse
or leaking batteries.
NOTE: Check with your
local phone company
regarding name service
availability.
This unit receives and displays information transmitted by your local phone company.
This information can include the phone number, date, and time; or the name, phone
number, date, and time.
The unit can store up to 80 calls records. When the memory is full, a new call automatically replaces the oldest call in memory.
REVIEW AND DELETE BUTTONS
•
Press REVIEW
to see the next record. When all
messages have been viewed, the LCD displays
START/END.
Press
OR
A
M
DELETE
CALL
#
— Mail prepaid (with proof of purchase) and insured to:
Thomson Consumer Electronics Canada, Inc.
Distribution Centre
7400 A Bramalea Road
Mississauga, Ontario L5S 1X1
NEW will appear in the display for calls received that have not been reviewed.
•
1. Return it to the selling dealer with proof of purchase for replacement,
2. Remove the batteries (where applicable), and pack product complete with accessories in the original carton (or equivalent).
RECEIVING AND STORING CALLS
REVIEW BUTTONS
Should your product not perform properly during the warranty period, either:
LOW
NEW
REVIEW
The provisions of this written warranty are in addition to and not a modification of or
subtraction from the statutory warranties and other rights and remedies contained in any
applicable legislation, and to the extent that any such provisions purport to disclaim,
exclude or limit any such statutory warranties and other rights and remedies, such
provisions shall be deemed to be amended to the extent necessary to comply therewith.
If you are unable to find a qualified servicer for out of warranty service, you may write to:
Thomson Consumer Electronics Canada, Inc.
REVIEW to view previous records.
P.O. Box 0944
INSTALLING YOUR CALLER ID UNIT
DELETE BUTTON
1. Plug a telephone line cord into either jack on the back of the Caller ID unit and into
the Modular Jack on the wall.
•
2. Plug another telephone line cord into the remaining jack on the back of the unit into
the telephone.
•
To permanently delete the call record shown in the
display, press the DELETE button once.
Indianapolis, Indiana, U.S.A., 46206-0944
DELETE
button
REVIEW
button
To permanently delete all the call records, (any call
NEW CALL
REVIEW
record can be shown on the display), press and hold
indicator
button
the DELETE button for about 3 seconds and release
when the display request the confirmation DELETE ALL?. Press the DELETE button
once again to delete all records, or if you don’t wish to delete all records, do not touch
any buttons and the unit will timeout after 10 seconds keeping the records.
Attach your sales receipt to this booklet for future reference. This information is required
if service is needed during the warranty period.
PURCHASE DATE _____________________________________________________
NAME OF STORE ______________________________________________________