1
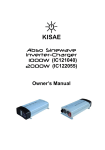
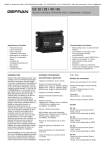
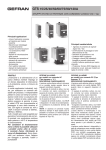
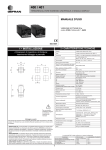
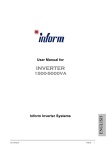
VIRB Series ™ Quick Start Manual May 2014 190-01627-01_0B Printed in Taiwan Introduction WARNING See the Important Safety and Product Information guide in the product box for product warnings and other important information. It is your responsibility to use the device in a safe manner. Garmin® will not be responsible for any property damage, injuries or deaths resulting from any use of this device in any activities. Installing a Memory Card You must install a microSD™ memory card up to 64GB to use your device. For optimal performance, use a class 10 or better memory card. 1 Turn the D-ring counter-clockwise, and pull up to remove the cover. 2 If necessary, remove the battery pack. 3 In the battery compartment, slide the card holder À toward the lens, and lift up. 5 Replace the battery cover, and turn the D-ring clockwise. Charging the Lithium-Ion Battery Pack NOTICE To prevent corrosion, thoroughly dry the mini-USB port, the weather cap, and the surrounding area before charging or connecting to a computer. Do not attempt to use the device to charge a battery that was not provided by Garmin. Attempting to charge a battery that was not provided by Garmin can damage the device and void the warranty. NOTE: The battery will not charge when outside the temperature range of 32 to 114°F (0 to 45°C). You can charge the battery using a standard wall outlet or a USB port on your computer. You can also use an optional battery charger accessory. Go to www.garmin.com/outdoor for more information. 1 Pull up the weather cap À from the mini-USB port Á. 4 Place the memory card Á with the gold contacts facing 5 6 7 8 down. Close the card holder. Slide the card holder away from the lens to lock it. Replace the battery pack. Replace the battery cover, and turn the D-ring clockwise. Installing the Battery Pack WARNING This product contains a lithium-ion battery. To prevent the possibility of personal injury or product damage caused by battery exposure to extreme heat, store the device out of direct sunlight. 1 Turn the D-ring counter-clockwise, and pull up to remove the cover. 2 Locate the metal contacts on the end of the lithium-ion battery. 3 Insert the battery into the compartment, contacts first. 4 Press the battery into place. 2 2 Plug the small end of the USB cable into the mini-USB port. 3 Plug the USB end of the cable into the AC adapter or a computer USB port. 4 Plug the AC adapter into a standard wall outlet. When you connect the device to a power source, the device turns on. The LED is orange while the battery is charging. 5 Charge the battery completely. The LED turns green when the battery is fully charged. 6 Remove the USB cable and fully close the weather cap. Attaching the Device to the Mount When attaching the device to the mount, the recommended temperature range is from 70° to 100°F (21° to 38°C). Your device includes an assortment of mounting bases and arms, which can be used in many configurations. These instructions provide an example of one possible configuration. You can also purchase additional mounts for your device, such as wearable mounts, vehicle mounts, or a tripod mount. Go to www.garmin.com/outdoor for more information. NOTE: By default, the camera should be mounted with the screen facing up to record correctly oriented video. You can adjust the settings to record with the screen facing down (Advanced Recording Settings). 1 Thoroughly clean the mounting surface using water or alcohol. 2 Remove the film from the base À, and press the base firmly onto the mounting surface. You can use either the flat base or the curved base, depending on the contour of the mounting surface. Keys 3 Allow the base to bond to the mounting surface for at least 24 hours. Select to scroll through menus and settings. 4 Place the coupler Á into the base. 5 Place the threaded ring  over the coupler, and tighten it onto the base. 6 Snap the mounting arm à into the coupler. 7 Insert a thumbscrew Ä into the joint, and tighten the thumbscrew to lock the angle of the joint. 8 Snap the camera mount Å into the top of the mounting arm. 9 Insert a thumbscrew into the joint, and tighten the thumbscrew to lock the angle of the joint. 10 Place the tab Æ on the back of the camera mount into the slot in the back of the camera. 11 Squeeze the buttons Ç on the sides of the mount, press the front of the camera È down, and release the buttons. Select to scroll through menus and settings. OK Select to choose menu options or to take a photo. MODE Select to scroll through modes. Hold to turn the device on and off. REC Slide toward the lens to record video. Turning On the Device You can turn on the device using either or REC. • Select . The device turns on and displays the viewfinder. • Slide REC toward the lens. The device turns on and starts recording video. Turning Off the Device NOTICE To prevent loss of data, always turn off the device before removing the battery. NOTE: You cannot turn off the device while recording video. 1 If necessary, slide REC away from the lens. 2 Hold . appears on the screen while the device saves track log data and turns off. If you need to remove the battery, wait until the screen turns off before removing the battery. Modes The camera should be held tightly and should not move in the mount when properly secured. 12 If the camera feels loose in the mount, press the front of the camera into the mount until it clicks. You can operate your device in several modes. VIEWFINDER: Displays the camera viewfinder and status information. PLAYBACK: Allows you to view recorded videos and photos. DASHBOARD: Displays sensor data in charts and data fields (VIRB Elite only). SETUP: Allows you to change camera settings. Changing Modes 1 Select MODE to cycle through the available modes. 2 Stop selecting MODE when the desired mode appears on the screen. 3 Video Playback Recording a Video Viewing Photos and Videos NOTE: If the battery power becomes very low while recording video, the device automatically stops recording, saves the video, and safely turns off. 1 Slide REC toward the lens to start recording video. If the device is off, it turns on automatically. The device starts recording video immediately. 2 Slide REC away from the lens to stop recording video. The video is saved on the memory card as an MP4 file, and the track log for the video is saved on the memory card as a GPX file. You can view your photos and recorded videos on the device screen. 1 Select MODE > PLAYBACK. 2 Select and to select a photo or video. Videos are indicated with . 3 Select OK. You can control video playback using the on-screen controls. Video Settings Select MODE > SETUP > VIDEO. Mode: Sets the resolution, aspect ratio, and frame rate. Field of View: Sets the zoom level. Loop: Enables loop recording and sets the number of minutes of video to store when recording a video loop. Auto Record: Enables automatic recording. When Moving automatically starts recording when the device is in motion. Ski Mode automatically starts recording when the device is moving downhill (VIRB Elite only). Microphone: Enables the microphone. Advanced Recording Settings Select MODE > SETUP > ADVANCED. Lens Correct: Corrects wide-angle barrel distortion and reduces the field of view. Automatically sets Field of View to Ultra-Zoom in the video settings. Stabilize: Turns on image stabilization to reduce shaky video. Automatically enables Lens Correct. Flip Camera: Sets the camera to capture video and images with the screen facing up or down. This Side Down captures correctly oriented video and photos with the screen facing downward. Photos Taking a Photo Your device provides several methods for taking a photo. • Select MODE > VIEWFINDER, aim the camera using the viewfinder, and select . • From anywhere except the playback screen, hold . The device displays the photo briefly and returns to the page you were using. • While recording a video, select to capture a photo at the same resolution as the video recording. Photos taken while recording a video always use normal photo mode. Burst mode is ignored while recording video. Photos Settings Select MODE > SETUP > Photos. Resolution: Sets the photo resolution. Mode: Sets the shooting mode. Burst mode takes several photos in quick succession to capture a specific instance, such as the finish line during a race. Self Timer: Sets the timer to delay taking a photo. Repeat On automatically repeats the time interval and captures a photo until you press again. Date Stamp: Adds a date stamp to your photo. 4 Deleting Photos and Videos 1 Select MODE > PLAYBACK. 2 Select and to select a photo or video. 3 Select OK > . Dashboards NOTE: This feature is available for VIRB Elite only. A dashboard is a grouping of data fields, charts, or graphs of data from the device sensors and connected ANT+™ sensors. The dashboards provide real-time and historical views of the sensor data recorded to the track log. Viewing the Dashboards 1 Select MODE > DASHBOARD. 2 Select or to scroll through the dashboards. Pairing Your ANT+ Sensors When you pair a compatible ANT+ sensor with your device, the sensor data is included in the track log, and you can view dashboards for the sensor data. 1 Turn on the sensor, and bring the device and sensor within 10 ft. (3 m) of each other. 2 On the device, select MODE > SETUP > SENSORS. 3 On the device, select the type of sensor to pair. The icon for the sensor blinks. When the icon turns solid, the sensor is paired and connected. Tracks NOTE: This feature is available for VIRB Elite only. A track is a recording of your path. The track log contains information about points along the recorded path, such as time, location, and elevation for each point. If you have paired ANT+ sensors with your device, data from connected sensors is included in the track log. The device records a continuous track log while it is on. This track is saved as a FIT file on the memory card each time you turn off the device. The device also records a separate track log for each video recording. Video track logs are saved as GPX files on the memory card each time you stop recording video. The track logs include track point data at one-second intervals. You can view GPX and FIT track logs on your computer using the BaseCamp™ application. Go to www.garmin.com/basecamp for more information. You can also view and upload FIT track logs to Garmin Connect™. Go to http://connect.garmin.com for more information. Device Information System Settings Select MODE > SETUP > SYSTEM. GPS: Enables the device to receive GPS satellite signals. When Recording enables GPS reception only when the camera is recording video (VIRB Elite only). Record Light: Turns the recording light on or off. Tones: Turns audible tones on or off. Time: Sets the time and date formats. Units: Sets the units of measure. Language: Sets the on-screen text language. Reset Settings: Restores the default device settings. About: Displays important software information and your unit ID. Cleaning the Device NOTICE Do not use a dry cloth to clean the lens. Use of a dry cloth may damage the fog resistant coating on the lens. Wipe the device with a soft, non-scratch cloth dampened with water or alcohol. Specifications Battery type Rechargeable Lithium-ion battery Battery life Up to 3 hours Water resistance Water resistant to IEC 60529 IPX7 Operating temperature range From 5º to 140ºF (from -15º to 60ºC) Charging temperature range From 32º to 113°F (0º to 45°C) Radio frequency/ protocol 2.4 GHz ANT+ wireless communications protocol Wi-Fi® IEEE 802.11 b/g at 2.4 GHz Getting More Information You can find more information about this product on the Garmin website. • Go to www.garmin.com/outdoor. • Go to www.garmin.com/learningcenter. • Go to http://buy.garmin.com, or contact your Garmin dealer for information about optional accessories and replacement parts. Support and Updates The Garmin VIRB application provides easy access to these tools and services for your device. • Reviewing and editing recorded videos • Reviewing track logs • Linking track logs to your recorded videos • Software and feature updates The Garmin VIRB application is available for Windows® and Mac® computers. Go to www.garmin.com/VIRB for more information. 5 www.garmin.com/support +43 (0) 820 220230 + 32 2 672 52 54 Garmin® and the Garmin logo are trademarks of Garmin Ltd. or its subsidiaries, registered in the USA and other countries. VIRB™, ANT+™, Garmin Connect™, and BaseCamp™ are trademarks of Garmin Ltd. or its subsidiaries. These trademarks may not be used without the express permission of Garmin. For open source license information associated with this product, see wifi_copyrights.txt on the device microSD card. 0800 770 4960 1-866-429-9296 +385 1 5508 272 +385 1 5508 271 +420 221 985466 +420 221 985465 + 45 4810 5050 + 358 9 6937 9758 + 331 55 69 33 99 + 39 02 36 699699 (+52) 001-855-792-7671 0800 0233937 +47 815 69 555 00800 4412 454 +44 2380 662 915 (+35) 1214 447 460 +386 4 27 92 500 0861 GARMIN (427 646) +27 (0)11 251 9999 +34 93 275 44 97 + 46 7744 52020 +886 2 2642-9199 ext 2 0808 238 0000 +44 (0) 870 8501242 microSD™ and the microSDXC logo are trademarks of SD-3C, LLC. Other trademarks and trade names are those of their respective owners. Windows® is a registered trademark of Microsoft Corporation in the United States and other countries. Mac® is a trademark of Apple Inc. Wi-Fi® is a registered mark of Wi-Fi Alliance Corporation. +49 (0)180 6 427646 20 ct./Anruf. a. d. deutschen Festnetz, Mobilfunk max. 60 ct./Anruf 913-397-8200 1-800-800-1020 TRA REGISTERED No: ER0116234/13 DEALER No: DA0061884/11 © 2013–2014 Garmin Ltd. or its subsidiaries TA-2013/1091