1
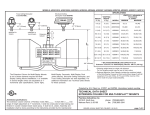
G500 PFD/MFD System Instructions for Continued Airworthiness as installed in _____________________________ (Make and Model Airplane) Reg. No.____________ S/N_______________ Dwg. Number: 190-01102-00 Rev. 5 Garmin International, Inc. 1200 E. 151st Street Olathe, Kansas 66062 USA Record of Revision Rev. Date Description of Change 1 2 06/30/09 11/30/09 3 02/08/11 4 08/15/11 5 12/11/12 Initial Release Add replacement instructions for OAT bond strap Update referenced publications. Clarified periodic maintenance instructions. Foil check annual. Added new special inspection requirements and periodic bonding test. Remove “FAA Approved” language. Update IM rev. Add additional instructions for Mid-Continent standby attitude indicator installations. Added information regarding GAD 43e. Added additional Control, Operating Information and deleted Pilot’s Guide reference. Incorporated GDC 74 testing procedural information from Installation Manual. Revised lightning strike inspection. 1. INTRODUCTION................................................................................................................... 3 1.1 Purpose................................................................................................................. 3 1.2 Scope .................................................................................................................... 3 1.3 Document Control ................................................................................................. 3 1.4 Airworthiness Limitations Section ......................................................................... 3 1.5 Permission to Use Certain Documents ................................................................. 3 1.6 Definitions ............................................................................................................. 3 2. INSTRUCTIONS FOR CONTINUED AIRWORTHINESS .................................................... 4 2.1 Introduction ........................................................................................................... 4 2.2 Description of Alteration ........................................................................................ 4 2.3 Control, Operating Information ............................................................................. 4 2.4 Servicing Information ............................................................................................ 5 2.5 Periodic Maintenance Instructions ........................................................................ 6 2.6 Troubleshooting Information ................................................................................. 8 2.7 Removal and Replacement Information ............................................................... 8 2.8 Diagrams............................................................................................................... 9 2.9 Special Inspection Requirements ......................................................................... 9 2.10 Application of Protective Treatments .................................................................... 9 2.11 Data Relative to Structural Fasteners ................................................................... 9 2.12 Special Tools ........................................................................................................ 9 2.13 Additional Instructions ........................................................................................... 10 2.14 Overhaul Period .................................................................................................... 10 2.15 ICA Revision and Distribution ............................................................................... 10 2.16 Assistance............................................................................................................. 10 2.17 Implementation and Record Keeping ................................................................... 10 3. APPENDIX A ......................................................................................................................... 11 3.1 LRU Locations ...................................................................................................... 11 3.2 Wire Routing – Single-Engine .............................................................................. 12 3.3 Wire Routing – Twin-Engine ................................................................................. 13 G500 PFD/MFD System Instructions for Continued Airworthiness 190-01102-00 Rev. 5 Page 2 of 13 1. INTRODUCTION 1.1 Purpose This document is designed for use by the installing agency of the Garmin G500 PFD/MFD System as Instructions for Continued Airworthiness in response to Federal Aviation regulation (FAR) Part 23.1529, and Part 23 Appendix G. This ICA includes information required by the operator to adequately maintain the Garmin G500 system installed under Approved Model List (AML) STC. 1.2 Scope This document identifies the Instruction for Continued Airworthiness for the modification of the aircraft for installation of the Garmin G500 PFD/MFD System installed under Approved Model List (AML) STC. 1.3 Document Control This document shall be released, archived, and controlled in accordance with the Garmin document control system. When this document is revised, refer to Section 2.15 for information on how to gain FAA acceptance or approval and how to notify customers of changes. 1.4 Airworthiness Limitations Section There are no additional Airworthiness Limitations as defined in 14 CFR § 23, Appendix G. G23.4 that result from this modification. The Airworthiness Limitations section is FAA approved and specifies maintenance required under §§43.16 and 91.403 of the Federal Aviation Regulations unless an alternative program has been FAA approved. 1.5 Permission to Use Certain Documents Permission is granted to any corporation or person applying for approval of a Garmin G500 system to use and reference appropriate STC documents to accomplish the Instructions for Continued Airworthiness and show compliance with STC engineering data. This permission does not construe suitability of the documents. It is the responsibility of the applicant to determine the suitability of the documents for the ICA. 1.6 Definitions The following terminology is used within this document: 1) 2) 3) 4) 5) 6) 7) 8) 9) 10) 11) 12) 13) 14) AC: Advisory Circular ACO: Aircraft Certification Office ADC: Air Data Computer AEG: Aircraft Evaluation Group AHRS: Attitude Heading Reference System CFR: Code of Federal Regulations FAA: Federal Aviation Administration ICA: Instructions for Continued Airworthiness MFD: Multi-Function Display PFD: Primary Flight Display PMI: Primary Manufacturing Inspector STC: Supplemental Type Certificate TSO: Technical Standard Order TVS: Transient Voltage Suppressor G500 PFD/MFD System Instructions for Continued Airworthiness 190-01102-00 Rev. 5 Page 3 of 13 2. INSTRUCTIONS FOR CONTINUED AIRWORTHINESS 2.1 Introduction Content, Scope, Purpose and Arrangement: This document identifies the Instructions for Continued Airworthiness for the modification of the aircraft by installation of the Garmin G500 PFD/MFD System. Applicability: Applies to aircraft altered by installation of the Garmin G500 PFD/MFD System. Definition of Abbreviations: See Section 1.6 Precautions: None Units of measurement: None Referenced publications: Garmin 190-01102-06 Rev. 7 “G500 AML STC Installation Manual” or later revisions Retention: This document, or the information contained within, will be included in the aircraft’s permanent records. 2.2 Description of Alteration The Garmin G500 PFD/MFD System is a combination of Garmin LRUs designed to provide both a PFD and MFD in the primary field of view. The system consists of a GDU 620 display, GRS 77 AHRS, GDC 74( ) ADC, GMU 44 magnetometer, and GTP 59 outside air temperature probe. This modification may also include a Garmin GAD 43 Adapter and/or Mid Continent Instruments attitude indicator (models 4300-4( ), or 4200-( ) with MD420). Installation of the Garmin G500 system, specific for the aircraft installation, is documented in the G500 AML STC Installation Manual. 2.3 Control, Operating Information The GDU 620, GRS 77, GMU 44, and GDC 74( ) are powered by an electrical bus which is normally energized with battery, generator, or external power applied to the aircraft. The GAD 43/43e is typically powered by an avionics bus which is normally controlled by the avionics bus power switch. The LRUs do not have individual power switches and are powered when the bus is energized and the circuit breakers are closed. The following circuit breakers provide power to the individual LRUs: • PFD: GDU 620 • AHRS: GRS 77 #1 and GMU 44 #1 • ADC: GDC 74( ) • GAD: GAD 43/43e In a dual G600 installation, the PFD, AHRS, and ADC circuit breakers are suffixed with the numbers 1 and 2 (i.e. AHRS 1 and AHRS 2). If an LRU is optionally powered from multiple circuit breakers, then the circuit breakers will be suffixed with the letters A and B (i.e AHRS 1A and AHRS 1B). The GDU 620 has a PFD and MFD display and front panel controls for performing all normal and configuration operations. Knobs at the lower left and right corners are used for selecting and entering G500 PFD/MFD System Instructions for Continued Airworthiness 190-01102-00 Rev. 5 Page 4 of 13 data on each screen. The function of the soft keys along the bottom of the display is depicted by the text above the key. There are dedicated ENT, CLR, and MENU keys on the MFD side of the unit. Turning the PFD knob adjusts the values for the mode selected by the PFD bezel keys, such as, Heading (HDG), Course (CRS), Altitude (ALT), Vertical Speed (V/S), and Barometric Setting (BARO). The values are shown in a window to the left of the HSI. Pressing the PFD knob reverts to the default value of the selected mode. The Small (Inner) MFD Knob selects a specific page within a page group. Pressing the small MFD knob turns the selection cursor ON and OFF. When the cursor is ON, data may be entered in the applicable window by turning the small and large MFD knobs. In this case, the large MFD knob moves the cursor on the page and the small MFD knob selects individual characters or values for the highlighted cursor location. The Large (Outer) MFD Knob selects the MFD page group. When the cursor is ON, the large MFD knob moves the cursor to highlight available fields. The system starts in normal mode when power is applied to the LRUs. After completing the self-test, the database confirmation page is displayed. Invalid or expired databases are displayed in yellow. Press ENT to proceed to normal mode. Normal mode consists of a Primary Flight Display (PFD) on one screen and a Multifunction Display (MFD) on the other screen. The AHRS alignment should complete within one minute and attitude should be displayed on the PFD. System alerts are accessible via an “ALERTS” softkey at the lower right of the MFD. During normal system operation with all aircraft systems and avionics powered there should not be any red Xs or system alerts on the GDU 620. To enter into Configuration Mode, verify that the GDU 620 is off and an Installer Unlock Card is inserted in the SD card slot of the GDU 620. Apply power to the GDU 620 while holding the ENT key. Release the ENT key when “INITIALIZING SYSTEM” appears in the upper left corner of the display. Refer to the G500 AML STC Installation Manual for further configuration instructions. 2.4 Servicing Information In the event of system failure, troubleshoot the G500 system in accordance with Section 2.6 Troubleshooting Information. If the Mid-Continent Instruments 4300-4XX Electric Attitude Indicator or MD420 battery pack is installed, the battery or batteries may be charged by one of the following methods: 1. Keep the battery or batteries plugged into the Attitude Indicator or Battery Module. Apply power to the aircraft and run the unit overnight (approx. 15 hours) at the rated voltage. 2. Float Charging: Disconnect the battery or batteries from the indicator or module. Connect the battery or batteries to a constant voltage source (battery plug (pin 1) red wire = positive) of 20.4 to 20.6 VDC continuously. Float charging may take 24 hours or longer to charge a battery pack. 3. Routine Charging: Disconnect the battery or batteries from the indicator or module. Connect the battery or batteries to a constant voltage source (battery plug pin 1 red wire = positive) of 21.6 to 22.1 VDC with a current limit of 0.1 ampere maximum. When the charging current drops to approximately 5mA, the battery is fully charged and should be disconnected. Leaving 21.6 to 22.1 VDC charge voltage on the battery for an extended time will degrade its life. If continuous maintenance of the charge is desired, refer to step 2, Float Charging. ****WARNING**** Battery out gassing and a rotten egg odor may occur due to prolonged high rate overcharging and may result in battery damage. The battery assembly must be replaced if out gassing has occurred. 4. The Mid-Continent Instruments Battery Charger/Tester P/N 36029 may be used. This Battery Charger/Tester will apply an initial charge, per step 3 above, and then automatically switch to maintain a float charge, per step 2 above, indefinitely after initial charging is complete. G500 PFD/MFD System Instructions for Continued Airworthiness 190-01102-00 Rev. 5 Page 5 of 13 2.5 Periodic Maintenance Instructions All G500 system LRUs are designed to detect internal failures. A thorough self-test is executed automatically upon application of power to the units, and built-in tests are continuously executed. Detected errors are indicated on the GDU 620 display via failure annunciations. Operation of the G500 system is not permitted unless an inspection as described in this section has been completed within the preceding 12 calendar months. Conduct a visual inspection (look for signs of wear, deterioration, or damage to wires, switches, backshells, connectors, overbraid, bonding straps or foil) of the G500 system LRUs and wiring harnesses to ensure installation integrity: 1. Inspect all units for security of attachment, including visual inspection of brackets and other supporting structure attaching all units to the airframe. 2. Inspect all switches, knobs and buttons for legibility. 3. Visually inspect each unit’s wiring for chafing or wear at each termination. 4. Visually check for any signs of corrosion. 2.5.1 Transient Voltage Suppressors (non-metallic aircraft only) The GDU 620 #1, GRS 77 #1, GDC 74( ) #1, and GAD 43 (if installed) will have a TVS located at each LRU. The electronic Mid Continent Instrument standby Attitude Indicator (if installed) will have a TVS located at the indicator and at the attitude indicator power bus. These components must be tested every 24 calendar months in accordance with section 8.3.1 of the G500 AML STC Installation Manual. 2.5.2 Aluminum Foil Tape (non-metallic aircraft only) Any aluminum foil tape used in the G500 installation (see section 3.1 of this document) must be inspected every 12 calendar months in accordance with section 8.3.2 of the G500 AML STC Installation Manual. 2.5.3 GDU 620 – Display Unit Maintenance of the GDU 620 is ‘on condition’ only. 2.5.4 GRS 77 – Attitude, Heading Reference System (AHRS) The GRS 77 utilizes an Earth magnetic field model which is updated once every five years as part of the Aviation Database maintained by the owner/operator. If the magnetic model is not up to date, the unit will issue an alert upon startup indicating the model has expired. The model can be updated in accordance with the database update section of the G500 AML STC Installation Manual. Otherwise maintenance of the GRS 77 is ‘on condition’ only. 2.5.5 GMU 44 – Magnetometer Maintenance of the GMU 44 is ‘on condition’ only. 2.5.6 GDC 74( ) – Air Data Computer Test according to 14 CFR § 91.411. When testing in accordance with 14 CFR Part 43, Appendix E, it is not necessary to perform sections (b)(1)(iv), Friction, or (b)(1)(vi), Barometric Scale Error. 2.5.7 GTP 59 – OAT Probe Maintenance of the OAT Probe is ‘on condition’ only. 2.5.8 GAD 43/43e – Adapter Maintenance of the GAD 43/43e is ‘on condition’ only. G500 PFD/MFD System Instructions for Continued Airworthiness 190-01102-00 Rev. 5 Page 6 of 13 2.5.9 Mid Continent Instruments Attitude Indicator Models 4300-4( ), or 4200-( ) with MD420 If a Mid Continent Instruments Attitude Indicator is installed as part of the G500 AML STC, within the preceding 12 calendar months each battery pack must be tested by one of the following means: 1. Manual: a. Disconnect each battery pack from the Attitude Indicator or Battery Module. b. Ensure each battery pack is completely charged (per Section 2.4) and at or near room temperature (20-25°C). c. Connect each battery to a load of 90 ohms (rated for 10 watts) for 60 minutes while monitoring the battery voltage level. i. If the battery voltage is at or above 15.0 volts while under load at the end of the 60 minute test, the battery may be recharged immediately in accordance with Section 2.4 and re-installed in the aircraft. ii. If the battery voltage is below 15.0 volts while under load at the end of the 60 minute test the battery must be replaced. 2. Automatic: a. Use the Mid Continent Instruments Battery Charger/Tester P/N 36029 to test the battery. i. If the time required for discharge is 60 minutes or greater, the battery may be recharged immediately in accordance with Section 2.4 and re-installed in the aircraft. ii. If the time required for discharge is less than 60 minutes, the battery must be replaced. ****WARNING**** The battery may be permanently damaged if it is left in a discharged state. Recharge a discharged battery as soon as possible and maintain with a float charge for maximum battery life. Within the preceding 12 calendar months, proper operation of the attitude instrument must be verified with the following procedure: 1. Apply aircraft power to the unit and verify that the invalid flag is removed from view and the STBY PWR indicator is not illuminated. 2. Remove aircraft power from the unit and verify that the invalid flag is not visible and the STBY PWR indicator is flashing. 3. Press the STBY PWR button and verify that the invalid flag is not visible and the STBY PWR indicator is not flashing. 4. Press the STBY PWR button a second time and verify that the invalid flag is displayed. Otherwise maintenance of the Mid Continent Instruments attitude indicator is ‘on condition’ only. G500 PFD/MFD System Instructions for Continued Airworthiness 190-01102-00 Rev. 5 Page 7 of 13 2.5.10 Electrical Bonding Test G500 LRU electrical bonding must be tested every 2000 flight hours or ten (10) years, whichever is first. During the test, any cables normally attached to the LRU must be disconnected from the LRU. If measured resistance is greater than applicable values in the following table, bonding must be improved to meet applicable requirements for a new installation in accordance with section 3.8 of the G500 AML STC Installation Manual. LRU Metallic Aircraft Non-Metallic Aircraft GDU 620 – Display Unit 40 mΩ (to instrument panel) 40 mΩ (to instrument panel) GRS 77 – Attitude, Heading Reference System (AHRS) 20 mΩ (to aircraft ground plane) 20 mΩ (to instrument panel) GMU 44 – Magnetometer 20 mΩ (to aircraft ground plane) No bond check required since the GMU is required to be isolated from it’s mounting location. Verify that there is sufficient clearance around the installation per section 2.5.11.5.3 of the G500 AML STC Installation Manual GDC 74( ) – Air Data Computer 20 mΩ (to aircraft ground plane) 20 mΩ (to instrument panel) GTP 59 – OAT Probe 5 mΩ (to aircraft skin) No bond check required since the GTP is required to be isolated from it’s mounting location. Verify that there is sufficient clearance around the installation per section 2.5.11.7.2 of the G500 AML STC Installation Manual GAD 43/43e – Adapter 20 mΩ (to aircraft ground plane) 20 mΩ (to instrument panel) Note: there are no applicable bonding requirements for the Mid Continent Instruments Attitude Indicator Models 4300-4( ), or 4200-( ) with MD420 2.6 Troubleshooting Information If error indications are displayed on the GDU 620 display unit, and/or the optional Mid Continent Instruments standby attitude indicator, consult the Troubleshooting section contained in the G500 AML STC Installation Manual. The ‘G500 System Post-Installation Checkout Log’ in the aircraft permanent records includes the configuration information for the installation. (See Section 5 in the G500 System Installation Manual for a sample Log). 2.7 Removal and Replacement Information If any G500 LRUs are removed and reinstalled, verify that the LRU unit power-up self-test sequence is successfully completed and no failure messages are annunciated on the GDU 620 display. See the unit replacement procedure in Section 3 of the G500 AML STC Installation Manual. Perform any additional procedures that are required for each LRU, as specified in the following subsections. G500 PFD/MFD System Instructions for Continued Airworthiness 190-01102-00 Rev. 5 Page 8 of 13 If any work has been done on the aircraft that could affect the system wiring, antenna cable, or any interconnected equipment, verify the G500 system unit power-up self-test sequence is successfully completed and no failure messages are annunciated on the GDU 620 display. Refer to the G500 AML STC Installation Manual (listed under reference documentation in Section 2.1 of this document) for particular LRU removal/installation procedures and special handling precautions. 2.7.1 GAD 43e Adapter Replacement If the GAD 43e is used with an analog navigation receiver, the GAD 43e calibration specified in 5.5.11.3 of the G500 AML STC Installation Manual must be performed whenever the GAD 43e and/or the analog navigation receiver is replaced. 2.8 Diagrams Aircraft specific LRU locations and wire routing diagram are contained in Appendix A of this document. Refer to the G500 AML STC Series Installation Manual (listed under reference documentation in Section 2.1 of this document) for drawings applicable to this installation. Point to point wiring diagrams are in Appendix F of the G500 AML STC Installation Manual. Refer to the G500 Post-Installation Checkout Log retained in the aircraft permanent records for a list of the interfaced equipment and port configurations. 2.9 Special Inspection Requirements After a suspected lightning strike, the following actions must be performed: Inspect the GTP 59 OAT for signs of lightning damage. Check the self-sealing washer (P/N 212-00026-00) used on the probe tip outside of the aircraft for any evidence of melting or lack of seal. Replace washer if damaged. If there is evidence of lightning strike to the OAT or any lightning damage, replace the GTP 59 OAT. Non-metallic aircraft must have all Transient Voltage Suppressors replaced in accordance with section 8.3.1 of the G500 AML STC Installation Manual. Tube and fabric aircraft must replace the OAT bond strap (if installed) in accordance with section 8.3.3 of the G500 AML STC Installation Manual. Aircraft with a GMU mounted in the wingtip of metallic aircraft with non-metallic wingtip covers must inspect the magnetometer installation in accordance with section 8.4.1 of the G500 AML STC Installation Manual. Aircraft with an ARINC 708 weather radar interfaced to the GDU 620 must inspect the overbraid to the weather radar in accordance with section 8.4.2 of the G500 AML STC Installation Manual. If the Mid-Continent Standby Attitude Indicator (if installed) has not been operated for more than 3 months, charge each battery pack using one of the methods described in Section 2.4. 2.10 Application of Protective Treatments None, N/A. 2.11 Data Relative to Structural Fasteners Data relative to structural fasteners, such as type, torque, and installation requirements can be found in Section 3 of the G500 AML STC Installation Manual. 2.12 Special Tools For electrical bonding testing, a milli-ohm meter is required. No special tools are required for system checkout. See G500 AML STC Installation Manual listed in reference documentation in Section 2.1 of this document. G500 PFD/MFD System Instructions for Continued Airworthiness 190-01102-00 Rev. 5 Page 9 of 13 2.13 Additional Instructions None 2.14 Overhaul Period The system does not require overhaul at a specific time period. Power on self-test and continuous BIT will monitor the health of the G500 system. If any LRU indicates an internal failure, the unit may be removed and replaced. See the troubleshooting section contained in the G500 AML STC Installation Manual, listed under reference documentation in paragraph 2.1 of this document. 2.15 ICA Revision and Distribution To revise this ICA, a letter must be submitted to the ACO or ODA along with the revised ICA. The ACO or ODA will obtain AEG acceptance, and approve any revision to the Airworthiness Limitations in Section 1.4. After FAA acceptance/approval, Garmin will release the revised ICA for customer use, and provide any required notification of the revision. The latest revision of this document will be available on the Garmin website (www.garmin.com). A Garmin Service Bulletin, describing ICA revision, will be sent to dealers if revision is determined to be significant. 2.16 Assistance Flight Standards Inspectors or the certificate holder’s PMI have the required resources to respond to questions regarding this ICA. In addition, the customer may refer questions regarding this equipment and its installation to the manufacturer, Garmin. Garmin customer assistance may be contacted during normal business hours via telephone 913-397-8200 or email from the Garmin web site at www.garmin.com. 2.17 Implementation and Record Keeping Modification of an aircraft by this Supplemental Type Certificate obligates the aircraft operator to include the maintenance information provided by this document in the operator’s aircraft maintenance manual and/or the operator’s aircraft scheduled maintenance program. G500 PFD/MFD System Instructions for Continued Airworthiness 190-01102-00 Rev. 5 Page 10 of 13 3. APPENDIX A 3.1 LRU Locations The following table describes the locations of the G500 LRUs: LRU included in this installation? Aluminum foil tape used for grounding? GDU 620 #1 Yes N/A GRS 77 #1 Yes Yes No GDC 74( ) #1 Yes Yes No GMU 44 #1 Yes N/A GTP 59 #1 Yes N/A GAD 43/43e Yes No Yes No MCI 4300-4 ( ) Yes No N/A MCI 4200-( ) Yes No N/A MCI MD420 Yes No N/A Yes No N/A Yes No N/A Yes No N/A Yes No N/A Yes No N/A LRU GDU 620 #2 (dual installations only) GRS 77 #2 (dual installations only) GDC 74A #2 (dual installations only) GMU 44 #2 (dual installations only) GTP 59 #2 (dual installations only) G500 PFD/MFD System Instructions for Continued Airworthiness Description of Location 190-01102-00 Rev. 5 Page 11 of 13 3.2 Wire Routing – Single-Engine The following diagram depicts the wire routing for the G500 LRUs throughout the aircraft structure for a single-engine aircraft: G500 PFD/MFD System Instructions for Continued Airworthiness 190-01102-00 Rev. 5 Page 12 of 13 3.3 Wire Routing – Twin-Engine The following diagram depicts the wire routing for the G500 LRUs throughout the aircraft structure for a twin-engine aircraft: G500 PFD/MFD System Instructions for Continued Airworthiness 190-01102-00 Rev. 5 Page 13 of 13