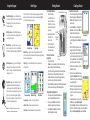
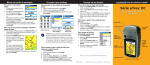
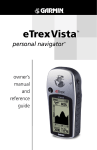
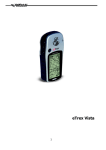
1
Marking a Waypoint
To mark your current location:
1. Press and hold Enter to open the
Mark Waypoint Page.
2. To accept the waypoint with the
default information, highlight OK,
and press Enter.
OR
To change any information on the
Mark Waypoint Page, highlight the
appropriate field, and press Enter to open the on-screen
keypad. After entering and confirming your changes,
highlight OK, and press Enter.
To find an item from your current location:
1. Press and hold the Menu key to open the Find Menu.
2. Highlight a category icon (Waypoints, Cities, Exits, for
example), and press Enter.
3. Use the Rocker to highlight an item, and press Enter to
open the information page for the selected item.
To Go To a highlighted map item:
1. Use the Rocker to highlight the item you want to navigate
to on the Map Page.
2. Press and quickly release Enter to capture the pointer
location ( ) and open the information page.
3. Highlight Go To, and press Enter to begin navigation.
4. Follow the magenta route created on the Map Page. You
can also use the Compass Page to help you navigate to
the point.
To initiate a Go To from the Find Menu:
To create a new waypoint using the Map Page:
1. Open the Map Page, and use the Rocker to move
the pointer ( ) to the map item you want to mark as a
waypoint.
2. Press and quickly release Enter to
capture the pointer location.
If you highlighted a map feature,
an information page appears.
Highlight Save, and press Enter to
save the item as a waypoint.
OR
If the map item selected contains
no information, a “No map information at this point. Do you
want to create a user waypoint here?” message appears.
Highlight Yes, and press Enter.
Going to a Destination
Finding Map Items
Find Menu
Waypoints List
Information Page
NOTE: For the Find Menu to display all of the categories shown above, MapSource detailed map
data must be downloaded to the microSD™ or TransFlash™ card. (Refer to the owner’s manual for
detailed information.)
To find an item from another location using the Find
Menu:
1. Press the Find key to open the Find Menu.
2. Highlight a category icon (Waypoints, Cities, Exits, for
example), and press Enter.
3. Press the Menu key to open the Options Menu.
4. Highlight Change Reference, and press Enter.
5. Use the Rocker to select a reference point on the map,
and press Enter. The list changes to show items nearest
to the new map location.
1. Press the Find key to open the Find Menu.
2. Highlight the Waypoint icon, and press Enter to open the
Waypoints Page.
3. Use the Rocker to select a waypoint, and press Enter.
The Waypoint Page opens.
4. Highlight Go To, and press Enter to begin navigation.
To go to a recently found item:
1. Press the Find key to open the Find
Menu.
2. Highlight the Recent Finds icon,
and press Enter to open the Recent
Finds Page.
3. Use the Rocker to select an item to
go to, and press Enter to open the
information page for the item.
4. Highlight Go To, and press Enter to begin navigation.
eTrex Vista Cx
®
hiking companion
quick reference guide
GPS antenna
In/Out (Zoom)
keys
Enter/Rocker
key
Menu/Find
key
Power/
Backlight
key
Color LCD display
190-00514-01 Rev. A
© Copyright 2006 Garmin Ltd. or its subsidiaries
Printed in Taiwan
Quit/
Compass
Key
Using the Keypad
Power/Backlight key—press and hold to turn
the unit on or off. Press and release to adjust the
backlighting, view the date or time, and view
the battery capacity.
The eTrex Vista Cx has four recurring main pages and one that
displays only with each start-up. Press and release the Quit key
to cycle through the page sequence.
Quit/Compass key—press to cycle through the
main pages. Press and release to cancel data
entry or exit a page. Press and hold to turn the
compass on or off.
Enter/Rocker key—press and release to enter
highlighted options and data or confirm onscreen messages. Press and hold to mark your
current location as a waypoint. Move up, down,
right, or left to move through lists; highlight
fields, on-screen buttons, or icons; enter data; or
to move the map panning arrow.
(Press down to Enter. Move to the side or up or down to scroll,
move the cursor, or increase or decrease values.)
Satellite Page
Map Page
Satellite Page—appears only at start-up and shows the GPS
receiver status, satellite locations, satellite signal strength, and the
receiver’s current location.
Map Page—shows a detailed map of the area around your
current location.
Compass Page
Altimeter Page
Main Menu
Compass Page—guides you to your destination.
Altimeter Page—tracks elevation and pressure.
Main Menu—contains advanced features and settings.
To install the batteries:
1. Remove the battery
cover from the back of
the unit by turning the
D-Ring 1/4 turn counterclockwise and pulling the
cover away.
microSD™
2. Insert two AA batteries,
or
TransFlash™
and replace the
card slot
battery cover.
3. Turn the D-Ring 1/4
turn clockwise to lock
the cover in place.
To turn on the eTrex
Legend Cx:
Battery compartment
PUSH TO EJECT
In/Out Zoom keys—from the Map Page, press
to zoom in or out. From any other page, press to
scroll up or down a list.
Menu/Find key—press and release to view options for a page. Press twice to view the Main
Menu. Press and hold to display the Find Menu.
Creating a Route
Getting Started
Main Pages
Locking
pin slot
1. Press and hold the
Power key. A tone sounds, and the Introduction Page
appears, followed by the Satellite Page.
The GPS receiver begins searching for satellite signals.
When the receiver has signals from at least three
satellites, the display at the top of the page indicates
position accuracy and location coordinates.
2. Press the Quit key repeatedly until the Map Page appears.
You are now ready to begin GPS-aided navigation.
To adjust the backlight level:
1. Press and quickly release the Power key to
open the backlight adjustment slider.
2. Press up on the Rocker to increase the
brightness, or press down to decrease.
3. Press Enter or the Quit key to close the
backlight adjustment window.
To create and use a route:
1. Access the Routes Page from the Main
Menu. The page has a New button, an
Active button, and space for a list of
saved routes.
2. Use the Rocker key to highlight the
New button, and then press Enter to
display the Route Setup Page.
Routes List
3. With an empty row (dashed) in the
route list highlighted, press Enter to display the Find
Menu.
4. Use the Find Menu to select a route
waypoint from one of the Find Menu
map item groups. Display the information
page for the selected item, highlight the
on-screen Use button, and press Enter to
add it to the route list of via points.
5. To add more via points to your route,
Route Setup
repeat the process.
6. When you have completed the route,
highlight the Navigate button to begin
calculation of the route and navigation
using the Map Page.
7. Follow the instructions at the top of the
Map Page, the magenta route overlay
on the map, and turn-by-turn pop-up
prompts.
Route on Map
8. To stop navigation at any time, press
the Menu key, select Stop Navigation,
and press Enter. The route is automatically saved to the
Routes List. To resume navigation, return to the Options
Menu, select Resume Navigation, and press Enter.