1
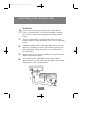
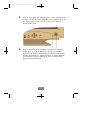
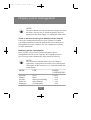
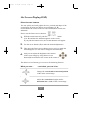
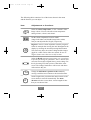
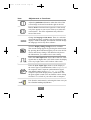
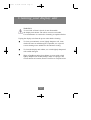
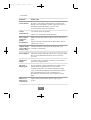
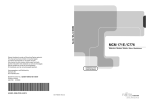
Fujitsu
8/16/92 5:16 PM
Page 2
Display Unit
Fujitsu x178
User’s Guide
Brugervejledning
Käyttäjän käsikirja
Manuel d’utilisation
Benutzerhandbuch
Manual do utilizador
Guía de usuario
Användarhandbok
Fujitsu
8/16/92 5:16 PM
Page 3
Display Unit Fujitsu x178
User’s Guide
First Edition
August 1999
Document Number:
This document was produced by Fujitsu Computers Oy in Espoo, Finland.
If you have comments or suggestions, we’d like to hear from you!
Mail:
Fujitsu Computers Oy
User Documentation
PO Box 10
FIN-02611 Espoo
Finland
Internet:
[email protected]
X.400:
G=user
O=fujitsu
P=fujitsu
S=documentation
OU1=fin1703
A=elisa
C=fi
Fujitsu Computers Ltd (hereinafter Fujitsu) endeavours to ensure that the information
in this document is correct, but accepts no liability for any error or omission in the
same.
Any procedures described in this document for operating Fujitsu products should be
read and understood by the operator before such products are used. To ensure that
Fujitsu products function without risk to safety or health, such procedures should be
strictly observed by the operator.
The development of Fujitsu products and services is continuous and published
information may not be up to date. Any particular issue of a product may contain part
only of the facilities described in this document or may contain facilities not described
herein. It is important to check the current position with Fujitsu.
Specifications and statements as to performance in this document are Fujitsu estimates
intended for general guidance. They may require adjustment in particular
circumstances and should therefore not be taken as formal offers or commitments.
Statements in this document are not part of a contract or program product licence
save insofar as they are incorporated into a contract or licence by express written
reference. Issue of this document does not entitle the recipient to access to or use of
the products described, and such access or use may be subject to separate contracts or
licences.
Microsoft, Windows, Windows NT and the Windows logo are registered trademarks
of Microsoft Corporation in the United States and other countries. Other products
mentioned may be trademarks or registered trademarks of their respective owners.
ENERGY STAR is a U.S. registered trademark.
©Copyright Fujitsu Computers Ltd 1998
Fujitsu
8/16/92 5:16 PM
Page 4
Contents
Contents
Your new display unit . . . . . . . . . . . . . . . . . . . . . . . . . . . . 3
Safety information . . . . . . . . . . . . . . . . . . . . . . . . . . . . . . . 4
Selecting a suitable location . . . . . . . . . . . . . . . . . . . . . . . 5
Installing your display unit . . . . . . . . . . . . . . . . . . . . . . . . 6
Display power management . . . . . . . . . . . . . . . . . . . . . . . . 8
Adjusting the picture . . . . . . . . . . . . . . . . . . . . . . . . . . . . . 9
Cleaning your display unit . . . . . . . . . . . . . . . . . . . . . . . . . 14
Troubleshooting . . . . . . . . . . . . . . . . . . . . . . . . . . . . . . . . . 15
Technical fact sheet . . . . . . . . . . . . . . . . . . . . . . . . . . . . . . 18
Fujitsu
8/16/92 5:16 PM
Page 6
Your new display unit
Your new display unit is a highly ergonomic colour display unit
■
supporting high screen refresh rates and full scan flicker-free
picture quality
■
allowing easy setup through Plug-and-Play
■
with On Screen Display menus for user control
■
complying with MPR90 and TCO92 recommendations for low
electromagnetic fields
■
meeting TCO’99 environmental specifications
■
with power management features that allow the unit to enter a
low power consumption state after a period of inactivity.
When you unpack the display unit, check to make sure that you have
the items below. A power cable is included in your system unit
package.
English
3
Fujitsu
8/16/92 5:16 PM
Page 7
Safety information
When you set up and use your display unit, follow the safety
instructions below.
Do not use a continental European type power cable in the
United Kingdom and Denmark. Use a 3-prong plug to ensure
an earthed connection.
This equipment must be connected to an earthed outlet which
is close to the display unit and accessible in case you need to
disconnect the display.
■
Do not connect an extension cord.
■
If you need to replace your cords, contact your Fujitsu sales
representative.
■
Do not under any circumstances open the display unit cabinet.
■
Slots in the cabinet are provided for ventilation. Do not block
the ventilation slots in the display unit cabinet.
English
4
Fujitsu
8/16/92 5:16 PM
Page 8
Selecting a suitable location
■
Place the display unit at least 30 cm from other electrical or
heat-emitting equipment and allow at least 10 cm on each side
for ventilatiion.
■
Place the display unit in a position where no light shines
directly onto or is reflected on the screen.
■
To reduce eye strain, avoid installing the display unit against a
bright background such as a window.
■
Place your display unit at a comfortable viewing height and
distance: most people prefer the top line of the text to be at or
just below eye level and the display within arm’s length (a
distance of 45 to 90 cm) when you are comfortably seated. You
can tilt and swivel the display unit to get a good viewing angle.
■
This display unit has an anti-glare antistatic screen. The use of
an additional anti-glare screen is not recommended as it will
impair picture quality.
English
5
Fujitsu
8/16/92 5:16 PM
Page 9
Installing your display unit
WARNING!
Before you start cabling your display unit, check that the
power is off on all units. To avoid any possibility of electric
shock, always connect your equipment to properly earthed
outlets.
1.
The base of the display is already installed; do not use the
monitor withour it. Place the display unit on a level and sturdy
surface.
2.
Connect the display unit’s signal cable (a) to the system unit
and scure it with the two screws. The connector pins may be
protected against damage by a plastic cover which needs to
be removed first.
3.
Plug the display unit’s power cable (b) first to the back of the
display unit, as shown below.
4.
Then plug the power cable (b) to a 100V-240V earthed
electrical outlet or to the system unit, if it has an outlet for the
display power cable, as shown below.
English
6
Fujitsu
8/16/92 5:16 PM
Page 10
5.
Turn on the display unit using the power switch (1) and check
to make sure that the power LED (2) is on, as shown below. If
not, repeat steps 2,3 and 4 or refer to the Troubleshooting
section of this guide.
6.
Turn on the power to the computer. The picture will appear
within about 15 seconds. During its start-up the computer
recognizes the display automatically provided that the display
unit has been turned on. Adjust the picture to obtain optimum
picture quality. See the Adjusting the picture section in this
guide for more information.
English
7
Fujitsu
8/16/92 5:16 PM
Page 11
Display power management
NOTE!
The power button does not disconnect the display unit from
the mains. The only way to isolate the display unit completely from the mains supply is to unplug the mains cable.
There is no need to turn your display unit on and off
If the power management function of your computer is enabled,
your display unit turns on and off automatically. You control power
management from your computer. See your computers’EasyGuide
for more information.
Reducing power consumption
Once you have set the timeout periods through the power
management function in your computer, the computer will enter
power savings modes automatically after periods of inactivity.
NOTE!
The sereensaver function (where the screen image is
replaced by a pattern) does not affect power consumption.
The purpose of the sereensaver is to extend the usable life
of the display.
MODE
LED
POWER
CONSUMPTION
Operating
Standby
Suspend
Power-off
Unplugged
green
amber
amber/green blinking
amber blinking
not illuminated
≤ 120 W
≤ 70 W
≤ 15 W
≤ 3W
0W
English
8
Fujitsu
8/16/92 5:16 PM
Page 12
Adjusting the picture
You can adjust the screen display using the buttons and controls
located below the screen.
English
9
Fujitsu
8/16/92 5:16 PM
Page 13
On Screen Display(OSD)
Direct Access buttons
You can quickly and easily adjust the size, position and shape of the
screen image by using two Direct Access buttons (1 , 2)
located below the screen on the left side. Both buttons contain two
submenus.
How to use the Direct Access buttons.
1.
With the actual menu off, push the Direct Access button
(1 or 2) and the first submenu appears on the screen.
If you push the button twice, the second submenu will appear.
2.
Use the arrow buttons (3) to make the desired adjustments.
3.
Then press the Direct Access button once or twice to make the
menu disappear (or wait until it disappears automatically).
4.
And you can adjust the brightness and contrast
of the screen image by using Direct Access
buttons(3) located below the screen on the center side.
The Direct Access buttons give access to the following features:
What you see...
...and what you use it for.
Change the vertical and/or horizontal position
of the entire screen image.
Adjust the vertical size (height) and/or
horizontal size (width) of the screen image.
English
10
Fujitsu
8/16/92 5:16 PM
Page 14
What you see...
...and what you use it for.
Adjust pincushion distortion if the sides
of the screen image bow in or out,
and adjust trapezoid distortion if the bottom or
the top of the screen is too wide or narrow.
Adjust parallel distortion if the sides
of the screen image are tilted left or right,
and adjust rotation if the entire screen image
is tilted.
Menu button
Use the Menu button (4) to activate the On Screen display (OSD).
With this button you also enter the submenu of the items shown in
the menu (colour temperature, colour control, degauss etc.).
How to use the Menu button
1.
Push the Menu button (4) to call the main menu to the screen.
2.
Use the arrow buttons (3) to choose an item. The selected item
is highlighted.
3.
Enter the submenu of the selected item by pushing the Menu
button (4). The submenu shows the name and current setting
of the selection.
4.
Use the arrow buttons (3) and the Menu button (4) to carry
out the adjusments or the functions.
5.
The display unit automatically saves the new settings when the
menu disappears. To make the menu disappear immediatly,
push the Menu button (4) or choose Exit (see page 13).
English
11
Fujitsu
8/16/92 5:16 PM
Page 15
The following table contains a list of the items shown in the menu
and the features you can adjust.
Item:
Adjustments or functions:
Select the colour temperature, i.e. the “warmth” of the
image colours. You can select the colour temperature
among colour1, colour2, and colour3.
Set the colour temperature between 9300K
(image looks bluer) and 5000K (image looks redder)
and you can adjust the R.G.B gain, respectively.
Degauss to remove colour impurities caused by magnetic
fields for example after moving the unit. Demagnetize the
display by selecting the item and pressing Menu button.
The screen may buzz, the colours change and the images
jiggle for a while. These effects are normal. Do not use
degauss feature more than once in half an hour.
Select the Recall screen to reset position, size, pincushion,
trapezoid, parallelogram, pinbalance, moire, rotation and
menu duration to their original factory preset settings. Do
this by choosing YES after you have entered the select
screen. The settings listed above will be reset and others
will remain as they are.
Change the OSD menu’s position on the screen by
moving it with the arrow buttons to the desired location.
Set the length of the period that the menu remanis on the
screen before it turns off automatically. The menu
duration selection screen shows various lengths of time
that you can choose from.
English
12
Fujitsu
8/16/92 5:16 PM
Item:
Page 16
Adjustments or functions:
Adjust the pinbalance distortion when the sides of the
screen image are bowed towards the right or the left.
Reduce moire when interference patterns of dark steady
wavy lines appear on your screen. First try to reduce the
vertical moire. The moire adjustments may affect the
focus of the screen.
Change the language of the menu. There is a selection
of nine(9) languages available. Only the language in the
display’s menu is changed; the function does not change
the language used in any other software.
View the display timing settings that are available.
The current timing appears by pressing the menu button.
By pressing the menu button again you can view the list
of user and factory timings. This function only shows
the information; you cannot select a new setting.
Select the video input level. Some video cards use video
signals that are higher than 1.0V which causes the display
to be very bright. Select 1.0V for those video cards.
Enter the Sync. Input Type menu to set the display to
the correct type of synchronization. Select Separate if
the computer sends a separate synchronization signal
(the default setting). Select Sync.On Greenif the
computer expects the display unit to synchronize with
the green signal it sends. You can find the correct setting
from the User’s Guide of your video card or computer.
Exit from the main menu by selecting this item once you
have finished making adjustments.
English
13
Fujitsu
8/16/92 5:16 PM
Page 17
Cleaning your display unit
WARNING!
To avoid risk of electric shock, do not disassemble
the display unit cabinet. The unit is not user-serviceable.
User maintenance is restricted to cleanning as explained below.
Unplug the display unit from the power outlet before cleaning.
■
To clean your antistatic screen, lightly dampen a soft, clean
cloth with water or mild detergent. If possible, use a special
screen cleaning tissue suitable for the antistatic coating.
■
To clean the display unit cabinet, use a cloth lightly dampened
with a mild detergent.
■
Wipe off stubborn stains from cabinet or screen with a cloth
lightly dampened in alcohol(methyl, enhyl or isopropyl). Do
not use thinner or benzine, abrasive cleaners or compressed air.
English
14
Fujitsu
8/16/92 5:16 PM
Page 18
Troubleshooting
These troubleshooting instructions are meant to eliminate
interruptions of use caused by possible easy-to-find defects (loose
connector, for example). Also, see the troubleshooting section in
your computer’s documentation.
Problem
What to do
Blank screen
If the power LED is not lit, push the power switch to
turn the display unit ON. If the display unit is powered
through the computer, check that the computer is
switched on.
The display unit might be in standby state. Push one of
the keyboard keys. Check that the keyboard is properly
connected to the computer.
Maximize the brightness and contrast of the screen (see
section Adjusting the picture).
Check that the power cable is correctly connected to the
display unit and to the power outlet. Use a desk lamp,
for example, to check that current is connected to a
power outlet.
Switch off the display unit and the computer. Unplug the
display unit from the power outlet for about one minute.
Restart.
Colour missing
or error message
“No connection.
Check signal
cable”
Check that the signal cable connectors are properly
connected and that the connection pins are not bent or
damaged. If the connectors are loose, tighten the
connectors’screws.
English
15
Fujitsu
8/16/92 5:16 PM
Page 19
...continued
Problem
What to do
Colour defects
If colour is not uniform, demagnetize (i.e degauss) the
display unit as described in section. Adjusting the picture,
and make sure that the display unit is at least
30 cm from other electrical equipment.
Colour
unsatisfactory
Try another colour temperature.
Size, position,
shape and
quality
unsatisfactory
Adjust color Temperature and R.G.B gain.
Make sure that other electrical devices are at least 30 cm
away.
Adjust the picture characteristics as described in section
Adjusting the picture.
Change resolution or font size (see EasyGuide, your
Objects on the
screen either too computer’s online help).
small or large
Screen flickers
The screen flickers when the refresh rate is less than 75Hz.
See list of recommended modes in section Technical
fact sheet.
Duplicated
images
A problem with your display controller or unit. Contact
your service representative.
Choosing a
display type
If your computer is DDC compatible, the display type is
automatically recognized when you turn on the
computer. If, however, you need to change the display
type, you will find the display units listed under Fujitsu
ICL in the Manufacturers’ list in Windows 95 or
Windows NT (see EasyGuide, your computer’s online
help).
Dark, wavy
lines appear
on the screen
Adjust moire as described in section Adjusting the
picture.
English
16
Fujitsu
8/16/92 5:16 PM
Page 20
Contacting service
If the above troubleshooting hints do not help you find a solution to
the problem, contact an authorised service agent. If the display unit
is sent for service, use the original package if possible.
Unplug the display unit from the power outlet and contact a service
agent when
■
the display unit does not operate normally while following the
operating instructions.
■
the display unit exhibits a distinct change in performance.
■
the display unit has been dropped or the cabinet has been
damaged.
■
the display unit has been exposed to rain, or water or liquid
has been spilled into the display unit.
■
the power cable set or power switch is damaged.
English
17
Fujitsu
8/16/92 5:16 PM
Page 21
Technical fact sheet x178
Picture tube
■
■
■
■
■
17’’ FST, 90o deflection,
0.26mm dot pitch invar shadow mask
Anti-glare, antistatic multi-layer coated
Transmission 46%
Phosphor colour P22, medium persistence
Display area
■
Maximum area 325mm x 244mm,
diagonal 406.4mm
Factory preset area 306mm x 230mm
■
Operating
conditions
■
Input signals
■
■
■
■
■
■
Ambient temperature +0 to +40oC (operating),
-40 to +65 oC (transportation)
Relative operating humidity 10 to 80%,
non-condensing
Video signal: Analog 0.714 Vpp positive
at 75 ohm
Maximum Pixel Clock: 205 MHz
Separate sync: TTL Level, positive or negative
Composite sync: TTL Level, positive or negative
Sync-on-Green: Composite sync 0.286 Vpp
negative (Video 0.714 Vpp positive)
Input voltage
100-240 VAC, 60/50 Hz auto select
Power
management
VESADPMS 1.0
Power
consumption
Operating
Standby mode
Suspend mode
Power-off mode
Unplugged
English
18
120 W (max).
100 W (nominal)
< 70W
< 15W
<3 W
0W
Fujitsu
8/16/92 5:16 PM
Page 22
Plug and Play
VESADDC level 1/2B version 2.0
Frequency rate
Horizontal: 30 to 96 kHz
Vertical: 50 to 160 Hz
Display modes
Resolution
1600 x 1200
1280 x 1024
1024 x 768
800 x 600
640 x 480
Recommended
refresh rate
75 Hz
85 Hz*
85 Hz
85 Hz
85 Hz
Maximum
refresh rate
76 Hz
89 Hz
119 Hz
152 Hz
160 Hz
*Recommended primary mode
Ergonomics,
safety
and EMC
TCO’99
SWEDAC MPR 1990:8/10
EN29241 (ISO9241:3)/EN55022-B/EN60950
TÜV-GS ZH1/618/10.80
FCC 15, subpart B; Class B
CE compliance with 89/336/EEC and 73/23/EEC
UL1950
CAN/CSA22.2 No. 950-M89
EPA ENERGY STAR Program*
NUTEK
FDA/DHHS (U.S. X-ray Act)
*As an ENERGY STAR Partner, Fujitsu
Computers Ltd has determined that this product
meets the ENERGY STAR guidelines for energy
efficiency.
Tilt and swivel
-5 o - +10o ,+/-45o
Dimensions
431.7 (h) x 424 (w) x 440.5 (d), 17.3kg unpacked
566.0 (h) x 534 (w) x 581 (d), 20.2kg packed
English
19
Fujitsu
8/16/92 5:16 PM
Page 23
Regulatory notices
Federal Communications Commission (FCC) Notice
Information to the User : This equipment has been tested and found
to comply with the limits for a Class B digital device, pursuant to
Part 15 of the FCC rules. These limits are designed to provide
reasonable protection against harmful interference in a residential
installation. This equipment generates, uses and can radiate radio frequency energy and, if not installed and used in accordance with
the instructions, may cause harmful interference to radio
communications. However, there is no guarantee that interference
will not occur in a particular installation. If this equipment does
cause harmful interference to radio or television reception, which
can be determined by turning the equipment off and on, the user is
encouraged to try to correct the interference by one or more of these
measures:
■
Reoriented or relocate the receiving antenna.
■
Relocate the equipment with respect to the receiver.
■
Plug the equipment into a different outlet so that equipment
and receiver are on different branch circuits.
■
If necessary, consult the dealer or an experienced radio/TV
technician for help.
The changes or modifications not expressly approved by Fujitsu
Computers Ltd could void the user’s authority to operate the
equipment. A shielded interface cable with a ferrite core must be
used in order to comply with the emission limits.
Fujitsu
8/16/92 5:16 PM
Page 24
Canadian Regulatory Information
This Class B digital apparatus meets all requirements of the Canadian
Interference-Causing Equipment Regulations.
Le présent appareil numérique n’émet pas de bruits radioélectriques
dépassant les limites applicables aux appareils numériques de Classe
B prescrites dans le Réglement sur le brouillage radioélectrique édicté
par le Ministère des Communications du Canada.
Fujitsu
8/16/92 5:16 PM
Page 25
TCO’99
Congratulations! You have just purchased a TCO’99 approved and
labelled product! Your choice has provided you with a product
developed for professional use. Your purchase has also contributed
to reducing the burden on the environment and also to the further
development of environmentally adapted electronics products.
Why do we have environmentally labelled
computers?
In many countries, environmental labelling has become an
established method for encouraging the adaptation of goods and
services to the environment. The main problem, as far as computers
and other electronics equipment are concerned, is that
environmentally harmful substances are used both in the products
and during their manufacture. Since it is not so far possible to
satisfactorily recycle the majority of electronics equipment, most of
these potentially damaging substances sooner or later enter nature.
There are also other characteristics of a computer, such as energy
consumption levels, that are important from the viewpoints of both
the work (internal) and natural (external) environments. Since all
methods of electricity generation have a negative effect on the
environment (e.g. acidic and climate-influencing emissions,
radioactive waste), it is vital to save energy. Electronics equipment in
offices is often left running continuously and thereby consumes a lot
of energy.
What does labelling involve?
This product meets the requirements for the TCO’99 scheme which
provides for international and environmental labelling of personal
computers. The labelling scheme was developed as a joint effort by
Fujitsu
8/16/92 5:16 PM
Page 26
the TCO (The Swedish Confederation of Professional Employees),
Naturskyddsforeningen (The Swedish Society for Nature
Conservation) and Statens Energimyndighet (The Swedish National
Energy Administration).
Approval requirements cover a wide range of issues: environment,
ergonomics, usability, emission of electric and magnetic fields,
energy consumption and electrical and fire safety.
The environmental demands impose restrictions on the presence and
use of heavy metals, brominated and chlorinated flame retardants,
CFCs (freons) and chlorinated solvents, among other things. The
product must be prepared for recycling and the manufacturer is
obliged to have an environmental policy which must be adhered to in
each country where the company implements its operational policy.
The energy requirements include a demand that the computer and/or
display, after a certain period of inactivity, shall reduce its power
consumption to a lower level in one or more stages. The length of
time to reactivate the computer shall be reasonable for the user.
Labelled products must meet strict environmental demands, for
example, in respect of the reduction of electric and magnetic fields,
physical and visual ergonomics and good usability.
Below you will find a brief summary of the environmental
requirements met by this product. The complete environmental
criteria document may be ordered from:
TCO Development Unit
S-114 94 Stockholm
Sweden
Fax: +46 8 782 92 07
Email (Internet): [email protected]
Current information regarding TCO’99 approved and labelled
products may also be obtained via the Internet, using the address:
Http://www.tco-info.com/
Fujitsu
8/16/92 5:16 PM
Page 27
Environmental Requirements
Flame retardants
Flame retardants are present in printed circuit boards, cables, wires,
casings and housings. Their purpose is to prevent, or at least to delay
the spread of fire. Up to 30% of the plastic in a computer casing can
consist of flame retardant substances. Most flame retardants contain
bromine or chloride, and those flame retardants are chemically
related to another group of environmental toxins, PCBs. Both the
flame retardants containing bromine or chloride and the PCBs are
suspected of giving rise to severe health effects, including
reproductive damage in fish-eating birds and mammals, due to the
bio-accumulative* processes. Flame retardants have been found in
human blood and researchers fear that disturbances in foetus
development may occur.
The relevant TCO’99 demand requires that plastic components
weighing more than 25 grams must not contain flame retardants with
organically bound bromine or chlorine. Flame retardants are allowed
in the printed circuit boards since no substitutes are available.
Cadmium**
Cadmium is present in rechargeable batteries and in the
colour-generating layers of certain computer displays. Cadmium
damages the nervous system and is toxic in high doses.The relevant
TCO’99 requirement states that batteries, the colour-generating
layers of display screens and the electrical or electronics components
must not contain any cadmium.
Mercury**
Mercury is sometimes found in batteries, relays and switches. It
damages the nervous system and is toxic in high doses. The relevant
TCO’99 requirement states that batteries may not contain any
mercury. It also demands that mercury is not present in any of the
electrical or electronics components associated with the labelled unit.
Fujitsu
8/16/92 5:16 PM
Page 28
CFCs (freons)
The relevant TCO’99 requirement states that neither CFCs nor
HCFCs may be used during the manufacture and assembly of the
product. CFCs (freons) are sometimes used for washing printed
circuit boards. CFCs break down ozone and thereby damage the
ozone layer in the stratosphere, causing increased reception on earth
of ultraviolet light with e.g. increased risks of skin cancer (malignant
melanoma) as a consequence.
Lead**
Lead can be found in picture tubes, display screens, solders and
capacitors. Lead damages the nervous system and in higher doses,
causes lead poisoning. The relevant TCO’99 requirement permits the
inclusion of lead since no replacement has yet been developed.
* Bio -accumulative is defined as substances which accumulate within living
organisms
** Lead, Cadmium and Mercury are heavy metals which are
Bio-accumulative.