1
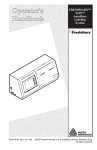
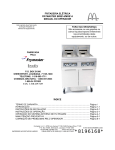
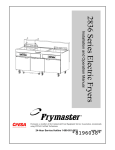
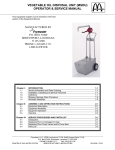
Installation and Operation Manual
Frymaster, a member of the Commercial Food Equipment Service Association, recommends
using CFESA Certified Technicians.
24-Hour Service Hotline 1-800-551-8633
819-5992
OCTOBER 2003
NOTICE
IF, DURING THE WARRANTY PERIOD, THE CUSTOMER USES A PART FOR THIS ENODIS
EQUIPMENT OTHER THAN AN UNMODIFIED NEW OR RECYCLED PART PURCHASED
DIRECTLY FROM FRYMASTER/DEAN, OR ANY OF ITS AUTHORIZED SERVICE CENTERS,
AND/OR THE PART BEING USED IS MODIFIED FROM ITS ORIGINAL CONFIGURATION, THE
WARRANTY WILL BE VOID. FURTHER, FRYMASTER/DEAN AND ITS AFFILIATES WILL NOT BE
LIABLE FOR ANY CLAIMS, DAMAGES OR EXPENSES INCURRED BY THE CUSTOMER WHICH
ARISE DIRECTLY OR INDIRECTLY, IN WHOLE OR IN PART, DUE TO THE INSTALLATION OF
ANY MODIFIED PART AND/OR PART RECEIVED FROM AN UNAUTHORIZED SERVICE CENTER.
NOTICE
This appliance is intended for professional use only and is to be operated by qualified
personnel only. A Frymaster/DEAN Factory Authorized Service Center (FASC) or other qualified
professional should perform installation, maintenance, and repairs. Installation, maintenance,
or repairs by unqualified personnel may void the manufacturer’s warranty.
NOTICE
This equipment must be installed in accordance with the appropriate national and local codes of
the country and/or region in which the appliance is installed.
NOTICE TO U.S. CUSTOMERS
This device complies with Part 15 of the FCC rules. Operation is subject to the following two
conditions: 1) This device may not cause harmful interference, and 2) This device must accept
any interference received, including interference that may cause undesired operation. While
this device is a verified Class A device, it has been shown to meet the Class B limits.
NOTICE TO CANADIAN CUSTOMERS
This digital apparatus does not exceed the Class A or B limits for radio noise emissions as set
out by the ICES-003 standard of the Canadian Department of Communications.
Cet appareil numerique n’emet pas de bruits radioelectriques depassany les limites de classe A
et B prescrites dans la norme NMB-003 edictee par le Ministre des Communcations du Canada.
DANGER
Improper installation, adjustment, maintenance or service, and unauthorized alterations or
modifications can cause property damage, injury, or death. Read the installation, operating,
and service instructions thoroughly before installing, operating or servicing this equipment.
Do not operate the CT16 Toaster unless it has been properly installed and checked.
Do not operate the CT16 Toaster unless all covers and access panels are in place and properly
secured.
Do not attempt to repair or replace any component of the CT16 Toaster unless all power to the
unit has been disconnected.
Use caution when setting up, operating, or cleaning the CT16 Toaster to avoid contact with
heated surfaces.
DANGER
Do not store or use gasoline or other flammable liquids or vapors in the vicinity of this or any
other appliance.
CT16 SERIES TOASTER
INSTALLATION & OPERATION MANUAL
TABLE OF CONTENTS
1.
2.
3.
4.
5.
6.
7.
8.
9.
Parts Ordering and Service Information.......................................................................................... 1
CT16 Toaster Operational Description ........................................................................................... 2
Installation/Setup............................................................................................................................. 2
Operation......................................................................................................................................... 3
Viewing and Adjusting the Setpoint ............................................................................................... 3
Adjusting Bun Compression ........................................................................................................... 4
Changing Belts ................................................................................................................................ 4
Operator Troubleshooting ............................................................................................................... 5
Preventive Maintenance .................................................................................................................. 6
i
CT16 SERIES TOASTER
INSTALLATION AND OPERATION MANUAL
1. Parts Ordering and Service Information
Parts orders may be placed directly with your local Frymaster Factory Authorized Service Center
(FASC)/Distributor. A list of Frymaster FASCs was included with the unit when shipped from the
factory. If you do not have access to this list, contact the Frymaster Service Department at 1-800551-5633 or 1-318-865-1711.
To speed up your order, the following information is required:
Model Number
Serial Number
Voltage
Part Number
Quantity Needed
Service may be obtained by contacting your local FASC or Distributor. Service information may be
obtained by calling the Frymaster Service Department. The following information will be needed in
order to assist you quickly and efficiently.
Model Number
Serial Number
Nature of Problem
Also include any other information which may be helpful in solving your service problem.
1
Upper
Compression
Adjustment
Knobs
LED
DISPLAY
Bun Guide for Heel
and Crown Slots
REdY
RAISE
SETPOINT
BUTTON
LOWER
SETPOINT
BUTTON
ON/OFF
BUTTON
DISPLAY
TEMPERATURE
BUTTON
Lower
Compression
Adjustment
Knobs
Holding Tray
2. CT16 Toaster Operational Description
The CT16 Toaster is designed to produce fresh, uniformly toasted buns on an "as needed” basis. The
countertop-mounted unit consists of a cabinet, a computer, a heating element and a pair of conveyor
assemblies.
When the unit is turned on, an electrical heating element (called a platen) is energized. The platen
heats up to a programmed temperature referred to as the setpoint. At the same time, both conveyor
assemblies are activated. When a bun is placed into one of the slots at the top of the cabinet, the
conveyor belts gently carry it through the unit, with the cut face of the bun passing over the heated
platen. As the bun passes over the platen, it is toasted. At the end of the process, the bun is deposited
onto a holding tray.
The computer allows the operator to adjust the setpoint to obtain desired toasting characteristics.
Compression adjustment knobs also allow the operator to adjust the compression of heels and crowns
as they pass through the toaster.
3. Installation/Setup
Upon arrival, inspect the toaster for concealed damage. Immediately report any damage to the
delivering freight company. Claims must be filed within 15 days after receipt of the unit.
Power Requirements:
ALL ELECTRICALLY OPERATED APPLIANCES MUST BE ELECTRICALLY GROUNDED IN ACCORDANCE WITH LOCAL CODES, OR
IN THE ABSENCE OF LOCAL CODES, WITH THE NATIONAL ELECTRICAL CODE (ANSI/NFPA NO. 70-1990) OR THE
CORRESPONDING NATIONAL CODE OF THE COUNTRY IN WHICH INSTALLED.
THIS APPLIANCE IS EQUIPPED WITH A GROUNDING PLUG FOR YOUR PROTECTION AGAINST SHOCK HAZARD AND MUST BE
PLUGGED INTO A PROPERLY GROUNDED RECEPTACLE. DO NOT CUT OR REMOVE THE GROUNDING PRONG FROM THIS PLUG!
•
•
Voltage: 208VAC or 240VAC depending on model ordered
Frequency: 60 Hz (non-CE) or 50 Hz (CE and Australian models)
2
•
•
Phase: Single
Service: 30 Amp
Setup:
Setup of the toaster consists of unpacking the unit, placing it on a sturdy table or countertop adjacent to
a properly grounded AC outlet of appropriate voltage, removing the cardboard packing inserts, installing
the bun feeder in the slot on top of the cover, and plugging it in. NOTE: The cover must be closed to
install the bun feeder, and the bun feeder must be removed to open the cover.
The unit is shipped with a programmed setpoint of 550°F (288°C), upper crown compression knob set
to 4, lower crown compression knob set to 5, upper heel compression knob set to D, and lower
compression knob set to E. The operator may change these settings to attain desired toasting.
4. Operation
1. Press the ON/OFF
button. The word LOW will appear in the green LED display window. The
unit will take about 10 minutes to reach operating temperature, at which time the display will change
to REDY, indicating the toaster is ready for use.
2. Load buns into the appropriate slots (Heel or Crown) one at a time, with the cut faces toward the
rear of the unit. The unit will toast the buns and transfer them to the holding tray.
3. Adjust the setpoint and bun compression as necessary to achieve desired toasting.
5. Viewing and Adjusting The Setpoint
To view the platen temperature: Press the
button once. The temperature in degrees Fahrenheit
will appear in the green LED display window. To view the current setpoint, press the
button twice.
The setpoint in degrees Fahrenheit will be displayed in the green LED display window.
LED
DISPLAY
550F
RAISE
SETPOINT
BUTTON
LOWER
SETPOINT
BUTTON
ON/OFF
BUTTON
DISPLAY
TEMPERATURE
BUTTON
To change the display from Fahrenheit to Celsius: Unplug the unit, then press and hold the
button as the unit is plugged back in.
To change the setpoint:
button). Enter the setpoint programming mode by pressing the
,
1. Turn the unit OFF (press the
,
,
buttons in that order. The current setpoint will appear in the LED display. To increase
the setpoint, press the
button; to decrease it, press the
button.
button once. Press the ON/OFF
button. If
2. When the desired setpoint is displayed, press the
the platen is within 20°F (11°C) of the setpoint, the display will show REDY. Otherwise, the display
will show LOW or HIGH until the platen is within 20°F (11°C) of the setpoint, at which time the
display will change to REDY.
3
6. Adjusting Bun Compression
1. There are two pairs of compression adjustment knobs (one pair numbered 1-5, the other lettered AE), as shown in the accompanying illustration. Factory settings are circled.
Crown Compression
Adjustment (1-5)
UPPER COMPRESSION LABEL
Heel Compression
Adjustment (A-E)
Crown Compression
Adjustment (1-5)
2. Settings A and 1 cause the greatest bun compression (that is, the thinnest bun after toasting).
7. Changing Belts
1. Turn the unit off (press the ON/OFF
button) then unplug it. If the unit has been in operation,
allow it to cool for about 1½ hours. TIP: Change belts in the morning, prior to turning the toaster
on.
2. Remove the bun feeder, and then open the cover.
3. Set the bun compression knobs to positions E and 5.
4. Press down on the top roller and move it to the retracted (down) position. (NOTE: Each side of the
roller must be locked down.)
4
5. Rotate the tray stabilizer latch upward to unlatch it.
Tray
Stabilizer
Latch
6. Slip the old belt off the rollers and slip the new belt on. When the replacement belt has been
properly positioned between the raised edges of its rollers, rotate the tray stabilizer latch to the
latched position.
7. Press down on the top roller to unlock it and allow it to extend.
8. Close the cover. Return the bun compression knobs to their previous settings.
8. Operator Troubleshooting
PROBLEM
PRO1 in LED display.
PRO2 in LED display.
PROBABLE CAUSES
CORRECTIVE ACTION
A. Indicates failure of main platen probe or A. Call FASC.
associated circuitry.
B. Indicates failure of holding tray resistor. B. Call FASC.
A. Make sure cover is correctly positioned so
that the cover interlock switch is
A. Cover not properly installed.
Bun conveyors do not start
when ON/OFF button is B. Toaster not plugged in.
pressed. C. Store circuit breaker tripped.
D. Failed cover interlock switch, failed high
limit, failed motor, or failed controller.
depressed.
B. Plug toaster in.
C. Reset circuit breaker.
D. Call FASC.
A. If toasting is too dark, lower the setpoint
Toasting is consistently too A. Improper setpoint programmed and/or
dark or too light.
incorrect compression knob setting.
5
and/or compression setting until desired
toasting is achieved.
If toasting is too light, increase setpoint
and/or compression setting until desired
toasting is achieved.
PROBLEM
PROBABLE CAUSES
CORRECTIVE ACTION
A. Adjust the compression knobs to achieve
Buns are too thick or too A. Compression knobs on an improper
thin.
setting for desired compression.
Buns are toasting
inconsistently.
A. Belt slippage.
desired compression. Moving them to a
lower setting will increase compression.
Moving them to a higher setting will
decrease compression. Make sure both
pairs of knobs are on the same setting.
A. Shut down and clean unit, paying
particular attention to grooves in rollers
and condition of belts.
B. Incorrect belt speed, faulty platen heater, B. Call FASC.
or faulty controller.
9. Preventive Maintenance
The toaster should be cleaned on a daily basis. Remove the cover. Remove the belts, wash them in
solution of detergent and warm water, and dry them thoroughly. Use a basting brush or similar softbristled brush to whisk crumbs from the unit. Alternatively, a small vacuum may be used to remove
crumbs from the unit. Wipe down all metal surfaces with cloth dampened with a solution of detergent
and warm water, the wipe again with a cloth dampened with clean warm water. If necessary, use a
stiff-bristled brush to dislodge stubborn residue from the grooves in the rollers, then wipe them down.
Additionally, Frymaster recommends that a Frymaster Factory Authorized Service Technician inspect
this appliance at least annually as follows:
•
Inspect all wiring for signs of chafing, kinking, and/or loose connections.
•
Verify that all mechanical and electronic components are securely mounted (i.e., screws and nuts
and bolts are tight.)
•
Verify that idler roller springs are in serviceable condition (i.e., rollers are held securely in the top of
the J-slots and belts do not slip).
6
Frymaster, L.L.C., 8700 Line Avenue, PO Box 51000, Shreveport, Louisiana 71135-1000
Shipping Address: 8700 Line Avenue, Shreveport, Louisiana 71106
TEL 1-318-865-1711
FAX (Parts) 1-318-219-7140
PRINTED IN THE UNITED STATES
FAX (Tech Support) 1-318-219-7135
SERVICE HOTLINE
1-800-551-8633
Price: $6.00
819-5992
OCTOBER 2003