1
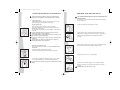
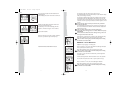
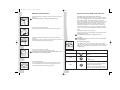
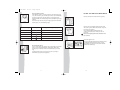
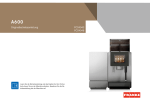
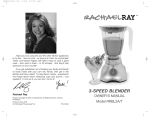
J1 User Guide
21/6/05
1:16 pm
Page 1
User Guide
myflavia.com
® 'FLAVIA' ©/™/® MASTERFOODS 2005
280-01198
myflavia.com
888 MYFLAVIA (888 693 5284)
J1 User Guide
21/6/05
1:16 pm
Page 3
WELCOME TO THE FLAVIA® WORLD.
WARRANTY
You’ve made the right choice. The FLAVIA® FUSIONTM drinks station offers 30 delicious drinks
to suit your every mood.
Conditions of limited Warranty
Your FLAVIA® FUSIONTM drinks station is covered by a one year limited warranty from the date
of purchase under normal use within the home.
If within 1 year from the purchase date of your FLAVIA® FUSIONTM drinks station it should
cease to function correctly due to mechanical or electrical failure, FLAVIA® will, at its
discretion, repair or replace your FLAVIA® FUSIONTM free of charge.
FLAVIA® will only pay for repair or replacement provided proof of purchase is seen. In order to
ensure this, you should either keep your original purchase receipt or register your machine online at myflavia.com or call 888 MYFLAVIA (888 693 5284) and register with one of our
Customer Service assistants.
The warranty is not valid if a defect is caused through poor maintenance of your FLAVIA®
FUSIONTM drinks station, lack of descaling, incorrect use (including the use of non FLAVIA®
approved products), general wear and tear or if alterations or repairs have been carried out by a
non-authorised service provider.
FLAVIA® reserves the right to offer an alternative appliance in the event that an exact
replacement is not available. This will not affect your statutory rights.
From an exquisite range of round-the-globe coffees, to fresh leaf teas. From well being
infusions, to total indulgence. FLAVIA® FUSIONTM is all about choices.
The FLAVIA® world gives whatever you want, whatever you’re like. Be inspired. With FLAVIA®
FUSIONTM you can mix and match and invent your own drink creations.
What are you waiting for? Stop reading, and start brewing. Keep this handy little guide on how
your FLAVIA® FUSIONTM drinks station works. If you have any questions go to myflavia.com or
call 888 MYFLAVIA (888 693 5284). Your FLAVIA® friends are always there to help.
THIS PRODUCT IS FOR HOUSEHOLD USE ONLY.
PLEASE READ AND SAVE THIS USER GUIDE FOR FUTURE REFERENCE.
ASSISTANCE
To ORDER DRINKS or SPARE PARTS, or for general assistance go on line at myflavia.com or call 888 MYFLAVIA (888 693 5284).
When ordering drinks at myflavia.com or 888 MYFLAVIA (888 693 5284), register the serial
number of your FLAVIA® FUSIONTM drinks station to facilitate any future warranty claim.
Warranty claim process
In the event that your FLAVIA® FUSIONTM should cease to function correctly, firstly refer to the
TROUBLE SHOOTING GUIDE on page 16 of this guide.
If your FLAVIA® FUSIONTM still does not work then call our FLAVIA® Customer Service Team on
888 MYFLAVIA (888 693 5284) where a technical consultant will be waiting to assist you. You
will be asked for proof of purchase if you have not registered your FLAVIA® FUSIONTM drinks
station previously.
If they are unable to resolve the issue over the telephone then they will authorise the
replacement of your FLAVIA® FUSIONTM drinks station.
Please note that FLAVIA® will endeavour to replace your FLAVIA® FUSIONTM drinks station with
a replica unit. However in the event that this is not feasible, FLAVIA® will offer you an
alternative. Please note that your replacement FLAVIA® FUSIONTM drinks station, may have
been refurbished to an as new condition. This will not affect your statutory rights or any
warranty remaining on the product.
When ordering drinks at myflavia.com or 888 MYFLAVIA (888 693 5284), register the serial number
of your FLAVIA® FUSIONTM drinks station to facilitate any future warranty claim.
SHORT CORD INSTRUCTIONS
A short power supply cord is provided to reduce the risk resulting from becoming entangled in
or tripping over a long cord. If an extension cord is used:
1. The marked electrical rating of the cord set or extension cord should be at least as great as
the electrical rating of the appliance.
2. The cord should be arranged so that it will not drape over the counter-top or table-top where
it can be pulled on by children or tripped over unintentionally.
1
18
J1 User Guide
21/6/05
1:16 pm
Page 5
IMPORTANT SAFEGUARDS
Problem
Solution
Water leaks from the appliance
Make sure that the Pack Door is fully closed when
brewing beverages.
Make sure the water Reservoir has not been filled
beyond the MAX indication line.
Make sure the Drip Tray is not overflowing.
In all other cases, switch off and unplug the appliance
immediately and contact the FLAVIA® Customer
Service Team.
Beverages are too strong and/or
small
Beverages are too weak and/or
large
Liquid splashes out of, or misses
altogether, the cup
Adjust the volume of beverage dispensed (see the
GETTING THE MOST FROM YOUR APPLIANCE section
on page 8).
Choose an alternative strength beverage from the
extensive FLAVIA® range.
Ensure the Brew Head is as close to the top of the cup
as possible during brewing.
Ensure your cup or mug is placed in the centre of the
Cup Stand.
The Volume Control does not
This is normal. The Volume Control only varies the size
vary the size of drinks brewed on of drinks brewed on the middle Selection Button.
the left or right Selection
Buttons
To prevent harm or injury to those using the appliance or to any other persons and/or property.
READ THE FOLLOWING SAFETY
INSTRUCTIONS
GENERAL USE
Always place the appliance out of reach of children. Children and persons unfamiliar with
the appliance should only use it under supervision. Not observing these precautions may
cause burns, electric shock or other injury.
Do not place the appliance on an unstable surface or surfaces that can be affected by
heat. The appliance may tip over causing damage or injury.
Do not place the appliance close to walls or furniture. Steam and heat could damage walls
and furniture, causing a change to the color or shape.
Never place the appliance outside. This appliance is for indoor use only.
Never use the appliance at altitudes above 2500m.
Never overfill the appliance with water as this may result in electric shock.
Never put anything other than water in the Water Reservoir. Do not put milk, alcohol or
anything other than cold water in the Water Reservoir. This may result in serious damage
to the appliance.
Never use packs that have been stored in the refrigerator or freezer.
Never tilt or shake the appliance, as this may result in spillage which could lead to electric
shock.
Never turn the appliance upside down, as this may result in spillage and/or serious
damage to the machine.
Never use without placing a cup or mug under the water outlet. Hot water may splash
against the Drip Tray causing burns.
Never attempt to dismantle, repair or modify the appliance in any way. Any attempt to do
so may result in fire or injury. Always contact the FLAVIA® Customer Service Team.
Do not immerse the appliance in water. This may result in an electric shock.
Never use the appliance to store ice. Condensation could occur creating a potential source
of electric shock or malfunction.
Only clean specified areas.
Ensure that the mug or cup you use is the right size for the beverage you are brewing.
Failure to do so could lead to overflow and may cause burns.
17
2
J1 User Guide
21/6/05
1:16 pm
Page 7
Never remove the cup during brewing as this may cause burns.
TROUBLE SHOOTING GUIDE
Never open the Pack Door during brewing cycle as this may cause burns.
If you experience a problem with this appliance, you may find a solution in the table below. If
the table below does not provide a solution to your problem or if you have any additional
questions please see the section titled ASSISTANCE on page 1 of this booklet.
Do not move the appliance while a cup or mug is on the Cup Stand. This may cause burns.
ELECTRICAL SUPPLY AND CORD
Problem
The appliance does not operate
Solution
Check that the Plug is correctly inserted in to the outlet.
Check that the Power switch is in the ON position.
The appliance does not brew
beverages when used for the
first time
The appliance must be primed with water before using it for
the first time, so that the boiler will be completely filled
with water. Prime the appliance (see PREPARING YOUR
APPLIANCE FOR USE on page 6) before brewing beverages.
Make sure the Plug is correctly inserted into the outlet. A loose connection or damaged
Plug may cause electric shock or generate heat resulting in fire.
The 3 Indicator Lights flash
quickly
Check that the Water Reservoir is correctly fitted to the
machine and/or filled to the MAX indication line.
120 V outlet must not be used with other appliances, the heat generated may result in fire.
The 3 Indicator Lights flash
slowly
The appliance is heating the water to the optimum
temperature for brewing. This may take up to 90 seconds.
Never do anything that might cause damage to the Cord or Plug (such as modifying,
bending, stretching or twisting them or placing hot or heavy objects on them). If the
appliance is used when damaged, electrical short circuit or fire may result. If in need of
repair please contact the FLAVIA® Customer Service Team.
Clean Plug regularly, a build up of dust on the Plug will attract condensation, which could
lead to cable damage resulting in fire. Remove the Plug and clean with a dry cloth.
Never plug or unplug the appliance with wet hands. This may result in electric shock.
Remove the plug from the socket only when the appliance is not in use. Deteriorating
insulation may result in electric shock and/or fire.
The 3 Indicator Lights are off
When unplugging the appliance, always pull by the Plug – NOT THE CORD!
POLARIZED PLUG
This appliance is fitted with a polarized Plug (one blade is wider than the other) as a safety
feature.
To reduce the risk of electric shock:
Fit the Plug into the outlet in the correct way
If the Plug does not properly fit in to the outlet at first, reverse it.
If the Plug still does not fit, contact a qualified electrician.
Do not attempt to modify the Plug in any way.
The appliance has seen no activity for at least 40 minutes
and has gone in to “Power Save” mode. To power up the
machine press any Selection Button or open the Pack
Door. The machine will now re-heat the water to the
optimum temperature.
The right Indicator Light is
flashing
This will occur when the first pack of a 2-pack beverage
is complete. Insert the 2nd pack and press the right
button to complete your beverage. If you choose to
cancel, simply press the left or middle button to do so.
The Indicator Lights display a
sequence other than those
mentioned above
Contact the FLAVIA® Customer Service Team (see
ASSISTANCE section on page 1)
The Pack Door cannot be closed Check that the Pack Door is correctly fitted to the
appliance. Please note: When closing the Pack Door with
a pack present, you will feel some resistance, this is only
the seal of the pack being pierced and is perfectly
normal. Please check that nothing is blocking the “latch.”
The pack cannot be pierced
Check that the pack is correctly inserted, and that the
Pack Door is correctly fitted to the appliance.
The appliance makes a “pop”
Occasionally a “pop” may be heard at the start of a
sound shortly after the Selection beverage being brewed, this is normal and is confirmation
button is pressed
of the optimal freshness of your beverage.
SAVE THESE SAFETY INSTRUCTIONS.
The amount of beverage
The boiler and internal parts of the machine have become
dispensed is repeatedly too small blocked with scale. See the DESCALING YOUR APPLIANCE
and/or is dispensing too slowly
section on page 15.
3
16
J1 User Guide
21/6/05
1:16 pm
Page 9
DESCALING YOUR APPLIANCE
Regular descaling will prolong the life of your appliance and will
ensure optimal brewing performance for the life of your brewer. If
the machine is used twice per day on average, the appliance must
be descaled at least once every 3 months.
Remove the Water Filter from the Water Reservior if fitted.
Fill the Water Reservoir up to the MAX indication line with white
wine vinegar or descaler and water, according to the descaler
manufacturers guidelines. Fit the Water Reservoir to the machine.
Use only citric acid based descaler.
TABLE OF CONTENTS
Features of your Appliance
Preparing your Appliance for use
Getting the most from your Appliance
Filling your Appliance with water
Remove the drip tray and place a bowl with a capacity of at least
45 fl.oz under the Brew Head.
Brewing your Beverages
Switch the appliance on and wait until the 3 indicator lights are lit
continuously.
Brewing 2-pack Beverages
Cleaning and Maintenance of your Appliance
Following the process BREWING YOUR BEVERAGES (from page 11),
insert a USED pack into the Brew Head.
If available, please insert a used instant pack e.g. Choco or Creamy
Topping.
Adjust the Volume Control to the maximum setting.
Descaling your Appliance
Trouble-shooting Guide
Warranty
1. Press the MIDDLE selection button (coffee/tea). Allow the
machine to operate.
2. Repeat this until the water reservoir is empty.
3. Remove, empty and replace the bowl on the appliance.
Repeat steps 1 - 3, three times with new white wine vinegar or a
new mixture of descaler.
Empty the Water Reservoir to remove any remaining descaler.
Flush the machine with fresh water following the steps 1 - 3, three
times.
The appliance has no other user-serviceable parts. Any other
service should be performed only by the FLAVIA® Customer
Service Team.
15
4
J1 User Guide
21/6/05
1:16 pm
Page 11
FEATURES OF YOUR APPLIANCE
Ref.
1
2
3
4
5
6
7
8
9
10
11
12
13
14
15
16
17
Spare or accessory
Part Name
Yes
Yes
Yes
Yes
Yes
Yes
Water Reservoir
Lid
Water Filter
Drip Tray
Cup Stand
Pack Door
Pack Holder
Top Ring
Brew Head
Brew Head Adjustment Button
Beverage Selection Buttons
Indicator Lights
Volume Control
Power Switch
Power Cord
Plug
User Guide
Yes
To order spare parts or accessories contact the FLAVIA® Customer Service Team. (see section titled
ASSISTANCE at the start of this guide).
Periodic Maintenance
Your appliance is supplied with a Water Filter to ensure the optimal
quality of water used in brewing your beverages. To maintain the
quality of beverages brewed, while protecting and extending the life
of your appliance, you will need to replace this filter periodically.
The recommended replacement frequency is every 50 litres
(approximately 250 beverages) or 2 months whichever comes first.
The frequency of replacement depends on the number of drinks
brewed.
There is a rotating disk on the filter to set the replacement date. You
can set both the month and the week of the month.
Water Filter Replacement
To remove old filter - remove the Lid (and Water Reservoir if
necessary) from the appliance. Pull the Filter firmly upward to
remove it.
To install a new Filter – remove the Filter from its packaging and
push the small end of the Filter down firmly into the round location
at the bottom of the Water Reservoir.
Continued use of the Filter will inhibit the build up of scale and reduce
the need for periodic descaling.
Storage
If the appliance has been used and therefore primed, it should only
be used or stored in a frost free environment to prevent it from
becoming damaged. Before storing the appliance you should
remove and empty the Water Reservoir. After a period of storage we
recommend that you rinse the Water Reservoir and brew 2 drinks
with fresh water to cleanse the appliance.
Your appliance may differ slightly from that illustrated in this guide.
5
14
J1 User Guide
21/6/05
1:16 pm
Page 13
CLEANING AND MAINTENANCE OF YOUR APPLIANCE
PREPARING YOUR APPLIANCE FOR USE
Never immerse the appliance in water or any other liquid.
Always turn the appliance off and unplug it before cleaning.
YOU CANNOT BREW BEVERAGES IF YOU HAVE NOT PRIMED THE
APPLIANCE FIRST!
The priming cycle fills the boiler with water. After this your appliance
will be ready to use.
Daily maintenance
Fill the Water Reservoir or empty the Drip Tray if required. Any
other daily maintenance should be unnecessary.
Weekly maintenance
Wipe the outside of the appliance with a damp cloth.
Open the Pack Door and wipe the inside surfaces of the Pack
Holder with a damp cloth.
The Pack Door, Drip Tray and Cup Stand should be washed with a
wet cloth.
Do not clean with brushes or scouring agents as this may
damage the surface of your appliance.
Do not wash with excessive amounts of water, it could get into
the machine causing a malfunction.
Do not use cleaning agents as they may leave a residue on the
appliance.
Do not apply any products containing benzene, they may
damage the surface of your appliance.
How to remove the Pack Door
Open the Pack Door as described in section 4 BREWING YOUR
BEVERAGES.
Pull the Pack Door straight down to remove.
The Pack Door should only be removed in the open position.
Remove the Water Reservoir from the machine.
Remove the Lid. Inside you will find a Water Filter. Remove the
Filter from its packaging and install, small end first, by pushing it
firmly into the round location at the bottom of the Water
Reservoir.
Fill the Water Reservoir with cold water up to the MAX indication
line and put it back on to the appliance. Replace the Lid.
Put the Plug into a 120V AC electrical outlet.
To re-fit the Pack Door, push straight up until you feel a “click.”
The Pack Door should only be re-fitted in the open position.
Do not attempt to operate the appliance without the Pack Door
fitted.
13
Put the Drip Tray onto the appliance in the position indicated.
Ensure the Pack Door is closed and the Brew Head is in the down
position.
DO NOT fit the Cup Stand at this stage.
6
J1 User Guide
21/6/05
1:16 pm
Page 15
Press the left and right selection buttons down
simultaneously.
While holding these down switch the machine on.
Continue to hold down the buttons until water
is dispensed into the Drip Tray.
It will take up to 20 seconds to fully prime the
appliance and water to appear. This is normal.
Release both buttons.
Empty the Drip Tray and return it to the appliance.
Place the Cup Stand on top of the Drip Tray.
The appliance will now start to brew your beverage.
The indicator light of the selection button pressed will flash slowly
while your beverage is brewing.
The appliance automatically supplies the optimal amount of water.
Each button delivers the drink with its own unique brew cycle. This
means that water may flow from the pack or from the Jet system. This
is normal. The brew cycle may also include a number of pauses. This is
normal.
Do not open the door or attempt to remove the pack before
brewing has finished.
You can interrupt the brewing process at any time by pressing any of
the 3 selection buttons.The machine however will not complete the
interrupted beverage.
Take care when removing the pack immediately after
interrupting the brewing process as it will be HOT and may drip
HOT WATER.
Do not remove the Water Reservoir during brewing as the next
beverage brewed will be too small.
When Brewing is complete, the appliance will automatically stop.
Open the Pack Door, remove the used pack and discard it.
Take care when removing the pack immediately after brewing
has finished as it will be HOT.
BREWING 2-PACK BEVERAGES
Follow the steps on page 11 of this guide.
YOUR APPLIANCE IS NOW READY TO USE!
At the end of the 1st brew, the right hand indicator light will flash.
This is a prompt to insert the 2nd pack.
Open the Pack Door, remove the used pack and discard it.
Take care when removing the pack immediately after brewing
has finished as it will be HOT.
Insert the 2nd pack, close the Pack Door and push the right hand
selection button.
Push the pack fully into the Brew Head until it “clicks” into position.
The machine will start to brew the 2nd pack of your beverage.
At the end of the 2nd brew, the 3 indicator lights will flash.
Open the Pack Door, remove the used pack and discard it.
Take care when removing the pack immediately after brewing
has finished as it will be HOT.
7
12
J1 User Guide
21/6/05
1:16 pm
Page 17
BREWING YOUR BEVERAGES
GETTING THE MOST FROM YOUR APPLIANCE
Open the Pack Door by rotating the Top Ring a quarter turn counter
clockwise.
Do not attempt to open or close by the Pack Door itself.
Pure Water For The Finest Hot Beverages Every Time
For a great-tasting hot beverage in every cup, replace the FLAVIA®
filter every two months. FLAVIA® filter cartridges will help protect
your FLAVIA® FUSIONTM drinks station and extend its life. The
organic ion exchangers and activated charcoal reduce heavy metals
and other contaminants, as well as substances such as chlorine
which could impair the flavor and aroma of your hot beverage.
The filter goes straight in the reservoir and does not require any
accessories or take up any extra space. It’s easy to order FLAVIA®
Filters. Go to myflavia.com or call 888 MYFLAVIA (888 693 5284).
Insert the pack in to the Brew Head.
Push the pack fully in to the Brew Head until it“clicks” into position.
Packs
Packs should be stored in a cool dry place.
If unopened, your packs are good until the best before date shown
on the back of the pack.
Packs should not be stored in a refrigerator or freezer.
Cups/Mugs
To avoid spillage or burns, please ensure the correct size mug or
cup is always used.
Close the Pack Door fully by rotating the Top Ring a quarter turn
clockwise.
When closing the door you will feel some resistance, this is only the seal
of the pack being pierced and is perfectly normal.
Beverage Selection Buttons
Your appliance is fitted with 3 selection buttons, which enable a
wide choice of beverages to be made with the push of a button. The
button to press depends on your particular choice of beverage (see
the table below).
Place a cup or mug on the Cup Stand.
Use a mug or cup of the correct size for the beverage.
To minimize the risk of splashing, position the Brew Head as close
to the top of the cup or mug as possible.
Selection button
Beverages to be brewed
Graphic
Choco
Other *
Left
Press a Selection Button.
Press the middle button for all Coffee, Tea and Wellbeing beverages.
Press the right button for all 2-pack beverages (e.g. Cappuccino).
Press the left button for Choco and other beverages.
11
Middle
Coffees
Teas
Wellbeing range
Right
Frothy 2-pack beverages e.g.
Cappuccino (Creamy Topping then Coffee)
Mochaccino (Choco then Coffee)
Chococcino (Creamy Topping then Choco)
Chai Latte (Creamy Topping then Chai Tea)
8
* (exciting new FLAVIA® drinks coming)
J1 User Guide
21/6/05
1:16 pm
Page 19
Beverage Volume Control
Your FLAVIA® appliance is designed to brew the optimal beverage
every time. However, you can tailor your Coffee, Tea and Wellbeing
beverages to your own particular tastes by using the Beverage
Volume Control. The control settings deliver the following beverage
volumes.
This control only varies the size of beverages prepared on the middle
button (Coffee, Tea, and Wellbeing range).
Control Setting
Approx. Beverage Size (fl.oz)
Graphic
1 (smallest)
3
2
4 1/3
3
5 2/3
4
7
FILLING THE APPLIANCE WITH WATER
Remove the Water Reservoir from the appliance.
Remove the Lid and fill the Water Reservoir with
cold water up to the MAX indication line and put it
back on to the appliance.
We recommend filtered drinking water only.
A full reservoir allows you to make up to six 7 oz.
beverages.
Never pour anything other than cold water in to
the reservoir.
8 1/3
5 (largest)
Brew Head Adjustment
You can easily adapt your appliance to accommodate your favorite
mug or cup by simply adjusting the height of the Brew Head.
The Drip Tray can also be removed to accommodate your travel
mug.
Position the Brew Head close to the top of your cup or mug to
minimize the splash from your appliance.
9
Switch the appliance on.
The 3 Indicator Lights will flash slowly while the water
is heating up (which will take about 90 seconds).
The appliance is ready for use when the 3 Indicator
Lights are lit continuously.
10