1
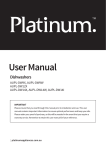
RRBL2A/T_IB_15-7-06
7/15/06
8:24 PM
Page 1
R AY
Hope you love using this and the other kitchen appliances
in my line. I love to cook – as long as it's fast, fun and simple!
These cool kitchen helpers will make it easy to cook a great
meal – from start to finish – in 30 minutes. And they'll look
awesome on your counter!
If you get satisfaction out of treating your family and friends
to foods made with your own two hands, then get in the
kitchen and have a blast! Try new flavors, tastes – experiment!
And forget about those measuring cups and spoons – just
eyeball it! If I can do it, you can too! Go for it!
3-SPEED BLENDER
Rachael Ray
Recipes Copyright © 2006, by Rachael Ray. All Rights Reserved. Used by
Permission.
Printed in China 8/06
© 2006 Maxim®/Toastmaster® Inc.
P/N 61864
OWNER'S MANUAL
Model RRBL2A/T
TM
RRBL2A/T_IB_15-7-06
7/15/06
8:24 PM
Page 3
IMPORTANT SAFEGUARDS
When using electrical appliances, basic safety precautions should
always be followed including the following:
1. Read all instructions.
2. To protect against risk of electrical shock do not put cord,
plugs, or appliance in water or other liquid.
3. Close supervision is necessary when any appliance is used by
or near children.
4. Unplug from outlet when not in use, before putting on or taking
off parts, and before cleaning.
5. Avoid contacting moving parts.
6. Do not operate any appliance with a damaged cord or plug or
after the appliance malfunctions, or is dropped or damaged in
any manner. Contact Consumer Service for examination, repair
or electrical or mechanical adjustment.
7. The use of attachments, including canning jars, not recommended by the manufacturer may cause a risk of injury to persons.
8. Do not use outdoors.
9. Do not let cord hang over edge of table or counter.
10. Do not let cord contact hot surface, including the stove.
11. Keep hands and utensils away from Blade Assembly and out of
container while blending to reduce the risk of severe injury to
persons or damage to the Blender. A scraper may be used but
must be used only when the Blender is not running.
12. Blades are sharp. Handle carefully.
13. To reduce the risk of injury, never place Blade Assembly on
Motor Housing without Blending Container properly attached.
14. Always operate Blender with Lid in place.
15. When blending hot liquids, remove center piece of two-piece
Lid.
SAVE THESE INSTRUCTIONS
LIMITED ONE-YEAR WARRANTY
Warranty Coverage: This product is warranted to be free from defects in materials
or workmanship for a period of one (1) year from the original purchase date. This
product warranty is extended only to the original consumer purchaser of the product and is not transferable. For a period of one (1) year from the date of original
purchase of the product, our Repair Center will, at its option, either (1) repair the
product or (2) replace the product with a reconditioned comparable model. These
remedies are the purchaser's exclusive remedies under this warranty.
Warranty Service: To obtain warranty service, you must call our warranty service
number at 1-800-233-9054 for return instructions on how to deliver the product, in
either the original packaging or packaging affording an equal degree of protection
to the Repair Center specified below. You must enclose a copy of your sales
receipt or other proof of purchase to demonstrate eligibility for warranty coverage.
To return the appliance, ship to:
To contact us, please write to, call, or email:
ATTN: Repair Center
708 South Missouri Street
Macon, MO 63552 USA
Consumer Relations Department
PO Box 7366
Columbia MO 65205-7366 USA
1-800-233-9054
E-mail:
[email protected]
What Is Not Covered: This warranty does not cover damage resulting from misuse, accident, commercial use, improper service or any other damage caused by
anything other than defects in material or workmanship during ordinary consumer
use. This warranty is invalid if the serial number has been altered or removed from
the product. This warranty is valid only in the United States and Canada.
LIMITATION ON DAMAGES: THERE SHALL BE NO LIABILITY FOR ANY INCIDENTAL OR CONSEQUENTIAL DAMAGES FOR BREACH OF ANY EXPRESS OR IMPLIED
WARRANTY OR CONDITION ON THIS PRODUCT.
DURATION OF IMPLIED WARRANTIES: EXCEPT TO THE EXTENT PROHIBITED BY
APPLICABLE LAW, ALL IMPLIED WARRANTIES AND CONDITIONS, INCLUDING,
WITHOUT LIMITATION, IMPLIED WARRANTIES AND CONDITIONS OF MERCHANTABILITY AND FITNESS FOR A PARTICULAR PURPOSE OR USE ON THIS
PRODUCT ARE LIMITED IN DURATION TO THE DURATION OF THIS WARRANTY.
Some jurisdictions do not allow the exclusion or limitation of incidental or consequential damages, or allow limitations on how long an implied warranty lasts, so
the above limitations or exclusions may not apply to you. This warranty gives you
specific legal rights and you may have other rights under the laws of your jurisdiction.
For more information on our products, visit our website: www.maxim-toastmaster.com
FOR HOUSEHOLD USE ONLY
2
23
RRBL2A/T_IB_15-7-06
7/15/06
8:24 PM
Page 5
Additional Important Safeguards
1. All users of this appliance must read and understand this
Owner's Manual before operating or cleaning this appliance.
2. The cord to this appliance should be plugged into a 120V AC
electrical outlet only.
3. Do not leave this appliance unattended during use.
4. If this appliance begins to malfunction during use, immediately
turn the Control Dial to the (0) OFF position and unplug the
cord. Do not use or attempt to repair the malfunctioning appliance.
5. If this appliance falls or accidentally becomes immersed in
water, unplug it immediately. Do not reach into the water! Do
not use this appliance after it has fallen into or has become
immersed in water.
6. To reduce the risk of injury to persons or property, never use
this appliance in an unstable position.
7. Do not use this appliance for other than its intended use.
8. Do not use the Blender Container if cracked or chipped.
Polarized Plug
This appliance has a polarized plug (one blade is wider than the
other). To reduce the risk of electric shock, this plug is intended to
fit into a polarized outlet only one way. If the plug does not fit fully
in the outlet, reverse the plug. If it still does not fit, contact a qualified electrician. Do not attempt to modify the plug in any way.
Short Cord Instructions
A Short power-supply cord is provided to reduce the risk resulting
from becoming entangled in or tripping over a longer cord.
Do not use an extension cord with this product.
Electric Power
If the electrical circuit is overloaded with other appliances, your
appliance may not operate properly. It should be operated on a
separate electrical circuit from other appliances.
Plasticizer Warning
CAUTION: To prevent Plasticizers from migrating from the finish of
the counter top or table top or other furniture, place NON-PLASTIC
coasters or placemats between the appliance and the finish of the
counter top or table top.
Failure to do so may cause the finish to darken, permanent
blemishes may occur or stains can appear.
22
3
RRBL2A/T_IB_15-7-06
7/15/06
8:24 PM
Page 7
Getting to Know Your
3-Speed Blender
R AY
ml
8
TM
Recipes on this page have
been specially created by
Rachael Ray.
QUICK CREAMY TOMATO SOUP
20
40
60
2
(15-ounce) containers, chicken or vegetable stock/broth (preferred
brand: Kitchen Basics)
1
(28-ounce) can concentrated crushed tomatoes
1
cup heavy cream
Coarse salt and black pepper
20 leaves fresh basil, cut into chiffonade, for garnish
Soup toppers, for garnish, recipe follows
7
max
ml
1500
1250
1000
6
Combine broth and tomatoes in a medium saucepan over moderate heat.
When soup bubbles, stir in heavy cream and reduce heat to low. Season
with a little salt and pepper and simmer gently 15 minutes, stirring occasionally. Working in 2 to 3 batches, transfer to blender and blend on
Speed 3 until smooth. Serve bowls of soup with basil chiffonade and
floating soup toppers, recipe follows.
750
500
250
4
Yield: 4 servings
5
3
2
9
P
Toast bread slices in your toaster until golden. Rub the toasted bread
rounds with crushed garlic, if using. Arrange bread on cookie or baking
sheet. Drizzle each slice with extra-virgin oil and top with a grind of black
pepper and a layer of shredded cheese. Place under hot broiler to melt
cheese until toppers are golden brown in color.
1
2
3
1
10
1.
2.
3.
4.
Motor Housing
Control Dial
Collar
Blade Assembly (P/N
71089RR)
5. Rubber Seal Ring (P/N 71090)
SOUP TOPPERS:
4
slices crusty bread, 4 inches across, 1/4-inch thick-slice artisan
breads at counter in market
2
cloves cracked fresh garlic, optional
Extra-virgin olive oil
Freshly ground black pepper
1/2 pound shredded cheese to complement your soup: provolone,
Asiago, cheddar, Gruyere, Swiss, etc.
Yield: 4 servings
6. Blender Container (P/N 71091)
7. Lid (P/N 71092RR)
8. Measuring Cap/Key
(P/N 71093)
9. Power cord
10. Non-Slip Rubber Feet
4
21
RRBL2A/T_IB_15-7-06
7/15/06
8:24 PM
Page 9
Recipes
R AY
TM
(Cont.)
Recipes on this page have
been specially created by
Rachael Ray.
GREENS 'N BEANS SALAD
1/2 head escarole, chopped
1/2 half head green or red leaf lettuce, chopped
1
can (15 ounces) cannellini, drained
1/4 red onion, chopped
1
clove garlic, minced
1
teaspoon sugar
1
tablespoon lemon juice
1
tablespoon red wine vinegar
3
tablespoons extra-virgin olive oil (evoo)
Salt and freshly ground black pepper, to taste
Arrange greens on a large platter or in a salad bowl. Top with beans and
red onions.
Make the dressing: In Blender Container combine garlic, sugar, lemon
juice, and vinegar. Blend on Speed 3. Whisk in evoo. Pour dressing evenly
over the salad. Season salad with salt and pepper, toss and serve.
Yield: 2 servings
GUACAMOLE SAUCE
3
1
1/2
1
1
2
2
small to medium ripe Haas avocados, pitted and scooped from
skins with a large spoon
lemon, juiced
teaspoon cayenne pepper, eyeball it
cup plain yogurt
teaspoon coarse salt, eyeball it
plum tomatoes, seeded and chopped
scallions, thinly sliced on an angle
Combine avocado flesh, lemon juice, cayenne pepper, yogurt and salt in
blender. Blend guacamole sauce on Speed 3 until smooth. Remove guacamole sauce to a bowl and stir in diced tomatoes and chopped scallions. Serve drizzled over your favorite grilled fish or chicken.
Yield: 4 servings
Introduction
Congratulations on your purchase of this 3-Speed Blender. This versatile appliance offers 3 levels of power and a pulse setting. It's
equipped with a large capacity 48 oz blender container that allows you
to conveniently puree, stir, beat, blend, liquefy or crumb with one
multi-function appliance.
Features
Control Dial - A wide variety of foods, from milk shakes to crushed
ice can be processed utilizing the Control Dial and Pulse action.
Two-Piece Blender Lid - Conveniently measure and add additional
ingredients through the opening of the two piece lid during processing.
When processing hot ingredients, remove the Measuring Cap from the
Lid to allow steam to escape.
Pulse Setting - The Pulse setting provides short bursts of power
allowing you to prepare bread crumbs, grind chocolate and finely chop
nuts. You can also use the Pulse setting for cleaning the interior of the
Blender Container. See "User Maintenance Instructions" for details.
Crushing Ice - Add 1 cup of ice cubes, about 9, to the Blender
Container. Turn Speed Control to Pulse and release several times and
in seconds the ice will be fluffy and snow like.
Before First Use
CAUTION: Use extreme care when handling the Blade
Assembly. Do not touch the Blades with your fingers. The
Blades are very sharp and can cause injury if touched.
1. Carefully unpack the Blender.
2. Wash the Blender Container, Lid, Measuring Cap and the Blade
Assembly in warm soapy water. Rinse and dry thoroughly.
3. Make sure the cord is unplugged and the Control Dial is in the (0)
OFF position.
CAUTION: Never immerse the Motor Housing, plug or cord
in water or any other liquid.
4. Wipe the Motor Housing clean with a moistened cloth. Dry thoroughly.
20
5
RRBL2A/T_IB_15-7-06
7/15/06
8:24 PM
Page 11
Assembly Instructions
NOTE: Before each use, make sure the blender cord is
unplugged and the Control Dial is in the (0) OFF position.
R AY
CAUTION: Use extreme care when handling the Blade
Assembly. Do not touch the Blades with your fingers. The
Blades are very sharp and can cause injury if touched.
1. Carefully place the Rubber Seal Ring over the Blade Assembly.
2. Turn the Blender Container
upside down. Insert the Blade
Assembly into the opening at
the bottom of the Container,
then turn the Collar clockwise
to engage the threads.
Measuring
Cap
ml
20
60
1500
1000
750
Blender
Container
500
250
Rubber
Seal
Ring
Blade
Assembly
Collar
Measuring Cap In Use As a Key
ml
20
60
Locking Notches
CRUDITÉS
2
large eggs
1
seedless cucumber, halved across then quartered lengthwise
1
head celery, trimmed, separated, and wiped clean, ribs left whole
4
scallions, whole, cleaned and roots trimmed
4
large radishes, cleaned but left whole with greens intact
4
baby zucchini, washed
4
small carrots, peeled and left whole
2
vine ripened tomatoes
Make the anchovy sauce: Place anchovies, capers, caper brine, and garlic in Blender Container and blend on Speed 3. Stream in evoo to form a
thick dressing. Scrape the dressing into a small serving cup or bowl.
Clean the Blender Container and return it to its base.
Make the black olive and Parmigiano sauce: Place olives, vinegar and
thyme in Blender Container. Blend on Speed 3 and stream in evoo. When
dressing forms, stop blender and add cheese. Pulse-process cheese into
dressing then transfer dressing into a second cup or small bowl.
40
4. When tightening the collar,
align the LOCK symbol
molded on the bottom of the
collar, within the LOCK RANGE
symbol IIIIIII molded on the
bottom of the Blending
Container.
CRUDITÉS AND 3 SAUCES (continued)
ml
1250
3. The Blade Assembly MUST be
firmly attached to the Blender
Container, Note that the
Measuring Cap doubles as a
'key' to tighten or loosen the
Blade Assembly. Insert the
Measuring Cap into the Collar,
allowing the notches in the
Measuring Cap to engage the
ribs in the Collar. While securely holding the Blender
Container, turn the Collar
clockwise to tighten or counter
clockwise to loosen.
Recipes on this page have
been specially created by
Rachael Ray.
GARDEN TOMATO AND SCALLION SAUCE
2
plum tomatoes, seeded and chopped
2
scallions, whites and tops, thinly sliced
2
tablespoons chopped fresh flat-leaf parsley (a palmful)
Extra-virgin olive oil (evoo), for drizzling
Coarse salt and freshly ground black pepper, to taste
40
max
TM
Make the garden tomato and scallion sauce: In a small mixing bowl, combine tomatoes, scallions, and parsley. Drizzle the sauce with evoo and
season it with salt and pepper, to taste.
Blade Assembly
and Seal Ring
5. Place the Blender Container
onto the Motor Housing, making sure it is properly seated.
Prepare the crudités: Place eggs in a small pot. Cover eggs with water
and bring water to a boil. Cover pot and remove from heat. Let eggs
stand 10 minutes. Drain eggs then crack shells by rattling cooked eggs
inside empty, covered pot. Peel and cool eggs under cold running water.
250
500
750
1000
1250
max
1500
ml
6
Arrange the vegetables in a flower pot, building high and stuffing the pot
lightly. Nest whole eggs and whole tomatoes among the vegetables.
Serve your vegetable masterpiece with sauces to pass at table.
19
RRBL2A/T_IB_15-7-06
7/15/06
8:24 PM
Page 13
Recipes
R AY
TM
(Cont.)
Recipes on this page have
been specially created by
Rachael Ray.
CHOPPED ICEBERG LETTUCE WITH "FRENCH" DRESSING
1
4
4
1/3
1
head iceberg lettuce
radishes, chopped
scallions, chopped
seedless cucumber, chopped
cup shredded carrots (preshredded are available in produce section)
DRESSING
1/3 cup white wine vinegar
1/3 cup sugar
1/2 cup ketchup
1/2 cup extra-virgin olive oil (evoo) (eyeball it)
1
teaspoon garlic powder
2
teaspoons Worcestershire Sauce®
1/4 small white onion, finely chopped or grated
salt and white pepper, to taste
Hold the lettuce head over a clean counter, core side down. Give the lettuce head a good whack on the counter and pull the core out. Chop lettuce. Combine lettuce, radishes, scallions, cucumber and carrots in a
large salad bowl.
Make the dressing: Put all of the dressing ingredients in the Blender
Container. Put the top in place and blend on Speed 3 until dressing is
combined. Pour dressing over salad and toss. Adjust salt and pepper to
your taste.
Yield: 6 servings
CRUDITÉS AND 3 SAUCES
ANCHOVY SAUCE
2
tins flat-fillet anchovies, lightly drained
1
tablespoon small capers in brine
2
tablespoons caper brine
1
clove garlic, cracked from skin
1/2 cup extra-virgin olive oil (evoo) (eyeball it)
BLACK OLIVE AND PARMIGIANO SAUCE
1/2 cup pitted nicoise or Kalamata olives
2
tablespoons red wine vinegar (eyeball it)
1
teaspoon dried thyme or 2 tablespoons fresh thyme leaves
1/3 cup extra-virgin olive oil (evoo) (eyeball it)
1/4 cup grated Parmigiano Reggiano cheese (a handful)
18
Instructions For Use
CAUTION: Keep hands and utensils out of the Container while
blending to prevent the possibility of severe injury to persons
or damage to the unit. A scraper may be used but must only be
used when the unit is not running.
CAUTION: Use extreme care when handling the Blender Blade
Assembly. Do not touch the Blades with your fingers. The
Blades are very sharp and can cause injury if touched.
1. Before starting, make sure power cord is unplugged and the
Control Dial is in the (0) OFF position.
2. Place the Motor Housing on a clean, dry surface to prevent debris
being pulled into the motor during operation.
3. Make sure that the Blade Assembly, Rubber Seal Ring and Collar
are properly assembled and securely fastened to the Blender
Container. See Assembly Instructions for details.
4. Place the Blender Container on top of the Motor Housing, making
sure it is firmly seated and not tilting to one side.
CAUTION: Never place the Blade Assembly on the Motor
Housing without the Blender Container being completely
assembled and securely tightened.
5. Add ingredients to the Blender Container and secure the Lid by
turning it clockwise to engage the locking tabs. NOTE: Do not fill
the Container more than 3/4 full, 4.5 cups (36 oz.). Never operate
when the Container is empty.
6. Insert the Measuring Cap into the center of the Lid and turn it
about 1/4 turn (clockwise or counter clockwise) to engage the
locking tabs. The Measuring Cap may be removed as needed to
add additional ingredients during processing. However, when processing hot foods or liquids, remove the Measuring Cap to prevent
pressure build-up.
7. At the start of the blending process, the powerful motor may cause
the liquid to surge against the Lid and cause leakage. To prevent
leakage, as well as steadying the unit, place one hand firmly on top
of the Lid and select your desired blending speed. Never lean over
the Blender when it is started or while it is running. Remember to
always hold the Lid during use.
7
RRBL2A/T_IB_15-7-06
7/15/06
8:24 PM
Page 15
Instructions For Use
(Cont.)
8. Plug the power Cord into a 120V AC electrical outlet. Turn the
Control Dial to the desired speed setting: 1 is the lowest speed; 3
is the highest. Blend until ingredients have reached desired consistency.
CAUTION: If Container rotates during blending, immediately
turn Control Dial to (0) OFF, then secure by tightening the
Collar and Blade Assembly on Blender Container.
9. When blending is complete, turn Control Dial to (0) OFF and
remove the plug from the electrical outlet.
10. Clean unit as instructed in the "User Maintenance Instructions."
Crushing Ice
Add 1 cup of ice cubes, about 9, to the Blender Container. Place the
Lid on Blender Container then repeatedly turn the Control Dial to (P)
Pulse and release. Repeat until the cubes are reduced. This will yield
one serving, about 1 cup.
Hot Ingredients
CAUTION: Use extreme caution when blending hot liquids to
avoid accidental scalding or burns. Do not use your hand to
cover opening!
NOTE: When processing hot foods, always remove the Measuring
Cap from the Lid before beginning.
• DO NOT put more than one cup of hot ingredients into the Blender
Container before beginning blending.
• After the blending process has begun, you may slowly add up to an
additional 1 cup of hot ingredients through the center hole in the
Lid.
• Always use a vessel with a pouring spout when adding hot ingredients.
8
R AY
TM
Recipe on this page has
been specially created by
Rachael Ray.
DECADENT DUO FOR DECADENT DUOS
Chocolate Cups with Whipped Cream
2/3 cup whole milk
1
egg
2
tablespoons sugar
Pinch salt
1
cup semi-sweet chocolate chips
2
tablespoons hazelnut liqueur or dark rum
4
demitasse cups
1
cup whipping cream
2
tablespoons sugar
Mint sprigs, for garnish, optional
Heat milk in a small pan over moderate heat until it comes to a boil.
In blender combine egg, sugar, a pinch of salt, semisweet chips, and
liqueur. Turn on blender to Speed 1. Pour in boiling milk in a slow
stream. The hot milk will cook egg and melt chocolate. Blend 1
minute, until smooth.
Spoon chocolate into 4 demitasse cups and chill. After dinner, beat
cream until soft peaks form. Add a little sugar and beat to combine.
Top the chocolate cups with a dollop of cream and garnish each cup
with mint sprigs.
Place cups on saucers and serve with demitasse spoons. If you use
teacups, this recipe will yield 2 cups, rather than 4.
Yield: 4 servings in demitasse cups
17
RRBL2A/T_IB_15-7-06
7/15/06
8:24 PM
Page 17
Recipes
R AY
TM
(Cont.)
Recipes on this page have
been specially created by
Rachael Ray.
ORANGE FREEZES
2
1
1
1
16
pints orange sherbet
pint vanilla ice cream
liter lemon lime soda or lemon lime seltzer
lime, for garnish, optional
ice cubes
For each freeze, in blender combine 3 scoops orange sherbet and 1
scoop vanilla ice cream. Add 1/4 liter lemon lime soda or lemon lime
seltzer and 4 ice cubes to the blender. Set blender top in place and blend
on Speed 3 until frothy and smooth. Pour into fountain or tall glass and
garnish glass rim with a round of lime and a straw. Repeat with remaining
ingredients.
Yield: 4 freezes
PEACH POWER UP
1
2
3/4
2
(1-inch) piece fresh ginger, peeled and grated
cups plain yogurt
cup orange juice
cups sliced frozen peaches
In blender combine ginger, yogurt, orange juice and the frozen peaches.
Blend on Speed 1 until smooth.
Yield: 4 servings
SORBET SHAKES
1
pint chocolate sorbet or strawberry sorbet
2
cups skim milk
Cool Whip® or other nondairy low-fat topping
If sorbet is too firm to scoop, soften in microwave for 10 seconds on high.
Blend milk and sorbet in Blender Container on Speed 1 and pour into
12-ounce tumblers. Top shakes with whipped topping.
Yield: 2 shakes
16
User Maintenance Instructions
This 3-Speed Blender requires little maintenance. It contains no user
serviceable parts. Do not try to repair it yourself. Any servicing requiring disassembly must be performed by a qualified appliance repair
technician.
CAUTION: Never immerse the Motor Housing, plug or cord in
water or any other liquid.
1. Always unplug the unit before cleaning.
2. Whenever possible, rinse parts immediately after processing to
make cleanup easier.
CAUTION: Use extreme care when handling the Blade
Assembly. Do not touch the Blades with your fingers. The
Blades are very sharp and can cause injury if touched.
3. Wash the Blender Container, Lid, Measuring Cap and Blade
Assembly in warm soapy water. Rinse and dry thoroughly. Never
use rough scouring pads or abrasive cleansers on any plastic or
metal parts as the surface may be damaged. Do not wash in the
dishwasher.
4. If necessary, wipe exterior surfaces with a moist cloth or sponge
and dry thoroughly.
5. Do not fill the Blender Container with boiling water or place any of
the parts in boiling water.
6. Do not allow the Blade Assembly to soak in water for long periods
of time.
7. Quick clean-ups of the interior of the Blender Container can be
made by using the Pulse setting. Plug the Blender into an electrical
outlet then pour some warm water and a small amount of detergent into the Blender Container. Repeat for several short bursts.
The unit will clean itself without you having to handle the sharp
Blades. Unplug the Blender, rinse and dry thoroughly, being careful
as the Blades are sharp.
8. Properly reassemble all parts before storing.
STORAGE
CAUTION: Always assemble clean Blender parts correctly
before storing on the Motor Housing. Severe injury can result if
Blender is accidentally turned ON when not properly assembled.
Unplug and clean unit. Store in original box or in a clean, dry place.
Never store Blender while it is hot or plugged in. Never wrap cord
tightly around the appliance. Never place any stress on cord, especially where the cord enters the unit, as this could cause the cord to fray
and break.
9
RRBL2A/T_IB_15-7-06
7/15/06
8:24 PM
Page 19
Helpful Hints
•
•
•
•
•
•
•
•
•
•
•
•
Add ingredients to Blender Container a little at a time to ensure
proper blending and prevent overflow. Never fill Blender
Container more than 3/4 full; the action of the Blade will cause
ingredients to rise in the Container. Make large recipes in several
batches.
Place liquid ingredients into the Blender first, unless recipe
instructs otherwise. The liquid will speed processing at a lower
speed.
It only takes seconds to perform a function, not minutes. Stop
the Blender after several seconds to check the results. This will
help avoid over-processing.
Always secure Lid on Blender Container before operating.
Do not remove Blender Container from the Motor Housing when
the motor is running.
Thick mixtures require special attention during processing. Turn
Blender off if blending stops or ingredients stick to sides of the
Container. Remove the Lid and, with a rubber spatula, push the
mixture toward the blades. Replace the Lid and continue processing. Select a higher speed if processing becomes sluggish.
Extra ingredients may be added while blending by removing the
Measuring Cap on top of Lid. Add solids and ice a little at a
time through the hole in the Container Lid. Always cut solid
foods, such as vegetables and cheese, into small chunks before
placing in the Blender Container.
To reduce wear on the Blade Assembly, place solid food portions in Blender 1/2 cup at a time. Raw fruits and vegetables as
well as cooked meats should be cut into 1 inch pieces before
processing.
Remove thick mixtures easily through bottom of the Blender
Container after removing the Collar and Blade Assembly.
Do not store food in Blender.
To prevent excessive heat expansion, always remove Measuring
Cap from Lid when processing hot ingredients. Add hot foods
slowly (to a maximum of 2 cups).
The blending or processing of foods that are gummy or sticky,
such as fresh ginger is not recommended.
10
R AY
TM
Recipes on this page have
been specially created by
Rachael Ray.
LUSCIOUS LASSI
Chill out any spicy meal or snack with this cool, refreshing and
tangy drink.
3
cups vanilla flavored custard style, low fat or nonfat yogurt
1
cup coconut milk, found on drink mix aisle of market
14 ice cubes
1
cup crushed pineapple
1
ripe banana, peeled and cut into chunks
1
inch fresh ginger root, grated
2
large stem strawberries, garnish
Combine yogurt, coconut milk, ice cubes, pineapple, banana and grated
ginger in a blender and blend on Speed 3 until smooth and frothy. Serve
in tall glasses and garnish with a large stem strawberry.
Yield: 2 Lassies
MOCHACCINO SHAKES
1
cup cold milk
1
cup strong black coffee, regular or decaf
1/2 cup chocolate syrup
1/2 teaspoon ground cinnamon
2
pints coffee flavor ice cream
Whipped cream in spray canister, garnish
Chocolate shavings, garnish
To blender, add 1/2 cup of milk, 1/2 cup of coffee, 1/4 cup of syrup,
and the cinnamon. Blend on Speed 1 to combine ingredients. Add 1
pint ice cream and blend on Speed 1 until smooth. Pour into 2 frosted
fountain glasses or tall glasses and garnish with swirls of whipped
cream, an extra pinch of cinnamon, and some chocolate shavings and
serve. Repeat to make 2 more shakes.
Yield: 4 servings
15
RRBL2A/T_IB_15-7-06
7/15/06
8:24 PM
Page 21
Recipes
R AY
TM
Blending Guide
(Cont.)
Recipes on this page have
been specially created by
Rachael Ray.
Your blender features a Pulse and a three speed control. While you
may select any speed, the selection will depend on the food to be
processed. Use low to high speed according to the kind of food and
recipe purpose.
FROZEN PEACH CHAMPAGNE COCKTAILS
This recipe is a Bellini-esque slush for grown ups.
1/4 cup sugar, to rim glasses
1
pint peach sorbet
2
shots orange liquor such as Triple Sec, Grand Marnier or Cointreau
Chilled champagne or sparkling wine, to fill blender, 1/3 bottle
Raspberries and 4 sprigs mint, optional garnish
Speed
1
Foods
Mixing Procedures
Powdered Milk
Add water, then dry milk to Blender Container.
Blend 15 seconds.
Frozen Juice
Place a shallow bowl of water along side a shallow bowl with 1/4 cup
sugar in it. Dip 4 cocktail glasses in water, then sugar to rim glass.
Add one 6 oz. can frozen juice, then water to
Blender Container. Blend 15 seconds or until
thoroughly mixed.
Pancake Batter
Place 4 scoops peach sorbet in blender. Add 2 shots orange liqueur. Fill
blender with Champagne to maximum fill line or up to 1-inch from top of
blending pitcher. Place cover on blender tightly. Blend on Speed 1 until
smooth and pour into cocktail glasses, keeping an eye out not to wreck
the pretty sugar rims. Garnish with a few raspberries and a sprig of mint
and serve.
Add liquid, eggs, then enough mix for 15 small
pancakes to Blender Container. Blend 5
seconds. Stop and scrape sides. Blend 5
seconds more until large lumps disappear.
Instant Pudding
Add milk, then pudding mix to Blender
Container. Blend 30 seconds or until smooth.
Milk Shake
Add milk, flavoring and Ice cream to Blender
Container. Blend 15 - 90 seconds
Baby Food
Vegetables
Cut into 1" pieces, simmer until tender, cool.
Add 1/2 cup liquid and up to 1 cup cut-up
food to Blender Container. Blend until desired
texture.
Fruit Toppings
Slightly thaw a 10 oz. package of frozen fruit.
Place in Blender Container and Puree until
desired consistency.
Bread
Tear 1 slice of bread into 6 pieces. Add to
Blender Container. Blend for 5 seconds or until
desired texture.
Fruits and
Vegetables
Add up to 1 cup of food cut into 1/2" pieces
and 1/2 cup water or other liquid to Blender
Container. Chop 5 seconds or until desired
consistency. Drain. (To chop dry, use Pulse).
Cabbage
Coarsely dice cabbage and place up to 4.5
cups into Blender Container, fill with water.
Chop for 5 seconds or until desired
consistency. Drain thoroughly.
Nuts
Place up to 1 cup into Blender Container and
chop until desired consistency (or use Pulse).
Yield: 4 servings
LAVA FLOWS
Pina Coladas with Rivers of Strawberry
These can be made as mocktails for the kids or cocktails for big
kids
2
cups frozen sliced strawberries in juice, defrosted
2
cans coconut milk drink mix (recommended: Coco Lopez)
2
cups pineapple juice
6
shots coconut rum or light rum
*
For mocktails, omit liquor and use a few extra ice cubes
1
tray of ice
Blend strawberries in a blender on Speed 3 until smooth. Place 1/2 cup
strawberry puree in the bottom of 4 hurricane or double rocks cocktail
glasses. Rinse blender and return to motor base. Place remaining ingredients in blender and blend on Speed 3 until smooth. Pour pina coladas
into glasses on top of the strawberry puree. The puree will run up through
the pina colada, making a lava flow effect.
2
Yield: 4 cocktails or mocktails
14
11
RRBL2A/T_IB_15-7-06
7/15/06
8:24 PM
Page 23
Blending Guide
Speed
3
Foods
Creamed Soups
Reconstitute
Recipes
(Cont.)
R AY
Mixing Procedures
Add liquid, then soup to Blender Container.
Mix 5 seconds or until smooth.
Sauces
Add liquids then solids to Blender Container.
Mix until desired consistency.
Fruit
Cut fruit into 1/2" cubes and place up to 1 cup
into Blender Container. Add 1/2 cup liquid. Mix
30-60 seconds or until desired consistency.
Salad Dressing
Add liquids then solids to Blender Container.
Mix until desired consistency.
Frozen Drinks
Place up to 2 cups of liquid then solid food
into Blender Container. Mix 5-15 seconds then
quickly drop 5-10 ice cubes, one at a time,
through the removable Cap on the Lid.
Immediately replace Cap after each addition
of ice cubes to prevent splattering.
TM
Recipes on this page have
been specially created by
Rachael Ray.
COOL-IT-DOWN CRANBERRY MARGARITAS
1
1
8
1
container (10 ounces) frozen limeade or margarita mix, such as
Bacardi® brand
tray ice cubes
shots tequila
can cranberry juice concentrate or cranapple juice concentrate
such as Mott's® brand
Combine all ingredients in Blender Container and blend on Speed 3. Pour
into glasses and serve.
Yield: 4 servings
DATE SHAKES
1
1
2
1
cup pitted dates, coarsely chopped
quart skim milk
pints French vanilla ice cream
teaspoon grated fresh nutmeg
Cheese (Soft)
Cut cheese into 1/2" cubes and place up to
1 cup into Blender Container. Grate 10-20
seconds or until desired consistency.
Cheese (Hard)
Cut cheese into 1/2" cubes and place up to
1/2 cup into Blender Container. Grate 10-20
seconds or until desired consistency.
Orange/Lemon
Cut peel of one orange/lemon into 1" chunks.
Place into Blender Container. Grate 5-10
seconds or until desired consistency.
Yield: 4 shakes
Coffee Beans
Add up to 1/2 cup beans to Blender Container.
Grind 20-40 seconds or until desired
consistency.
Chocolate Bars
Break 2 ounces into 1" pieces. Place in
Blender Container and Pulse until desired
consistency.
For
1
8
1/2
1
Vegetables
Place 1 cup of liquid and then add up to 1 cup
of food cut into 1/2" cubes into Blender
Container. Grate 30-60 seconds or until
desired consistency.
For each date shake, place 1/4 cup coarsely chopped pitted dates, a
handful, in blender. Add 1 cup cold skim milk and 2 big scoops of French
vanilla ice cream. Grate 1/4 teaspoon of fresh nutmeg into blender and
blend date shake on Speed 1 until smooth.
FROZEN MOHITO SLUSHES
every 4 slushes, you will need:
pint lime sorbet or 1 can lime ade from frozen juice section
shots light rum
cup mint leaves
tray ice cubes
In a blender, combine 1/2 pint sorbet or 1/2 can of lime ade with 4 shots
of rum, 1/4 cup mint leaves and 1/2 tray of ice. Pulse, then blend on
Speed 3 until lime-mint slush is smooth. Pour drinks into 2 large cocktail
glasses using a long handled spoon and repeat with remaining ingredients.
Yield: 4 cocktails, for 8, double the recipe.
12
13
RRBL2A/T_IB_15-7-06
7/15/06
8:24 PM
Page 21
Recipes
R AY
TM
Blending Guide
(Cont.)
Recipes on this page have
been specially created by
Rachael Ray.
Your blender features a Pulse and a three speed control. While you
may select any speed, the selection will depend on the food to be
processed. Use low to high speed according to the kind of food and
recipe purpose.
FROZEN PEACH CHAMPAGNE COCKTAILS
This recipe is a Bellini-esque slush for grown ups.
1/4 cup sugar, to rim glasses
1
pint peach sorbet
2
shots orange liquor such as Triple Sec, Grand Marnier or Cointreau
Chilled champagne or sparkling wine, to fill blender, 1/3 bottle
Raspberries and 4 sprigs mint, optional garnish
Speed
1
Foods
Mixing Procedures
Powdered Milk
Add water, then dry milk to Blender Container.
Blend 15 seconds.
Frozen Juice
Place a shallow bowl of water along side a shallow bowl with 1/4 cup
sugar in it. Dip 4 cocktail glasses in water, then sugar to rim glass.
Add one 6 oz. can frozen juice, then water to
Blender Container. Blend 15 seconds or until
thoroughly mixed.
Pancake Batter
Place 4 scoops peach sorbet in blender. Add 2 shots orange liqueur. Fill
blender with Champagne to maximum fill line or up to 1-inch from top of
blending pitcher. Place cover on blender tightly. Blend on Speed 1 until
smooth and pour into cocktail glasses, keeping an eye out not to wreck
the pretty sugar rims. Garnish with a few raspberries and a sprig of mint
and serve.
Add liquid, eggs, then enough mix for 15 small
pancakes to Blender Container. Blend 5
seconds. Stop and scrape sides. Blend 5
seconds more until large lumps disappear.
Instant Pudding
Add milk, then pudding mix to Blender
Container. Blend 30 seconds or until smooth.
Milk Shake
Add milk, flavoring and Ice cream to Blender
Container. Blend 15 - 90 seconds
Baby Food
Vegetables
Cut into 1" pieces, simmer until tender, cool.
Add 1/2 cup liquid and up to 1 cup cut-up
food to Blender Container. Blend until desired
texture.
Fruit Toppings
Slightly thaw a 10 oz. package of frozen fruit.
Place in Blender Container and Puree until
desired consistency.
Bread
Tear 1 slice of bread into 6 pieces. Add to
Blender Container. Blend for 5 seconds or until
desired texture.
Fruits and
Vegetables
Add up to 1 cup of food cut into 1/2" pieces
and 1/2 cup water or other liquid to Blender
Container. Chop 5 seconds or until desired
consistency. Drain. (To chop dry, use Pulse).
Cabbage
Coarsely dice cabbage and place up to 4.5
cups into Blender Container, fill with water.
Chop for 5 seconds or until desired
consistency. Drain thoroughly.
Nuts
Place up to 1 cup into Blender Container and
chop until desired consistency (or use Pulse).
Yield: 4 servings
LAVA FLOWS
Pina Coladas with Rivers of Strawberry
These can be made as mocktails for the kids or cocktails for big
kids
2
cups frozen sliced strawberries in juice, defrosted
2
cans coconut milk drink mix (recommended: Coco Lopez)
2
cups pineapple juice
6
shots coconut rum or light rum
*
For mocktails, omit liquor and use a few extra ice cubes
1
tray of ice
Blend strawberries in a blender on Speed 3 until smooth. Place 1/2 cup
strawberry puree in the bottom of 4 hurricane or double rocks cocktail
glasses. Rinse blender and return to motor base. Place remaining ingredients in blender and blend on Speed 3 until smooth. Pour pina coladas
into glasses on top of the strawberry puree. The puree will run up through
the pina colada, making a lava flow effect.
2
Yield: 4 cocktails or mocktails
14
11
RRBL2A/T_IB_15-7-06
7/15/06
8:24 PM
Page 19
Helpful Hints
•
•
•
•
•
•
•
•
•
•
•
•
Add ingredients to Blender Container a little at a time to ensure
proper blending and prevent overflow. Never fill Blender
Container more than 3/4 full; the action of the Blade will cause
ingredients to rise in the Container. Make large recipes in several
batches.
Place liquid ingredients into the Blender first, unless recipe
instructs otherwise. The liquid will speed processing at a lower
speed.
It only takes seconds to perform a function, not minutes. Stop
the Blender after several seconds to check the results. This will
help avoid over-processing.
Always secure Lid on Blender Container before operating.
Do not remove Blender Container from the Motor Housing when
the motor is running.
Thick mixtures require special attention during processing. Turn
Blender off if blending stops or ingredients stick to sides of the
Container. Remove the Lid and, with a rubber spatula, push the
mixture toward the blades. Replace the Lid and continue processing. Select a higher speed if processing becomes sluggish.
Extra ingredients may be added while blending by removing the
Measuring Cap on top of Lid. Add solids and ice a little at a
time through the hole in the Container Lid. Always cut solid
foods, such as vegetables and cheese, into small chunks before
placing in the Blender Container.
To reduce wear on the Blade Assembly, place solid food portions in Blender 1/2 cup at a time. Raw fruits and vegetables as
well as cooked meats should be cut into 1 inch pieces before
processing.
Remove thick mixtures easily through bottom of the Blender
Container after removing the Collar and Blade Assembly.
Do not store food in Blender.
To prevent excessive heat expansion, always remove Measuring
Cap from Lid when processing hot ingredients. Add hot foods
slowly (to a maximum of 2 cups).
The blending or processing of foods that are gummy or sticky,
such as fresh ginger is not recommended.
10
R AY
TM
Recipes on this page have
been specially created by
Rachael Ray.
LUSCIOUS LASSI
Chill out any spicy meal or snack with this cool, refreshing and
tangy drink.
3
cups vanilla flavored custard style, low fat or nonfat yogurt
1
cup coconut milk, found on drink mix aisle of market
14 ice cubes
1
cup crushed pineapple
1
ripe banana, peeled and cut into chunks
1
inch fresh ginger root, grated
2
large stem strawberries, garnish
Combine yogurt, coconut milk, ice cubes, pineapple, banana and grated
ginger in a blender and blend on Speed 3 until smooth and frothy. Serve
in tall glasses and garnish with a large stem strawberry.
Yield: 2 Lassies
MOCHACCINO SHAKES
1
cup cold milk
1
cup strong black coffee, regular or decaf
1/2 cup chocolate syrup
1/2 teaspoon ground cinnamon
2
pints coffee flavor ice cream
Whipped cream in spray canister, garnish
Chocolate shavings, garnish
To blender, add 1/2 cup of milk, 1/2 cup of coffee, 1/4 cup of syrup,
and the cinnamon. Blend on Speed 1 to combine ingredients. Add 1
pint ice cream and blend on Speed 1 until smooth. Pour into 2 frosted
fountain glasses or tall glasses and garnish with swirls of whipped
cream, an extra pinch of cinnamon, and some chocolate shavings and
serve. Repeat to make 2 more shakes.
Yield: 4 servings
15
RRBL2A/T_IB_15-7-06
7/15/06
8:24 PM
Page 17
Recipes
R AY
TM
(Cont.)
Recipes on this page have
been specially created by
Rachael Ray.
ORANGE FREEZES
2
1
1
1
16
pints orange sherbet
pint vanilla ice cream
liter lemon lime soda or lemon lime seltzer
lime, for garnish, optional
ice cubes
For each freeze, in blender combine 3 scoops orange sherbet and 1
scoop vanilla ice cream. Add 1/4 liter lemon lime soda or lemon lime
seltzer and 4 ice cubes to the blender. Set blender top in place and blend
on Speed 3 until frothy and smooth. Pour into fountain or tall glass and
garnish glass rim with a round of lime and a straw. Repeat with remaining
ingredients.
Yield: 4 freezes
PEACH POWER UP
1
2
3/4
2
(1-inch) piece fresh ginger, peeled and grated
cups plain yogurt
cup orange juice
cups sliced frozen peaches
In blender combine ginger, yogurt, orange juice and the frozen peaches.
Blend on Speed 1 until smooth.
Yield: 4 servings
SORBET SHAKES
1
pint chocolate sorbet or strawberry sorbet
2
cups skim milk
Cool Whip® or other nondairy low-fat topping
If sorbet is too firm to scoop, soften in microwave for 10 seconds on high.
Blend milk and sorbet in Blender Container on Speed 1 and pour into
12-ounce tumblers. Top shakes with whipped topping.
Yield: 2 shakes
16
User Maintenance Instructions
This 3-Speed Blender requires little maintenance. It contains no user
serviceable parts. Do not try to repair it yourself. Any servicing requiring disassembly must be performed by a qualified appliance repair
technician.
CAUTION: Never immerse the Motor Housing, plug or cord in
water or any other liquid.
1. Always unplug the unit before cleaning.
2. Whenever possible, rinse parts immediately after processing to
make cleanup easier.
CAUTION: Use extreme care when handling the Blade
Assembly. Do not touch the Blades with your fingers. The
Blades are very sharp and can cause injury if touched.
3. Wash the Blender Container, Lid, Measuring Cap and Blade
Assembly in warm soapy water. Rinse and dry thoroughly. Never
use rough scouring pads or abrasive cleansers on any plastic or
metal parts as the surface may be damaged. Do not wash in the
dishwasher.
4. If necessary, wipe exterior surfaces with a moist cloth or sponge
and dry thoroughly.
5. Do not fill the Blender Container with boiling water or place any of
the parts in boiling water.
6. Do not allow the Blade Assembly to soak in water for long periods
of time.
7. Quick clean-ups of the interior of the Blender Container can be
made by using the Pulse setting. Plug the Blender into an electrical
outlet then pour some warm water and a small amount of detergent into the Blender Container. Repeat for several short bursts.
The unit will clean itself without you having to handle the sharp
Blades. Unplug the Blender, rinse and dry thoroughly, being careful
as the Blades are sharp.
8. Properly reassemble all parts before storing.
STORAGE
CAUTION: Always assemble clean Blender parts correctly
before storing on the Motor Housing. Severe injury can result if
Blender is accidentally turned ON when not properly assembled.
Unplug and clean unit. Store in original box or in a clean, dry place.
Never store Blender while it is hot or plugged in. Never wrap cord
tightly around the appliance. Never place any stress on cord, especially where the cord enters the unit, as this could cause the cord to fray
and break.
9
RRBL2A/T_IB_15-7-06
7/15/06
8:24 PM
Page 15
Instructions For Use
(Cont.)
8. Plug the power Cord into a 120V AC electrical outlet. Turn the
Control Dial to the desired speed setting: 1 is the lowest speed; 3
is the highest. Blend until ingredients have reached desired consistency.
CAUTION: If Container rotates during blending, immediately
turn Control Dial to (0) OFF, then secure by tightening the
Collar and Blade Assembly on Blender Container.
9. When blending is complete, turn Control Dial to (0) OFF and
remove the plug from the electrical outlet.
10. Clean unit as instructed in the "User Maintenance Instructions."
Crushing Ice
Add 1 cup of ice cubes, about 9, to the Blender Container. Place the
Lid on Blender Container then repeatedly turn the Control Dial to (P)
Pulse and release. Repeat until the cubes are reduced. This will yield
one serving, about 1 cup.
Hot Ingredients
CAUTION: Use extreme caution when blending hot liquids to
avoid accidental scalding or burns. Do not use your hand to
cover opening!
NOTE: When processing hot foods, always remove the Measuring
Cap from the Lid before beginning.
• DO NOT put more than one cup of hot ingredients into the Blender
Container before beginning blending.
• After the blending process has begun, you may slowly add up to an
additional 1 cup of hot ingredients through the center hole in the
Lid.
• Always use a vessel with a pouring spout when adding hot ingredients.
8
R AY
TM
Recipe on this page has
been specially created by
Rachael Ray.
DECADENT DUO FOR DECADENT DUOS
Chocolate Cups with Whipped Cream
2/3 cup whole milk
1
egg
2
tablespoons sugar
Pinch salt
1
cup semi-sweet chocolate chips
2
tablespoons hazelnut liqueur or dark rum
4
demitasse cups
1
cup whipping cream
2
tablespoons sugar
Mint sprigs, for garnish, optional
Heat milk in a small pan over moderate heat until it comes to a boil.
In blender combine egg, sugar, a pinch of salt, semisweet chips, and
liqueur. Turn on blender to Speed 1. Pour in boiling milk in a slow
stream. The hot milk will cook egg and melt chocolate. Blend 1
minute, until smooth.
Spoon chocolate into 4 demitasse cups and chill. After dinner, beat
cream until soft peaks form. Add a little sugar and beat to combine.
Top the chocolate cups with a dollop of cream and garnish each cup
with mint sprigs.
Place cups on saucers and serve with demitasse spoons. If you use
teacups, this recipe will yield 2 cups, rather than 4.
Yield: 4 servings in demitasse cups
17
RRBL2A/T_IB_15-7-06
7/15/06
8:24 PM
Page 13
Recipes
R AY
TM
(Cont.)
Recipes on this page have
been specially created by
Rachael Ray.
CHOPPED ICEBERG LETTUCE WITH "FRENCH" DRESSING
1
4
4
1/3
1
head iceberg lettuce
radishes, chopped
scallions, chopped
seedless cucumber, chopped
cup shredded carrots (preshredded are available in produce section)
DRESSING
1/3 cup white wine vinegar
1/3 cup sugar
1/2 cup ketchup
1/2 cup extra-virgin olive oil (evoo) (eyeball it)
1
teaspoon garlic powder
2
teaspoons Worcestershire Sauce®
1/4 small white onion, finely chopped or grated
salt and white pepper, to taste
Hold the lettuce head over a clean counter, core side down. Give the lettuce head a good whack on the counter and pull the core out. Chop lettuce. Combine lettuce, radishes, scallions, cucumber and carrots in a
large salad bowl.
Make the dressing: Put all of the dressing ingredients in the Blender
Container. Put the top in place and blend on Speed 3 until dressing is
combined. Pour dressing over salad and toss. Adjust salt and pepper to
your taste.
Yield: 6 servings
CRUDITÉS AND 3 SAUCES
ANCHOVY SAUCE
2
tins flat-fillet anchovies, lightly drained
1
tablespoon small capers in brine
2
tablespoons caper brine
1
clove garlic, cracked from skin
1/2 cup extra-virgin olive oil (evoo) (eyeball it)
BLACK OLIVE AND PARMIGIANO SAUCE
1/2 cup pitted nicoise or Kalamata olives
2
tablespoons red wine vinegar (eyeball it)
1
teaspoon dried thyme or 2 tablespoons fresh thyme leaves
1/3 cup extra-virgin olive oil (evoo) (eyeball it)
1/4 cup grated Parmigiano Reggiano cheese (a handful)
18
Instructions For Use
CAUTION: Keep hands and utensils out of the Container while
blending to prevent the possibility of severe injury to persons
or damage to the unit. A scraper may be used but must only be
used when the unit is not running.
CAUTION: Use extreme care when handling the Blender Blade
Assembly. Do not touch the Blades with your fingers. The
Blades are very sharp and can cause injury if touched.
1. Before starting, make sure power cord is unplugged and the
Control Dial is in the (0) OFF position.
2. Place the Motor Housing on a clean, dry surface to prevent debris
being pulled into the motor during operation.
3. Make sure that the Blade Assembly, Rubber Seal Ring and Collar
are properly assembled and securely fastened to the Blender
Container. See Assembly Instructions for details.
4. Place the Blender Container on top of the Motor Housing, making
sure it is firmly seated and not tilting to one side.
CAUTION: Never place the Blade Assembly on the Motor
Housing without the Blender Container being completely
assembled and securely tightened.
5. Add ingredients to the Blender Container and secure the Lid by
turning it clockwise to engage the locking tabs. NOTE: Do not fill
the Container more than 3/4 full, 4.5 cups (36 oz.). Never operate
when the Container is empty.
6. Insert the Measuring Cap into the center of the Lid and turn it
about 1/4 turn (clockwise or counter clockwise) to engage the
locking tabs. The Measuring Cap may be removed as needed to
add additional ingredients during processing. However, when processing hot foods or liquids, remove the Measuring Cap to prevent
pressure build-up.
7. At the start of the blending process, the powerful motor may cause
the liquid to surge against the Lid and cause leakage. To prevent
leakage, as well as steadying the unit, place one hand firmly on top
of the Lid and select your desired blending speed. Never lean over
the Blender when it is started or while it is running. Remember to
always hold the Lid during use.
7
RRBL2A/T_IB_15-7-06
7/15/06
8:24 PM
Page 11
Assembly Instructions
NOTE: Before each use, make sure the blender cord is
unplugged and the Control Dial is in the (0) OFF position.
R AY
CAUTION: Use extreme care when handling the Blade
Assembly. Do not touch the Blades with your fingers. The
Blades are very sharp and can cause injury if touched.
1. Carefully place the Rubber Seal Ring over the Blade Assembly.
2. Turn the Blender Container
upside down. Insert the Blade
Assembly into the opening at
the bottom of the Container,
then turn the Collar clockwise
to engage the threads.
Measuring
Cap
ml
20
60
1500
1000
750
Blender
Container
500
250
Rubber
Seal
Ring
Blade
Assembly
Collar
Measuring Cap In Use As a Key
ml
20
60
Locking Notches
CRUDITÉS
2
large eggs
1
seedless cucumber, halved across then quartered lengthwise
1
head celery, trimmed, separated, and wiped clean, ribs left whole
4
scallions, whole, cleaned and roots trimmed
4
large radishes, cleaned but left whole with greens intact
4
baby zucchini, washed
4
small carrots, peeled and left whole
2
vine ripened tomatoes
Make the anchovy sauce: Place anchovies, capers, caper brine, and garlic in Blender Container and blend on Speed 3. Stream in evoo to form a
thick dressing. Scrape the dressing into a small serving cup or bowl.
Clean the Blender Container and return it to its base.
Make the black olive and Parmigiano sauce: Place olives, vinegar and
thyme in Blender Container. Blend on Speed 3 and stream in evoo. When
dressing forms, stop blender and add cheese. Pulse-process cheese into
dressing then transfer dressing into a second cup or small bowl.
40
4. When tightening the collar,
align the LOCK symbol
molded on the bottom of the
collar, within the LOCK RANGE
symbol IIIIIII molded on the
bottom of the Blending
Container.
CRUDITÉS AND 3 SAUCES (continued)
ml
1250
3. The Blade Assembly MUST be
firmly attached to the Blender
Container, Note that the
Measuring Cap doubles as a
'key' to tighten or loosen the
Blade Assembly. Insert the
Measuring Cap into the Collar,
allowing the notches in the
Measuring Cap to engage the
ribs in the Collar. While securely holding the Blender
Container, turn the Collar
clockwise to tighten or counter
clockwise to loosen.
Recipes on this page have
been specially created by
Rachael Ray.
GARDEN TOMATO AND SCALLION SAUCE
2
plum tomatoes, seeded and chopped
2
scallions, whites and tops, thinly sliced
2
tablespoons chopped fresh flat-leaf parsley (a palmful)
Extra-virgin olive oil (evoo), for drizzling
Coarse salt and freshly ground black pepper, to taste
40
max
TM
Make the garden tomato and scallion sauce: In a small mixing bowl, combine tomatoes, scallions, and parsley. Drizzle the sauce with evoo and
season it with salt and pepper, to taste.
Blade Assembly
and Seal Ring
5. Place the Blender Container
onto the Motor Housing, making sure it is properly seated.
Prepare the crudités: Place eggs in a small pot. Cover eggs with water
and bring water to a boil. Cover pot and remove from heat. Let eggs
stand 10 minutes. Drain eggs then crack shells by rattling cooked eggs
inside empty, covered pot. Peel and cool eggs under cold running water.
250
500
750
1000
1250
max
1500
ml
6
Arrange the vegetables in a flower pot, building high and stuffing the pot
lightly. Nest whole eggs and whole tomatoes among the vegetables.
Serve your vegetable masterpiece with sauces to pass at table.
19
RRBL2A/T_IB_15-7-06
7/15/06
8:24 PM
Page 9
Recipes
R AY
TM
(Cont.)
Recipes on this page have
been specially created by
Rachael Ray.
GREENS 'N BEANS SALAD
1/2 head escarole, chopped
1/2 half head green or red leaf lettuce, chopped
1
can (15 ounces) cannellini, drained
1/4 red onion, chopped
1
clove garlic, minced
1
teaspoon sugar
1
tablespoon lemon juice
1
tablespoon red wine vinegar
3
tablespoons extra-virgin olive oil (evoo)
Salt and freshly ground black pepper, to taste
Arrange greens on a large platter or in a salad bowl. Top with beans and
red onions.
Make the dressing: In Blender Container combine garlic, sugar, lemon
juice, and vinegar. Blend on Speed 3. Whisk in evoo. Pour dressing evenly
over the salad. Season salad with salt and pepper, toss and serve.
Yield: 2 servings
GUACAMOLE SAUCE
3
1
1/2
1
1
2
2
small to medium ripe Haas avocados, pitted and scooped from
skins with a large spoon
lemon, juiced
teaspoon cayenne pepper, eyeball it
cup plain yogurt
teaspoon coarse salt, eyeball it
plum tomatoes, seeded and chopped
scallions, thinly sliced on an angle
Combine avocado flesh, lemon juice, cayenne pepper, yogurt and salt in
blender. Blend guacamole sauce on Speed 3 until smooth. Remove guacamole sauce to a bowl and stir in diced tomatoes and chopped scallions. Serve drizzled over your favorite grilled fish or chicken.
Yield: 4 servings
Introduction
Congratulations on your purchase of this 3-Speed Blender. This versatile appliance offers 3 levels of power and a pulse setting. It's
equipped with a large capacity 48 oz blender container that allows you
to conveniently puree, stir, beat, blend, liquefy or crumb with one
multi-function appliance.
Features
Control Dial - A wide variety of foods, from milk shakes to crushed
ice can be processed utilizing the Control Dial and Pulse action.
Two-Piece Blender Lid - Conveniently measure and add additional
ingredients through the opening of the two piece lid during processing.
When processing hot ingredients, remove the Measuring Cap from the
Lid to allow steam to escape.
Pulse Setting - The Pulse setting provides short bursts of power
allowing you to prepare bread crumbs, grind chocolate and finely chop
nuts. You can also use the Pulse setting for cleaning the interior of the
Blender Container. See "User Maintenance Instructions" for details.
Crushing Ice - Add 1 cup of ice cubes, about 9, to the Blender
Container. Turn Speed Control to Pulse and release several times and
in seconds the ice will be fluffy and snow like.
Before First Use
CAUTION: Use extreme care when handling the Blade
Assembly. Do not touch the Blades with your fingers. The
Blades are very sharp and can cause injury if touched.
1. Carefully unpack the Blender.
2. Wash the Blender Container, Lid, Measuring Cap and the Blade
Assembly in warm soapy water. Rinse and dry thoroughly.
3. Make sure the cord is unplugged and the Control Dial is in the (0)
OFF position.
CAUTION: Never immerse the Motor Housing, plug or cord
in water or any other liquid.
4. Wipe the Motor Housing clean with a moistened cloth. Dry thoroughly.
20
5
RRBL2A/T_IB_15-7-06
7/15/06
8:24 PM
Page 7
Getting to Know Your
3-Speed Blender
R AY
ml
8
TM
Recipes on this page have
been specially created by
Rachael Ray.
QUICK CREAMY TOMATO SOUP
20
40
60
2
(15-ounce) containers, chicken or vegetable stock/broth (preferred
brand: Kitchen Basics)
1
(28-ounce) can concentrated crushed tomatoes
1
cup heavy cream
Coarse salt and black pepper
20 leaves fresh basil, cut into chiffonade, for garnish
Soup toppers, for garnish, recipe follows
7
max
ml
1500
1250
1000
6
Combine broth and tomatoes in a medium saucepan over moderate heat.
When soup bubbles, stir in heavy cream and reduce heat to low. Season
with a little salt and pepper and simmer gently 15 minutes, stirring occasionally. Working in 2 to 3 batches, transfer to blender and blend on
Speed 3 until smooth. Serve bowls of soup with basil chiffonade and
floating soup toppers, recipe follows.
750
500
250
4
Yield: 4 servings
5
3
2
9
P
Toast bread slices in your toaster until golden. Rub the toasted bread
rounds with crushed garlic, if using. Arrange bread on cookie or baking
sheet. Drizzle each slice with extra-virgin oil and top with a grind of black
pepper and a layer of shredded cheese. Place under hot broiler to melt
cheese until toppers are golden brown in color.
1
2
3
1
10
1.
2.
3.
4.
Motor Housing
Control Dial
Collar
Blade Assembly (P/N
71089RR)
5. Rubber Seal Ring (P/N 71090)
SOUP TOPPERS:
4
slices crusty bread, 4 inches across, 1/4-inch thick-slice artisan
breads at counter in market
2
cloves cracked fresh garlic, optional
Extra-virgin olive oil
Freshly ground black pepper
1/2 pound shredded cheese to complement your soup: provolone,
Asiago, cheddar, Gruyere, Swiss, etc.
Yield: 4 servings
6. Blender Container (P/N 71091)
7. Lid (P/N 71092RR)
8. Measuring Cap/Key
(P/N 71093)
9. Power cord
10. Non-Slip Rubber Feet
4
21
RRBL2A/T_IB_15-7-06
7/15/06
8:24 PM
Page 5
Additional Important Safeguards
1. All users of this appliance must read and understand this
Owner's Manual before operating or cleaning this appliance.
2. The cord to this appliance should be plugged into a 120V AC
electrical outlet only.
3. Do not leave this appliance unattended during use.
4. If this appliance begins to malfunction during use, immediately
turn the Control Dial to the (0) OFF position and unplug the
cord. Do not use or attempt to repair the malfunctioning appliance.
5. If this appliance falls or accidentally becomes immersed in
water, unplug it immediately. Do not reach into the water! Do
not use this appliance after it has fallen into or has become
immersed in water.
6. To reduce the risk of injury to persons or property, never use
this appliance in an unstable position.
7. Do not use this appliance for other than its intended use.
8. Do not use the Blender Container if cracked or chipped.
Polarized Plug
This appliance has a polarized plug (one blade is wider than the
other). To reduce the risk of electric shock, this plug is intended to
fit into a polarized outlet only one way. If the plug does not fit fully
in the outlet, reverse the plug. If it still does not fit, contact a qualified electrician. Do not attempt to modify the plug in any way.
Short Cord Instructions
A Short power-supply cord is provided to reduce the risk resulting
from becoming entangled in or tripping over a longer cord.
Do not use an extension cord with this product.
Electric Power
If the electrical circuit is overloaded with other appliances, your
appliance may not operate properly. It should be operated on a
separate electrical circuit from other appliances.
Plasticizer Warning
CAUTION: To prevent Plasticizers from migrating from the finish of
the counter top or table top or other furniture, place NON-PLASTIC
coasters or placemats between the appliance and the finish of the
counter top or table top.
Failure to do so may cause the finish to darken, permanent
blemishes may occur or stains can appear.
22
3
RRBL2A/T_IB_15-7-06
7/15/06
8:24 PM
Page 3
IMPORTANT SAFEGUARDS
When using electrical appliances, basic safety precautions should
always be followed including the following:
1. Read all instructions.
2. To protect against risk of electrical shock do not put cord,
plugs, or appliance in water or other liquid.
3. Close supervision is necessary when any appliance is used by
or near children.
4. Unplug from outlet when not in use, before putting on or taking
off parts, and before cleaning.
5. Avoid contacting moving parts.
6. Do not operate any appliance with a damaged cord or plug or
after the appliance malfunctions, or is dropped or damaged in
any manner. Contact Consumer Service for examination, repair
or electrical or mechanical adjustment.
7. The use of attachments, including canning jars, not recommended by the manufacturer may cause a risk of injury to persons.
8. Do not use outdoors.
9. Do not let cord hang over edge of table or counter.
10. Do not let cord contact hot surface, including the stove.
11. Keep hands and utensils away from Blade Assembly and out of
container while blending to reduce the risk of severe injury to
persons or damage to the Blender. A scraper may be used but
must be used only when the Blender is not running.
12. Blades are sharp. Handle carefully.
13. To reduce the risk of injury, never place Blade Assembly on
Motor Housing without Blending Container properly attached.
14. Always operate Blender with Lid in place.
15. When blending hot liquids, remove center piece of two-piece
Lid.
SAVE THESE INSTRUCTIONS
LIMITED ONE-YEAR WARRANTY
Warranty Coverage: This product is warranted to be free from defects in materials
or workmanship for a period of one (1) year from the original purchase date. This
product warranty is extended only to the original consumer purchaser of the product and is not transferable. For a period of one (1) year from the date of original
purchase of the product, our Repair Center will, at its option, either (1) repair the
product or (2) replace the product with a reconditioned comparable model. These
remedies are the purchaser's exclusive remedies under this warranty.
Warranty Service: To obtain warranty service, you must call our warranty service
number at 1-800-233-9054 for return instructions on how to deliver the product, in
either the original packaging or packaging affording an equal degree of protection
to the Repair Center specified below. You must enclose a copy of your sales
receipt or other proof of purchase to demonstrate eligibility for warranty coverage.
To return the appliance, ship to:
To contact us, please write to, call, or email:
ATTN: Repair Center
708 South Missouri Street
Macon, MO 63552 USA
Consumer Relations Department
PO Box 7366
Columbia MO 65205-7366 USA
1-800-233-9054
E-mail:
[email protected]
What Is Not Covered: This warranty does not cover damage resulting from misuse, accident, commercial use, improper service or any other damage caused by
anything other than defects in material or workmanship during ordinary consumer
use. This warranty is invalid if the serial number has been altered or removed from
the product. This warranty is valid only in the United States and Canada.
LIMITATION ON DAMAGES: THERE SHALL BE NO LIABILITY FOR ANY INCIDENTAL OR CONSEQUENTIAL DAMAGES FOR BREACH OF ANY EXPRESS OR IMPLIED
WARRANTY OR CONDITION ON THIS PRODUCT.
DURATION OF IMPLIED WARRANTIES: EXCEPT TO THE EXTENT PROHIBITED BY
APPLICABLE LAW, ALL IMPLIED WARRANTIES AND CONDITIONS, INCLUDING,
WITHOUT LIMITATION, IMPLIED WARRANTIES AND CONDITIONS OF MERCHANTABILITY AND FITNESS FOR A PARTICULAR PURPOSE OR USE ON THIS
PRODUCT ARE LIMITED IN DURATION TO THE DURATION OF THIS WARRANTY.
Some jurisdictions do not allow the exclusion or limitation of incidental or consequential damages, or allow limitations on how long an implied warranty lasts, so
the above limitations or exclusions may not apply to you. This warranty gives you
specific legal rights and you may have other rights under the laws of your jurisdiction.
For more information on our products, visit our website: www.maxim-toastmaster.com
FOR HOUSEHOLD USE ONLY
2
23
RRBL2A/T_IB_15-7-06
7/15/06
8:24 PM
Page 1
R AY
Hope you love using this and the other kitchen appliances
in my line. I love to cook – as long as it's fast, fun and simple!
These cool kitchen helpers will make it easy to cook a great
meal – from start to finish – in 30 minutes. And they'll look
awesome on your counter!
If you get satisfaction out of treating your family and friends
to foods made with your own two hands, then get in the
kitchen and have a blast! Try new flavors, tastes – experiment!
And forget about those measuring cups and spoons – just
eyeball it! If I can do it, you can too! Go for it!
3-SPEED BLENDER
Rachael Ray
Recipes Copyright © 2006, by Rachael Ray. All Rights Reserved. Used by
Permission.
Printed in China 8/06
© 2006 Maxim®/Toastmaster® Inc.
P/N 61864
OWNER'S MANUAL
Model RRBL2A/T
TM