1
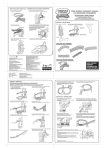
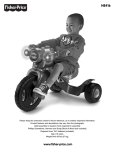
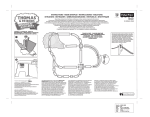
T6209
Please keep this instruction sheet for future reference,
as it contains important information.
Adult assembly is required.
Tools required for assembly: Phillips Screwdriver,
Hammer and Scrap Block of Wood (not included).
Age: 2-5 years
Weight limit: 55 lbs (25 kg).
www.fisher-price.com
Consumer Information
WARNING
TO AVOID SERIOUS INJURY:
• Adult supervision is required.
• Never use near cars and other motor
vehicles, near streets, steps, sloped
driveways, hills, roadways, alleys, swimming
pools or other bodies of water.
• Always wear shoes.
• Never allow more than one rider.
#8 x 2¼" Screw - 1
.354"
#8 x¾" Screw - 6
.354" Cap Nut - 2*
ALL SHOWN ACTUAL SIZE
*We’ve included one extra .354" cap nut for your convenience.
Parts
• Please save all packaging material until assembly is complete to ensure that no parts are discarded.
• Please wipe each part with a clean, dry cloth before assembly.
• Some parts shown are assembled to both sides of he trike.
• Tighten assembled screws with a Phillips screwdriver. Do not over-tighten the screws.
Handlebar Front
Handlebar Back
Seat
Frame
Fork
2 Fork Covers
4 Pedal Hubs
Front Wheel Assembly
Straight Axle
2 Bushings
Part not shown: Label Sheet
2 Rear Wheels
2
2 Wheel Hubs
2 Wheel Caps
Assembly
CAUTION
This product contains small parts
in its unassembled state.
Adult assembly is required.
Straight Axle Assembly
PUSH
Seat
3
Bottom View
• Turn the frame upside down.
• Insert the straight axle assembly through the holes in the
rear of the frame.
Frame
1
Wheel
• Fit the seat onto the frame. Push firmly near the back end
of the seat to "snap" it into place.
(Flat Side First)
Bushing
(Grooved Side Down)
Straight Axle
Bushing
(Smooth Side First)
Rear
Wheel
(Indented
Side Down)
Straight
Axle
4
Wheel Hub
(Flat Side Down)
Wheel Hub
(Pointed End First)
• Turn the assembly upright.
• Slide a bushing, smooth side first, onto the end of the
straight axle.
• Slide a wheel, flat side first, onto the end of the straight axle.
• Slide a wheel hub, pointed end first, onto the end of the
straight axle.
Straight
Axle
Cap Nut
2
• Place one end of the straight axle into the cap nut. Tap
the end of the straight axle with a hammer. Make sure
the cap nut is securely attached to the straight axle.
• Slide a wheel hub, flat side down, onto the straight axle.
• Slide a rear wheel, indented side down, onto the
straight axle.
• Slide a bushing, grooved side down, onto the straight axle.
3
Assembly
Pedal Hub
Pedal Axle Tab
Pedal Hub
7
• Fit two pedal hubs onto the pedal axle tabs. Make sure
the tabs fit into the slot in each pedal hub.
• While holding the pedal hubs on the pedal axle, insert the
pedal axle into the hole in the center of the front wheel.
• Press the pedal hubs into the center of the front wheel
until they are flush with the surface of the front wheel.
• Repeat this procedure on the other side with the other
two pedal hubs.
5
• Fit the cap nut on the end of the straight axle.
• Tap the cap nut with a hammer. Gently pull the rear
wheel to be sure the cap nut is securely attached to
the straight axle.
Hint: You may need the help of another adult to hold the
other end of the straight axle in place.
Fork Arms
Front Wheel
Assembly
Groove
Fork Cover
8
Wheel Hub
Pedal Axle
• Place the front wheel assembly between the fork arms.
Make sure the pedal axle fits into the groove at the bottom
of each fork arm.
• Place a fork cover over the pedal axle on one fork arm.
• Insert two #8 x ¾" screws into the fork cover and tighten.
• Repeat this procedure to attach the other fork cover to the
other fork arm.
6
Wheel Cap
• Fit the tabs on the wheel cap into the slots in the wheel
hub. Push to "snap" the wheel cap in place.
• Repeat this procedure to attach the other wheel cap to
the other wheel hub.
4
Assembly
Label Decoration
E
IK
R
FT
R
O
A
RE
Fork Post
2
3
BACK
9
Fork Cover
1
• Insert the fork post up through the hole in the neck of the
frame. Make sure the fork is positioned so that the fork
covers face the rear wheels.
Fork Post
Handlebar Front
Handlebar Back
¾" Screw
¾" Screw
FRONT
2¼" Screw
• Wash your hands before applying the labels.
• Make sure the areas where the labels will be applied are
clean and dry. Wipe your vehicle with a clean, soft, dry
cloth to remove any dust or oils.
• For best results, avoid applying a label more than once.
• Apply the labels as shown in the illustration above.
• After applying a label, rub the label firmly with a cloth to
make sure the label is adhered to your vehicle.
10
• Fit the handlebar front to the fork post.
Hint: The handlebar front is designed to assemble to the
fork post one way.
• Fit the handlebar back to the fork post and handlebar
front. Hold them together firmly.
• First, insert the remaining #8 x ¾" screws through the
outer holes in the handlebar back and tighten.
• Then, insert the #8 x 2¼" screw through the center hole
in the handlebar back and tighten.
5
Label Decoration
Consumer Information
• Periodically, check the plastic parts and if broken or
cracked, dispose of them properly.
• Periodically, check all fasteners regularly to be sure they
are tight. If the fasteners are not tight, tighten them
as necessary.
• To clean, use a mild soap and water solution and a clean
cloth. Rinse clean with water to remove soap residue.
6
9
4
IMPORTANT! It is a good practice to start training children
very young regarding the importance of helmet use. When
children are older and riding bicycles and faster vehicles,
it is important that they use a helmet each and every time
they ride. For this reason, even while riding a tricycle, it is
a good idea to familiarize your child with helmet use,
so that it becomes a habit for life. Choose a helmet that
complies with requirements of the applicable certifying
agency for bicycle helmets.
RIGHT SIDE
CONSUMER ASSISTANCE
1-800-432-5437 (US & Canada)
1300 135 312 (Australia)
7
8
5
Fisher-Price, Inc., 636 Girard Avenue, East Aurora, NY 14052.
Hearing-impaired consumers: 1-800-382-7470.
Outside the United States:
Canada: Mattel Canada Inc., 6155 Freemont Blvd.,
Mississauga, Ontario L5R 3W2; www.service.mattel.com.
Great Britain: Mattel UK Ltd, Vanwall Business Park,
Maidenhead SL6 4UB. Helpline: 01628 500303.
www.service.mattel.com/uk
Mattel Europa, B.V., Gondel 1, 1186 MJ Amstelveen, Nederland.
LEFT SIDE
Australia: Mattel Australia Pty. Ltd., 658 Church Street,
Locked Bag #870, Richmond, Victoria 3121 Australia.
New Zealand: 16-18 William Pickering Drive,
Albany 1331, Auckland.
Based on the Railway Series by The Reverend W Awdry.
© 2010 Gullane (Thomas) Limited. Thomas the Tank Engine & Friends and Thomas
& Friends are trademarks of Gullane (Thomas) Limited. © HIT Entertainment Limited.
HIT and the HIT logo are trademarks of HIT Entertainment Limited.
Fisher-Price, Inc., a subsidiary of Mattel, Inc., East Aurora, NY 14052 U.S.A.
©2010 Mattel, Inc. All Rights Reserved. ® and ™ designate U.S. trademarks of Mattel, Inc., unless otherwise indicated.
PRINTED IN MEXICO
T6209b-0920