1
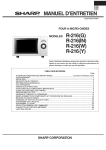
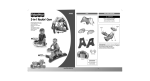
L8145
Please keep this instruction sheet for future reference,
as it contains important information.
Requires four “AA” (LR6) and six “AAA” (LR03) alkaline
batteries (not included) for operation.
An adult must install batteries and set-up this system for use.
Tool required for battery installation: Phillips screwdriver
(not included).
cluded.
TV not in ality may vary.
qu
TV image
Battery Installation
Base Unit
• Locate the battery compartment on the bottom of the base unit.
• Loosen the screw in the battery compartment door with a Phillips screwdriver. Remove the battery compartment door.
• Insert four “AA” (LR6) alkaline batteries.
• Replace the battery compartment door and
tighten the screw with a Phillips screwdriver.
Do not over-tighten.
• When images on your TV screen appear
grainy or lose colour, it's time for an adult
to change the batteries!
Hint: We recommend
using alkaline batteries
for longer battery life.
1,5V x 4
“AA” (LR6)
Microphones
• Locate the battery compartment on each microphone.
• Loosen the screw in the battery compartment door with a Phillips screwdriver. Remove the battery compartment door.
• Insert three “AAA” (LR03) alkaline batteries into
each microphone.
• Replace the battery compartment door and tighten the
screw with a Phillips screwdriver. Do not over-tighten.
• It's time for an adult to change the batteries in the
microphone when:
- Power light on microphone becomes dim.
- Sounds from the microphone become faint or stop.
•Protect the environment by not disposing of this
product with household waste (2002/96/EC). Check your local authority for recycling advice and facilities (Europe only).
1,5V x 3
“AAA” (LR03)
Battery Safety Information
In exceptional circumstances, batteries may leak fluids that can cause a chemical
burn injury or ruin your product. To avoid battery leakage:
• Do not mix old and new batteries or batteries of different types: alkaline, standard
(carbon-zinc) or rechargeable (nickel-cadmium).
• Insert batteries as indicated inside the battery compartment.
• Remove batteries during long periods of non-use. Always remove exhausted
batteries from the product. Dispose of batteries safely. Do not dispose of the product
in a fire. The batteries inside may explode or leak.
• Never short-circuit the battery terminals.
• Use only batteries of the same or equivalent type, as recommended.
• Do not charge non-rechargeable batteries.
• Remove rechargeable batteries from the product before charging.
• If removable, rechargeable batteries are used, they are only to be charged under
adult supervision.
Connecting Your Star Station to Your TV or VCR
®
Two Microphones
ROM
Cartridge
Camera
Play/Pause
Power Light
Power/Volume
Track Forward/Back
Important! Your TV or VCR must
have audio and video input jacks.
Reset
• Position Star Station® near your TV (or
VCR) or on the floor in front of your TV.
Important! Do not place Star Station® on
top of your TV. Keep excess cable off the
floor and out of the way.
1
• Make sure the power/volume dial on
Star Station® is off. The power light
should be off.
• Turn your TV or VCR off.
2
Power/Volume
Dial
• Locate the audio/video cable on the
back of Star Station®.
• Plug the audio/video pins into the
matching colored input jacks on your TV or VCR (Yellow for VIDEO IN, White for LEFT AUDIO IN and Red for RIGHT
AUDIO IN).
Note: We've included a detailed
illustration to show how to connect
Star Station® to a TV or TV and VCR.
Please refer to page 11.
Power Light
3
Note: The photo abo
ve
jacks on the front. You shows a combination TV/VCR/DVD with
inp
r TV or VCR may have
input jacks on the bac ut
k.
• Insert the ROM cartridge into the slot in
Star Station®.
Note: For proper function, turn
Star Station® off before inserting
ROM cartridges.
4
• Rotate the power/volume dial to turn
power on. The power light turns on.
Hint: Do not turn the volume all the way
up. Start at a lower setting.
• Turn your TV or VCR on.
5
Power/Volume Dial
• To find the picture transmitted on your
TV screen, set your TV's or VCR's mode
selector to INPUT or VIDEO IN.
• Have your child stand about 1,2 m - 1,5 m
from Star Station®.
• Move the lens up or down until your child
is visible on the TV screen.
Power Light
6
1,2 m - 1,5 m
No Image?
If you do not see an image on your TV screen transmitted from Star Station®, try
the following:
1. Verify that your audio and video cable is fully inserted into your TV or VCR.
2.Press the channel down button on the TV or VCR and check for an INPUT channel
below channel 2.
3.Use the menu system on your TV or VCR to find INPUT or SOURCE. Change to INPUT
or SOURCE.
4.If you are still unable to see an image, refer to your TV or VCR instruction manual.
Hints About Lighting...
Images on the TV screen look best when there is good lighting in the room where you
use Star Station®.
Front Lighting
Overhead Lighting
Make sure the light source in the room is in front or above your child.
The light source should NOT
be behind your child!
Back Lighting
• Slide the power/volume switch on
the microphone to either low
or high
volume. The power light turns on.
Hint: The microphone power/volume switch
controls the volume of your voice.
7
• Press the play/pause button to start
the music. Press again to pause.
• Use the track forward and back buttons to move ahead or back through the songs
on the ROM Cartridge.
• Start singing!
• Be sure to slide the power/volume
switch off on the microphone when
you are finished.
Hints:
- The power/volume dial on Star Station®
controls the volume of the music. Adjust
the overall volume on your TV.
- When you first turn the microphone on, the
power light may blink rapidly for a few
seconds as it “locks in” a signal to the
Star Station®.
- If the power light blinks slowly, it’s time to
change batteries in the microphone. See
page 2.
- If the microphone does not “lock in” to
Star Station® or the product acts erratically,
press the reset button on Star Station®.
8
Power Light
Power/Volume
Switch
Play/Pause
Button
Track
Forward/Back Button
Reset Button
Recording Your Performances
If Star Station® is connected to your VCR, you can record performances. Simply insert a blank tape and press record on your VCR.
VCR not included.
Connection to an External Music Source
You can connect Star Station® to an external
music source such as a portable music
player or stereo so you can sing-along to
other music!
1.Turn the power/volume dial on
Star Station® off.
2.Remove the ROM Cartridge from
Star Station®.
3.Connect an audio cord (not included) to
the LINE OUT jack on your external music
source. The audio cord should have a 3,2 mm (1/8”) stereo (mini) plug.
Note: You can purchase audio cords in an electronics or some department stores.
4.Insert the 3,2 mm (1/8”) stereo plug into the INPUT socket on the back of Star Station®.
5.Press play on your external music source.
6.Turn Star Station® power on.
7.Adjust volume on your external music source.
Music player and
audio cord not included.
Additional ROM
Storage
/8” (3,2 mm) Stereo
(mini) Input
1
Care
1.Wipe this product with a clean cloth dampened with a mild soap and water solution. Do not immerse this product.
2.This product has no consumer serviceable parts. Do not take this product apart.
Troubleshooting Guide
PROBLEM
No image on the TV
CAUSE
SOLUTION
TV or VCR is not set to
proper input
Press the channel down button on the VCR
or TV and check for an INPUT channel below
channel 2.
Use the menu system on your TV or VCR to
find INPUT or SOURCE. Change to INPUT
or SOURCE.
Consult your TV's or VCR’s instruction manual.
Batteries in Star Station
are weak or dead
Feedback noise
®
Microphone is too close
to speakers
Replace the batteries in Star Station® with
four, new “AA” (LR6) alkaline batteries.
Stand further away from your TV speakers.
Turn the volume down on your TV or
stereo system.
ROM inserted with main unit “ON”
Turn the Star Station® off then on again.
ROM not fully inserted
Make sure ROM is fully inserted into the
Star Station®.
Images on TV look
grainy or lose color
Batteries in Star Station®
are weak
Replace the batteries in Star Station® with
four, new “AA” (LR6) alkaline batteries.
Images on TV
look dark
Improper room lighting
Make sure the light source in the room is
in front or above your child. See page 7 for
important hints about room lighting
Muted voice sound
Batteries in microphone are
weak or dead
Replace the batteries in the microphone with
three, new “AAA” (LR03) alkaline batteries.
Other wireless devices in your
home may cause temporary
interference.
When the microphone detects interference
from another device, it will attempt to locate
another free channel. Sound from the
microphone will be temporarily muted while
this occurs. This could take up to 30 seconds.
Volume is set too loud on
external music source
Turn the volume down on your external music
source. Adjust the volume on your TV or
stereo system.
Music does not play
Sound is distorted
from external
music source
10
Connecting to a TV or VCR and TV
White
INPUT
AUDIOIN
TV
LEFT
RIGHT
Red
VIDEOIN
OR
TV
VCR
Yellow
Note: Input jacks may be on the back of your TV or VCR.
One (1) Year Limited Warranty
Mattel Australia Pty., Ltd., (658 Church Street, Locked Bag #870, Richmond, Victoria 3121 Australia) warrants to the original owner that this product is free from all defects in material and workmanship when used under normal conditions for a period of one (1) year from the date of purchase.
Should the product fail to perform properly, we will repair replace it at our option, free of charge. Purchaser is responsible for shipping the product to the Fisher-Price® Product Service Department at the address indicated above and for all associated freight and
insurance costs. Fisher-Price® Inc., will bear the cost of shipping the repaired or replacement item to you. The warranty is void if the owner repairs or modifies the product. The is
warranty excludes any liability other than that expressly stated above, including, but not
limited to, any incidental or consequential damages.
SOME STATES DO NOT ALLOW THE EXCLUSION OR LIMITATION OF INCIDENTAL OR CONSEQUENTIAL DAMAGES, SO THE ABOVE LIMITATION OR EXCLUSION MAY NOT APPLY TO YOU.
THIS WARRANTY GIVES YOU SPECIFIC LEGAL RIGHTS, AND YOU MAY ALSO HAVE OTHER
RIGHTS WHICH MAY VARY FROM STATE TO STATE.
Consumer Advisory Service phone numbers are as follows:
Australia 1300 135 312
New Zealand 0800 174 063
11
Consumer Information
Visit us on-line at www.service.fisher-price.com
AUSTRALIA: Mattel Australia Pty. Ltd., 658 Church Street, Locked Bag #870, Richmond, Victoria 3121 Australia. Consumer Advisory Service 1300 135 312.
NEW ZEALAND: 16-18 William Pickering Drive, Albany 1331, Auckland.
ASIA: Mattel East Asia Ltd, Room 1106, South Tower, World Finance Centre, Harbour City, Tsimshatsui, HK, China.
Fisher-Price, Inc., a subsidiary of Mattel, Inc., East Aurora, NY 14052 U.S.A.
©2008 Mattel, Inc. All Rights Reserved. ® and ™ designate U.S. trademarks of Mattel, Inc.
PRINTED IN CHINA
L8145pr-0729