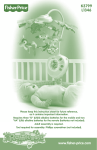
1
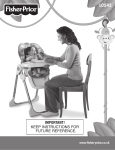
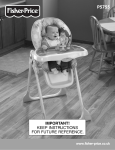
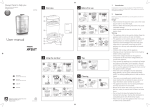
L3891 IMPORTANT! KEEP INSTRUCTIONS FOR FUTUREREFERENCE. www.fisher-price.com.au Consumer Information IMPORTANT! Place the high chair on a level, stable surface away from electrical flexes. Be sure to keep electrical flexes out of child's reach. • Please read these instructions before assembly and use of this product. • Adult assembly is required. Tool needed for assembly: Phillips screwdriver (not included). • Weight limit: 22,7 kg (50 lbs). • Product features and decorations may vary from photos. WARNING Prevent serious injury or death from falls or sliding out: •Always use the restraint system for the upright and reclined positions of the seat. Adjust restraint to fit your child snugly. The tray is not designed to hold the child in the chair. •It is recommended that only children capable of sitting upright unassisted use the upright position of the high chair. •Position the high chair away from steps, hot surfaces, electrical cords and other items that may cause injury to the child. •Always leave wheels locked. •Always keep child in view while in high chair. • Never leave child unattended. •Follow the manufacturer’s instructions. • Australia: Mattel Australia Pty. Ltd., 658 Church Street, Locked Bag #870, Richmond, Victoria 3121 Australia. Consumer Advisory Service 1300 135 312. • New Zealand: 16-18 William Pickering Drive, Albany 1331, Auckland. • Asia: Mattel East Asia Ltd, Room 1106, South Tower, World Finance Centre, Harbour City, Tsimshatsui, HK, China. • Malaysia: Diimport & Diedarkan Oleh: Mattel SEA Ptd Ltd. (993532-P) Lot 13.5, 13th Floor, Menara Lien Hoe, Persiaran Tropicana Golf Country Resort, 47410 PJ. Tel: 03-78803817, Fax: 03-78803867. CAUTION This package contains small parts in its unassembled state. Adult assembly is required. 2 Parts Pad Seat Back 2 Frames Seat Bottom Back Base Front Base Hinge Rod 2 Seat Bottom Tubes Footrest Food Tray Base Tray Teether Toy Note: Tighten or loosen all screws with a Phillips screwdriver. Do not over-tighten the screws. #10 x 2,2 cm Black Screws - 7 #8 x 1,9 cm Screws - 8 Shown Actual Size Assembly IMPORTANT! Before assembly and each use, inspect this product for damaged hardware, loose joints, missing parts or sharp edges. DO NOT use if any parts are missing or broken. Contact Mattel for replacement parts and instructions if needed. Never substitute parts. Footrest Seat Bottom 1 •Place the seat bottom face down on a flat surface. •At an angle, fit the footrest to the seat bottom, as shown. Plastic Rings 3 •Align the holes in the plastic rings and the seat bottom tubes. •Insert a #8 x 1,9 cm screw through each plastic ring and into the seat bottom tubes, as shown. Tighten the screws. This may require extra force. •Push the seat bottom tubes back and forth to be sure they are secured to the seat bottom. If the seat bottom tubes move, you have probably not fastened them properly. Remove the screws and check to be sure the screw holes in the seat bottom tubes and seat bottom plastic rings are aligned. Replace and tighten the screws. Seat Bottom Tubes 2 Plastic Rings •Slide a seat bottom tube through each set of plastic rings on the seat bottom. Assembly Insert Screws Here Hinge Hinge Rod 4 6 •Insert two #10 x 2,2 cm black screws through the footrest and into the seat bottom. Tighten the screws. •Turn the seat assembly face down. •Insert the hinge rod through the hinge on the seat back and seat bottom, as shown. •Insert a #10 x 2,2 cm black screw into the hinge rod. Tighten the screw. •Set the seat assembly aside for Assembly step 10. Seat Back Pins Frame Leg Slot Slot 7 5 •Pull the frame leg out on each frame to open. Make sure it "clicks" into place. •Turn the seat bottom assembly upright. •Fit the seat back pins into the slots in the top side of the seat bottom assembly. Assembly 4 Frame Decorated Side Seat Height Adjusters Frame Back Legs Position 4 Press Lever Back Base 9 Screw Retainers •While pressing the levers on the seat height adjusters, lift them to position 4 on the frame front legs, as shown. Seat Assembly 8 •Position a frame so that the decorated side is outward. •Insert the back frame legs into the back base. •Fit a screw retainer over a hole in the back base, as shown. •Insert a #10 x 2,2 cm black screw through the screw retainer and back base. Tighten the screw. •Repeat this procedure to fasten the other frame back leg to the other side of the back base. Hint: The #10 x 2,2 cm black screws may have been assembled to the screw retainers. Sockets 10 Seat Bottom Tubes •Fit the seat assembly between the two frames. •Insert the seat bottom tubes into the sockets in each seat height adjuster. Hints: •Be sure the seat height adjusters are in the same position (position 4). •You may need to push the frames apart slightly to fit the seat bottom tubes into the seat height adjuster sockets. Assembly Seat Height Adjusters Screw Retainers Front Base 11 Seat Bottom Tube Ends 13 •From the back and bottom of the assembly, insert a #8 x 1,9 cm screw through both seat height adjusters and the ends of the seat bottom tube.Tighten the screws.This may require extra force. •Fit the frame front legs onto the front base. •Fit a screw retainer over the hole in a front leg. •Insert a #10 x 2,2 cm black screw through the screw retainer and front leg. Tighten the screw. •Repeat this procedure to fasten the other end of the front base with the remaining screw retainer and #10 x 2,2 cm black screw. Hint: The #10 x 2,2 cm black screws may have been assembled to the screw retainers. PRESS Push PRESS Push 14 •Squeeze the restraint release tabs together. •Remove the ends of the restraint system from the peg. 12 •Push each seat height adjuster to be sure they are completely on the seat bottom tubes. •Insert a #8 x 1,9 cm screw through each seat height adjuster and the ends of the seat bottom tube.Tighten the screws.This may require extra force. Assembly Shoulder Straps Crotch Strap 16 15 •Fit the pocket on the top of the pad onto the seat back. •Remove both shoulder straps from the seat back. •Remove the crotch strap from the seat back. Assembly Shoulder Straps Up Clips Lowest Slot Crotch Strap Down 17 19 •Fit the clips on the front edge of the pad onto the seat bottom. Hint: Do not unbuckle the restraint system. It is easier to attach or re-attach it to the product if it is buckled. •Grasp the restraint system so that the shoulder straps are up and the crotch strap is down. •Insert the end of the crotch strap through the lowest slot in the pad and the seat back. •From behind the product, attach the end of the crotch strap to the peg. 18 •Hook the elastic loops on each side of the pad onto the tabs in the seat back. 20 •From behind the product, attach the end of the crotch strap to the peg. Assembly 21 22 Smaller Baby •Insert the ends of the shoulder straps through the lower slots in the pad. •From behind the product, attach the ends of the shoulder straps to the peg. Larger Baby •From the front of the product, insert the ends of the shoulder straps through the upper slots in the pad and seat back. •From behind the product, attach the ends of the shoulder straps to the peg. 10 Secure Child Adjuster WARNING Prevent serious injury or death from falls or sliding out: Always use the restraint system for the upright and reclined positions of the seat. Adjust restraint to fit your child snugly. The tray is not designed to hold the child in the chair. Waist/Shoulder Belt Shoulder Strap Free End Anchored End Waist/Shoulder Belt TIGHTEN 2 •To tighten the waist straps: Feed the anchored end of the waist strap up through the buckle to form a loop . Pull the free end of the waist strap . •To tighten the shoulder straps: Hold the adjuster and pull the shoulder strap down C. Adjuster Shoulder Strap Crotch Belt 1 Free End •Place your child in the seat. Position the crotch belt between your child’s legs. •Fasten both waist/shoulder belts to each side of the crotch belt. Make sure you hear a "click" on both sides. •Check to be sure the restraint system is securely attached by pulling it away from your child. The restraint system should remain attached. Anchored End 3 LOOSEN •To loosen the waist straps: Feed the free end of the waist strap up through the buckle to form a loop . Enlarge the loop by pulling on the end of the loop toward the buckle. Pull the anchored end of the waist strap to shorten the free end of the waist strap . •To loosen the shoulder straps: Lift the adjuster C. Note: After adjusting the restraint system to fit your child, make sure you pull on it to be sure it is securely fastened. 11 Secure Child Shoulder Straps Shoulder Straps 5 PUSH •You can remove the shoulder straps and use only the waist restraint. PUSH PUSH •From behind the product, squeeze the restraint release tabs and remove the shoulder straps. •From the front of the product, pull to remove the shoulder straps from the seat back/pad. •Push to remove the shoulder straps from the waist restraint buckle slots. •Store the shoulder straps in a safe in a safe place for future use. PUSH 4 To change strap slots: •From behind the product, squeeze the restraint release tabs and remove the shoulder straps. •From the front of the high chair, pull the shoulder portions of the restraint system out and then fit them back through the desired shoulder strap slots in the seat pad and in the seat back. •From behind the product, attach the ends of the shoulder straps to the peg. 12 Using the Trays WARNING Prevent serious injury or death from falls or sliding out: Always use the restraint system for the upright and reclined positions of the seat. Adjust restraint to fit your child snugly. The tray is not designed to hold the child in the chair. PULL PULL PUSH 7 •You can adjust the base tray forward or backward. - While pulling the latches underneath the tray out, adjust the base tray forward or backward . - While pushing the release bar on the front of the base tray, adjust the base tray forward or backward . Tray Latch Armrest PULL 6 PULL PUSH •While pulling the latches underneath the tray out, slide it onto the armrests. Release the latches to secure the tray in place. Hint: Before use, thorougly wash all parts (the trays) that may contact food. The base tray is not dishwasher safe. 8 •To remove the tray: - Pull one or both of the latches underneath the tray out and lift . - Push the release bar on the front of the tray and lift . 13 Using the Trays Using the Brakes WARNING Food Tray Prevent serious injury or death from falls or sliding out: •Position the high chair away from steps, hot surfaces, electrical cords and other items that may cause injury to the child. •Always leave wheels locked. Base Tray 9 •Fit the food tray into the base tray, as shown. Hint: Before use, thorougly wash all parts (the trays) that may contact food. The food tray is not microwave safe. Toy Press Tab Lift Tab 11 10 To Lock: Press the tab on all four wheels down until you hear a "snap". To Unlock: Lift the tab on all four wheels up. Press •Insert and “snap” the toy tab into either slot in the tray. Hint: To remove the toy, press the tab and lift the toy. 14 Adjusting the Seat WARNING Prevent serious injury or death from falls or sliding out: • Always use the restraint system for the upright and reclined positions of the seat. Adjust restraint to fit your child snugly. The tray is not designed to hold the child in the chair. • It is recommended that only children capable of sitting upright unassisted use the upright position of the high chair. Seat Height Adjuster Press Lever Upright 13 Semi-Recline Hint: Adjust the seat height to any of seven positions! To adjust the seat height: •Press the levers on both seat height adjusters and lift or lower the seat to the desired height. •Make sure both sides of the seat are adjusted to the same height. Push the seat bottom to be sure the seat is locked in place. Recline Lift 12 4 BACK VIEW Hint: Adjust the seat angle to any of three positions: Upright, Semi-Recline or Recline. To adjust the seat angle: •Squeeze the seat back handle and push the seat back forward or, pull it backwards to the desired position. •Push the seat back to be sure it is latched in position. 15 Care Storage Pull Frame Release Latch 14 •The pad, frame, and base tray may be wiped clean using a mild cleaning solution and a damp cloth. Do not use bleach. •The restraint system may be wiped clean or is machine washable. Machine wash in cold water on the gentle cycle. Do not use bleach. Line dry. •The food tray, teether toy and restraint system are also top rack dishwasher safe (or use bottom rack - without using the drying cycle). To remove the pad: •Remove the elastic loops from the pegs on the underside and back of the seat. •From behind the product, squeeze the restraint release tabs and remove the restraint system from the peg. •From the front of the product, pull to remove the restraint system. •Unfasten the pad hooks from the front edge of the seat. Lift the top of the pad off of the seat back. •To replace the pad, refer to Assembly steps 14-20. IMPORTANT! Never use this product without the restraint system. Replace the waist/shoulder belts and crotch belt. •With the legs all the way open, lower the seat to position 7 the lowest position). •Pull the frame release latches forward and push the rear legs toward the front legs. ©2006 Mattel, Inc. All Rights Reserved. ® and ™ designate U.S. trademarks of Mattel, Inc. Fisher-Price, Inc., a subsidiary of Mattel, Inc., East Aurora, New York 14052, U.S.A. PRINTED IN CHINA L3891pr-0729