1
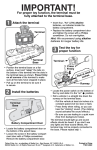
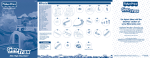
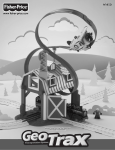
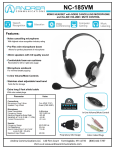
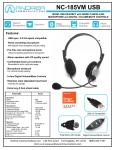
G5760
Parts
www.fisher-price.com
A. Airplane
B. Long Runway
C. Short Runway
D. Arm
E. Control Tower
F. Tower Base
G. Controller Base
H. Crane
I. Straight Track
J. 2 Flags
K. Cargo Tray
L. Sign
M. Windsock
N. Handle
O. 2 Cargo Crates
P. Train
Q. 2 Small Ramps
Please keep this instruction
sheet for future reference, as it
contains important information.
Requires three “C” (LR14)
alkaline batteries (not included).
Adult assembly is required.
Tools required for battery
installation: Phillips screwdriver
(not included).
J
Battery Installation
A
B
C
D
E
F
1.5V x 3
“C” (LR14)
Shown Actual Size
For layout ideas, visit the
GeoTrax™ section of
www.fisher-price.com
BOTTOM VIEW
G
I
H
K
• Locate the battery compartment door on the
bottom of the tower base.
• Loosen the screws in the battery compartment
door with a Phillips screwdriver. Remove the
battery compartment door.
• Insert three “C” (LR14) alkaline batteries.
• Replace the battery compartment door and
tighten the screws with a Phillips screwdriver.
Do not over-tighten.
• When sounds, lights or motions from this toy
become faint or stop, it’s time for an adult to
change the batteries.
L
M
Questions? We'd like to hear from you!
Call Fisher-Price® Consumer Relations, toll-free at 1-800-432-KIDS (5437),
8 AM - 6 PM EST Monday through Friday. Hearing-impaired consumers using
TTY/TDD equipment, please call 1-800-382-7470. Or, write to: Fisher-Price®
Consumer Relations, 636 Girard Avenue, East Aurora, New York 14052, U.S.A.
For other countries outside the United States:
Canada: call 1-800-567-7724, or write to: Mattel Canada Inc., 6155 Freemont Blvd., Mississauga, Ontario L5R 3W2.
Great Britain: telephone 01628 500302. Australia: Mattel Australia Pty. Ltd., 658 Church Street, Locked Bag #870, Richmond, Victoria
3121 Australia. Consumer Advisory Service 1300 135 312. New Zealand: 16-18 William Pickering Drive, Albany 1331, Auckland.
Asia: Mattel East Asia Ltd, Room 1106, South Tower, World Finance Centre, Harbour City, Tsimshatsui, HK, China.
The more you collect,
the more fun it gets!
Battery Safety Information
x2
N
O
P
x2
Coastal Winds Airport ™
Q
x2
Batteries may leak fluids that can cause a chemical burn injury or
ruin your toy. To avoid battery leakage:
• Do not mix old and new batteries or batteries of different
types: alkaline, standard (carbon-zinc) or rechargeable
(nickel-cadmium).
• Insert batteries as indicated inside the battery compartment.
• Remove batteries during long periods of non-use. Always remove
exhausted batteries from the toy. Dispose of batteries safely.
• Never short-circuit the battery terminals.
• Use only batteries of the same or equivalent type, as
recommended.
• Do not charge non-rechargeable batteries.
• Remove rechargeable batteries from the toy before charging.
• If removable, rechargeable batteries are used, they are only to
be charged under adult supervision.
Playsets and accessories sold separately and subject to availability.
Multiple track packs used to create this configuration.
©2004 Mattel, Inc. All Right Reserved. ® and ™ designate U.S. trademarks of Mattel, Inc.
Fisher-Price, Inc., a subsidiary of Mattel, Inc., East Aurora, NY 14052 U.S.A.
PRINTED IN CHINA
G5760pr-0920
Ready for Takeoff!
Assembly
1
1
3
2
2
4
On/Off Switch
• Locate the On/Off switch on the bottom of
the tower base.
• Slide the switch to the
the toy on and to the
it off.
Fit the peg on one side of the cargo
tray into the hole in the tower base.
Press and “snap” the peg on the
opposite side of the tray into the other
hole in the base.
“Snap” the control tower into the
tower base.
“Snap” the arm into the top of the
control tower.
“Snap” the flags into the tower,
as shown.
Press to “snap” the plane to the arm.
position to turn
position to turn
4
If you haven’t used the toy for a few minutes it goes to sleep.
To “wake up” the control tower, press the reset button near the
bottom of the tower.
Hint: Additional GeoTrax™ planes also work
with the airport (sold separately and subject
to availability).
3
5
6
7
Rotate the luggage carousel to get cargo
from the train to the plane.
• Pull back on the
controller handle
to raise the airplane with realistic sound effects and
flashing lights. The more you pull back,
the higher the plane flies.
“Snap” the controller base into the
tower base, as shown.
“Snap” the handle on to the post on
the controller base.
Fit the long and short runways onto
the controller base, as shown.
Hint: The two runway pieces can be
removed for storage.
Assembly is now complete!
Turn the selector dial to choose the sounds
of a jet, a propeller plane or a helicopter.
Use the crane to pick up and load cargo.
PRESS
PRESS
• Push the handle forward to lower and
land the plane.
The crane, windsock and sign have a small
tab that fits into a matching notch in the
runway, the tower base or any track piece.
For storage, press the buttons on the sides
of the controller base and pull to remove.
G5760
Parts
www.fisher-price.com
A. Airplane
B. Long Runway
C. Short Runway
D. Arm
E. Control Tower
F. Tower Base
G. Controller Base
H. Crane
I. Straight Track
J. 2 Flags
K. Cargo Tray
L. Sign
M. Windsock
N. Handle
O. 2 Cargo Crates
P. Train
Q. 2 Small Ramps
Please keep this instruction
sheet for future reference, as it
contains important information.
Requires three “C” (LR14)
alkaline batteries (not included).
Adult assembly is required.
Tools required for battery
installation: Phillips screwdriver
(not included).
J
Battery Installation
A
B
C
D
E
F
1.5V x 3
“C” (LR14)
Shown Actual Size
For layout ideas, visit the
GeoTrax™ section of
www.fisher-price.com
BOTTOM VIEW
G
I
H
K
• Locate the battery compartment door on the
bottom of the tower base.
• Loosen the screws in the battery compartment
door with a Phillips screwdriver. Remove the
battery compartment door.
• Insert three “C” (LR14) alkaline batteries.
• Replace the battery compartment door and
tighten the screws with a Phillips screwdriver.
Do not over-tighten.
• When sounds, lights or motions from this toy
become faint or stop, it’s time for an adult to
change the batteries.
L
M
Questions? We'd like to hear from you!
Call Fisher-Price® Consumer Relations, toll-free at 1-800-432-KIDS (5437),
8 AM - 6 PM EST Monday through Friday. Hearing-impaired consumers using
TTY/TDD equipment, please call 1-800-382-7470. Or, write to: Fisher-Price®
Consumer Relations, 636 Girard Avenue, East Aurora, New York 14052, U.S.A.
For other countries outside the United States:
Canada: call 1-800-567-7724, or write to: Mattel Canada Inc., 6155 Freemont Blvd., Mississauga, Ontario L5R 3W2.
Great Britain: telephone 01628 500302. Australia: Mattel Australia Pty. Ltd., 658 Church Street, Locked Bag #870, Richmond, Victoria
3121 Australia. Consumer Advisory Service 1300 135 312. New Zealand: 16-18 William Pickering Drive, Albany 1331, Auckland.
Asia: Mattel East Asia Ltd, Room 1106, South Tower, World Finance Centre, Harbour City, Tsimshatsui, HK, China.
The more you collect,
the more fun it gets!
Battery Safety Information
x2
N
O
P
x2
Coastal Winds Airport ™
Q
x2
Batteries may leak fluids that can cause a chemical burn injury or
ruin your toy. To avoid battery leakage:
• Do not mix old and new batteries or batteries of different
types: alkaline, standard (carbon-zinc) or rechargeable
(nickel-cadmium).
• Insert batteries as indicated inside the battery compartment.
• Remove batteries during long periods of non-use. Always remove
exhausted batteries from the toy. Dispose of batteries safely.
• Never short-circuit the battery terminals.
• Use only batteries of the same or equivalent type, as
recommended.
• Do not charge non-rechargeable batteries.
• Remove rechargeable batteries from the toy before charging.
• If removable, rechargeable batteries are used, they are only to
be charged under adult supervision.
Playsets and accessories sold separately and subject to availability.
Multiple track packs used to create this configuration.
©2004 Mattel, Inc. All Right Reserved. ® and ™ designate U.S. trademarks of Mattel, Inc.
Fisher-Price, Inc., a subsidiary of Mattel, Inc., East Aurora, NY 14052 U.S.A.
PRINTED IN CHINA
G5760pr-0920