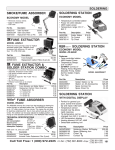
1
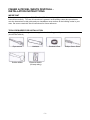
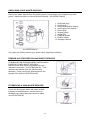
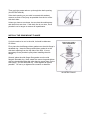
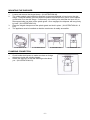
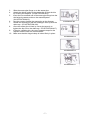
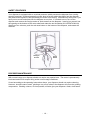
Fisher & Paykel
Waste
Disposal
User’s Guide
(Models WD1001 and WD2002)
- 2 -
FISHER & PAYKEL WASTE DISPOSAL INSTALLATION INSTRUCTIONS
IMPORTANT
Before you start to install your FISHER & PAYKEL Waste disposal please read all of these
instructions carefully. This set of instructions is general: local building codes take precedence
over the instructions in this guide and your installation must conform to the building codes in your
area. Be sure to retain this set of instructions for future reference.
TOOLS REQUIRED FOR INSTALLATION
You may need the following tools and supplies when installing your disposer:
(ILLUSTRATION #1)
Pipe wrench
Hacksaw
Rubber Mallet
Electrical Switch
(20 amp rating)
Plumber’s Rod
- 3 -
Phillips Screw Driver
UNPACKING YOUR WASTE DISPOSAL
Remove the waste disposal from the packing carton, being careful not to misplace any of the
pieces. Inside the carton you should find the following: (ILLUSTRATION #2)
1. Sink Drain plug *
2. Sink Frange *
3. Sink Flange Rubber Gasket *
4. Sink Flange Fiber Gasket *
5. Mount Ring *
6. Hinged Clamp *
7. Waste Pipe
8. Flange & Screws
9. Rubber Gasket
10. Hexagon Wrench
ILLUSTRATION #2
If any parts are missing contact your dealer before beginning installation.
REMOVE OLD DISPOSER OR SINK WASTE REDUCER
IF REMOVING AN OLD DISPOSER & INSTALLING A
FISHER & PAYKEL WASTE DISPOSAL…
Disconnect the drain where it connects to the old
disposer’s waste pipe. (ILLUSTRATION #3). Then
dismount the disposer from the sink mounting
assembly. Finally remove the sink flange from the
topside of the sink (ILLUSTRATION #4).
ILLUSTRATION #3
IF REMOVING A SINK WASTE REDUCER
If your sink is equipped with a sink waste reducer
instead of a waste disposer, remove the nut or
threaded ring holding the waste reducer in place.
(ILLUSTRATION #5).
ILLUSTRATION #4
ILLUSTRATION #5
- 4 -
Then push the waste reducer up through the drain opening.
(ILLUSTRATION #6)
If the drain opening on your sink is covered with sealant,
remove as much of the putty as possible from the rim of the
sink drain hole.
Unless you have a new home, be sure that the existing trap
and drain lines are clear. If the drain line is not clear, use a
plumber’s rod or auger to remove all impediments.
INSTALL THE SINK MOUNT FLANGE
If a hole needs to be cut in the sink, it should be diameter
87-92mm.
PRESS DOWN FIRMLY
WHEN ASSEMBLING
First, place the sink flange rubber gasket over the sink flange’s
threaded ring. Insert the flange and rubber gasket in to the
sink drain opening from the top side of the sink. It is not
necessary to use plumber’s putty when installing the sink
flange.
Second, place the sink flange fiber gasket over the sink
flange’s threaded ring. Next, attach the mount ring and tighten
with one hand while using the other hand to press down on the
sink flange. (ILLUSTRATION #7). Hand tighten as tight as
possible. Do not try to tighten with a wrench or hammer.
ILLUSTRATION #7
- 5 -
MOUNTING THE DISPOSER
1.
2.
3.
4.
Loosen and remove the hinged clamp. (ILLUSTRATION #9).
The rubber splash guard should be attached to the waste disposal unit and not to the sink
flange. Using two hands, push the disposer upwards so that the inner groove on the splash
guard locks on to the sink flange. If necessary, use cooking oil to lubricate the inner rim on
the exposed side (top side) of the splash guard. Once engaged, the disposer will hang freely
by itself. (ILLUSTRATION #10).
Place the hinged clamp around the splash guard and lock in place. (ILLUSTRATION #11 &
#12).
The appliance must be installed so that the reset button is readily accessible.
ILLUSTRATION #9
ILLUSTRATION #10
ILLUSTRATION #11
PLUMBING CONNECTION
1.
2.
Check inside the disposer to make sure that no foreign
objects are inside the grinding hopper.
Rotate the disposer so that the discharge outlet faces
you. (ILLUSTRATION #13).
- 6 -
ILLUSTRATION #12
3.
4.
5.
6.
7.
8.
9.
10.
Slide the waste pipe flange on to the waste pipe.
Attach the rubber gasket to the waste pipe so that the thin
lip is facing the disposer. (ILLUSTRATION #14)
Insert the non-notched end of the waste pipe flange into the
slot below the waste outlet on the waste disposer.
(ILLUSTRATION #15)
Use the screw to tighten the waste pipe to the disposer.
Rotate the disposer so that the waste pipe lines up with the
drain trap. (ILLUSTRATION #16).
Once the waste pipe is lined up use a pipe wrench to
tighten the slip nut on the drain trap. ILLUSTRATION #17).
If fitted to a double sink, the use of separate traps for the
disposer and the sink are recommended.
Make sure that the hinged clamp is locked firmly in place.
ILLUSTRATION #14
ILLUSTRATION #15
ILLUSTRATION #16
ILLUSTRATION #17
- 7 -
ELECTRICAL CONNECTIONS
ELECTRICAL CONNECTIONS FOR A FACTORY WIRED DISPOSER:
Your FISHER & PAYKEL waste disposal is equipped with a pre-wired power cord, simply plug it in.
Electrical connections should be done by a registered electrician. Your FISHER & PAYKEL waste
disposal is equipped with a standard 3 pin plug. An earthed 3 pin power socket should be
mounted in the cupboard under the sink. Power to the socket must be controlled by a standard
wall switch positioned a minimum of 500 mm from the sink.
As per your local Regulations.
CONGRATULATIONS
The installation of your FISHER & PAYKEL waste disposal is now complete. Plug the power cord
in and read the following safety instructions before proceeding to the section explaining the proper
usage and maintenance of your new waste disposer.
INSTRUCTION PERTAINING TO A RISK OF FIRE, ELECTRICAL SHOCK, OR INJURY TO
PERSONS
IMPORTANT SAFETY INSTRUCTIONS
WARNING: When using electric appliances, basic precautions should always be followed
including the following:
1.
2.
3.
4.
5.
6.
7.
8.
Read all instructions before using the appliance.
To reduce the risk of injury, close supervision is necessary when an appliance is used near
children.
Do not put fingers or hands into the waste disposal unit.
Turn the power switch to the off position before attempting to clear a jam or remove an object
from the dispenser.
When attempting to loosen a jam in the waste disposal use the hexagonal wrench provided.
See safety features for further information.
When attempting to remove objects from the waste disposal, use long handled tongs or
pliers.
Do not put the following into the disposer:
a.
Shells
b.
Drain cleaner
c.
Glass, china or plastic
d.
Large, whole bones
e.
Metal, such as bottle caps, tin cans, or aluminium foil
f.
Whole corn husks
g.
Any fibrous materials
When not operating the disposer, leave the sink drain plug in place to reduce the risk of
objects falling into the disposer.
- 8 -
SAVE THESE INSTRUCTIONS
OPERATING INSTRUCTIONS
1.
2.
3.
4.
5.
6.
7.
Remove the sink drain plug
Turn on the cold water to a medium-high flow, allowing the water to flow into the waste
disposer.
Turn on your waste disposer.
Put all food waste into the disposer while the disposer is operating and the water running. Do
not put your hand into the disposer.
Let your disposer continue to run for about half a minute after the grinding has stopped.
Turn off the disposer.
Turn off the water when the impellers have stopped spinning.
CAUTION
While your FISHER & PAYKEL waste disposal will have no problem grinding food waste, some
items should never be placed into it. In particular, do not attempt to grind the following:
Metal: Silverware, nails, tacks, wire, bread bag ties, staples
Glass: Jars, bottles, pieces of pottery or crockery
Lye or drain cleaning chemicals
Excessive quantities of fat or grease
Any fibrous materials
Remember, your FISHER & PAYKEL waste disposal is designed for grinding food waste only.
With proper use and care it will provide you with many years of trouble free service.
Note: Do not operate your garbage disposer while it is upside down.
If the supply cord is damaged it must be replaced by a qualified electrician.
- 9 -
SAFETY FEATURES
Your disposer is equipped with an overload protector which prevents the disposer from running
should it overload. Overload generally occurs when a foreign object has fallen into the disposer
and jammed the impellors, thus preventing the motor from turning. Overload may also occur if you
have put too much food waste into the disposer at one time. If overload occurs, turn off the
disposer and remove the foreign matter or food waste from the disposer. Insert a hex wrench into
the opening at the bottom of the motor shaft and rotate the tool clockwise (ILLUSTRATION #18).
Wait five to ten minutes, push the red reset button on the bottom of the disposer, and restart the
machine.
Hexagon
wrench
Reset
button
ILLUSTRATION #18
DISPOSER MAINTENANCE
With normal usage your disposer should not require any special care. The motor is permanently
lubricated and will not require oiling under normal usage conditions.
If used according to the operating instructions above, your disposer should not require cleaning.
However, should it start to smell, grinding a tray of ice cubes in the disposer will clean the grinding
components. Grinding a lemon, cut into quarters, will also give your disposer a fresh, clean smell.
- 10 -
Express Warranty
Fisher & Paykel Appliances Limited
FULL TWO YEAR WARRANTY FROM DATE OF PURCHASE
FISHER & PAYKEL UNDERTAKES TO
Repair or, at its option, replace without cost to the owner either for material or labour any part of
the product which is found to be defective within TWO YEARS of the date of purchase.
THIS EXPRESS WARRANTY DOES NOT INCLUDE:
A.
Service calls to:
1.
Correct the installation of the Product.
2.
Instruct you how to use the Product.
3.
Replace house fuses or correct house wiring or plumbing.
4.
Replace light bulbs.
B.
Damage when the product has been used otherwise than:
1.
In normal domestic use or
2.
In accordance with the Product’s Use & Care booklet.
C.
Damage when the Product has been dismantled, repaired or serviced by other than a
FISHER & PAYKEL AUTHORISED SERVICE CENTRE.
D.
Normal recommended maintenance as set out in the Product’s Use & Care booklet.
E.
Cartage (or mileage) when the product is situated more than 50kms from a FISHER &
PAYKEL AUTHORISED SERVICE CENTRE.
F.
Damage to the Product caused by accident, neglect, misuse or Act of God.
SERVICE UNDER THIS EXPRESS WARRANTY MUST BE PROVIDED BY A FISHER & PAYKEL
AUTHORISED SERVICE CENTRE. SUCH SERVICE SHALL BE PROVIDED DURING THEIR
NORMAL BUSINESS HOURS. THIS EXPRESS WARRANTY CERTIFICATE SHOULD BE
SHOWN WHEN MAKING ANY CLAIM.
NOTE: THIS EXPRESS WARRANTY IS OFFERED AS AN EXTRA BENEFIT AND DOES NOT
AFFECT YOUR LEGAL RIGHTS.
Customer: _______________________ Date of Purchase _________________________
MODEL
SERIAL NO.
This Warranty applies only to an appliance purchased in New Zealand.
Please turn over
- 11 -
FISHER & PAYKEL WASTE DISPOSAL INSTALLATION DIMENSIONS
MODEL
A
B
C
D
E
WD1001
320
175
127
170
114
WD2002
312
159
127
170
114
Measurements in mm
Dimensions:
A.
Distance from bottom of sink to bottom of disposer
B.
Width of disposer
C.
Distance from centre of disposer to centre of drain pipe
D.
Length from bottom of sink to centre of drain opening
E.
Length from centre of drain opening to bottom of drain pipe
- 12 -
We want you to be a happy satisfied customer
If you need service or assistance, we suggest you follow these steps
1.
Before calling for assistance:
Check the things you can do yourself. Ensure that the appliance is correctly installed and
that you are familiar with it’s normal operation.
2.
If you need service:
Contact the Dealer from whom the appliance was purchased, who will arrange service or
advise you where to obtain service.
Your Authorised Service Centre
Is: ...............................................................
Telephone no: ...........................................
Fisher & Paykel has a network of FISHER & PAYKEL AUTHORISED SERVICE CENTRES whose
fully trained technicians can carry out any service necessary on your appliance.
3.
For further assistance (if necessary)
Fisher & Paykel Customer Care Centre
PO Box 58-732
Greenmount
AUCKLAND
Freephone 0800 37 2273
Telephone (09) 273 0448
Facsimile (09) 273 0656
One of our Customer Representatives can instruct you on how to obtain satisfactory operation from
your appliance or, if necessary, recommend a Fisher & Paykel Authorised Service Centre in your
area.
If you call or write, please provide your name and address, model number, serial number, date of
purchase, and a complete description of the problem. This information is needed in order to better
respond to your request for assistance.
571972 ERC B
- 13 -