1
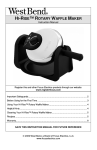
User guide
Freestanding cookers
OR61 models
NZ
Contents
Installation instructions
Introduction
Safety and warnings
Clocks and timers
Automatic cooking
Using the oven
Cooking functions
Cooking charts
Cooking tips
Using the cooktop
Care and cleaning
Troubleshooting
Warranty and service
1
2
3
4
5
8
10
11
13
16
17
19
21
24
Important!
SAVE THESE INSTRUCTIONS
The models shown in this user guide may not be available in all markets and are
subject to change at any time. For current details about model and specification
availability in your country, please go to our website www.elba.co.nz or
contact your local Fisher & Paykel dealer.
2
Installation instructions
Installing your cooker
NN
$-&"3"/$&
Connection of this cooker to fixed or flexible
wiring must be made by a suitably registered
person. Connection by an unregistered person
can cause a safety hazard.
We recommend that the cooker circuit is
protected by a suitably rated circuit breaker
but not connected to a Residual Current Device
(R.C.D.) or an Earth Leakage Circuit Breaker
(E.L.C.B.).
This cooker is designed for a 230/240V AC single
NN
or two phase connection.
$-&"3"/$&
This cooker must be connected with an
appropriately rated cord and plug that is
compatible with the socket-outlet fitted to the final subcircuit in the fixed wiring that is
intended to supply this cooker. For single phase connection, the supply cord should be at least
equivalent to an ordinary PVC sheathed and insulated, 4 mm2, three-core (twin and earth),
flexible cord. For two phase connection, the supply cord should be at least equivalent to an
ordinary PVC sheathed and insulated, 2.5 mm2, four-core, flexible cord.
This appliance must be connected to a circuit which incorporates an isolating switch providing
full disconnection from the power supply.
Cabinet clearances are as in the diagram on the right.
If you raise the cooker to align it with the bench, make sure the base of the cooker cannot slip.
Anti-tip brackets
Two anti-tip brackets are supplied with the accessories so that the cooker can be secured to
the wall to prevent it from tipping over. Use the two screws on the back panel of the cooker,
shown below.
WARNING!
Tipping Hazard
All cookers can tip. Keep children away
and take care.
The anti-tip brackets supplied must be
installed.
Failure to follow these instructions could
result in injury.
ANTI TIP BRACKET
Introduction
3
About your new cooker
Thank you for buying an ELBA freestanding cooker. Now that it is installed and ready to use, you
will want to know everything about it to ensure excellent results right from the start. This guide
introduces you to all its features, as well as giving you a set of cooking charts. We recommend
you read the whole guide before using your new cooker, to ensure both safety and cooking
success.
For further information, go to www.elba.co.nz
First use
Before using your new oven, please:
Read this user guide, taking special note of the ‘Safety and warnings’ section following.
Remove all accessories and packaging.
Set the clock. The oven will not work until the clock has been set. See the ‘Clocks and timers’
section.
Condition the oven by turning the function knob to BAKE or FAN BAKE and the temperature
knob to 2000C and heat for one hour.
There will be a distinctive smell while you are conditioning your oven. This is normal, but make
sure your kitchen is well ventilated during the conditioning.
After conditioning the oven, wipe it out with a damp cloth and mild detergent and dry
thoroughly.
4
Safety and warnings
WARNING!
Hot Surface Hazard
Accessible parts will become hot when this appliance is in use.
Take care to avoid touching hot surfaces inside the oven.
Use oven mitts or other protection when handling hot surfaces such as oven racks or
dishes.
Take care when opening the oven door.
Let hot air or steam escape before removing or replacing food.
Supervise children and keep them safely away until the oven is cool.
Failure to follow these instructions could result in burns and scalds.
WARNING!
Electrical Shock Hazard
Switch the appliance off at the power supply before replacing fuses or the oven
lamp. If the cooktop surface is cracked, switch the appliance off at the power
supply and contact your service centre. Do not use until repaired.
Failure to do so could result in death or electric shock.
Important safety precautions
Isolating switch: make sure this appliance is connected to a circuit which incorporates an
isolating switch providing full disconnection from the power supply.
Household appliances are not intended to be played with by children.
Children, or persons with a disability which limits their ability to use the appliance, should have
a responsible person to instruct them in its use. The instructor should be satisfied that they can
use the appliance without danger to themselves or their surroundings.
Safe food handling:
Food should be left in the oven for as short a time as possible before and after cooking. This is
to avoid contamination by organisms which may cause potential food poisoning. Particular
care should be taken during warmer weather.
Do not place aluminium foil, dishes with reflective qualities, water, ice or any object on the
oven floor as this will cause a heat build-up which irreversibly damages the enamel.
If the electrical supply cord is damaged, it must only be replaced by an authorised person.
Do not stand or place heavy objects on the door.
Do not use abrasive cleaners on the outside surfaces of the oven.
Do not use a steam cleaner to clean any surface of the oven.
Do not use harsh abrasive cleaners or sharp metal scrapers to clean the oven door glass since
Clocks and timers
5
Ringer timer model
This model has a manual timer, which can be set for up to 55 minutes and can be used at any
time, even if the oven is not in use.
Note: the timer does not turn the oven off.
Using the ringer timer
To use the timer, turn the
control knob clockwise to the 55-minute mark, then turn it back to
show the number of minutes you want.
The timer will count down and will ring when the set time is reached.
Analogue clock models
Manual
Bell off/Oven off
This clock has an analogue display and a minute
timer function.
1
2
3
1
2
3
Setting the clock
Push and turn the COOK TIME knob anticlockwise
until the clock shows the correct time.
shows in the display
Make sure the hand
window. (If the hand is not showing, turn the COOK
TIME knob anticlockwise until the hand appears).
Push and turn the START TIME knob anticlockwise
until the
triangle clicks into alignment with the
hour hand.
Using the timer
The timer can be used at any time, even if the oven is
not in use. If the oven is in use, it will turn the oven off
when the set time has finished.
Turn the COOK TIME knob anticlockwise until you have
reached the number of minutes you want in the centre
of the display window, eg 60 minutes.
When the time you have set is finished, the timer will
ring. Turn the COOK TIME knob anticlockwise to
to stop the ringing.
Return the oven to manual mode by turning the COOK
TIME knob anticlockwise to
.
Timer minutes
Start time indicator
6
Clocks and timers
Electronic clock models
Buttons
Timer
Cooking time
End of cooking time
Manual position; and cancels the set program
Decreases the number shown on the display
or changes the volume of the beeps
Increases the number shown on the display
Illuminated symbols
AUTO - flashing - oven in automatic position but not set
AUTO - steady illumination - oven set for automatic cooking
AUTO - flashing and timer beeping when you have set automatic cooking time - program
error (The time of day lies between the calculated cooking start and end time.)
Timer in operation
Setting the clock
When first connected, or after a power failure longer than 15 seconds, ‘0.00’ and AUTO will flash
on the display. To set the clock, press the
button and then the
and
buttons.
Note: changing the time (by pressing
) will delete any automatic program.
Clocks and timers
7
Using the timer
You can use the timer at any time, even when the oven is not in use. The timer does not turn the
oven off.
The timer can be set for up to 23 hours and 59 minutes.
To set the timer, press the
button briefly, then the
and
buttons. After a few seconds,
the display will show the time of day with the
symbol, indicating the timer is set.
Note: the timer will automatically begin to count down after being set.
To check the remaining time, press the
button.
When the time is up, the timer will beep. Press the
button to turn it off.
To cancel the timer, press the
and then reset the time to 0.00 by pressing the
button. The
timer will beep. Press the
button to turn the timer off.
Setting the timer volume
You can choose between three levels of volume for the timer beeps.
To adjust the volume:
Check the clock is set and timer is not running.
Press and hold the
button. The timer will beep.
Release the
button and re-press to hear the next level of volume. The last level selected is
stored.
Note: if the power to the oven is cut, the ‘beep’ volume will reset to the loudest level.
8
Automatic cooking
Use this function to automatically turn your oven on, cook, and then turn off.
Automatic cooking with the analogue clock
1
2
3
4
To set the oven for automatic cooking
Check that the clock shows the correct time.
To set the start time, push and turn the START TIME knob
anticlockwise until the
arrow points
to the time you would like the oven to turn on.
To set the cook time, turn the COOK TIME knob
anticlockwise (without pushing) until the desired cooking
time in minutes is set in the clock window, eg
. Allow
for preheating in this time.
To set the function and temperature, turn the function and
temperature knobs to the settings you want to cook at.
Your oven is now set for automatic cooking.
When automatic cooking finishes
When finished, the oven will switch off and the timer will
ring. Turn the COOK TIME knob anticlockwise to
to stop the ringing.
1
2
3
To turn the oven off and/or cancel automatic cooking
.
Return the oven to manual mode by turning the COOK TIME knob anticlockwise to
arrow clicks into alignment with
Push and turn the START TIME knob anticlockwise until the
the hour hand.
Turn the temperature and function knobs to OFF.
Example
Let’s assume you want to cook roast vegetables using the BAKE function at 180 oC. You estimate
the cooking time (including preheating) to be 60 minutes and you would like your meal to be
ready at 7 pm.
1
2
3
4
Following the instructions for automatic cooking, you need to:
Check the clock shows the correct time.
Set the start time using the START TIME knob. This is the time you want the oven to turn off,
minus the cooking time you estimated, eg 7 pm - 60 mins = 6 pm.
Turn the COOK TIME knob anticlockwise until 60 minutes is shown in the timer window.
Turn the function knob to BAKE and the temperature knob to 180 oC.
Automatic cooking
9
Automatic stop cooking with the analogue clock
This can be used if you are home to start cooking and want the oven to turn off automatically.
1
2
To set the oven for automatic stop cooking
Check the clock shows the correct time.
To set the oven to turn off, turn the COOK TIME knob anticlockwise until the remaining cook time
you want is shown in the timer.
When automatic stop cooking finishes
When finished, the oven will switch off and the timer will ring. Turn the COOK TIME knob
to
.
Automatic cooking with the electronic clock
1
2
3
4
5
Use automatic cooking to automatically turn the oven on, cook, and then turn the oven off.
Check the clock shows the correct time.
Select the function and temperature. The oven will come on.
Decide how long the food will take to cook, allowing time for preheating if necessary.
button. 0.00 will show. AUTO will also show in the display when you start using
Press the
the
and
buttons to set the cooking time, eg 30 minutes.
button, and then
Select the time you would like the oven to finish cooking by pressing the
using the
and
buttons, eg 9.45 am.
If there is time to wait before the cooking starts, the current time of day and AUTO will show in
the clock display. The oven temperature and function lights will go out and the oven will switch
off but is now set for automatic cooking.
If you are already at home to turn the oven on and only want the oven to turn off automatically,
start cooking as normal, then follow step 4 or step 5 to set a time to stop the oven.
When automatic cooking starts, AUTO will be displayed and the oven will turn on.
To see the remaining cook time, press the
button.
To see the set stop time, press the
button.
To cancel automatic cooking at any time, press the
button and turn the temperature and
function knobs to the OFF position.
When the stop time is reached, the oven will turn off, the timer will beep and AUTO will flash:
Press the
button to stop the beeping and return the oven to manual mode.
Turn the temperature and function knobs to the OFF position.
Important!
Safe food handling: leave food in the oven for as short a time as possible before and after cooking. This is to
avoid contamination by organisms which may cause food poisoning. Take particular care during warmer
weather.
10
Using the oven
Controls
Using your oven : models with two cooking functions (BAKE and GRILL)
Turn the oven on by selecting the temperature you want with the temperature knob. The oven
light will come on automatically. The temperature light will glow until the oven has reached the
set temperature.
For grilling, turn the temperature knob to GRILL. You cannot change the grill temperature.
When you have finished cooking, turn the temperature knob to off.
Using your oven : models with four and eight cooking functions
Select the function using the function knob, then select the temperature using the temperature
knob. The oven light will come on automatically when a function is selected. The temperature
indicator light will glow until the oven has reached the set temperature.
To use the grill, select GRILL with the function knob. Set the GRILL temperature using the
temperature knob. The hottest temperature is HI. We recommend that you use HI for grilling
meats.
When you have finished cooking, turn the temperature and function knobs to OFF.
Shelf positions
Shelf positions are numbered from the top down. Generally, the
top positions are for grilling, and the middle and lower positions
are suitable for baking, roasting and casseroles. Do not place
anything on the oven floor.
1
2
3
4
Place the shelves in the correct shelf position before you heat
the oven.
See the ‘Cooking charts’ for suggested shelf positions.
Important!
The oven shelves have a ‘stop-notch’ so that you do not accidentally pull them right out of the
oven. Make sure you put the stop notch towards the back of the oven.
Warmer drawer (some models only)
The warmer drawer has a low-powered element and is useful for keeping food warm or for
warming plates and serving dishes. Rotate the warmer knob to turn the warmer drawer on and
off. The indicator light will glow when the drawer is on.
Storage drawer (some models only)
The storage drawer does not have an element so is not used for keeping food warm.
Cooking functions
11
Depending on your model, your cooker may have a variety of cooking functions.
Before cooking on FAN or BAKE functions, check the ‘Cooking charts’ for the recommended shelf
positions.
Fan cooking
Fan functions allow you to cook individual foods or several foods on different shelves and
can successfully be used for most foods. A fan circulates air throughout the oven, distributing
temperature more evenly.
Your oven may have some of the following cooking functions:
FAN BAKE
A separate fan at the rear of the oven circulates hot air from the top and bottom
elements around the oven. The fan tends to dry the surface of the food
being cooked, which makes it suitable for crisping foods, eg slices, pastries and
oven- roasted vegetables. FAN BAKE can be used at a low temperature (50 °C) for
drying fruit, vegetables and herbs.
FAN FORCED
Multi-level fan forced cooking circulates heat from a fan element around the
fan throughout the oven. This function is particularly good for multishelf cooking, batch baking or cooking several dishes together. Use FAN FORCED
for casseroles and baked vegetables, as you can place them anywhere in the
oven except on the oven floor.
FAN GRILL
The fan circulates heat from the grill element around the oven. FAN GRILL is
suitable for foods you would normally fry, eg sausages and meatballs. It also
cooks larger cuts of meat and whole chickens well, giving a result that
is similar to a rotisserie. Fan grilling is carried out with the door closed, and the
oven does not need to be preheated.
GRILL
GRILL cooks a large area of food by using heat from the upper element and is
suitable for family meals or larger amounts of food. To use the grill, select GRILL
or ECO GRILL using the function knob. Set the required heat using the
temperature knob. The hottest temperature is achieved at HI. We recommend
you use this temperature to grill meats.
For best results when grilling, leave the oven door open at the first stop position.
12
Cooking functions
ECO GRILL
ECO GRILL is suitable for single servings or small pieces of food. By using it you
can save energy because you heat a smaller portion of the grill element.
BAKE
This is the traditional method of cooking. It is most suitable for food that
requires long cooking such as rich fruit cakes and traditional roasts. Heat comes
from the top and bottom elements in the oven. The bottom element is
concealed beneath the oven floor. You will achieve a better result with baking
if the oven is preheated first. Cooking one shelf of food at a time is preferable.
Use FAN FORCED for multi-shelf baking.
CLASSIC BAKE
CLASSIC BAKE uses heat from the bottom element only. It is particularly suitable
for quiches, pies and slices that require more cooking on the bottom. We
recommend that you preheat the oven on BAKE or FAN BAKE then switch to
CLASSIC BAKE once the oven is at the desired temperature.
DEFROST
DEFROST allows you to defrost food using the oven fan without any heat. This
prevents food from drying out or starting to cook. Leave the temperature
setting at the OFF position as no heat is required. Defrosting this way is
particularly good for delicate foods. When defrosting, remove food from the
oven as soon as the food is thawed.
Important!
Do not place anything, including aluminium foil or dishes, on the oven floor. This will cause a build-up of
heat, which will irreversibly damage the enamel.
Baking
Biscuits- single tray
Biscuits- 2-3 trays
Slices/squares
Butter cake
Fruit cake
Sponge
Meringues
Scones
Muffins
Pizza
Single tray baking
Multiple tray baking
Pastry & pies
Bacon & egg pie
Lemon meringue
Quiche
Meats
Beef roast
Steak
Lamb roast
Lamb chops
Pork roast
Pork chops
Poultry
Chicken-whole
Chicken pieces
Family favourites
Casserole
Lasagne
Macaroni cheese
Complete oven meals
Reheating
Key:
Recommended method
Alternative method
FAN GRILL
GRILL
CLASSIC
BAKE
FAN BAKE
FAN FORCED
BAKE
Cooking charts
13
14
Cooking charts
Baking chart
FAN FORCED
BAKE
Shelf
Temp ( C) Time
(min)
Shelf
Temp (oC) Time
(min)
Light fruit cake
4
135 - 155
90 -120
4
150
90 - 120
Banana cake
4
160 - 170
60 - 65
4
160 - 170
55 - 60
Biscuits
2-3
175 - 180
0 - 12
2
175 - 180
10 - 12
Scones
2
210 - 220
10 - 15
2
225
10 - 15
Slices
3
160 - 175
20 - 25
3
160 - 180
20 - 25
Meringues
2-3
100 - 120
55 - 65
3
100 - 120
60 - 70
Sponge
4
165 - 185
20 - 30
3
170 - 190
20 - 30
Chicken - whole (per 500g)
4
175 - 180
30 - 35
4
180
30 - 35
Custard tart - pastry case
4
170 - 190
4
180 - 200
14 - 48
Custard tart - filling
4
170 then
150
14 - 16
6-8
then 30
- 35
4
170 then
150
6 - 8 then
30 - 35
Food
o
Baked foods
Grilling chart
GRILL
FAN GRILL
o
Food
Shelf
Temp ( C) Time
(min)
Toast
1
Hi
Sausages (well done)*
2
Hi
Chicken (whole)
Shelf
Temp (oC) Time
(min)
4
175 - 180
50 - 60
secs/side
10 - 15
*When grilling thicker items such as sausages, turn often to ensure even browning.
30 - 35 per
500 g
Cooking charts
Roasting chart
Temp (oC)
Minutes per
500 g
Internal
Temp (oC)
Rare
Medium
Well done
160 - 170
160 - 170
160 - 170
30 - 35
35 - 45
45 - 60
60 - 65
65 - 75
75 - 80
Well done
160 - 170
45 - 60
80 - 85
Medium
Well done
160 - 170
160 - 170
30 - 40
45 - 60
79 - 82
82 - 85
Well done
180 - 185
40 - 45
78
Well done
160 - 180
25 - 30
82
Rare*
220
3 per cm
65 - 70
Food
Beef
Mutton
Hogget/lamb
Pork
Chicken
Venison
thickness
*Brown prior to roasting in an oiled frypan on high heat.
15
16
Cooking tips
The times and temperatures in the cooking charts are a guide only and are based on the oven
being preheated first (except in the case of FAN GRILL).
Baking
Always position the oven shelves before turning the oven on.
Grease tins and line bases with non-stick paper. For rich mixtures and fruitcakes, line the sides of
the tins as well.
Turn cakes onto baking racks when cool. Leave sponges in tins for at least 10 minutes before
inverting.
Always preheat the oven until the temperature indicator light turns off. This is particularly
important when baking.
Grilling
The length of time your food takes to grill will be affected by its thickness and temperature.
When grilling thicker items such as sausages, turn them often to ensure even browning.
Always grill with the door open to the first stop position unless you use FAN GRILL, when the
door should be closed and the oven does not need preheating.
The door and cooktop may become hot. Take care to keep children away.
Roasting
A large piece of meat requires fewer minutes per 500 g than a smaller piece. Meat with a bone
will cook faster than a rolled roast.
Do not add water to your roast as this has a steaming effect.
Use a meat thermometer to ensure an accurate result. As the internal temperature of the meat
will continue to rise during standing, please allow for this in your calculation. This is particularly
important if you want a rare or medium rare roast.
Using the cooktop
17
Ceramic glass cooktop
The ceramic cooktop is made from glass ceramic, a tough material that is not affected by
changes in temperature. If cared for, it will continue to function well and look attractive for
many years.
Elements
Your cooktop has four individual elements, one of which is a dual circuit element. The diameters
of the cooking areas are clearly marked.
The elements become red when turned on full and the corresponding indicator lights glow on
the control area.
Temperature limiters are fitted to the element to prevent the glass from overheating. The
limiters may turn the elements on and off during cooking.
Aluminium and copper cookware can leave a metallic residue on the cooktop. Clean this off with
ceramic glass cleaner after every use. If it is left, it becomes difficult to remove.
Hot surface indicator lights
The hot surface indicator lights are marked on the ceramic glass.
The indicator lights will glow when the element is above a safe touch temperature.
After the element has been turned off, the indicator lights will continue to glow until the
element surface has cooled down to a surface temperature that is safe to touch.
Dual element control
To heat the entire element, turn the control knob anticlockwise.
To heat the inner part only, turn the control knob clockwise.
Radiant cooktop
These tubular elements are designed to lift and rotate, allowing easy access to the element
bowls for cleaning. Replacement bowl liners are available from the retailer you purchased your
cooker from.
Control
Turn the control knob to High to begin cooking and adjust as necessary.
18
Using the cooktop
Choosing the right cookware
To get the best use out of your cooktop, consider the following points when selecting pots and
pans.
Preheat the pots and pans on the cooktop before adding food.
It is important that the bottoms of the pots and pans are the same size as the element.
A flat base makes better contact with the element, resulting in shorter cooking times.
Aluminium and copper cookware can leave a metallic residue. Clean off immediately.
Jagged edges on saucepans or heavy frypans may scratch elements or glass surfaces.
Round-based woks should NOT be used on radiant elements without a wok ring as they will
damage the element bowls.
Always lift pots and pans off ceramic cooktops - do not slide, or they may scratch the cooktop
surface.
Care and cleaning
19
Important!
Do not use abrasive sponges or heavy-duty scourers of any type. Do not use corrosive cleaners such as
oven sprays or stain removers.
Always turn the cooker off at the wall before cleaning. Wipe the outside surfaces frequently
using warm water and a household detergent or a spray-on, wipe-off cleaner.
Cleaning the oven door
1
2
3
To remove the oven door for easier cleaning:
Open the door to the first stop position.
Lift the door to disengage the hinges, by holding the handle only. Do not place your hands near
the hinges, as they are spring-loaded and will snap back and could cause an injury.
To replace, slide the hinge arms into the slots, lift the door by the handle and push it from the
bottom to engage the hinges.
Cleaning the oven lamp cover
Turn the cooker off at the wall before touching the oven lamp. To remove the glass cover for
cleaning, grip the back edge of the cover and pull it away from the oven wall. Always replace the
glass cover before using the oven.
Cleaning the oven cavity
Clean the inside of the oven while still warm using household detergents or an ammonia- based
cleaner. ‘Off the shelf’ oven cleaners may be used providing manufacturer instructions are
followed carefully.
Cleaning the ceramic cooktop
To keep your cooktop looking attractive, it is important to clean it regularly. Normal wear and
tear will occur but this will not affect the performance of your cooktop. Prior to cleaning your
cooktop, remove any food, spillovers, grease or staining with the razor blade scraper supplied.
Clean the cooktop while it is still warm to touch. Rinse and wipe dry with a clean cloth or paper
towel. The cooktop may become stained if cleaning residue remains.
Spillovers
Clean the following spillovers immediately using the razor blade scraper provided: sugar and
sugar syrup, jam, melted plastics and plastic wrap, melted aluminium foil. Do not let these cool
on the cooktop. Anything that melts on the ceramic surface may cause pitting if left to cool
before removing.
20
Care and cleaning
Cleaning the radiant cooktop
The element bowls should be cleaned regularly to avoid food residue being burned onto the
enamel. Wipe out using warm water and detergent or a liquid cleaner containing ammonia.
The element bowls have an acid-resistant finish but spillovers of acidic foods should be wiped up
as soon as possible to avoid damaging the enamel.
All surfaces can be wiped with a damp cloth and liquid detergent or a non-abrasive cleaner.
Replacing the fuse in the side-mounted power outlets
The two side-mounted power outlets are internally fused with
one 15 A fuse. Be careful not to overload them as this will blow
the fuse.
1
2
3
4
5
6
If required, the fuse can be repaired by following these steps:
Turn the power to the cooker off at the wall. Take extra care to
make sure there is no power to the cooker before repairing the
fuse.
Pull the cooker out from the wall, (after unscrewing the anti-tip
brackets) so the back is accessible and locate the fuse cover on
the right-hand side.
Remove the screw holding the fuse cover in place and remove the
fuse cover.
Remove the fuse carrier from its base and replace the blown fuse
wire with a new 15 A fuse wire. 15 A is the maximum allowable
fuse wire that can be used in this fuse.
Refit the fuse and the fuse cover.
Push the cooker back into position (and refit the anti-tip
brackets).
Removing and replacing the oven lamp
Always turn the oven off at the wall before touching an oven lamp. If you need to replace the
bulb, pull off the glass cover (see ‘Cleaning the oven lamp cover’) and simply unscrew the bulb.
Note: oven bulb replacement is not covered by your warranty.
Troubleshooting
21
Problem
Possible cause
What to do
Baking too
brown on top
Oven not preheated.
Always preheat the oven until the
temperature indicator light goes out. FAN
BAKE and BAKE take approximately 15-20
minutes to preheat. FAN FORCED preheats
in approximately 13-17 minutes.
Baking tins too large for the
recipe.
Use correctly sized baking tins.
Baking tins not evenly
spaced on the shelves.
Stagger baking tins so that there’s at least 3
cm between the tin and the oven wall. This
is to allow hot air and radiant energy to
circulate better.
Baking not evenly sized on
trays eg scones and biscuits.
Make items in a batch the same size and
shape and space them evenly over the
trays.
Shelf position too high for
specific function.
Lower shelf position by one.
Baking at too high a
temperature.
Lower the temperature.
Baking tins too large for the
recipe.
Use correctly sized tins.
Position of shelf too low in
the oven.
Cook one shelf higher.
Opening the oven door
frequently during baking.
Do not open the door until at least 3/4 of
the cooking time has passed.
Baking temperature too
high.
Lower the temperature.
Baking too
brown on
bottom
22
Troubleshooting
Problem
Possible cause
What to do
Cakes have
cracked thick
crust
Baking temperature too
high.
Lower the temperature.
Position of shelf too high in
oven.
Cook one shelf lower.
Cake batter overmixed.
Mix just long enough to combine
ingredients.
Pan too deep.
Check size of pan and use recommended
size.
Incorrect function eg
GRILL/FAN GRILL.
Change to a function which supplies top
& bottom element heat (BAKE) and/or
convection currents (FAN BAKE/FAN
FORCED).
Baking pale, flat Aluminium foil in oven.
and undercooked
Remove foil. Foil liners reflect the
heat back down in the oven which will
damage the enamel.
Shiny tins/trays being
used from older-style
(unconcealed bottom
element) oven - oven slow
to cook.
Rather than absorbing the heat and
heating food, shiny baking tins/trays
reflect the heat back towards the bottom
of the oven resulting in poor cooking
performance. Food tends to take longer
to cook and does not brown well.
Using baking utensils with dark, dull
surfaces shortens the cooking period in
concealed lower element ovens.
Baking temperature too low.
Raise the temperature.
Shelf position too low in the
oven.
Cook one shelf higher.
Baking time too short.
Increase cooking times.
Incorrect tin size.
Use correctly sized tin: check recipe
specification.
Incorrect function eg
CLASSIC BAKE.
Change to a function which supplies top
& bottom element heat (BAKE) and/or
convection currents (FAN BAKE/FAN
FORCED).
Troubleshooting
23
Problem
Possible cause
What to do
Baking taking
too long to cook
Shelf position too low.
Move shelf position up by one.
Temperature too low.
Raise the temperature.
Shiny trays/tins being used.
Use dark, dull baking tins and pans: they
absorb heat more quickly and speed up
the cooking process.
Baking tin too large.
Use the tin size stated in the recipe.
Incorrect function eg
CLASSIC BAKE.
Try changing to a fan function. Fan ovens
speed up cooking and distribute heat
more evenly; they also increase the rate
of browning.
Cake has fallen in Baking temperature too low.
the centre
Oven not
working
but cooktop
elements
working
Raise the temperature.
Opening the door too early
in baking.
Do not open the door until at least 3/4 of
the cooking time has passed: a sudden
burst of cold air can make cakes sink in
the middle.
Baking time too short.
Increase cooking time.
Proportions of ingredients
incorrect.
Check recipe.
Clock not set (electronic
clock models).
Set the clock. Refer to ‘Clocks and timers’
for instructions.
Oven set for automatic
cooking (some models only).
See section ‘Automatic cooking’.
24
Warranty and service
Before you call for service or assistance ...
Check the things you can do yourself. Refer to the installation instructions and your user guide
and check that:
1
2
Your product is correctly installed.
You are familiar with its normal operation.
If after checking these points you still need assistance, please refer to the Service & Warranty
book for warranty details and your nearest Authorised Service Centre, Customer Care, or contact
us through our website:
www.elba.co.nz
Product details
Fisher & Paykel Ltd
Model
Serial No.
Date of Purchase
Purchaser
Dealer
Suburb
Town
Country
26
Copyright © Fisher & Paykel 2008. All rights reserved.
The product specifications in this booklet apply to
the specific products and models described at the
date of issue. Under our policy of continuous product
improvement, these specifications may change at any
time. You should therefore check with your Dealer to
ensure this booklet correctly describes the product
currently available.
www.elba.co.nz
NZ
Freestanding cooker user guide
Published: 01/2008
Part No. 599500 A