1
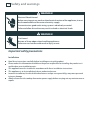
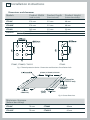
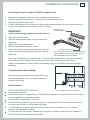
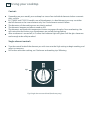
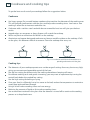
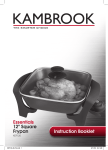
Installation instructions
and User guide
Ceramic glass cooktops
CT2802, CT560C, CT5602F and CT6551S models
NZ AU
Contents
1
Safety and warnings
Installation instructions
2
Introduction
Using your cooktop
Cookware and cooking tips
Care and cleaning
Frequently asked questions
Warranty and service
8
Important!
SAVE THESE INSTRUCTIONS
The models shown in this User Guide may not be available in all markets and are
subject to change at any time. For current details about model and specification
availability in your country, please go to our website www.fisherpaykel.com or
contact your local Fisher & Paykel dealer.
6
10
12
13
14
15
2
Safety and warnings
WARNING!
Electrical Shock Hazard
Before carrying out any work on the electrical section of the appliance, it must
be disconnected from the mains electricity supply.
Connection to a good earth wiring system is absolutely essential.
Failure to follow this advice may result in death or electrical shock.
WARNING!
Cut Hazard
Beware of sharp edges when handling appliances.
Failure to use caution could result in injury or cuts.
Important safety precautions
Installation
Read these instructions carefully before installing or using this product.
Please make this information available to the person responsible for installing the product as it
could reduce your installation costs.
This appliance must be installed in accordance with these installation instructions.
This appliance is to be installed only by an authorised person.
Incorrect installation, for which the manufacturer accepts no responsibility, may cause personal
injury or damage.
Always disconnect the cooktop from mains power supply before carrying out any maintenance or
repairs.
Safety and warnings
3
This product should not be sealed into the bench with silicone or glue. Doing so will make future
servicing difficult. Fisher & Paykel will not be liable for costs associated with releasing such a
product, nor for repairing damage that may be incurred in doing this.
When this product is installed it shall not be used as a space heater, especially if installed in
marine craft or caravans.
No combustible material or products should be placed on this product at any time.
Before you install the appliance, ensure that
the benchtop is square and level and no structural members interfere with space requirements.
there is a minimum of 60 mm between the cutout and the rear or side wall.
if the cutout is less than 100 mm from the wall, some form of protection against heat is used, such
as ceramic tiles.
if the appliance is a CT2802 model, the power supply cable is rated for use at 100OC.
a suitable disconnection switch is incorporated in the permanent wiring, mounted and positioned
to comply with local wiring rules and regulations. A means of disconnection with at least a 3 mm
air gap contact separation in all poles must be incorporated into the fixed wiring in accordance
with the wiring rules, unless the local wiring rules allow for the following variation of these
requirements: A means of disconnection from the supply having an air gap separation in all
active (phase) conductors must be incorporated into the fixed wiring.
the interconnection cord between the cooktop and the oven or control box will not be accessible
via cupboard doors after installation. This applies to any extension cord as well, even if they are
double-insulated.
you consult local building authorities and by-laws if in doubt regarding installation.
the appliance is rated 5.9 kW at 220-240 V (CT560C,CT5602F,CT6551S models) or 3.0 kW at
220-240V (CT2802 models).
When you install the appliance, ensure that you comply with the following requirements:
If prolonged use is anticipated, or the cooktop is mounted above a drawer space, a thermal
protection barrier between is recommended AND
Where the base of this product is accessible after installation, a thermal protection barrier MUST
be installed to prevent contact.
If a thermal protection barrier is installed below the cooktop, this barrier must be made of heat
resistant material capable of withstanding sustained exposure to temperatures up to 70 oC,
be at least 30 mm and no greater than 75 mm below the base of the cooktop and have FOUR
ventilation holes or TWO similiar holes for CT2802 models (min 50 mm – max 70 mm diameter,
see Fig. 1 for details). These ventilation holes must be open to free air.
We recommend that the thermal protection barrier be removable, so that the cooktop can be
easily secured with the supplied clamps.
Use easy-to-clean finishes for the wall surfaces surrounding the cooktop, so that cooking fume
staining resulting from using the cooktop is easy to remove.
4
Safety and warnings
WARNING!
Electrical Shock Hazard
Do not attempt to use this appliance if the ceramic glass surface is cracked. If
the surface becomes cracked, switch the appliance and the power supply off
immediately.
Switch the cooktop off at the wall before cleaning or maintenance.
Failure to do so may result in death or electrical shock
WARNING!
Hot Surface Hazard
During use, accessible parts of this appliance will become hot enough to cause
burns.
Avoid body or clothing contact with the ceramic glass until it is cool.
Keep children away.
Handles of saucepans may be hot to touch. Check saucepan handles do not
overhang other elements that are on. Keep handles out of reach of children.
Failure to do so may result in serious injury.
WARNING!
Cut Hazard
When the safety cover is retracted, the blade in the scraper is razor-sharp. Use
with extreme care and always store safely and out of reach of children.
Failure to use caution could result in injury or cuts.
Safety and warnings
5
Important safety precautions
Operation
Household appliances are not intended to be played with by children.
Children or persons with a disability that may limit their ability to use the appliance should
have a competent person to instruct them in its use. This person should be satisfied that
they can use the appliance without danger to themselves or their surroundings.
This appliance shall not be used as a space heater, especially if installed in marine craft or
caravans.
If the power supply cable is damaged, it must only be replaced by an authorised person.
This appliance should be connected to a circuit which incorporates an isolating switch
providing full disconnection from the power supply.
Do not use a steam cleaner to clean your cooktop.
Do not stand or place heavy objects on this appliance.
Do not use pans with jagged edges or drag pans across the ceramic glass surface as this can
scratch the glass.
Do not use scourers or any other harsh/abrasive cleaning agents to clean your cooktop, as
these can scratch the ceramic glass.
6
Installation instructions
Dimensions and clearances
Models
Product Width
Product Depth
Product Height
(side to side)
(front to back)
(below benchtop)
CT560C
578 mm
511 mm
60 mm
CT5602F
578 mm
511 mm
60 mm
289 mm
578 mm
88 mm
511 mm
511 mm
511 mm
55 mm
45 mm
63 mm
CT2802
CT6551S
(cooktop)
(controls)
CT560C, CT5602F, CT6551S
CT2802
Fig. 1 Thermal protection barrier - Dimensions and locations of ventilation holes
CT560C, CT5602F, CT6551S
Cutout for
CT6551S only
CT6551S
(CONTROL
PANEL)
270 3mm
(CT2802
COOKTOP)
25mm 70 3mm
(min)
Fig. 2 Cutout dimensions
Minimum clearance
(below benchtop)
CT560C
70 mm
CT2802
60 mm
CT5602F
70 mm
CT6551S
65 mm
Installation instructions
7
Installing the control panel (CT6551S models only)
1
2
3
4
Remove the supplied clamps from the cooktop and control panel.
Feed the cooktop wiring harness up through the control panel cutout.
Remove the control panel cover.
Connect the cooktop wiring harness by aligning the numbers/letters on the harness with those
on the control panel connector block (see Fig. 3 below).
Important!
Leave the plastic wiring card attached for future reference.
5
6
7
8
9
Clamp the wiring harness.
Wire the mains power supply to the control panel
and clamp.
Replace the control panel cover.
Roll the control panel into the cutout.
Secure the control panel and the cooktop using the
clamps provided (see ‘Clamping down the cooktop’
following).
Control panel
connector block
5 4
P N
E E
N 3
2 1
5 4
P N
E E
N3
2 1
Plastic wiring card
Fig. 3 Using the plastic wiring card to align the
numbers/letters on the harness with those on
the control panel connector block.
Note: two small clamps are supplied and must be used for clamping down the control panel to
the benchtop. These clamps are to be screwed to the sides of the control panel. Three
clamps are provided for clamping down the cooktop itself (see ‘Clamping down the cooktop’
following).
Clamping down the cooktop
Place the cooktop into the cutout and tighten with
the supplied clamps. These will cope with bench
thickness 20-50 mm.
Final checklist
Fig. 4 Clamping down the cooktop
TO BE COMPLETED BY THE INSTALLER
Is the product earthed?
Check that the power supply cable is NOT touching the product. This will ensure that the cable is
not damaged by heat from the product.
Is the product clamped down securely?
Check that all the elements function correctly by switching on all of them and leaving them on
for at least one minute. Are all elements glowing?
Is the ‘Element On’ indicator light functioning when you turn an element on? Turn all the
elements on individually to check.
To check that the ‘Surface Hot’ indicator light functions correctly, switch off all the elements. Is
the ‘Surface Hot’ indicator light functioning?
8
Introduction
About your new cooktop
Thank you for buying a Fisher & Paykel ceramic glass cooktop. Once it is installed and ready to
use, you will want to know everything about it to make sure you get excellent results right from
the start.
This guide introduces you to all its special features. We recommend you read the whole guide
before using your new cooktop, for both safety and cooking success.
For more information, go to www.fisherpaykel.com
Before using your new cooktop
Before using your new cooktop, please:
Read this user guide, taking special note of the ‘Safety and warnings’ section.
Remove any protective film that may still be on your cooktop.
3
1
Front element
2
Front element control knob
3
Rear element
4
Rear element control knob
5
‘Surface Hot’ indicator lights
5
Fig.5 Cooktop layout-CT2802 models
1
2
4
3
5
7
9
10
1
2
4
6
1
Left front element
2
Left front element control knob
3
Left rear element
4
Left rear element control knob
5
Right rear element
6
Right rear element control knob
7
Right front element
8
Right front element control knob
9
‘Surface Hot’ indicator light
10 ‘Element On’ indicator light
8
Fig.6 Cooktop layout-CT560C models
(available in Australia only)
Introduction
3
9
5
7
1
Left front element
2
Left front element control knob
3
Left rear element
4
Left rear element control knob
5
Right rear element
6
Right rear element control knob
7
Right front element
8
Right front element control knob
9
‘Surface Hot’ indicator lights
9
2
1
4
6
8
Fig.7 Cooktop layout-CT5602F models
3
5
6
4
8
2
1
9
1
Left front element (dual)
2
Left front element control knob
3
Left rear element
4
Left rear element control knob
5
Right rear element
6
Right rear element control knob
7
Right front element
8
Right front element control knob
9
‘Surface Hot’ indicator lights
7
Fig.8 Cooktop layout-CT6551S models
10
Using your cooktop
Controls
Depending on your model, your cooktop has two or four individual elements below a ceramic
glass surface.
In CT5602F and CT6551S models, one of the elements is a dual element; you may use either
the full element or the inner element only. See ‘Dual element controls’ below.
The diameters of the cooking areas are clearly marked.
The elements become red when turned on full.
The elements are fitted with temperature limiters to prevent the glass from overheating. You
will notice that the limiters turn the elements on and off during cooking.
After an element is turned off, its ‘Surface Hot’ indicator light will glow until the glass becomes
cool enough to be safely touched.
Single element controls
Turn the control knob of the element you wish to use to the High setting to begin cooking, and
adjust as necessary.
For further advice on cooking, see ‘Cookware and cooking tips’ following.
High
Low
Fig.9 Single element control knob (knobs may vary)
Using your cooktop
Dual element controls (CT5602F and CT6551S models only)
Select the full element by turning the knob anticlockwise to High to begin
cooking, and adjust as necessary.
To heat the inner element only, turn clockwise to High to begin cooking, and adjust as
necessary.
For further advice on cooking, see ‘Cookware and cooking tips’ following.
High (full element)
Low (full element)
Low (inner element)
High (inner element)
Fig.10 Dual element control knob (knobs may vary)
(CT5602F & CT6551S models only)
11
12
Cookware and cooking tips
To get the best results out of your cooktop, follow the suggestions below.
Cookware
Use heavy-gauge, flat, smooth-bottom cookware that matches the diameter of the cooking area.
This will provide good contact with the glass and help reduce cooking times. Low heat or slow
cooking is often due to incorrect cookware size.
Cookware with a stainless steel sandwich base or enamelled cast iron will give you the best
results.
Jagged edges on saucepans or heavy frypans will scratch the cooktop.
Never use plastic or aluminium foil dishes on the cooktop.
Aluminium and copper-bottomed cookware can leave a metallic residue on the cooktop. If left
on the glass, this becomes difficult to remove. Clean the cooktop after every use.
Fig.11 Use cookware with flat and smooth bases to
provide good contact with the glass
Cooking tips
The elements of your cooktop operate over a wide range of settings from very low to very high,
giving you accurate and repeatable control of the heat.
Use the low setting for delicate tasks like melting chocolate or keeping milk warm.
For delicate cooking tasks and gentle simmering, you may want to experiment by turning the
control knob below the marked low setting.
Use the high setting for boiling or frying.
Once your food is sufficiently hot or has come to the boil, reduce the temperature to maintain a
steady heat and cook food through.
Using a lid will reduce cooking times and save energy.
Minimise the amount of liquid or fat to reduce cooking times.
Use residual heat retained in the glass after the element is turned off to continue the cooking
process or to keep food warm.
Care and cleaning
13
Important!
Switch the cooktop off at the wall before cleaning.
Cut hazard – When the safety cover is retracted, the blade in the scraper is razor-sharp. Use with
extreme care and always store safely and out of reach of children.
Do not use harsh/abrasive cleaning agents or heavy-duty scourers to clean your cooktop, as they
may scratch the glass surface and damage the stainless steel finish and the knobs.
Some nylon scourers may scratch the ceramic glass surface and damage the stainless steel finish
and the knobs. Always read the label to check if your scourer is suitable for cleaning ceramic glass
cooktops.
Commercial stainless steel cleaners containing chlorine compounds are corrosive and may
damage the appearance of your cooktop. Always read the label to check if your cleaner contains
chlorine.
Use cleaner on the cooktop while it is still warm to touch. Rinse and wipe dry with a clean cloth
or paper towel. The cooktop may become stained if cleaning residue is left on it.
Remove any food, spillovers or grease from the cooktop while it is still warm using the razor
blade scraper provided. Hold it at a 30o angle.
Cleaning metallic stains
Copper-based or aluminium saucepans may cause metallic staining. These stains show as a
metallic sheen on the cooktop. If the cooktop is not cleaned regularly and the stains are
allowed to burn onto the surface, they may react with the glass and will no longer be
removable. To help prevent such damage, apply a glass cooktop conditioner after every use.
Cleaning melts and spillovers
Anything that melts onto the ceramic glass surface or food spills with a high sugar content
may cause pitting of the ceramic glass surface if they are left there to cool.
Examples include:
plastic wrap
melted aluminium foil
sugar, sugary syrups, jams and jellies
vegetables and vegetable water with a high sugar content eg peas, sweet corn, beetroot.
1
2
3
Remove these spills immediately with the razor blade scraper provided, taking care not to
scratch the glass. Follow the steps below:
Turn the elements off and carefully scrape the spill to a cool area of the cooktop surface.
Clean the spill up with a dish cloth or paper towel.
As soon as the cooktop is cool enough to safely touch, clean with cooktop cleaner.
Cleaning the surround strip
To remove fingerprints and other marks, wipe with a clean damp cloth and dry with a lintfree
cloth. Brushed stainless steel (some models only) can also be cleaned with a commercial stainless
cleaner (see ‘Important’ above).
Do not use steel soap pads as this may dull the appearance of the stainless steel over time.
14
Frequently asked questions
Q Is it possible for my cooktop to shatter?
A This is highly unlikely. The glass is very robust and goes through a rigorous testing process
before it reaches you.
Q Does the glass scratch easily?
A No, the glass is very tough. However, check that your cookware does not have jagged edges and
do not use a heavy-duty or unsuitable nylon scourer.
Q Will the surface overheat?
A Each element is fitted with temperature limiters that prevent overheating.
Q What is the best way to clean my cooktop?
A See ‘Care and cleaning’.
Q Why do the elements appear to turn off while cooking/heating?
A In order to maintain the selected temperature, the element may cycle on and off.
Q Do I need special cookware?
A Flat-bottom cookware is recommended as these are more stable and energy-efficient.
Q How can I achieve a low setting for delicate cooking and simmering?
A You may experiment by turning the control knob below the marked low setting.
Q Can I install my cooktop above my DishDrawer or oven?
A Yes, you can install your cooktop above your DishDrawer or oven with a standard bench height
(see ‘Installation instructions’ for clearances below benchtop).
Warranty and service
15
Before you call for service or assistance ...
Check the things you can do yourself. Refer to the installation instructions and your user guide
and check that:
1
2
Your product is correctly installed.
You are familiar with its normal operation.
If after checking these points you still need assistance, please refer to the Service & Warranty
book for warranty details and your nearest Authorised Service Centre, Customer Care, or contact
us through our website:
www.fisherpaykel.com
Product details
Fisher & Paykel Ltd
Model
Serial No.
Date of Purchase
Purchaser
Dealer
Suburb
Town
Country
Copyright © Fisher & Paykel 2008. All rights reserved.
The product specifications in this booklet apply to
the specific products and models described at the
date of issue. Under our policy of continuous product
improvement, these specifications may change at any
time. You should therefore check with your Dealer to
ensure this booklet correctly describes the product
currently available.
www.fisherpaykel.com
NZ AU
Ceramic glass cooktop user guide
Published: 02/2008
Part No. 599517 A