1
Important Safety Instructions
ENGLISH - PAGES . . . . . . . . . . . 6-8
This symbol warns the user of dangerous voltage levels localized within the
enclosure.
This symbol advises the user to read all accompanying literature for safe
operation of the unit.
∆ Read, retain, and follow all instructions. Heed all warnings.
ESPAÑOL
- PAGINAS . . . . . . . 9-11
∆ Only connect the power supply cord to an earth grounded AC receptacle in accordance
with the voltage and frequency ratings listed under INPUT POWER on the rear panel of
this product.
∆ WARNING: To prevent damage, fire or shock hazard, do not expose this unit to rain or
moisture.
∆ Unplug the power supply cord before cleaning the unit exterior (use a damp cloth only).
Wait until the unit is completely dry before reconnecting it to power.
FRANÇAIS - PAGES . . . . . . . . . . 12-14
∆ Maintain at least 6 inches (15.25 cm) of unobstructed air space behind the unit to allow
for proper ventilation and cooling of the unit.
∆ This product should be located away from heat sources such as radiators, heat registers,
or other products that produce heat.
∆ This product may be equipped with a polarized plug (one blade wider than the other).
This is a safety feature. If you are unable to insert the plug into the outlet, contact an
electrician to replace your obsolete outlet. Do not defeat the safety purpose of this
plug.
∆ Protect the power supply cord from being pinched or abraded.
ITALIANO
- PAGINE . . . . . . . . 15-17
∆ This product should only be used with a cart or stand that is recommended by the
manufacturer.
∆ The power supply cord of this product should be unplugged from the outlet when left
unused for a long period of time, or during electrical storms.
∆ This product should be serviced by qualified service personnel when: the power supply
cord or the plug has been damaged; or objects have fallen, or liquid has been spilled onto
the product; or the product has been exposed to rain; or the product does not appear to
operate normally or exhibits a marked change in performance; or the product has been
dropped, or the enclosure damaged.
DEUTSCH - SEITEN . . . . . . . . . . 18-20
∆ Do not drip nor splash liquids, nor place liquid filled containers on the unit.
∆ CAUTION: No user serviceable parts inside, refer servicing to qualified personnel only.
∆ Fender® amplifiers and loudspeaker systems are capable of producing very high sound
pressure levels which may cause temporary or permanent hearing damage. Use care
when setting and adjusting volume levels during use.
∆ Hazardous voltages may be present within the cabinet even when the power switch is off and
the power cord is connected. Therefore, disconnect the power cord from the rear panel power
inlet before servicing. The power inlet must remain readily operable.
PORTUGUÊS - PAGINA . . . . . . 21-23
. . . . . . . . . . . . . 24-26
Instrucciones de Seguridad Importantes
Este símbolo advierte al usuario que en el interior de la carcasa hay niveles
peligrosos de voltaje.
Este símbolo advierte al usuario que lea toda la documentación adjunta para
utilizar la unidad con seguridad.
Consignes de Sécurité Importantes
Ce symbole avertit l'utilisateur de la présence de niveaux de tension à risque
dans l'appareil.
Ce symbole conseille à l'utilisateur de lire toute la documentation jointe au
produit pour garantir une sécurité de fonctionnement.
∆ Lea las atentamente instrucciones y sígalas al pie de la letra. Tenga en cuenta todas las
instrucciones.
∆ Veuillez lire attentivement toutes les instructions et vous y conformer. Respectez
scrupuleusement tous les avertissements.
∆ Conecte únicamente el cable de alimentación eléctrica a una toma de CA de acuerdo
con las especificaciones de voltaje y frecuencia que se indican en la potencia de entrada
INPUT POWER del panel posterior de este producto.
∆ Connectez le câble d'alimentation électrique à une prise CA mise à la terre selon le
voltage et la fréquence indiqués sur le panneau arrière de l'amplificateur sous INPUT
POWER.
∆ ADVERTENCIA: Para evitar daños, incendios y descargas eléctricas, no exponga esta
unidad a la lluvia ni a la humedad.
∆ AVERTISSEMENT: Pour éviter l’endommagement de l’appareil, un départ d’incendie,
ou un choc électrique, ne l’exposez jamais a l’humidité ou à la pluie.
∆ Antes de limpiar el exterior de la unidad, desconecte el cable de alimentación (utilícese
únicamente un paño húmedo). Deje que la unidad se seque completamente antes de
volver a conectarla a la corriente.
∆ Débranchez le câble d'alimentation avant de nettoyer le boîtier de l'appareil (utiliser un chiffon
légèrement humide). Attendez que l'appareil soit complètement sec avant de le rebrancher sur
le secteur.
∆ Para una ventilación y refrigeración adecuadas, deje un espacio mínimo de 15.25 cm
detrás de la unidad.
∆ Conservez au moins 15.25 cm d'espace derrière l'appareil pour permettre une aération
appropriée de celui-ci.
∆ Este producto deberá estar situado lejos de fuentes de calor tales como radiadores,
registros de calefacción u otros productos que generen calor.
∆ Il est conseillé d'entreposer cet appareil loin de toute source de chaleur, telle que des
radiateurs, des accumulateurs de chaleur ou autres unités produisant de la chaleur.
∆ Es posible que este producto esté equipado con un enchufe polarizado (un blade más
ancho que el otro). Esta es una función de seguridad. Si no puede introducir el enchufe
dentro de la toma de corriente, póngase en contacto con un electricista para que la
cambie ya que podría estar anticuada. No anule el propósito de seguridad de este
enchufe.
∆ Cet appareil peut être équipé d'une prise polarisée (une fiche plus large que l'autre).
C'est une garantie de sécurité. Si vous ne parvenez pas à insérer la prise dans la sortie,
contactez un électricien pour qu'il remplace la sortie. Ne modifiez rien qui puisse
supprimer les garanties de sécurité qu'offre cette prise.
∆ Tenga cuidado de que el cable de alimentación no se pinche ni se erosione.
∆ Este producto sólo se debe utilizar con el soporte recomendado por el fabricante.
∆ El cable de alimentación de este producto deberá estar desconectado de la toma de
corriente cuando no se vaya a utilizar durante un período de tiempo largo o en caso de
tormenta eléctrica.
∆ Este producto deberá ser reparado por personal cualificado si: el cable de alimentación
o el enchufe están dañados, ha caído algún objeto o se ha derramado líquido encima, el
producto ha estado expuesto a la lluvia, no funciona normalmente o muestra signos de
cambio en el rendimiento, ha sufrido algún golpe o la caja esta dañada.
∆ Evite que goteen o salpiquen líquidos y no coloque recipientes con líquidos sobre la
unidad.
∆ PRECAUCIÓN: Contiene piezas cuyo mantenimiento no lo puede realizar el usuario,
sino sólo personal cualificado.
∆ Los amplificadores y altavoces Fender® pueden producir niveles de presión acústica muy
elevados, que pueden provocar daños temporales o permanenetes en el oído. Utilice la
precaución al ajustar el volumen nivela.
∆ Es posible que haya cargas eléctricas peligrosas dentro de la caja, aunque se haya
apagado, mientras esté conectado el cable de alimentación. Por tanto, se debe
desconectar el cable de alimentación del panel posterior antes de proceder a su
reparación o mantenimiento. La toma de corriente debe permanecer preparada para su
funcionamiento.
∆ Veillez à ce que le câble d'alimentation ne soit pas coincé ou abrasé.
∆ Cet appareil doit uniquement être utilisé avec un support à roulettes ou un pied conseillé
par le fabricant.
∆ Le câble d'alimentation de cet appareil doit être débranché de la sortie lorsqu'il reste
longtemps sans être utilisé ou en cas d'orage électrique.
∆ Les réparations et la maintenance de cet appareil doivent être effectuées par un personnel
qualifié dans les cas suivants : le câble d'alimentation ou la prise sont endommagés ; des
objets sont tombés sur l'appareil, du liquide a été renversé dessus ou l'appareil a été
exposé à la pluie ; l'appareil ne semble pas fonctionner normalement ou vous notez des
changements notables dans la performance de l'amplificateur, ou encore le produit est
tombé ou l'enceinte est endommagée.
∆ Ne placez aucun récipient rempli de liquide sur le produit.
∆ ATTENTION: Aucune maintenance ne doit être effectuée pour les pièces situées dans
l’appareil. Les réparations et la maintenance doivent être exécutées uniquement par une
personne qualifiée.
∆ Les niveaux sonores élévés émis par les systèmes d'emplificateur et haut-parleurs
Fender® peuvent entraîner des lésions auditives durables. Faites attention lorsque vous
réglez ou ajustez le volume lors de l'utilisation des appareils.
∆ Voltage dangereux. Risque d'électrocution au niveau du coffret lorsque le câble
d'alimentation est branché même si l'appareil n'est pas sous tension. Débranchez
le câble d'alimentation du panneau arrière avant de travailler sur l'appareil. L'entrée
électrique doit rester accessible.
Importanti Istruzioni per la Sicurezza
Questo simbolo indica che si avvisa l'utente della presenza di livelli di
tensione pericolosi all'interno della struttura.
Questo simbolo indica che si consiglia all'utente di leggere tutta la
documentazione allegata ai fini del funzionamento sicuro dell'unità.
∆ Leggere, conservare e seguire le istruzioni. Osservare le avvertenze.
∆ Collegare il cavo di alimentazione solo a una presa c.a. con messa a terra conforme
ai requisiti di tensione e frequenza indicati sull'etichetta INPUT POWER del pannello
posteriore di questo prodotto.
∆ AVVERTIMENTO: Per evitare danni, rischi di incendi o scosse elettriche, non esporre
questa unità alla pioggia o all'umidità.
∆ Scollegare il cavo di alimentazione prima di pulire l'esterno dell'unità (usare solo un
panno umido). Attendere che l'unità sia completamente asciutta prima di ricollegarla
all'alimentazione.
∆ Lasciare almeno 15.25 cm di spazio libero dietro all'unità per consentirne il corretto
raffreddamento tramite ventilazione.
∆ Questo prodotto va collocato lontano da fonti di calore come radiatori, unità di
riscaldamento o altri prodotti che producono calore.
Wichtige Sicherheitshinweise
Dieses Symbol warnt den Benutzer vor gefährlichen Spannungen innerhalb
des Gehäuses.
Dieses Symbol bedeutet für den Benutzer, dass er für einen sicheren Betrieb
des Geräts die gesamte begleitende Dokumentation lesen muss.
∆
Befolgen Sie sämtliche Sicherheitshinweise und bewahren Sie sie
auf. Beachten Sie alle Warnungen.
∆ Das Netzkabel muss an eine geerdete Netzsteckdose angeschlossen werden, die die auf
der Rückseite des Verstärkers unter INPUT POWER angegebene Spannung und Frequenz
liefert.
∆ WARNUNG: Setzen Sie dieses Gerät niemals Regen oder Feuchtigkeit aus, um
Beschädigung, Brandentwicklung und elektrische Schläge zu vermeiden.
∆ Ziehen Sie den Netzstecker, bevor Sie das Gehäuse des Geräts reinigen (verwenden Sie
zum Reinigen nur ein feuchtes Tuch). Stecken Sie den Netzstecker erst wieder ein, wenn
das Gerät vollständig getrocknet ist.
∆ Halten Sie hinter dem Gerät einen Freiraum von mindestens 15.25 cm ein, damit eine
ausreichende Belüftung gewährleistet ist.
∆ Der Verstärker darf nicht in der Nähe von Wärmequellen wie Heizkörpern oder anderen
wärmeerzeugenden Geräten aufgestellt werden.
∆ Questo prodotto può essere dotato di spina polarizzata (con poli grandi). Si tratta di una
misura di sicurezza. Se non si riesce a inserire la spina nella presa, far sostituire la presa
obsoleta ad un elettricista. Non eliminare la spina di sicurezza.
∆ Dieses Produkt ist möglicherweise mit einem unvertauschbaren Stecker ausgestattet
(unterschiedlich breite Pole). Dabei handelt es sich um eine Sicherheitsvorrichtung.
Wenn Sie den Stecker nicht in die Steckdose stecken können, lassen Sie Ihre alte
Steckdose von einem Elektriker auswechseln. Zerstören Sie nicht die Sicherheitsfunktion
des Steckers.
∆ Proteggere il cavo di alimentazione da danni e abrasioni.
∆ Das Netzkabel darf nicht eingeklemmt oder abgescheuert werden.
∆ Questo prodotto deve essere usato solo con un carrello o con un supporto consigliato dal
produttore.
∆ Das Produkt sollte nur mit vom Hersteller empfohlenen Karren oder Ständern verwendet
werden.
∆ Il cavo di alimentazione di questo prodotto deve essere scollegato dalla presa quando il
prodotto non viene usato per lunghi periodi o durante le tempeste elettromagnetiche.
∆ Bei Gewitter oder wenn das Gerät längere Zeit nicht gebraucht wird, sollte der
Netzstecker gezogen werden.
∆ La manutenzione per il prodotto deve essere eseguita da personale di assistenza
qualificato nei casi seguenti: danno del cavo o della spina di alimentazione; caduta di
oggetti o di liquido sul prodotto; esposizione del prodotto alla pioggia; funzionamento
anomalo del prodotto o marcata variazione delle prestazioni del prodotto; caduta del
prodotto; danno della struttura del prodotto.
∆ In folgenden Fällen sollte das Gerät repariert werden, und zwar ausschließlich von
qualifizierten Technikern: Schäden an Netzkabel oder -stecker; Beschädigung durch
herabfallende Gegenstände, ausgelaufene Flüssigkeit oder Regen; Funktionsstörungen
oder deutlich verändertes Betriebsverhalten; Beschädigung durch Herunterfallen;
Schäden am Gehäuse.
∆ Non disporre alcun contenitore riempito di liquido sul prodotto.
∆ Setzen Sie das Gerät keiner tropfenden oder spritzenden Flüssigkeit aus; stellen Sie keine
mit Flüssigkeit gefüllten Behälter auf dem Gerät ab.
∆ ATTENZIONE: Non contiene parti riparabili dall'utente: fare eseguire la manutenzione
soltanto da personale qualificato.
∆ VORSICHT: Im Gerät sind keine zu wartenden Teile. Reparaturarbeiten dürfen nur von
qualifizierten Technikern durchgeführt werden.
∆ I sistemi di amplificazione e gli altiparlanti Fender® sono in grado di produrre livelli di
pressione acustica molto alti che possono provocare danni temporanei o permanenti
all'udito. Prestare attenzione all'impostazione e regolazione dei livelli di volume durante
l'uso.
∆ Fender®-Verstärker und Lautsprecher können sehr hohe Lautstärkepegel erzeugen, die
vorübergehende oder dauerhafte Gehörschäden verursachen können. Gehen Sie beim
Einstellen bzw. Regulieren der Lautstärke vorsichtig vor.
∆ All'interno dell'apparecchiatura possono essere presenti livelli di tensione pericolosi
anche quando l'interruttore dell'alimentazione è disinserito ma il cavo di alimentazione
è collegato. Si raccomanda, perciò, di staccare tale cavo dalla presa dell'alimentazione
posta sul pannello posteriore prima di eseguire qualsiasi intervento di manutenzione.
La presa dell'alimentazione deve, tuttavia, rimanere sgombra e pronta per l'uso in
qualunque momento.
∆ Im Gehäuse können auch im ausgeschalteten Zustand gefährliche Spannungen
auftreten, wenn das Netzkabel eingesteckt ist. Ziehen Sie daher das Netzkabel aus
der Netzanschlussbuchse auf der Rückseite des Geräts bevor Sie Wartungs- oder
Reparaturarbeiten vornehmen. Die Netzanschlussbuchse muss stets frei zugänglich
bleiben.
Instruções Importantes
de Segurança
Este símbolo adverte o usuário da presença de níveis perigosos de voltagem
dentro da caixa.
Este símbolo adverte o usuário de que toda literatura que vem acompanhada
deste aparelho deverá ser lida para um manuseio seguro do mesmo.
∆ Leia, conserve na memória e siga todas as instruções. Observe todas as advertências.
∆ Conecte o cabo de força somente à uma saída de corrente com terminal de terra e cujas
voltagem e freqüência correspondam ao indicado no INPUT POWER no painel traseiro
deste produto.
∆ ADVERTÊNCIA: Para evitar danos, incêndio ou choque elétrico, não permita que este
aparelho seja exposto à chuva ou umidade.
∆ Desconecte o cabo de energia antes de limpar a superfície exterior deste aparelho (use
um pano úmido somente). Espere até que esteja completamente seco para reconectalo.
∆ Durante a operação: Mantenha pelo menos 6 polegadas (15.25cm) de espaço livre por
detrás desta unidade para permitir uma correta ventilação e refrigeração da mesma.
∆ Este produto deve estar localizado longe de fontes de calor tais como radiadores,
aquecedores ou outros aparelhos que produzam calor.
∆ Este aparelho pode estar equipado com um plug polarizado (uma extremidade mais larga
que a outra). Esta é uma medida de segurança. Se você não conseguir inserir o plug na
saída, entre em contato com um eletricista para substituir sua saída ultrapassada. Não
anule o propósito de segurança deste plug.
∆ Evite que o cabo de alimentação fique retorcido ou esmagado.
∆ Este produto deve ser usado somente com um suporte ou carreta que tenham sido
recomendados pelo próprio fabricante.
∆ Desconecte o cabo de alimentação deste aparelho da saída quando este não for ser
utilizado durante um longo período de tempo ou durante tempestades elétricas.
∆ Este aparelho deve ser revisado por técnicos especializados quando: o cabo de
alimentação ou o plug forem danificados; objetos caírem sobre ele ou líquidos forem
derramados no aparelho; ou o produto tiver sido exposto à chuva; ou o produto não
parecer operar corretamente ou se for observada alguma alteração evidente em sua
performance; ou se o aparelho for derrubado, ou a caixa danificada.
∆ Não derrame ou espirre líquidos, nem coloque objetos que os contenham sobre este
aparelho.
∆ AVISO: Manutenção e/ou reparo de quaisquer partes integrantes desde produto
não devem ser realizadas por usuários, encaminhe o serviço somente a técnicos
especializados.
∆ Os sistemas de amplificadores e auto-falantes Fender® têm capacidade para produzir
altíssimos níveis de pressão de som os quais podem causar perda temporária ou
permanente de audição. Seja prudente ao definir e ajustar os níveis de volume durante
a utilização.
∆ Es posible que haya cargas eléctricas peligrosas dentro de la caja, aunque se haya
apagado, mientras esté conectado el cable de alimentación. Por tanto, se debe
desconectar el cable de alimentación del panel posterior antes de proceder a su
reparación o mantenimiento. La toma de corriente debe permanecer preparada para su
funcionamiento.
Super-Sonic™ Series Amplifiers
The Super-Sonic™ amplifiers were created in response to constant player demand for the famous Fender® clean tone, and
a modern ultra high-gain tone, all in one simple tube amp!
The Super-Sonic includes a specially voiced VINTAGE channel,
based on two legendary historic Fender amps; the BURN channel provides true inspiration and flame-throwing modern gain.
The robust 60-Watt power platform provides lots of output for
club gigs and venues of almost any size. Features include:
• All-tube circuitry
• 60 Watts from two 6L6 output tubes
• Five 12AX7 preamp tubes & one 12AT7 (head version)
• Six 12AX7 preamp tubes & two 12AT7s (combo)
• Fender long-spring Reverb by Accutronics® (combo only)
• Professional FX loop with level control; may also be used
as a footswitchable boost, effectively creating four-channel
capability
• 112 combo, and Super-Sonic enclosures (sold separately),
feature premium 12" Celestion® Vintage 30 speakers
• Choice of iconic 1961 Blonde/Oxblood cosmetic treatment,
or new "Black Pepper" look
• Cover and 3-button Footswitch included
• 5-year limited transferable warranty (US and Canada. Other
territories may vary)
• VINTAGE channel contains two amp "voicing" selections
• Shimmering clean tone based on a 1965 Vibrolux® circuit
• Thick, punchy tone based on a 1966 Bassman® circuit
The World's Most Popular Instrument Amplifiers...
Since 1946
• Dual-gain BURN channel delivers awe-inspiring, fully
saturated tube overdrive
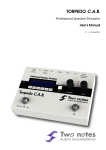
Front Panel
B. VOLUME—Adjusts the loudness of the VINTAGE channel.
GAIN 1 / GAIN 2—Primary and Secondary adjustments
for distortion and sustain of the BURN channel. Use in
conjunction with VOLUME {H} to control the overall loudness of the amp.
C. VIBROLUX / BASSMAN—Selects the amplifier circuitry
of the VINTAGE channel, as indicated by the LEDs.
G. TREBLE / BASS / MIDDLE—Adjusts the high– low– and
mid–frequency tone character of the BURN channel.
A. INPUT—
F.
Plug your guitar in here.
VIBROLUX Voicing
BASSMAN Voicing
D. TREBLE / BASS —Adjusts the high– and low–frequency
tone character of the VINTAGE channel.
E. VINTAGE / BURN —Selects the active channel as indicated by the LEDs.
VINTAGE Channel
BURN Channel
H. VOLUME—Use to adjust the overall loudness of the
BURN channel after setting GAIN {F} levels.
I.
REVERB (112 Combo Amps)—Adjusts the
Reverb level for both channels.
J.
POWER INDICATOR—Illuminates when the unit is ON.
BURN Channel Settings
Basic rock tone
–that cleans up nicely
Lo-Fi Fuzz
Texas
Plays Itself!
Percussion
6
◊
◊
Rear Panel
L. POWER—Turns the amp ON-OFF. You can extend the
life of the amplifier tubes by keeping the STANDBY {M}
switch down for the first 60 seconds that the power
is ON.
M. STANDBY—In standby, the amplifier outputs are disabled while power is supplied to the tube filaments
only, keeping them warm. *Tip: Use STANDBY instead of
switching the power off during short breaks to extend
tube life and avoid the warm-up delay upon returning to
play.
N. IEC POWER INPUT SOCKET— Connect to a grounded
outlet using the supplied power cord, in accordance with
the voltage and frequency specified on the rear panel of
your amplifier.
O. FUSE—Protects the amplifier from electrical faults. Only
replace a blown fuse with the type and rating specified
on the rear panel of your amplifier.
P.
SEND LEVEL—Adjusts the output level of the SEND {Q}
jack. Use to accommodate the input sensitivity of your
external effects device.
Q. SEND / RETURN—Effects loop jacks. Connect SEND to
your effects device input and RETURN to the effects output. TIP: The FX button on the footswitch can function as
a volume boost switch even without effects in the loop.
Simply connect SEND to RETURN with a guitar cable then
adjust SEND LEVEL {P} and RETURN LEVEL {R} for the
desired level of volume boost.
R. RETURN LEVEL—Adjusts the RETURN {Q} jack input
level going into the power amp. Use to match the volume level of the amp when effects are off, or to set an
alternate volume level selectable from the footswitch.
S. PRE AMP OUT—An unbalanced, line-level output
(includes Reverb on the 112 Combo amps) suitable for
connection to recording equipment and sound systems.
NOTE: You can connect this jack to the POWER AMP IN
jack on a second Super-Sonic amp for a double amplifier
setup. in which you can control both units from the control panel of the primary amplifier.
T.
U. FOOTSWITCH— Connect the included 3-button
footswitch to enable remote selection of: Amp Voicing {C},
Channel {E} and FX Loop Bypass. These buttons {C & E} are
disabled on the front panel when the footswitch is connected.
V. MAIN SPEAKER / EXTENSION SPEAKER—
A speaker must ALWAYS be plugged into the MAIN
SPKR jack when the Super–Sonic amplifier is ON or
damage may occur. Switch the amplifier OFF or to
STANDBY while changing speaker connections or impedance settings.
�����������������������
• (112 COMBO AMPS)—Keep the internal speaker connected to the MAIN SPKR jack for normal operation. Plug
an 8Ω extension speaker into the EXT SPKR jack and the
Super–Sonic amplifier will automatically switch to handle
a 4Ω load.
MAIN
SPKR
8Ω
8Ω
+
+
EXT
SPKR
None
8Ω
IMPEDANCE
AUTO SETTING
=
8Ω
=
4Ω
• (HEAD AMPS)— Connect speaker enclosures and set the
IMPEDANCE SELECTOR {W} according to the table below.
MAIN
SPKR
16Ω
16Ω
8Ω
8Ω
4Ω
+
+
+
+
+
EXT
SPKR
None
16Ω
None
8Ω
None
=
=
=
=
=
IMPEDANCE
SETTING
16Ω
8Ω
8Ω
4Ω
4Ω
W. IMPEDANCE SELECTOR— (Head Amps)
Select the speaker output impedance that
matches the total impedance load of the
speaker configuration you have chosen from the table
above.
POWER AMP IN—A direct input to the power amplifier.
The preamp circuit is automatically disconnected when
a plug is inserted into this jack. Useful when adding a
second Super-Sonic as an extension power amplifier.
Connect this jack to PRE AMP OUT from another amp.
◊
◊
7
Specifications
MODEL:
SUPER-SONIC HEAD
SUPER-SONIC 112 COMBO
TYPE:
PR 657
PR 687
PART NUMBERS:
2160100x00* (120V, 60Hz)
2160101x00* (110V, 60Hz) TW
2160103x00* (240V, 50Hz) AUS
2160104x00* (230V, 50Hz) UK
2160105x00* (220V, 50Hz) ARG
2160106x00* (230V, 50Hz) EUR
2160107x00* (100V, 50Hz) JPN
2160109x00* (220V, 60Hz) ROK
2160500x00* (120V, 60Hz)
2160501x00* (110V, 60Hz) TW
2160503x00* (240V, 50Hz) AUS
2160504x00* (230V, 50Hz) UK
2160505x00* (220V, 50Hz) ARG
2160506x00* (230V, 50Hz) EUR
2160507x00* (100V, 50Hz) JPN
2160509x00* (220V, 60Hz) ROK
POWER REQUIREMENT:
180W
180W
POWER AMP OUTPUT:
60W RMS @ 5% THD, 1kHz sine into 8Ω
60W RMS @ 5% THD, 1kHz sine into 8Ω
INPUT IMPEDANCE:
1MΩ
1MΩ
OUTPUT IMPEDANCE:
4Ω / 8Ω / 16Ω (selectable)
4Ω / 8Ω (automatic)
F 3A L, 250V
F 1.6A L, 250V
F 3A L, 250V
F 1.6A L, 250V
FOOTSWITCH (INCLUDED):
3-button, (069285)
Voicing / Channel / FX on-off
3-button, (069285)
Voicing / Channel / FX on-off
SPEAKERS:
Super-Sonic® 212** (2161200x00)*
Super-Sonic® 412** (2161400x00)*
One 8Ω, 12" Celestion®
Vintage 30 (047279)
8.625 in (21.9 cm)
25.375 in (64.5 cm)
9.625 in (24.5 cm)
17.375 in (44.1 cm)
25.375 in (64.5 cm)
10.188 in (25.9 cm)
32 lb (14.5 kg)
54 lb (24.5 kg)
FUSES
DIMENSIONS
WEIGHT:
100V-120V UNITS:
220V-240V UNITS:
HEIGHT:
WIDTH:
DEPTH:
*Super-Sonic amplifier and speaker cabinet exterior color code: Black "x"=0, Blonde "x"=4
**Recommended enclosures. Sold separately.
Product specifications are subject to change without notice.
8
◊
◊
Amplificadores Super-Sonic™ Series
Los amplificadores Super-Sonic™ han sido diseñados como
respuesta a la demanda constante de músicos que querían
el famoso sonido limpio Fender®, y un moderno sonido de
ganancia super elevada, ¡todo en un único amplificador de
válvulas! Los Super-Sonic incluyen un canal VINTAGE ajustado
especialmente que se basa en dos amplificadores Fender
legendarios; el canal BURN le ofrece auténtica inspiración y una
rebosante y moderna ganancia. La robusta plataforma de 60
watios de potencia pone en sus manos una gran cantidad de
salida, perfecta para actuaciones en locales de casi cualquier
tamaño. Entre sus características se incluyen:
• Canal BURN de ganancia dual que le ofrece una saturación a
válvulas impresionante y de gran inspiración
• Completa circuitería a válvulas
• Incluye tapa y pedalera de 3 botones
• 60 watios desde dos válvulas de salida 6L6
• 5 válvulas de previo 12AX7 y 1 12AT7 (versión cabezal)
• 6 válvulas de previo 12AX7 y 2 12AT7 (combo)
• Garantía limitada transferible de 5 años (para Estados
Unidos y Canadá; puede variar en el resto de países)
• Reverb de muelles Fender Accutronics® (solo combo)
• Bucle FX profesional con control de nivel; puede usarlo
también como un realce conmutable, lo que hace que
pueda disponer de forma efectiva de cuatro canales
• Recintos 112 combo y Super-Sonic (se vendern por
separado), con los altavoces 12" Celestion® Vintage 30
• Puede elegir entre un acabado Dorado/oxidado del año 61,
o la nueva imagen "pimienta negra"
• Canal VINTAGE con dos selecciones de "voicing" distintas
• El brillante sonido limpio de un circuito Vibrolux® del 65
• El sonido con pegada de un circuito Bassman® del 66
Los amplificadores de instrumentos más famosos
del mundo... desde 1946
Panel frontal
B. VOLUME—Ajusta el nivel de salida o volumen del canal
VINTAGE.
GAIN 1 / GAIN 2—Ajustes principal y secundario de
la distorsión y el sustain del canal BURN. Uselo junto
con VOLUME {H} para controlar el volumen global del
amplificador.
C. VIBROLUX / BASSMAN—Elige el circuito de amplificador
del canal VINTAGE, indicado por el LED encendido.
G. TREBLE / BASS / MIDDLE—Ajusta el carácter tonal de
frecuencias agudas, medias y graves del canal BURN.
A. INPUT—
F.
Conecte aquí su guitarra.
Voicing VIBROLUX
Voicing BASSMAN
D. TREBLE / BASS —Ajusta el carácter tona de las frecuencias
agudas y graves para el canal VINTAGE.
E. VINTAGE / BURN — Elige el canal activo, que será
indicado por los pilotos.
Canal VINTAGE
Canal BURN
H. VOLUME—Uselo para ajustar el volumen general del
canal BURN tras ajustar los niveles GAIN {F}.
I.
REVERB (Combo 112)—Le permite ajustar el
nivel de reverb para ambos canales.
J.
PILOTO POWER—Se ilumina cuando la unidad está
encendida.
Ajustes del canal BURN
Sonido básico de rock
–muy limpio
Fuzz Lo-Fi
Texas
¡Toca él solo!
Percusión
◊
◊
9
Panel trasero
L. POWER—Enciende o apaga el amplificador. Puede alagar
la vida de las válvulas del amplificador si deja pulsado el
interruptor STANDBY {M} durante el minuto siguiente a
haber activado este interruptor POWER.
M. STANDBY—En este modo, las salidas del amplificador
quedan desactivadas y la corriente pasa solo a los
filamentos de las válvulas, para que se recalienten.
*Consejo: Use este interruptor STANDBY en lugar de
apagar la unidad durante las pequeñas pausas para
alargar la vida de las válvulas y evitar retardos de
recalentamiento al volver a poner la unidad en marcha.
N. ENCHUFE DE ENTRADA IEC— Conecte la unidad a una
salida de corriente con toma de tierra con los valores
de voltaje y amperaje indicados en este panel trasero
usando el cable de alimentación incluido.
O. FUSIBLE—Protege el amplificador contra posibles
averías eléctricas. Si debe sustituirlo, cámbielo solo por
otro fusible de idénticas características.
P.
SEND LEVEL—Adjusts the output level of the SEND {Q}
jack. Use to accommodate the input sensitivity of your
external effects device.
Q. SEND / RETURN—Effects loop jacks. Connect SEND
to your effects device input and RETURN to the effects
output. TIP: The FX button on the footswitch can function
as a volume boost switch even without effects in the
loop. Simply connect SEND to RETURN with a guitar
cable then adjust SEND LEVEL {P} and RETURN LEVEL {R}
for the desired level of volume boost.
R. RETURN LEVEL—Ajustan el nivel de entrada del conector
RETURN {Q} que es enviado a la etapa de potencia. Uselo
para ajustar el nivel de volumen del amplificador cuando
los efectos estén desactivados o para ajustar un nivel de
volumen alternativo seleccionable con la pedalera.
S. PRE AMP OUT—Salida no balanceada de nivel de
línea (incluye reverb en los Combo 112) perfecta para
su conexión a unidades de grabación y sistemas de
sonido. NOTA: Puede conectar esta toma a la entrada
POWER AMP IN de un segundo Super-Sonic para crear un
sistema de doble amplificador en el que podrá controlar
ambas unidades desde el panel de control del primero.
T.
U. FOOTSWITCH— Conecte la pedalera de 3 botones
interna para que pueda realizar la selección a distancia
de: Voicing del amplificador {C}, Canal {E} y bypass del
bucle de efectos. Cuando tenga la pedalera conectada, los
botones {C & E} quedarán desactivados en el panel frontal.
V. MAIN SPEAKER / EXTENSION SPEAKER—
SIEMPRE debe tener un altavoz conectado a la toma
MAIN SPKR cuando el amplificador Super–Sonic
esté encendido, ya que en caso contrario se pueden
producir daños en la unidad. Apague el amplificador o
active el estado STANDBY cuando realice un cambio de
altavoces o un ajuste de impedancia.
�����������������������
• (UNIDADES 112 COMBO) — Deje
el
altavoz
interno conectado a la toma MAIN SPKR durante el
funcionamiento normal. Conecte un altavoz secundario
de 8Ω en la toma EXT SPKR y entonces el amplificador
Super–Sonic pasará automáticamente a gestionar una
carga de 4Ω.
MAIN
SPKR
8Ω
8Ω
+
+
◊
=
=
AUTO AJUSTE
IMPEDANCIA
8Ω
4Ω
• (CABEZALES) — Conecte recintos acústicos y ajuste
el SELECTOR IMPEDANCE {W} de acuerdo a la tabla
siguiente.
MAIN
SPKR
16Ω
16Ω
8Ω
8Ω
4Ω
+
+
+
+
+
EXT
SPKR
Ninguno
16Ω
Ninguno
8Ω
Ninguno
=
=
=
=
=
AJUSTE DE
IMPEDANCIA
16Ω
8Ω
8Ω
4Ω
4Ω
W. SELECTOR IMPEDANCE— (solo en cabezales)
Elija la impedancia de salida de altavoz que
coincida con la carga de impedancia de la
configuración de altavoz que haya escogido de la tabla
de arriba.
POWER AMP IN—Entrada directa a la etapa de potencia.
El circuito de previo se desconecte automáticamente
cuando introduzca un conector en esta toma. Esto es
muy útil cuando añada un segundo Super-Sonic como
etapa de potencia de refuerzo. Conecte esta entrada a la
toma PRE AMP OUT del otro amplificador.
10
EXT
SPKR
Ninguno
8Ω
◊
Especificaciones técnicas
MODELO:
CABEZAL SUPER-SONIC
COMBO SUPER-SONIC 112
TIPO:
PR 657
PR 687
REFERENCIAS:
2160100x00* (120 V, 60 Hz)
2160101x00* (110 V, 60 Hz) TW
2160103x00* (240 V, 50 Hz) AUS
2160104x00* (230 V, 50 Hz) UK
2160105x00* (220 V, 50 Hz) ARG
2160106x00* (230 V, 50 Hz) EUR
2160107x00* (100 V, 50 Hz) JPN
2160109x00* (220 V, 60 Hz) ROK
2160500x00* (120 V, 60 Hz)
2160501x00* (110 V, 60 Hz) TW
2160503x00* (240 V, 50 Hz) AUS
2160504x00* (230 V, 50 Hz) UK
2160505x00* (220 V, 50 Hz) ARG
2160506x00* (230 V, 50 Hz) EUR
2160507x00* (100 V, 50 Hz) JPN
2160509x00* (220 V, 60 Hz) ROK
CONSUMO:
180 W
180 W
SALIDA DE ETAPA DE POTENCIA:
60 W RMS @ 5% THD, 1 kHz sinusoidal a 8 Ω
60 W RMS @ 5% THD, 1 kHz sinusoidal a 8 Ω
IMPEDANCIA DE ENTRADA:
1 MΩ
1 MΩ
IMPEDANCIA DE SALIDA:
4 Ω / 8 Ω / 16 Ω (seleccionable)
4 Ω / 8 Ω (automático)
FUSIBLES
F 3A L, 250 V
F 1.6A L, 250 V
F 3A L, 250 V
F 1.6A L, 250 V
PEDALERA (INCLUIDA):
3 botones, (069285)
Voicing / Canal / FX on-off
3 botones, (069285)
Voicing / Canal / FX on-off
ALTAVOCES:
Super-Sonic® 212** (2161200x00)*
Super-Sonic® 412** (2161400x00)*
Un Celestion® de 12" y 8 Ω
Vintage 30 (047279)
(8.625 pulg.) 21.9 cm
(25.375 pulg.) 64.5 cm
(9.625 pulg.) 24.5 cm
(17.375 pulg.) 44.1 cm
(25.375 pulg.) 64.5 cm
(10.188 pulg.) 25.9 cm
(32 libras) 14.5 kg
(54 libras) 24.5 kg
DIMENSIONES
PESO:
UNIDADES 100 V-120 V:
UNIDADES 220 V-240 V:
ALTURA:
ANCHURA:
PROFUNDIDAD:
*Código de colores del exterior del amplificador Super-Sonic y del altavoz secundario: Negro "x"=0, Dorado "x"=4
**Recintos acústicos recomendados. Se venden por separado.
Las especificaciones de este aparato están sujetas a cambio sin previo aviso.
◊
◊
11
Amplificateurs Super-Sonic™
Les amplificateurs Super-Sonic™ ont été créés pour répondre
aux exigences des guitaristes à la recherche du célèbre son
clair Fender®, mais aussi à la recherche d'un son moderne ultra
saturé, le tout dans un même ampli à tubes ! Le Super-Sonic est
équipé d'un canal spécial VINTAGE, basé sur deux amplificateurs légendaires Fender ; le canal BURN délivre un véritrable
son moderne ultra saturé. L'étage de puissance de 60 Watts
offre une puissance suffisante pour quasiment toutes les tailles
de concerts. Caractéristiques générales :
• Circuits entièrement à tubes
• Étage de sortie de 60 Watts avec deux tubes 6L6
• Cinq tubes préamplificateurs 12AX7 et un 12AT7 (version
tête uniquement)
• Six tubes préamplificateurs 12AX7 et deux 12AT7
(combo)
• Canal BURN à double gain, pour une saturation à tubes ultra
puissante
• Réverbération Fender à ressorts Accutronics® (combo
uniquement)
• Boucle d'effets professionnelle avec réglage de niveau
pouvant servir de Boost commutable au pied (servant ainsi
de quatrième canal)
• Combo 112 et baffles Super-Sonic (vendus séparément),
équipés de haut-parleurs 12 pouces Celestion® Vintage 30
• Finition "Blonde/Oxblood" de 1961, ou "Black Pepper"
• Housse et pédalier à trois contacteurs fournis
• Garantie limitée de 5 ans transférable (US et Canada. Variable
selon le pays de distribution).
• Canal VINTAGE avec sélection de deux sons d'amplis
• Son ultra clair basé sur un Vibrolux® de 1965
• Son épais et puissant basé sur un Bassman® de 1966
Les amplis instrument les plus célèbre au monde...
Depuis 1946
Face avant
A. INPUT—
F.
Entrée guitare.
B. VOLUME—Niveau du canal VINTAGE.
C. VIBROLUX/BASSMAN—Sélectionne le circuit utilisé par
le canal VINTAGE (indiqué par les Leds).
SON DU VIBROLUX
SON DU BASSMAN
GAIN 1/GAIN 2—Réglages primaire et secondaire de
distorsion et de Sustain du canal BURN. À utiliser avec
le réglage VOLUME {H} pour régler le volume général de
l'ampli.
G. TREBLE/BASS/MIDDLE — Réglages de timbre (grave/
médium/aigu) du canal BURN.
D. TREBLE/BASS —Réglage de timbre (grave/aigu) du canal
VINTAGE.
H. VOLUME—Règle le volume général du canal BURN, une
fois les réglages de GAIN {F} réalisés.
E. VINTAGE/BURN —Sélectionne le canal actif (indiqué par
les Leds).
I.
REVERB (Combos 112)—Réglage de réverbération des deux canaux.
J.
TÉMOIN SECTEUR—S'allume lorsque l'ampli est sous tension.
Canal VINTAGE
Canal BURN
Réglages du canal BURN
Son Rock classique
Son Fuzz
Texas
Joue tout seul !
Son percussif
12
◊
◊
Face arrière
L. POWER—Place l'ampli sous/hors tension. Vous pouvez
économiser les tubes en laissant le STANDBY {M} Off pendant les premières 60 secondes de la mise sous tension.
M. STANDBY—En Standby, les sorties de l'amplificateur sont
désactivées — seuls les filaments des tubes sont alimentés. *Astuce : Utilisez le STANDBY plutôt que de placer
l'ampli hors tension lors des pauses pour économiser les
tubes et éviter la période de mise en chauffe des tubes.
N. EMBASE SECTEUR— Connectez le cordon fourni à une
prise avec terre, en vérifiant la tension et la fréquence
secteur spécifiés à l'arrière de l'amplificateur.
O. FUSIBLE—Protège l'amplificateur des défaillances secteur. Remplacez uniquement par un autre fusible exactement identique (valeurs indiquées à l'arrière de l'ampli).
P.
SEND LEVEL—Règle le niveau de la sortie SEND {Q}.
Réglez en fonction de la sensibilité d'entrée du processeur d'effets externe connecté.
Q. SEND/RETURN—jacks de la boucle d'effets. Connectez
la sortie SEND à l'entrée de l'effet et l'entrée RETURN à
la sortie de l'effet. ASTUCE : Le contacteur FX du pédalier
peut être utilisé comme Booster de volume même sans
effet connecté à la boucle. Connectez simplement les
Jacks SEND et RETURN avec un cordon guitare et réglez
les niveaux SEND LEVEL {P} et RETURN LEVEL {R} en fonction du niveau de Boost souhaité.
R. RETURN LEVEL—Détermine le niveau du signal du Jack
RETURN {Q} en entrée de l'étage de puissance. Permet
d'adapter le volume des effets lorsque les effets sont
activés ou permet de définir le volume du Boost sélectionnable par le pédalier.
S. PRE AMP OUT—Sortie asymétrique à niveau ligne (avec
réverbération sur le Combo 112) permettant la connexion
à votre enregistreur ou à votre console de sonorisation.
REMARQUE : Vous pouvez connecter ce Jack à l'entrée
POWER AMP IN d'un deuxième amplificateur Super-Sonic
si vous souhaitez utiliser deux amplis. Dans ce cas, vous
pouvez contrôler les deux amplis à partir des réglages de
l'amplificateur principal.
T.
U. FOOTSWITCH— Connectez le pédalier à 3 contacteurs
fournis pour activer : Le circuit de son {C}, le canal {E} et
le Bypass de la boucle d'effets. Les touches {C} et {E} sont
désactivées en face avant lorsque le pédalier est connecté.
V. MAIN SPEAKER/EXTENSION SPEAKER—
Vous devez TOUJOURS connecter le haut-parleur au
Jack MAIN SPKR lorsque le Super–Sonic est sous tension pour éviter tout dommage. Placez l'ampli sur
OFF ou en STANDBY lorsque vous modifiez les connexions
de haut-parleurs ou le réglage d'impédance.
�����������������������
• (COMBO 112)—Laissez le haut-parleur interne connecté
à la sortie MAIN SPKR. Connectez une enceinte externe
de 8 Ω au Jack EXT SPKR et le Super–Sonic se configure
automatiquement pour une charge de 4 Ω.
MAIN
SPKR
8Ω
8Ω
+
+
EXT
SPKR
Aucune
8Ω
RÉGLAGE AUTO
D'IMPÉDANCE
=
8Ω
=
4Ω
• (TÊTE)— Connectez les enceintes et réglez le sélecteur
IMPEDANCE {W} selon les valeurs ci-dessous :
MAIN
SPKR
16 Ω
16 Ω
8Ω
8Ω
4Ω
+
+
+
+
+
EXT
SPKR
Aucune
16 Ω
Aucune
8Ω
Aucune
=
=
=
=
=
RÉGLAGE
D'IMPÉDANCE
16 Ω
8Ω
8Ω
4Ω
4Ω
W. SÉLECTEUR D'IMPÉDANCE— (tête)
Sélectionnez la valeur d'impédance correspondant à l'impédance totale des enceintes,
selon les valeurs ci-dessus.
POWER AMP IN — Entrée directe de l'étage de puissance. Le circuit préamplificateur est automatiquement
déconnecté lorsque vous insérez une fiche dans ce Jack
(utile lorsque vous utilisez un deuxième Super-Sonic).
Connectez ce Jack à la sortie PRE AMP OUT du deuxième
amplificateur.
◊
◊
13
Caractéristiques techniques
MODÈLE :
TÊTE SUPER-SONIC
COMBO SUPER-SONIC 112
TYPE :
PR 657
PR 687
RÉFÉRENCE :
2160100x00* (120 V, 60 Hz)
2160101x00* (110 V, 60 Hz) TW
2160103x00* (240 V, 50 Hz) AUS
2160104x00* (230 V, 50 Hz) UK
2160105x00* (220 V, 50 Hz) ARG
2160106x00* (230 V, 50Hz) EUR
2160107x00* (100 V, 50 Hz) JPN
2160109x00* (220 V, 60 Hz) ROK
2160500x00* (120 V, 60Hz)
2160501x00* (110 V, 60 Hz) TW
2160503x00* (240 V, 50 Hz) AUS
2160504x00* (230 V, 50 Hz) UK
2160505x00* (220 V, 50 Hz) ARG
2160506x00* (230 V, 50 Hz) EUR
2160507x00* (100 V, 50 Hz) JPN
2160509x00* (220 V, 60 Hz) ROK
CONSOMMATION ÉLECTRIQUE :
180 W
180 W
PUISSANCE DE SORTIE :
60 W eff. avec DHT de 5 %, 1 kHz, dans 8 Ω
60 W eff. avec DHT de 5 %, 1 kHz, dans 8 Ω
IMPÉDANCE D'ENTRÉE :
1 MΩ
1 MΩ
IMPÉDANCE DE SORTIE :
Sélecteur 4 Ω/8 Ω/16 Ω
4 Ω/8 Ω (automatique)
FUSIBLES
F 3 A L, 250 V
F 1,6 A L, 250 V
F 3 A L, 250 V
F 1,6 A L, 250 V
PÉDALIER (FOURNI) :
3 boutons, (069285)
Son préampli/Canal/Effets On-Off
3 boutons, (069285)
Son préampli/Canal/Effets On-Off
HAUT-PARLEURS :
Super-Sonic® 212** (2161200x00)*
Super-Sonic® 412** (2161400x00)*
Un Celestion® Vintage 30 de 8Ω,
12 pouces (047279)
21,9 cm
64,5 cm
24,5 cm
44,1 cm
64,5 cm
25,9 cm
14,5 kg
24,5 kg
DIMENSIONS
VERSIONS 100 V-120 V :
VERSIONS 220 V-240 V :
HAUTEUR :
LARGEUR :
PROFONDEUR :
POIDS :
*Codes de finition des amplificateurs et enceintes Super-Sonic : Black "x" = 0, Blonde "x" = 4
**Enceintes recommandées. Vendues séparément.
Caractéristiques sujettes à modifications sans préavis.
14
◊
◊
Amplificatori Super-Sonic™ Series
Gli amplificatori della serie Super-Sonic™ sono stati realizzati
per soddisfare i musicisti che desiderano avere a disposizione il classico suono clean Fender® ed un timbro “ultra highgain” moderno, tutto in un unico Tube Amp! L'amplificatore
Super-Sonic include un canale VINTAGE, ottimizzato in modo
specifico basandosi su due storici modelli di amplificatori
Fender; il canale BURN offre una saturazione valvolare incisiva e
moderna, capace di ispirare ogni performance. L’efficace amplificazione da 60-Watt fornisce un’eccezionale livello d’uscita, ideale per suonare nei clubs e nei palchi di qualunque dimensione.
Le caratteristiche includono:
• Circuitazione completamente valvolare
• Potenza di 60 Watts generata da due valvole 6L6 in uscita
• Cinque valvole preamp 12AX7 e una 12AT7 (Head)
• Sei valvole preamp 12AX7 e due 12AT7 (Combo)
• Canale VINTAGE con due "amp voicing" selezionabili
• Suono Clean brillante, basato sulla circuitazione del
modello Vibrolux® (anno 1965)
• Suono incisivo e "punchy", basato sulla circuitazione del
modello Bassman® (anno 1966)
• Canale BURN Dual-gain per una saturazione Tube Overdrive
veramente ispirante
• Riverbero Long-Spring Fender realizzato da Accutronics®
(solo versione Combo)
• Loop FX professionale con controllo di livello; impiegabile
anche per controllare la funzione Boost mediante
footswitch, per una funzionalità effettiva a quattro-canali
• Il modello 112 Combo e il cabinet Super-Sonic (venduto
separatamente), dispongono di altoparlanti Celestion®
Vintage 30 da 12"
• Possibilità di scelta tra due finiture: la classica versione
Blonde/Oxblood del 1961 o il nuovo look "Black Pepper"
• Custodia e unità Footswitch a 3-pulsanti incluse
• 5-anni di garanzia limitata (solo USA e Canada. In altre aree
le condizioni di garanzia possono variare).
Gli amplificatori per strumenti più famosi al mondo...
Dal 1946
Pannello Frontale
A. INPUT—
sione.
Collega la tua chitarra a questa connes-
F.
B. VOLUME—Regola il volume del canale VINTAGE.
C. VIBROLUX / BASSMAN—Seleziona la circuitazione Amp
del canale VINTAGE, come segnalato dagli indicatori LED.
VIBROLUX Voicing
BASSMAN Voicing
D. TREBLE / BASS —Regolazione di tono delle alte e basse
frequenze nel canale VINTAGE.
E. VINTAGE / BURN —Seleziona il canale attivo, come
segnalato dagli indicatori LED.
Canale VINTAGE
Canale BURN
GAIN 1 / GAIN 2—Regolazioni primaria e secondaria per
la distorsione ed il sustain del canale BURN. Da utilizzare
in congiunzione al controllo VOLUME {H}, per regolare il
volume generale dell'amplificatore.
G. TREBLE / BASS / MIDDLE—Regolazione di tono delle
alte, basse e medie frequenze nel canale BURN.
H. VOLUME—Usa questo controllo per impostare il volume
generale del canale BURN, dopo aver regolato i livelli
GAIN {F}.
I.
REVERB (112 Combo)—Regola il livello del
riverbero su entrambi i canali.
J.
INDICATORE POWER—Si illumina quando l'unità è attiva.
Impostazioni Canale BURN
Rock Tone di base
–sonorità Clean gradevole
Lo-Fi Fuzz
Texas
Provalo!
Percussivo
◊
◊
15
Pannello Posteriore
L. POWER—Attiva/disattiva l'amplificatore (ON-OFF). Per
prolungare la durata delle valvole, è opportuno lasciare
l'unità in modalità STANDBY {M} (tasto Standby premuto)
per i primi 60 secondi successivi all'attivazione.
M. STANDBY— In modalità Standby, le uscite dell'amplificatore sono disabilitate, mentre l'alimentazione sarà
comunque fornita ai filamenti delle valvole, in modo
da mantenerle calde. *Suggerimento: In caso di brevi
pause, usa il tasto STANDBY invece di disattivare completamente l'unità con l'interruttore Power; in questo modo
non dovrai attendere il riscaldamento delle valvole per
riprendere a suonare, contribuendo inoltre a prolungare
la loro durata.
N. CONNESSIONE D'ALIMENTAZIONE IEC—Usa il cavo
fornito in dotazione per collegare l'unità ad una presa
di corrente collegata a terra, conforme alle specifiche di
voltaggio e frequenza specificate sul pannello posteriore
del tuo amplificatore.
O. FUSE—Protegge l'amplificatore da eventuali sbalzi o
problemi di corrente elettrica. In caso di sostituzione,
utilizzare fusibili dello stesso tipo e valore, specificati nel
pannello posteriore del tuo amplificatore.
P.
SEND LEVEL—Regola il livello d'uscita della connessione
SEND {Q}, utile per conformarsi alla sensibilità d'ingresso
di un'unità d'effetti esterna.
Q. SEND / RETURN— Connessioni Effect loop. Collega
la mandata SEND all'ingresso dell'unità d'effetti esterna, e l'uscita di quest'ultima alla connessione RETURN.
SUGGERIMENTO: Il tasto FX dell'unità footswitch può
agire come Volume Boost anche senza unità effetti presenti nel loop. È sufficiente collegare tra loro le connessioni SEND e RETURN, utilizzando un cavo per chitarra,
e regolare il SEND LEVEL {P} e il RETURN LEVEL {R} per
impostare il livello Boost desiderato.
R. RETURN LEVEL— Regola il livello d'ingresso della
connessione RETURN {Q} diretta all'amplificatore di
potenza. Questo controllo è utile per conformare il
livello di volume dell'amplificatore quando l'effetto non
è attivo, oppure per impostare un livello di volume alternativo selezionabile dall'unità footswitch.
S. PRE AMP OUT—Uscita sbilanciata con livello di linea
(che include il riverbero nel modello 112 Combo), utile per
il collegamento dell'amplificatore a sistemi di registrazione o impianti di diffusione esterni. NOTA: È possibile
collegare questa uscita all'ingresso POWER AMP IN di una
seconda unità Super-Sonic per creare un setup doppio,
16
◊
dove sarà possibile controllare entrambe le unità agendo
sul pannello di controllo dell'amplificatore primario.
T.
POWER AMP IN—Ingresso diretto all'amplificatore di
potenza. Inserendo un connettore a questa connessione,
il circuito preamp viene automaticamente disconnesso. Questo ingresso è utile se si desidera collegare una
seconda unità Super-Sonic come amplificatore di potenza aggiuntivo. Collega questa connessione all'uscita PRE
AMP OUT di un altro amplificatore.
U. FOOTSWITCH— Collega l'unità footswitch a 3-pulsanti fornita in dotazione, per abilitare il controllo remoto di: Amp Voicing {C}, Channel {E} e FX Loop Bypass.
Collegando l'unità footswitch, i tasti C e E del pannello
frontale verranno disabilitati.
V. MAIN SPEAKER / EXTENSION SPEAKER—
Il collegamento di un diffusore esterno alla connessione MAIN SPKR deve essere SEMPRE eseguita con
l'amplificatore Super–Sonic ATTIVO (ON), onde evitare danni. Se desideri modificare il collegamento degli altoparlanti o le impostazioni di impedenza, disattiva l'amplificatore (OFF) oppure imposta la modalità STANDBY.
�����������������������
• (MODELLO 112 COMBO) — Per un utilizzo normale,
mantieni l'altoparlante interno collegato alla connessione
MAIN SPKR. Collega un diffusore da 8Ω alla connessione
EXT SPKR: l'amplificatore Super–Sonic si imposterà automaticamente per gestire un carico d'impedenza di 4Ω.
MAIN
SPKR
8Ω
8Ω
EXT
IMPOSTAZIONE
SPKR
IMPEDENZA (AUTOM.)
+ non connesso =
8Ω
+
8Ω
=
4Ω
• (MODELLO HEAD)— Collega il diffusore cabinet e imposta il controllo IMPEDANCE SELECTOR {W} in base alla
seguente tabella.
MAIN
SPKR
16Ω
16Ω
8Ω
8Ω
4Ω
+
+
+
+
+
EXT
SPKR
non connesso
16Ω
non connesso
8Ω
non connesso
=
=
=
=
=
IMPOSTAZIONE
IMPEDENZA
16Ω
8Ω
8Ω
4Ω
4Ω
W. SELETTORE IMPEDANCE— (Modello Head)
Seleziona l'impedenza dell'uscita Speaker per
conformare il carico d'impedenza totale della
configurazione di diffusori esterni scelta nella tabella
precedente.
◊
Specifiche
MODELLO:
SUPER-SONIC HEAD
SUPER-SONIC 112 COMBO
TIPO:
PR 657
PR 687
NUMERO PARTI:
2160100x00* (120V, 60Hz)
2160101x00* (110V, 60Hz) TW
2160103x00* (240V, 50Hz) AUS
2160104x00* (230V, 50Hz) UK
2160105x00* (220V, 50Hz) ARG
2160106x00* (230V, 50Hz) EUR
2160107x00* (100V, 50Hz) JPN
2160109x00* (220V, 60Hz) ROK
2160500x00* (120V, 60Hz)
2160501x00* (110V, 60Hz) TW
2160503x00* (240V, 50Hz) AUS
2160504x00* (230V, 50Hz) UK
2160505x00* (220V, 50Hz) ARG
2160506x00* (230V, 50Hz) EUR
2160507x00* (100V, 50Hz) JPN
2160509x00* (220V, 60Hz) ROK
CONSUMO ENERGETICO:
180W
180W
POTENZA IN USCITA:
60W RMS @ 5% THD, sinusoide 1kHz su 8Ω
60W RMS @ 5% THD, sinusoide 1kHz su 8Ω
IMPEDENZA D'INGRESSO:
1MΩ
1MΩ
IMPEDENZA D'USCITA:
4Ω / 8Ω / 16Ω (selezionabile)
4Ω / 8Ω (automatico)
F 3A L, 250V
F 1.6A L, 250V
F 3A L, 250V
F 1.6A L, 250V
UNITÀ FOOTSWITCH (INCLUSA):
3-pulsanti, (069285)
Voicing / Channel / FX On-Off
3-pulsanti, (069285)
Voicing / Channel / FX On-Off
ALTOPARLANTI:
Super-Sonic® 212** (2161200x00)*
Super-Sonic® 412** (2161400x00)*
Un altoparlante Celestion® da 12", 8Ω
Vintage 30 (047279)
21.9 cm (8.625 in)
64.5 cm (25.375 in)
24.5 cm (9.625 in)
44.1 cm (17.375 in)
64.5 cm (25.375 in)
25.9 cm (10.188 in)
14.5 kg (32 lb)
24.5 kg (54 lb)
FUSIBILI
DIMENSIONI
PESO:
100V-120V:
220V-240V:
ALTEZZA:
LARGHEZZA:
PROFONDITÀ:
*Codice colore per Amplificatori Super-Sonic e Speaker Cabinet: Black "x"=0, Blonde "x"=4
**Unità cabinet raccomandata. Venduta separatamente.
Le specifiche possono essere soggette a variazioni senza alcun preavviso.
◊
◊
17
Amps der Super-Sonic™ Serie
Der Super-Sonic™ Verstärker befriedigt die Nachfrage vieler
Musiker nach einer Kombination des berühmten sauberen
Fender® Klangs mit einem modernen, ultra-übersteuerten
Sound in einem einfachen Röhren-Amp! Der Super-Sonic verfügt über einen speziell abgestimmten VINTAGE-Kanal, der auf
zwei legendären, historischen Fender-Amps basiert, und einen
BURN-Kanal, der eine echte Inspiration mit brandheißem, modernem Gain darstellt. Das robuste 60-Watt Leistungsfundament
bietet ausreichend Power für Club-Gigs und Veranstaltungsorte
fast jeder Größe. Hier die wichtigsten Features:
• Voll-Röhren-Schaltung
• 60 Watt von zwei 6L6 Ausgangsröhren
• Fünf 12AX7 Preamp-Röhren & eine 12AT7 (Amp TopVersion)
• Sechs 12AX7 Preamp-Röhren & zwei 12AT7 (ComboVersion)
• VINTAGE-Kanal mit zwei Amp "Voicing" Optionen
• Schimmernder sauberer Klang auf Basis einer 1965
Vibrolux® Schaltung
•
•
•
•
•
•
•
• Fetter druckvoller Sound auf Basis einer 1966 Bassman®
Schaltung
Doppel-Gain BURN-Kanal mit beeindruckendem, voll
gesättigtem Röhren-Overdrive
Fender Reverb von Accutronics® mit langer Hallfeder (nur
Combo)
Professioneller Effekt-Loop mit Pegelregler; auch als
fußschaltbarer Booster einsetzbar, ermöglicht 4-kanaligen
Betrieb
112 Combo und Super-Sonic Boxen (separat erhältlich) mit
premium 12" Celestion® Vintage 30 Lautsprechern
Wahlweise "kultiges" 1961 Blonde/Oxblood Styling oder
neuer "Black Pepper" Look
Inklusive Hülle und 3-Tasten Fußschalter
5-jährige, beschränkte, übertragbare Garantie (USA und
Kanada. Variable Regelung im Rest der Welt)
Die weltweit beliebtesten Instrumentenverstärker...
Seit 1946
Vorderseite
A. INPUT—
F.
Zum Anschluss der Gitarre.
B. VOLUME—Regelt die Lautstärke des VINTAGE-Kanals.
C. VIBROLUX / BASSMAN—Wählt die Amp-Schaltung des
VINTAGE-Kanals. Die jeweilige LED leuchtet.
VIBROLUX-Voicing
BASSMAN-Voicing
D. TREBLE / BASS — Regelt die Höhen und Bässe des
VINTAGE-Kanals.
E. VINTAGE / BURN —Wählt den aktiven Kanal. Die jeweilige LED leuchtet.
VINTAGE-Kanal
BURN-Kanal
GAIN 1 / GAIN 2—Erste und zweite Regelung von
Distortion und Sustain des BURN-Kanals. Regeln Sie mit
VOLUME {H} die Gesamtlautstärke des Amps.
G. TREBLE / BASS / MIDDLE—Regelt die Höhen, Bässe und
Mitten des BURN-Kanals.
H. VOLUME—Regelt die Gesamtlautstärke des BURN-Kanals
nach dem Einstellen der GAIN {F} Pegel.
I.
REVERB (112 Combo-Amp)— Regelt den
Reverb-Pegel auf beiden Kanälen.
J.
POWER-ANZEIGE—Leuchtet bei eingeschaltetem Gerät
(ON).
BURN-Kanaleinstellungen
Elementarer Rock-Sound
–mit sauberen Anteilen
Lo-Fi Fuzz
Texas
Spielt von alleine!
Percussion
18
◊
◊
Rückseite
L. POWER—Schaltet den Amp EIN/AUS. Sie können die
Lebensdauer der Verstärkerröhren verlängern, indem Sie
den STANDBY {M} Schalter in den ersten 60 Sekunden
nach dem Einschalten des Geräts deaktiviert lassen.
M. STANDBY—Im Standby-Modus sind die Amp-Ausgänge
deaktiviert, während nur die Röhren-Heizfäden mit
Spannung versorgt und warm gehalten werden. *Tipp:
In kurzen Pausen sollten Sie den Amp nicht aus-, sondern
auf STANDBY schalten, um die Lebensdauer der Röhren
zu verlängern und die Aufwärm-Verzögerung vor der
Fortsetzung des aktiven Betriebs zu vermeiden.
N. IEC NETZEINGANG—Verbinden Sie den Eingang
über das mitgelieferte Netzkabel mit einem geerdeten Netzausgang, der den Spannungs- und
Frequenzanforderungen auf der Amp-Rückseite entspricht.
O. FUSE—Schützt den Amp vor elektrischen Fehlern.
Ersetzen Sie durchgebrannte Sicherungen nur durch
Sicherungen des auf der Amp-Rückseite angegebenen
Typs und Nennwerts.
P.
SEND LEVEL— Regelt den Ausgangspegel der
SEND {Q} Buchse und passt das Signal an die
Eingangsempfindlichkeit Ihres externen Effektgeräts an.
Q. SEND / RETURN—Effekt-Loop-Buchsen. Verbinden Sie
SEND mit dem Effektgerät-Eingang und RETURN mit dem
Effektgerät-Ausgang. TIPP: Die FX-Taste des Fußschalters
kann auch ohne eingeschleiften Effekt als Volume BoostSchalter fungieren. Verbinden Sie SEND einfach über ein
Gitarrenkabel mit RETURN und stellen Sie dann mit SEND
LEVEL {P} und RETURN LEVEL {R} den gewünschten Pegel
der Lautstärke-Anhebung ein.
R. RETURN LEVEL—Regelt den Eingangspegel des über
die RETURN {Q} Buchse in die Endstufe eingespeisten
Signals. Damit können Sie den Pegel des Amps bei ausgeschalteten Effekten anpassen oder einen alternativen,
mit dem Fußschalter wählbaren Pegel einstellen.
S. PRE AMP OUT— Dieser asymmetrische Line-PegelAusgang (mit Reverb bei den 112 Combo Amps) eignet sich zum Anschließen von Aufnahmegeräten und
Soundsystemen. HINWEIS: Sie können diese Buchse mit
der POWER AMP IN-Buchse eines zweiten Super-Sonic
Amps verbinden und so ein Doppel-Amp-Set einrichten, bei dem sich beide Geräte über das Bedienfeld des
ersten Verstärkers steuern lassen.
T.
U. FOOTSWITCH—Schließen Sie hier den mitgelieferten
3-Tasten Fußschalter an, um eine Fernwahl von Amp
Voicing {C}, Channel {E} und FX Loop Bypass zu ermöglichen. Die entsprechenden vorderseitigen Tasten {C & E}
werden beim Anschluss eines Fußschalters deaktiviert.
V. MAIN SPEAKER / EXTENSION SPEAKER—
Die MAIN SPKR-Buchse muss bei EINGESCHALTETEM
Super–Sonic Amp IMMER von einem Lautsprecheranschluss belegt sein, um Beschädigungen zu vermeiden. Schalten Sie den Amp auf OFF oder STANDBY, wenn
Sie Lautsprecheranschlüsse oder Impedanz-Einstellungen
ändern.
�����������������������
• (112 COMBO AMPS)—Lassen Sie beim normalen Betrieb
den internen Lautsprecher an die MAIN SPKR-Buchse
angeschlossen. Wenn Sie eine Zusatzbox mit 8Ω an die
EXT SPKR-Buchse anschließen schaltet der Super–Sonic
Amp automatisch auf die Verarbeitung einer Last von 4Ω
um.
MAIN
SPKR
8Ω
8Ω
+
+
EXT
SPKR
keiner
8Ω
AUTOMATISCHE
IMPEDANZ-WAHL
=
8Ω
=
4Ω
• (AMP-TOPS)—Schließen Sie eine Box an und stellen
Sie den IMPEDANCE SELECTOR {W} entsprechend der
folgenden Tabelle ein.
MAIN
SPKR
16Ω
16Ω
8Ω
8Ω
4Ω
+
+
+
+
+
EXT
SPKR
keiner
16Ω
keiner
8Ω
keiner
=
=
=
=
=
IMPEDANZEINSTELLUNG
16Ω
8Ω
8Ω
4Ω
4Ω
W. IMPEDANCE SELECTOR— (Amp-Tops)
Wählen Sie die Boxen-Ausgangsimpedanz,
die der Gesamt-Impedanzlast Ihrer gewählten
Boxenkonfiguration entspricht, aus der obigen Tabelle.
POWER AMP IN — Direkteingang zur Endstufe. Die
Preamp-Schaltung wird automatisch deaktiviert, wenn
diese Buchse mit einem Stecker belegt wird. Nützlich, um
einen zweiten Super-Sonic als Zusatz-Endstufe zu nutzen. Verbinden Sie diese Buchse mit PRE AMP OUT eines
anderen Amps.
◊
◊
19
Technische Daten
MODELL:
SUPER-SONIC TOP
SUPER-SONIC 112 COMBO
TYP:
PR 657
PR 687
TEILENUMMERN:
2160100x00* (120V, 60Hz)
2160101x00* (110V, 60Hz) TW
2160103x00* (240V, 50Hz) AUS
2160104x00* (230V, 50Hz) GB
2160105x00* (220V, 50Hz) ARG
2160106x00* (230V, 50Hz) EUR
2160107x00* (100V, 50Hz) JPN
2160109x00* (220V, 60Hz) KOR
2160500x00* (120V, 60Hz)
2160501x00* (110V, 60Hz) TW
2160503x00* (240V, 50Hz) AUS
2160504x00* (230V, 50Hz) GB
2160505x00* (220V, 50Hz) ARG
2160506x00* (230V, 50Hz) EUR
2160507x00* (100V, 50Hz) JPN
2160509x00* (220V, 60Hz) KOR
LEISTUNGSAUFNAHME:
180W
180W
ENDSTUFENLEISTUNG:
60W RMS @ 5% THD, 1kHz Sinus an 8Ω
60W RMS @ 5% THD, 1kHz Sinus an 8Ω
EINGANGSIMPEDANZ:
1MΩ
1MΩ
AUSGANGSIMPEDANZ:
4Ω / 8Ω / 16Ω (wählbar)
4Ω / 8Ω (automatisch)
F 3A L, 250V
F 1.6A L, 250V
F 3A L, 250V
F 1.6A L, 250V
FUSSSCHALTER (INKLUSIVE):
3-Tasten, (069285)
Voicing / Channel / FX ein-aus
3-Tasten, (069285)
Voicing / Channel / FX ein-aus
LAUTSPRECHER:
Super-Sonic® 212** (2161200x00)*
Super-Sonic® 412** (2161400x00)*
1 x 8Ω, 12" Celestion®
Vintage 30 (047279)
21.9 cm (8.625")
64.5 cm (25.375")
24.5 cm (9.625")
44.1 cm (17.375")
64.5 cm (25.375")
25.9 cm (10.188")
14.5 kg (32 lbs.)
24.5 kg (54 lbs.)
SICHERUNGEN
ABMESSUNGEN
GEWICHT:
100V-120V GERÄTE:
220V-240V GERÄTE:
HÖHE:
BREITE:
TIEFE:
*Super-Sonic Amp und Boxen – Farbkodierung: Black "x"=0, Blonde "x"=4
**Empfohlene Boxen. Separat erhältlich.
Technische Daten können unangekündigt geändert werden.
20
◊
◊
Série de Amplificadores Super-Sonic™
Os amplificadores Super-Sonic™ foram criados em resposta à constante busca dos músicos pelo famoso som limpo da Fender®, e pelo
moderno timbre com fortíssimo ganho, tudo em um simples amplificador valvulado. O Super-Sonic™ inclúi um especial e sonoro canal
VINTAGE, baseado em dois famosos e históricos amplificadores da
Fender; O canal BURN oferece genuína inspiração e um fantástico
ganho moderno. A robusta plataforma de 60-Watt de potência oferece volume mais que suficiente para se usar em clubes e em palcos de
praticamente qualquer tamanho. Itens incluídos:
• O canal BURN realiza um surpreendente, bem saturado overdrive
valvulado
• Circuito totalmente valvulado
• Escolha o estilo 1961 Clara/Oxblood ou o novo visual “Black
Pepper”
• 60 Watts originados de duas válvulas 6L6
• Cinco válvulas pré-amplificadas 12AX7 e uma 12AT7 (versão
cabeçote)
• Seis válvulas pré-amplificadas 12AX7 e duas 12AT7s (combo)
• Canal VINTAGE contém duas opções de sonoridade:
• Som limpo cristalino baseado em um circuito 1965 Vibrolux®
• Timbre sólido e pesado baseado em um circuito 1966
Bassman®
• Reverb de mola Fender produzido pela Accutronics® (somente
versão combo)
• Loop FX profissional com controle de volume; Também usado
como um boost controlado por um pedal, criando efetivamente a
possibilidade de um quarto canal
• O combo 112, e as caixas (vendidas separadamente) apresentam
alto-falantes de 12 polegadas Celestion Vintage 30
• Capa protetora e Pedal de três botões estão incluídos
• 5 anos de garantia limitada e transferível (US e Canada. Outros
locais pode variar)
Fender - Os amplificadores mais populares do
mundo...desde 1946
Painel Frontal
A.
INPUT—
B.
VOLUME—Ajusta o volume do canal VINTAGE.
C.
VIBROLUX / BASSMAN —Seleciona o circuito do canal VINTAGE
do amplificador, como indicado pelos LEDs.
Conecte sua guitarra aqui.
VIBROLUX Voicing
D.
E.
BASSMAN Voicing
TREBLE / BASS —Ajusta o som das frequências agudas e graves do canal VINTAGE.
VINTAGE / BURN —Seleciona o canal ativo, como indicado
pelos LEDs.
Canal VINTAGE
Canal BURN
F.
GAIN 1 / GAIN 2—Ajuste primário e secundário para a distorção e para o sustain do canal BURN. Use em conjunto com o
VOLUME (H) para controlar o volume total do amplificador.
G.
TREBLE / BASS / MIDDLE—Ajusta o som das frequências agudas, graves e médias do canal BURN.
H.
VOLUME—Use para ajustar o volume total do canal BURN
após ajustar o GAIN (F).
I.
REVERB (112 Combo) - Ajusta o nível de Reverb para ambos os
canais.
J.
POWER INDICATOR—ILUMINA QUANDO O APARELHO
ESTÁ LIGADO.
Configurações do Canal BURN
Tímbre básico de rock (oferece um som cristalino)
Lo-Fi Fuzz
Texas
Toca Sozinho!
Percussão
◊
◊
21
Painel Traseiro
L.
POWER—Liga e desliga o amplificador. Você pode preservar a
vida das válvulas deixando o STANDBY (M) acionado para baixo
pelos primeiros 60 segundos após o amplificador ser ligado.
M. STANDBY—Em standby, a saída do amplificador é desacionada enquanto os filamentos das válvulas continuam recebendo
eletricidade, mantendo-as quente. *Dica: Durante pequenas
pausas, use standby ao invés de desligar o amplificador pois,
assim, você estará preservando a vida das válvulas e evitando
o gasto de tempo para aquecê-las quando você for voltar a
tocar.
N.
O.
IEC POWER INPUT SOCKET— Conecte a uma saída aterrada
com o cabo elétrico disponível, de acordo com a voltagem e
a frequência especificadas no painel traseiro do seu amplificador.
FUSE—Protege o amplificador de falhas elétricas. Somente
troque o fusível queimado por um outro de tipo e categoria
especificados no painel traseiro do seu amplificador.
P.
SEND LEVEL—Ajusta o volume da conexão SEND {Q}. Use para
regular a sensibilidade da entrada do seu aparelho externo de
efeitos.
Q.
SEND / RETURN— Conexão para loop de efeitos. Conecte
SEND à entrada dos seus aparelhos de efeitos e RETURN à
saída dos efeitos. Dica: O botão FX no pedal pode funcionar como um boost de volume mesmo sem efeitos no loop.
Simplesmente conecte SEND ao RETURN com um cabo de guitarra e, então, ajuste SEND LEVEL {P} e RETURN LEVEL {R} para o
nível desejado de boost de volume.
R.
RETURN LEVEL—Ajusta o volume da conexão RETURN {Q}
que entra no amplificador. Usa-se para equilibrar o volume do
amplificador quando efeitos estão desligados ou para determinar um volume alternativo acionado pelo pedal.
S.
PRE AMP OUT—Uma saída de linha desbalanceada (inclui
Reverb nos amplificadores combo 112) apropriada para
conexão em equipamentos de gravação e sistemas de som.
OBSERVAÇÃO: Você pode conectar essa entrada em um segundo amplificador Super-Sonic para ter um setup com amplificador duplo, e você pode controlar os dois aparelhos através do
painel de controle do amplificador primário.
T.
POWER AMP IN—Uma entrada direta para o amplificador
(não passa pelo pré-amplificador). O circuito do pré-amplificador é automaticamente desconectado quando um plugue
é inserido nessa entrada. Útil quando se adiciona um segundo
Super-Sonic como uma extensão para o amplificador. Conecte
essa entrada no PRE AMP OUT de outro amplificador.
22
◊
U.
FOOTSWITCH— Conecte o pedal de 3 botões incluso para possibilitar seleção remota de: Amp Voicing {C}, canal {E} e bypass
do loop FX. Esses botões {C & E} são desacionados no painel central quando o pedal está conectado.
V.
MAIN SPEAKER / EXTENSION SPEAKER—
Quando o amplificador está ligado, um alto-falante deve
SEMPRE estar conectado na entrada MAIN SPKR ou então
danos poderão ocorrer. Desligue o amplificador ou coloque-o em STANDBY enquanto estiver mudando as conexões de
alto-falante ou as configurações de impedância.
�����������������������
• (AMPLIFICADORES COMBO 112) —Para operações normais,
mantenha o alto-falante interno sempre conectado à entrada
MAIN SPKR. Conecte um alto-falante extra de 8Ω na conexão
EXT SPKR e o amplificador Super-Sonic vai mudar automaticamente para uma impedância de 4Ω.
MAIN
SPKR
8Ω
8Ω
+
+
EXT
SPKR
None
8Ω
=
=
IMPEDANCE
AUTO SETTING
8Ω
4Ω
• (AMPLIFICADORES CABEÇOTE) — Conecte caixas e determine o IMPEDANCE SELECTOR {W} de acordo com a tabela
abaixo.
MAIN
SPKR
16Ω
16Ω
8Ω
8Ω
4Ω
+
+
+
+
+
EXT
SPKR
None
16Ω
None
8Ω
None
=
=
=
=
=
IMPEDANCE
SETTING
16Ω
8Ω
8Ω
4Ω
4Ω
W. IMPEDANCE SELECTOR - (AMPLIFICADORES CABEÇOTE)
Selecione a impedância de saída do alto-falante
para que seja igual à impedância total que você
escolheu a partir da tabela acima.
◊
Especificações
MODELO:
SUPER-SONIC HEAD
SUPER-SONIC 112 COMBO
TIPO:
PR 657
PR 687
NUMEROS DAS PEÇAS:
2160100x00* (120V, 60Hz)
2160101x00* (110V, 60Hz) TW
2160103x00* (240V, 50Hz) AUS
2160104x00* (230V, 50Hz) UK
2160105x00* (220V, 50Hz) ARG
2160106x00* (230V, 50Hz) EUR
2160107x00* (100V, 50Hz) JPN
2160109x00* (220V, 60Hz) ROK
2160500x00* (120V, 60Hz)
2160501x00* (110V, 60Hz) TW
2160503x00* (240V, 50Hz) AUS
2160504x00* (230V, 50Hz) UK
2160505x00* (220V, 50Hz) ARG
2160506x00* (230V, 50Hz) EUR
2160507x00* (100V, 50Hz) JPN
2160509x00* (220V, 60Hz) ROK
POTÊNCIA NECESSÁRIA:
180W
180W
SAÍDA DO AMPLIFICADOR:
60W RMS @ 5% THD, 1kHz sine em 8Ω
60W RMS @ 5% THD, 1kHz sine em 8Ω
IMPEDÂNCIA DE ENTRADA:
1MΩ
1MΩ
IMPEDÂNCIA DE SAÍDA:
4Ω / 8Ω / 16Ω (selecionável)
4Ω / 8Ω (automático)
F 3A L, 250V
F 1.6A L, 250V
F 3A L, 250V
F 1.6A L, 250V
PEDAL (INCLUSO):
3-botões, (069285)
Voicing / Channel / FX on-off
3-botões, (069285)
Voicing / Channel / FX on-off
ALTO-FALANTES:
Super-Sonic® 212** (2161200x00)*
Super-Sonic® 412** (2161400x00)*
One 8Ω, 12" Celestion®
Vintage 30 (047279)
8.625 polegadas (21.9 cm)
25.375 polegadas (64.5 cm)
9.625 polegadas (24.5 cm)
17.375 polegadas (44.1 cm)
25.375 polegadas (64.5 cm)
10.188 polegadas (25.9 cm)
32 lb (14.5 kg)
54 lb (24.5 kg)
FUSÍVEL:
DIMENSÕES
PESO:
100V-120V UNITS:
220V-240V UNITS:
ALTURA:
LARGURA:
PROFUNDIDADE:
**Código da cor exterior do amplificador Super-Sonic e do gabinete de alto-falante: Black “x”=0, Blonde “x”=4
**Caixas recomendadas. Vendidas separadamente.
As especificações do produto estão sujeitas a mudança sem aviso prévio.
◊
◊
23
Super-Sonic™ シリーズ・アンプリファイアー
Super-Sonic™アンプリファイアーは、多くのプレイヤーの要望により実現し
• 圧倒的なフル・サチュレーションのチューブ・オーバードライブを実現する
た、モダーンなウルトラ・ハイゲイン・
トーンと有名なFender®クリーントーン
デュアル・ゲインのBURNチャンネル
を同居させた、シンプルな一体型のチューブ・アンプです。Super-Sonicは、
• Accutronics®によるFenderロング・スプリング・リバーブ(コンボのみ)
2つの伝説的な往年のFenderアンプをベースとして特別にヴォイシングさ
れたVINTAGEチャンネルと、燃えたぎるモダーンなゲインによりインスピレ
ーションをかき立てるBURNチャンネルを搭載しています。また、堅実な60ワ
• プロフェッショナルなエフェクト・ループ(レベル・コントロール装備)
;フット
スイッチ・ブーストとしても使用可能で、実質4チャンネルの機能を実現
• 112コンボとSuper-Sonicエンクロージャー(別売)
には、
プレミアム12"
ットのパワーを搭載し、ほとんどの規模のクラブ・ギグやベニューに対応しま
Celestion® Vintage 30スピーカーを搭載
す。主な特徴は次の通りです:
• 外装は、1961ブロンド/オックスブラッドと新しい「ブラックペッパー」を
• オール・チューブ回路
選択可能
• 2 × 6L6出力チューブによる60ワットの出力
• 5 × 12AX7プリアンプ・チューブ及び1 × 12AT7(ヘッド・ヴァージョン)
• カバー及び3スイッチ・フットスイッチを付属
• 6 × 12AX7プリアンプ・チューブ及び2 × 12AT7(コンボ)
• 5年間の譲渡可能有限保証(US及びカナダのみ、他の地域では異なる場
合があります)
• 2つのアンプ・ヴォイシングを選択できるVINTAGEチャンネル
• 1965 Vibrolux®回路をベースとした、きらびやかなクリーントーン
• 1966 Bassman®回路をベースとした、厚みとパンチのあるトーン
世界で最もポピュラーな楽器用アンプリファイアー、
1946年創業
フロントパネル
A. INPUT(入力)—
F. GAIN 1 / GAIN 2 — BURNチャンネルの歪みとサステインの特性を
ギターをこの端子に接続します。
調節するための一次と二次のコントロールです。アンプ全体の音量は、
B. VOLUME(ボリューム)— VINTAGEチャンネルの音量レベルを調節し
VOLUME {H}との組み合わせで調節します。
ます。
G. TREBLE / BASS / MIDDLE(トレブル/ベース/ミドル)— BURNチャ
C. VIBROLUX / BASSMAN — VINTAGEチャンネルのアンプ回路を選択
ンネルの高/低/中域のトーンをそれぞれ調節します。
します。状態はLEDに示されます。
VIBROLUXヴォイシング
H. VOLUME(ボリューム)— GAIN {F}レベルを設定した後に、ここで
BASSMANヴォイシング
BURNチャンネルの全体的な音量レベルを調節します。
D. TREBLE / BASS(トレブル/ベース)— VINTAGEチャンネルの高域と
I.
低域のトーンをそれぞれ調節します。
E. VINTAGE / BURN(ヴィンテージ/バーン) — 使用するチャンネルを
J. パワー・インジケーター — アンプがONの際に点灯しま
選択します。状態はLEDに示されます。
VINTAGEチャンネル
REVERB(リバーブ - 112コンボ・アンプ)— 両チャンネ
ルのリバーブ・レベルを調節します。
す。
BURNチャンネル
BURN チャンネル・セッティング例
ベーシックなロック・トーン
ローファイ・ファズ
テキサス
自動演奏!
パーカッション
24
◊
◊
リアパネル
L. 電源スイッチ — アンプをON/OFFします。 電源をONにした時に最初
の60秒間はSTANDBY {M}スイッチを下の状態にすることにより、アン
U. FOOTSWITCH(フットスイッチ)— 付属の3ボタン・フットスイッチを
接続することにより、次の機能をスイッチングできます:アンプ・ヴォ
イシング {C}、チャンネル選択
プ・チューブの寿命を延ばすことができます。
M. STANDBY(スタンバイ)— スタンバイ状態では、アンプの出力は行
わずにチューブのフィラメントのみに電源が供給され、チューブが温ま
った状態に保つことができます。* Tip: 短時間の休憩時には、アンプを
{C & E} は無効となります。
V. メイン・スピーカー/エキステンション・スピーカー
OFFにせずにSTANDBYを使用することにより、再開時にチューブが温
まるまでの待ち時間を削減でき、またチューブの寿命を延ばすことが
�����������������������
パネルに記載された電圧と周波数の規定に一致した、アースされ正し
く内部結線されたコンセントに接続します。
O. ヒューズ — アンプを電気的な障害から保護します。ヒューズを交換す
る場合は、必ずアンプのリアパネルに記載されたタイプと規定に一致
したヒューズをご使用ください。
Super - Sonic アンプリファイアーを ON にする場合は、必ず
MAIN SPKR端子にスピーカーが接続されていなければなりま
できます。
N. IEC電源ケーブル用ソケット — 付属の電源ケーブルを、アンプのリア
{E}、エフェクト・ループ・バイパス。フ
ットスイッチが接続されている場合、該当するフロントパネルのボタン
せん。スピーカーが接続されていない場合は、アンプが破損
する可能性があります。スピーカーの接続やインピーダンス設定を変
更する作業は、必ずアンプをOFFにした上で行ってください。
• (112コンボ・アンプ)— 通常の使用時には、内部スピーカーをMAIN
SPKR 端子に接続した状態でご使用ください。EXT SPKR 端子に8Ωの
エキステンション・スピーカーを接続すると、Super-Sonicは自動的に
P. SEND LEVEL(センド・レベル)— SEND {Q}端子の出力レベルを調
節します。使用する外部エフェクト機の入力感度に合わせて設定してく
ださい。
4Ωの負荷に対応する様に切り替わります。
MAIN
SPKR
インピーダンス
自動設定
EXT
SPKR
Q. SEND / RETURN(センド/リターン)— エフェクト・ループ用の端
8Ω
+
なし
=
8Ω
子です。SENDをエフェクト機の入力に、RETURNをエフェクト機の出力
8Ω
+
8Ω
=
4Ω
から接続してください。TIP: ループにエフェクトを接続しない場合、フ
ットスイッチのFXボタンをボリューム・ブーストとして使用できます。こ
の場合は、SENDとRETURNをギター用ケーブルで接続し、SEND LEVEL
{P}とRETURN LEVEL {R}でボリューム・ブーストの量を調節します。
R. RETURN LEVEL(リターン・レベル)— RETURN {Q}端子の入力レベ
ルを調節します。この信号はパワーアンプに供給されます。エフェクト
• (ヘッド・アンプ)— スピーカー・エンクロージャーを接続し、次の表
に従いIMPEDANCE SELECTOR {W} を設定してください。
MAIN
SPKR
インピーダンス
設定
EXT
SPKR
16Ω
+
なし
=
16Ω
イッチでボリューム設定を切り替えたい場合はその音量をここで調節
16Ω
+
16Ω
=
8Ω
してください。
8Ω
+
なし
=
8Ω
8Ω
+
8Ω
=
4Ω
4Ω
+
なし
=
4Ω
の ON/OFF時に音量のばらつきが生じない様に設定するか、フットス
S. PRE AMP OUT(プリアンプ・アウト)— 録音機器やサウンド・シス
テムに接続するための、ラインレベルのアンバランス・プリアンプ(112コ
ンボ・アンプでは、リバーブの信号を含む)出力です。NOTE: この端子
から二台目のSuper-SonicアンプのPOWER AMP IN端子に接続すること
により、一台目から両方のアンプのサウンドを同時にコントロールでき
るダブル・アンプ構成を構築できます。
T. POWER AMP IN(パワーアンプ・イン)— パワーアンプへのダイレク
ト・インプットです。この端子にプラグを挿入すると、プリアンプ回路
W. IMPEDANCE SELECTOR(インピーダンス・セレクター)—(ヘッド・
アンプ)
使用するスピーカー構成の合計インピーダンス負荷を上記の
表で確認し、該当する設定にしてください。
は自動的に結線が外されます。二台目のSuper-Sonicをエキステンショ
ン用のパワーアンプとして使用する際に便利です。他のアンプのプリア
ンプ出力から接続してください。
◊
◊
25
仕様
モデル:
SUPER-SONIC HEAD
SUPER-SONIC 112 COMBO
タイプ:
PR 657
PR 687
パーツ番号:
2160100x00* (120V, 60Hz)
2160101x00* (110V, 60Hz) TW
2160103x00* (240V, 50Hz) AUS
2160104x00* (230V, 50Hz) UK
2160105x00* (220V, 50Hz) ARG
2160106x00* (230V, 50Hz) EUR
2160107x00* (100V, 50Hz) JPN
2160109x00* (220V, 60Hz) ROK
2160500x00* (120V, 60Hz)
2160501x00* (110V, 60Hz) TW
2160503x00* (240V, 50Hz) AUS
2160504x00* (230V, 50Hz) UK
2160505x00* (220V, 50Hz) ARG
2160506x00* (230V, 50Hz) EUR
2160507x00* (100V, 50Hz) JPN
2160509x00* (220V, 60Hz) ROK
消費電力 :
180W
180W
パワーアンプ出力 :
60W RMS @ 5% THD、1kHz sine into 8Ω
60W RMS @ 5% THD、1kHz sine into 8Ω
入力インピーダンス:
1MΩ
1MΩ
出力インピーダンス:
4Ω / 8Ω / 16Ω(選択可能)
4Ω / 8Ω(自動選択)
F 3A L, 250V
F 1.6A L, 250V
F 3A L, 250V
F 1.6A L, 250V
フットスイッチ(付属):
3ボタン、(069285)
Voicing / Channel / FX on-off
3ボタン、(069285)
Voicing / Channel / FX on-off
スピーカー :
Super-Sonic® 212** (2161200x00)*
Super-Sonic® 412** (2161400x00)*
12" Celestion®
Vintage 30 (047279) ×1
21.9 cm (8.625 in)
64.5 cm (25.375 in)
24.5 cm (9.625 in)
44.1 cm (17.375 in)
64.5 cm (25.375 in)
25.9 cm (10.188 in)
14.5 kg (32 lb)
24.5 kg (54 lb)
ヒューズ
寸法
100V—120V 機 :
220V—240V 機 :
高さ:
幅:
奥行き:
重量 :
*Super- Sonicアンプ及びスピーカー・キャビネット外装カラー・コード:ブラック「x 」= 0、ブロンド「x 」= 4
**推奨エンクロージャー。別売。
製品の仕様は、告知なしに変更となる場合があります。
26
◊
◊
Notes
◊
◊
27
A PRODUCT OF:
FENDER MUSICAL INSTRUMENTS CORPORATION
CORONA, CALIFORNIA USA
Fender®, Bassman®, Vibrolux® and Super-Sonic™ are trademarks of FMIC.
Other trademarks are property of their respective owners.
© 2005 FMIC. All rights reserved.
P/N 069290 REV. A