1
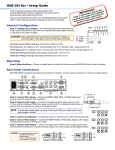
Product Category RGB 460xi Series • Setup Guide This guide provides basic instructions for an experienced technician to install the Extron RGB 46x series of architectural adapter plates (AAP) plates. For additional details see the RGB 460xi Series User Guide at www.extron.com. MONITOR H. SHIFT VIDEO INPUT MIN/MAX L/MONO S-VIDEO AUDIO R NO MONITOR MONITOR AUDIO Disconnect Power RGB 464xi Turn off all equipment. Disconnect the computer, the interface, and output devices from the power source. Attach AAPs Attach any optional AAPs to the interface (RGB 468xi, RGB 468 Mxi, or RGB 468xi AKM UK only), before connecting cables (see the RGB 460xi Series User Guide for more details). Set DIP Switches A bank of DIP switches, (see item a on the rear panel diagram on the next page), controls various options. Moving a switch up sets it On as shown by switch 7 at right. Moving it down sets it Off. Closed / On NOTE: The default for all DIP switches, except switch 7, is off (down). Switches 7 and 8 work together for sync routing. They cannot both be set to on, nor can both be set to off. Switch Number 1 2 3 Function Setting Digital Display Sync Processing (DDSP™) 4 Serration pulse 5 Vertical sync pulse width 6 Negative sync Open / Off Description Off Outputs separate horizontal and vertical sync on the H and V connectors for RGBHV. On Outputs sync on green (SOG). Off Outputs RGBHV or RGsB video. Sync on green Composite sync 1 2 3 4 5 6 7 8 On Outputs combined horizontal and vertical sync for RGBS. Off Interface performs sync process operations with Advanced Digital Sync Processing (ADSP™). On Interface uses DDSP. Off Serration pulses are off. On Serration pulses are on. Off Wide On Narrow Off Output sync same as input. On Output sync for to negative polarity. Off Must be set to Off if switch #8 is On. On Sync routing to 15-pin HD local monitor for all Macintosh® (other than 13 inch) and VGA monitors (default). Off Must be set to Off if switch #7 is On. On Sync routing to 15-pin HD local monitor for Macintosh 13 inch monitors. 7 Composite sync routing 8 1 Cable the Rear Panel 6 a DIP Switches — Used to set options, see previous page. b RGB video output connectors — Attach video cables from the interface to the display device using these female BNC connectors. See the video output connections diagram (below right) for the wiring diagrams. 7 2 3 8 c Gain switch — To compensate for longer cable runs, slide this switch to select the level of video gain that yields the sharpest picture. d Power connector — Connect a 9 to 24 VDC power supply to this 3.5 mm, 2-pole, direct insertion captive screw connector. Wire the connector as shown below at right. Polarity is not important. 9 4 1 5 5 Rear Panel Connections and Switches e Audio output connector — Insert wires into and tighten the screws on this 3.5 mm, 5-pole, direct insertion captive screw connector for unbalanced or balanced audio output. Wire the connector as shown in the audio wiring diagrams below at right. RGBHV NOTE:Items f, g, h, and i are features of the RGB 464xi interface only. R-Red G-Green B-Blue H-Black V-Yellow R-Red G-Green B-Blue S-Black Yellow G-Green B-Blue Black Yellow RGBS f Composite video pass-through BNC connector — A male BNC connector attaches here. RGsB g S-video pass-through 4-pin mini-DIN connector — A male 4‑pin mini-DIN connector attaches here. R-Red Video Output Connections h Balanced active audio output connector — Insert wires into this 3.5 mm, 9-24 VDC 5-pole, direct insertion captive screw connector for balanced active audio output, then tighten the screws. Wire the connector as shown below at right. i Network pass-through RJ-45 connector — If this connector is not required, a or or Power Connector Wiring blank cover is supplied to fill the opening. CAUTION: For an unbalanced stereo output, connect the sleeves to the ground contact. DO NOT connect the sleeves to the negative (–) contacts. Apply Power and Test the Interface Apply power to the interface. The power LED on the front panel lights. R L NO GROUND HERE Tip Sleeve (s) NO GROUND HERE Tip Before mounting into the wall, connect all input sources to the interface. Power up all AV devices connected to the interface. Check that all are working properly. If not, check cabling and switch settings, and make adjustments as necessary. Unbalanced Stereo Output Disconnect Power and Mount the Interface L Mount the interface as explained in the appropriate installation guide. R Ring Tip Sleeve (s) Ring Tip Disconnect power from all the devices except the interface. Balanced Stereo Output Connect Power Once the interface is properly mounted, restore power to all connected devices. Do not tin the wires! The interface is now ready for operation. Audio Wiring Extron USA - West Headquarters Extron USA - East Extron Europe Extron Asia Extron Japan Extron China Extron Middle East +800.633.9876 +800.633.9876 +800.3987.6673 +800.7339.8766 Inside Asia Only +81.3.3511.7655 +81.3.3511.7656 FAX +400.883.1568 Inside Europe Only +971.4.2991800 +971.4.2991880 FAX +1.919.863.1794 +1.919.863.1797 FAX +31.33.453.4040 +31.33.453.4050 FAX +65.6383.4400 +65.6383.4664 FAX Inside USA/Canada Only +1.714.491.1500 +1.714.491.1517 FAX 2 Inside USA/Canada Only Inside China Only +86.21.3760.1568 +86.21.3760.1566 FAX © 2011 Extron Electronics All rights reserved. www.extron.com 68-542-50 Rev. B 07 11