1
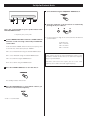
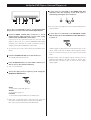
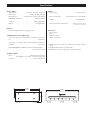
G-0s
Master Clock Generator
Owner’s Manual
CAUTION: TO REDUCE THE RISK OF ELECTRIC SHOCK,
DO NOT REMOVE COVER (OR BACK). NO USERSERVICEABLE PARTS INSIDE. REFER SERVICING TO
QUALIFIED SERVICE PERSONNEL.
The lightning flash with arrowhead symbol, within an
equilateral triangle, is intended to alert the user to the
presence of uninsulated “dangerous voltage” within the
product’s enclosure that may be of sufficient magnitude
to constitute a risk of electric shock to persons.
The exclamation point within an equilateral triangle is
intended to alert the user to the presence of important
operating and maintenance (servicing) instructions in the
literature accompanying the appliance.
IMPORTANT SAFETY INSTRUCTIONS
1)
2)
3)
4)
5)
6)
7)
Read these instructions.
Keep these instructions.
Heed all warnings.
Follow all instructions.
Do not use this apparatus near water.
Clean only with dry cloth.
Do not block any ventilation openings. Install in accordance with
the manufacturer’s instructions.
8) Do not install near any heat sources such as radiators, heat
registers, stoves, or other apparatus (including amplifiers) that
produce heat.
9) Do not defeat the safety purpose of the polarized or groundingtype plug. A polarized plug has two blades with one wider than
the other. A grounding type plug has two blades and a third
grounding prong. The wide blade or the third prong are provided
for your safety. If the provided plug does not fit into your outlet,
consult an electrician for replacement of the obsolete outlet.
10) Protect the power cord from being walked on or pinched
particularly at plugs, convenience receptacles, and the point
where they exit from the apparatus.
11) Only use attachments/accessories specified by the manufacturer.
12) Use only with the cart, stand, tripod,
bracket, or table specified by the
manufacturer, or sold with the apparatus.
When a cart is used, use caution when
moving the cart/apparatus combination
to avoid injury from tip-over.
13) Unplug this apparatus during lightning
storms or when unused for long periods
of time.
14) Refer all servicing to qualified service personnel. Servicing is
required when the apparatus has been damaged in any way,
such as power-supply cord or plug is damaged, liquid has been
spilled or objects have fallen into the apparatus, the apparatus
has been exposed to rain or moisture, does not operate normally,
or has been dropped.
< Do not expose this apparatus to dripps or splashes.
< Do not place any objects filled with liquids, such as vases, on the
apparatus.
< Do not install this apparatus in a confined space such as a book
case or similar unit.
< The apparatus draws nominal non-operating power from the AC
outlet with its POWER switch in the off position.
2
CAUTION
< DO NOT REMOVE THE EXTERNAL CASES OR CABINETS TO
EXPOSE THE ELECTRONICS. NO USER SERVICEABLE PARTS ARE
WITHIN!
< IF YOU ARE EXPERIENCING PROBLEMS WITH THIS PRODUCT,
CONTACT TEAC FOR A SERVICE REFERRAL. DO NOT USE THE
PRODUCT UNTIL IT HAS BEEN REPAIRED.
< USE OF CONTROLS OR ADJUSTMENTS OR PERFORMANCE OF
PROCEDURES OTHER THAN THOSE SPECIFIED HEREIN MAY
RESULT IN HAZARDOUS RADIATION EXPOSURE.
Contents
Thank you for choosing TEAC. Read this manual carefully
to get the best performance from this unit.
IMPORTANT SAFETY INSTRUCTIONS . . . . . . . . . . . . . . . . . . . . . 2
Before Use . . . . . . . . . . . . . . . . . . . . . . . . . . . . . . . . . . . . . . . . 3
Features . . . . . . . . . . . . . . . . . . . . . . . . . . . . . . . . . . . . . . . . . . 4
Before Use
Read this before operation
< As the unit may become warm during operation, always leave
sufficient space around the unit for ventilation.
< The voltage supplied to the unit should match the voltage as
printed on the rear panel. If you are in any doubt regarding
this matter, consult an electrician.
Names of Each Control . . . . . . . . . . . . . . . . . . . . . . . . . . . . . . . 5
Connections . . . . . . . . . . . . . . . . . . . . . . . . . . . . . . . . . . . . . . . 6
Set Up for Esoteric Units . . . . . . . . . . . . . . . . . . . . . . . . . . . . . . 8
Set Up for DVD Player, Universal Player, etc. . . . . . . . . . . . . . . . 9
< Choose the installation location of your unit carefully. Avoid
placing it in direct sunlight or close to a source of heat. Also
avoid locations subject to vibrations and excessive dust, heat,
cold or moisture.
Dimmer . . . . . . . . . . . . . . . . . . . . . . . . . . . . . . . . . . . . . . . . . 10
< Do not place the unit on the amplifier/receiver.
Troubleshooting . . . . . . . . . . . . . . . . . . . . . . . . . . . . . . . . . . . 10
< Do not open the cabinet as this might result in damage to the
circuitry or electrical shock. If a foreign object should get into
the unit, contact your dealer or service company.
Specifications . . . . . . . . . . . . . . . . . . . . . . . . . . . . . . . . . . . . . 11
< When removing the power plug from the wall outlet, always
pull directly on the plug, never yank the cord.
< Do not attempt to clean the unit with chemical solvents as
this might damage the finish. Use a clean, dry cloth.
< Keep this manual in a safe place for future reference.
Placement of the unit
High-quality hardened tool steel is used for the pin-point feet,
securely attached to the bottom of the player. Although the
cover feet may appear loose, the weight of the unit causes
them to be firm and secure, and the design effectively damps
and reduces vibration.
< Be careful to avoid injury when moving the unit, on account
of its weight. Get someone to help you if necessary.
< To protect floors, etc. you may stick the felt supplied with the
unit to the bottom of the cover feet.
Pin-point foot
Bottom plate
of the unit
Steel foot
Cover foot
Cover foot retaining screws
3
Features
Up to 192 kHz Word Sync clock production
With the advent of digital equipment using higher sampling
frequencies than ever, 176.4 kHz and 192 kHz word clocks
(sync signals) are made available in addition to conventional
44.1 kHz, 48 kHz, 88.2 kHz and 96 kHz clocks.
As an additional plus, the output circuitry consists of 3
separate channels with a total of 6 output terminals, thus
offering the capability of handling a variety of audio
equipment controlled by different word clocks. Also, each of
the 3 output channels is switch-selectable between 1xFs,
2xFs, and 4xFs, so you can, for example, get an 88.2 kHz and
a 176.4 kHz machine synchronized by connecting them to the
single G-0s.
Clocks Generated by Internal High-precision
Oscillator
The G-0s uses an advanced rubidium oscillator (monthly
precision variation: projected within ±0.05ppb) that generates
astonishingly super-accurate clocks.
Ready for connection to external oscillators
It is also possible to connect external reference frequency
oscillators to the G-0s. Using this capability, you can, for
example, readily bring in a higher precision oscillator when
made available in the future.
Universal Clock Output
Some universal players use clocks different from the ones
used by CD players to process both the video and audio
signals at the same time.
The G-0s comes with a 100 kHz clock output intended for
universal players (in PAL FILM mode, the output is switched to
96 kHz). If your universal players are 100 kHz-capable, you
can control them by this high-precision clock.
PAL Film Source-capable Clock Frequencies
The PAL (European TV format) film source is a better image
quality than NTSC discs provide. However, PAL video system is
standardized at 25 frames per second while the PAL film
source discs use the rate of 24 frames per second. So, if these
discs are played back without inserting one additional frame
per second in the process of conversion, the sound pitch may
be higher than is expected. To play PAL film source material
correctly, it is necessary to reduce the play speed by 4% and
play at 24 frames per second. To meet this requirement, the
G-0s is designed to output clock frequencies of 96% of
48/96/192 kHz (i.e., 46.08/92.16/184.32 kHz).
To play PAL film source material, connect the Esoteric UX-1 or
any other Universal Player that is equipped to accept 96%
clock frequencies.
4
Super-rigid Chassis to Ensure
Uncompromised Sound Quality
A rigid chassis featuring a total weight of 18 kg (40 pounds)
helps to provide a stabilized platform for the clock operation.
< 5-mm thick steel base plate completely eliminates external
vibrations.
< Triangular pinpoint feet composed of case-hardened tool
steel ensures enhanced stability against vibration.
Employs carefully selected highest quality
components
Tight-tolerance components are carefully hand-picked and
secured to the rugged chassis to support the high-precision
clock operation.
Names of Each Control
A
B
C
A STANDBY/ON button
When the Main Power switch on the rear panel is ON, use
this button to turn the unit on or to standby. When the unit
is on, the indicator lights.
B MASTER button
Press this button to select the signal source you will use for
the reference frequency.
When the clock signal is stabilized, the indicator for the
MASTER button stops blinking and lights steadily.
Xtal:
When using the clock made by internal crystal oscillator
Rb:
When using the internal rubidium oscillator as the source
clock
Ext:
When using the input from the reference sourced 10MHz IN
terminal
C UNIVERSAL CLOCK OUT button
Use this to switch the Universal Clock output on or off.
Universal Clock is the TEAC-ESOTERIC original clock for
universal players.
When the FREQUENCY MODE is set to 44.1kHz or 48kHz,
the frequency of the universal clock is set to 100kHz. When
the FREQUENCY MODE is set to PAL FILM, the frequency of
the universal clock is set to 96kHz.
When OFF is selected, the indicator turns off.
D
E
D FREQUENCY MODE button
Use this to select the fundamental frequency of the word
clock.
44.1kHz:
This is generally used for red-book CD players which operate
with a 44.1kHz clock standard.
48kHz:
This is used for DVD players, DAT recorders, etc. which
operate with a 48kHz clock standard.
PAL FILM:
This is used for reproducing PAL DVD discs at 24 frames/sec.
E Frequency change buttons [A/B/C]
The frequency of the each line (A/B/C) is changeable
between 1x/2x/4x of the fundamental frequency and off.
Following frequency can be selected for each FREQUENCY
MODE.
When OFF is selected, the indicator turns off.
44.1kHz:
44.1kHz, 88.2kHz, 176.4kHz
48kHz:
48kHz, 96kHz, 192kHz
PAL FILM:
48P (46.08kHz), 96P (92.16kHz), 192P (184.32kHz)
5
A WORD CLOCK OUT terminals
These terminals output precise word synchronization signals. Connect these OUT terminals to the
WORD SYNC IN terminals of the other digital equipment, using a commercially available BNC
coaxial cable.
< For other connections, read the instructions of each component you intend to use with this unit.
< Each of the A, B, and C channels is switch-selectable between 1xFs, 2xFs, and 4xFs. So you can,
for example, connect an 88.2 kHz and a 176.4 kHz machine to the single G-0s and synchronize
them. Three buttons (A, B, and C) are provided on the front panel for each channel.
B UNIVERSAL CLOCK OUT terminal
Universal clock signal is an original synchronization format developed by TEAC-Esoteric.
These terminals output universal clock signals. Connect these OUT terminals to the UNIVERSAL
CLOCK IN terminals of the other matched equipment (ex. UX-1, P-01,etc.), using a commercially
available BNC coaxial cable.
C 10MHz IN terminal
You can use the input of external 10MHz reference frequency. Connect this terminal to the
output terminal of the external 10MHz oscillator. Use a commercially available BNC coaxial cable
for connection.
D SIGNAL GND connection
Use a commercially available PVC-covered cord to connect the signal ground terminal on the unit
to the amplifier signal ground.
< Note that this is NOT an electrical safety ground (earth).
E Power cord receptacle
After all other connections have been made, insert the supplied AC power cord into this
receptacle, then connect the other end of the power cord into the AC power source. Ensure that
your AC voltage corresponds to the voltage marked on the rear panel of the unit. Consult a
qualified electrician if you are in doubt.
< In order to avoid the risk of electric shock, fire, or other hazard, only use the supplied power cord
or a suitably approved OEM power cord.
< If you are not going to use the unit for some time, disconnect the power cord from the wall
socket.
F Main Power switch
Use this to turn the unit on and off.
< When the G-0s is turned on, the process of pre-heating the rubidium oscillator to its operating
temperature gets started. It takes several minutes before the oscillator is ready for operation.
Keep the unit turned on if you want the oscillator to stabilize more quickly.
The equipment draws nominal non-operating power from the AC outlet with its POWER switch
in the OFF position.
7
Set Up for Esoteric Units
4 Select 44.1kHz using the FREQUENCY MODE button.
2
3
4
5
5 Select the frequency of the word clock for each line by
pressing the A, B or C button.
This is the recommended set up for synchronization with
TEAC-ESOTERIC CD units:
P-70, X-01, UX-1, P-01, D-01
1 Connect WORD CLOCK OUT terminals to WORD SYNC IN
terminals of each unit using commercially available BNC
coaxial cables.
P-70: turn ON the WORD SYNC IN switch (front panel), then
set the PLL filter switch (back panel) to ‘MODE2’.
< Set the frequency as high as the connected units will allow for
synchronization.
P-70: 88.2 kHz
X-01: 176.4 kHz
P-01: 176.4 kHz
D-01: 176.4 kHz
X-01: select ‘Word M1 ON’ using the CLOCK MODE button.
UX-1: select ‘Word ON’ using the CLOCK MODE button.
P-01: select ‘Rb IN’ using the WORD button.
D-01: select ‘Rb IN’ using the WORD button.
2 Press the STANDBY/ON button to turn the unit on.
The standby indicator will turn off.
3 Press the MASTER button to select which oscillator you
will use for the reference frequency.
< “Rb” is recommended.
8
NOTE:
If you connect this unit to other manufacturers units, be sure
to read the manuals of those devices to confirm the frequency
range of synchronization.
Dual AES connection will require you to set the clock
frequency at one half of the audio signal frequency.
Set Up for DVD Players, Universal Players, etc.
5 If your units are connected to the WORD SYNC OUT
terminals, select the frequency of the word clock for
each line by pressing the A, B or C button.
2
3
6
4
5
This is the recommended set up for synchronizing DVD
players, D/A converters and other similar digital devices.
1 Connect WORD CLOCK OUT terminals to word
synchronization input terminals of your units, using
commercially available BNC coaxial cables.
If your unit can be synchronized with the universal clock
signal (ex. UX-1, P-01, etc.), connect UNIVERSAL CLOCK OUT
terminals to the universal clock input terminals of the unit,
using a commercially available BNC coaxial cable.
< Set each unit to the slave mode (word synchronization input
mode).
< Set the frequency as high as the connected units will allow for
synchronization.
6 If your units are connected to the UNIVERSAL CLOCK
OUT terminals, press the UNIVERSAL CLOCK OUT button
to turn it on.
100 kHz signal is output from the terminals when you set the
master mode to 44.1kHz or 48kHz. 96 kHz signal is output
from the terminals when you set the master mode to PAL
FILM.
2 Press the STANDBY/ON button to turn the unit on.
The standby indicator will turn off.
3 Press the MASTER button to select which oscillator you
< Digital output from the digital output terminals may be
prohibited depending on the DISC format (ex. SACD). Your
D/A converter may not be able to convert all the digital
output signals.
wish to use for the reference frequency.
< “Rb” is recommended.
4 Select the appropriate frequency mode using the
FREQUENCY MODE button.
48kHz:
If you intend to play DVD, DAT, etc.
44.1kHz:
If you intend to play CD.
PAL FILM:
If you intend to play PAL DVD discs at 24frames/sec.
< Before you set PAL FILM mode, confirm that the connected
unit can be synchronized with the frequency of PAL FILM.
UX-1 can be synchronized with the PAL FILM mode.
9
Dimmer
Troubleshooting
In case you experience any problem with this unit, please take
the time to look through this chart and see if you can solve the
problem yourself before you call your dealer or a TEAC service
center.
No power
e Check the connection to the AC power supply. Check and
make sure the AC source is not a switched outlet and that,
if it is, the switch is turned on. Make sure there is power to
the AC outlet by plugging in another item such as a lamp or
fan.
e Turn on the POWER switch on the rear panel.
The front display can be dimmed to suit your preferred
environment. There are two levels and an “off” setting.
Press the A button for more than 2 seconds to switch
the dimmer mode.
LEd OFF 1:
All the illuminations are turned off except the MASTER
button indicator (Xtal, Rb, Ext).
LEd OFF 2:
All the illuminations are turned off.
LEd ON:
Normal mode.
< Note that the OFF setting is memorized when the power is
turned off.
< In OFF mode, when you turn on the power or you operate
other buttons, the illuminations turn temporarily on, and after
the clock signal is stabilized, it turns off. (After the indicator
for the MASTER button stops blinking and lights steadily.)
Not synchronized
e Check to see if the current word clock output is supported
by the connected players. If necessary, select a word clock
frequency that is appropriate for the individual players.
There are occasions where the word clock available for
synchronization varies depending on the connection and
settings of the individual players. For details, consult the
manual for each player.
e If you are using the PAL FILM mode, check to see whether
the connected player supports the PAL FILM frequency (-4%
of the standard frequency).
e Check to see whether the sync outputs on the rear panel are
connected to the acceptable sync inputs of the individual
players.
Desired frequency not selectable with A, B, and C buttons
e Select the proper fundamental frequency in FREQUENCY
MODE before operating the buttons.
Odd sound pitch
e Do not use the PAL FILM mode for NTSC discs or PAL discs
other than film source discs.
If normal operation cannot be recovered, unplug the
power cord from the outlet and plug it in again. This
resets the internal micro-computer which can be disturbed
during electrical storms, power interruptions, et cetera.
Maintenance
If the surface of the unit gets dirty, wipe with a soft cloth or
use diluted neutral cleaning liquid. Be sure to remove any
fluid completely. Do not use thinner, benzine or alcohol as
they may damage the surface of the unit.
10
Specifications
Clock outputs
44.1 kHz lines . . . . . . . . . . . . . 44.1 kHz, 88.2 kHz, 176.4 kHz
48 kHz lines . . . . . . . . . . . . . . . . . . . 48 kHz, 96 kHz, 192 kHz
PAL FILM lines . . . . . . . . . . 46.08 kHz, 92.1 6kHz, 184.32 kHz
UNIVERSAL CLOCK lines . . . . . . . . . . . . . . . . 100 kHz, 96 kHz
General
Power supply . . . . . . . . . . . . . . . . . . . . . . . . AC 120 V, 60 Hz
Power consumption . . . . . . 75 W (maximum), 31 W (nominal)
Weight . . . . . . . . . . . . . . . . . . . . . . . . . . . . 18.5 kg (40.8 lbs)
Terminals. . . . . . . . . . . . . . . . . . . . . . . . . . . BNC coaxial/75 Ω
Output. . . . . . . . . . . . . . . . . . . . . . . . . . . . . rectangular wave
Accuracy
Under ±0.05ppb (factory setting, ppb: 10-9)
Stabilized time of the output clock
If the main power to the Rubidium oscillator is first turned
on . . . . . . . . . . . . . . . . . . . . . . . . . . . . . . . . . . . . 10 minutes
If the G-0s is in standby mode and the Rubidium oscillator is
stabilized. . . . . . . . . . . . . . . . . . . . . . . . . . . . . . . . . 0 seconds
MASTER/FREQUENCY MODE switched to output stabilized . .
Less than 10 seconds
External dimensions (W x H x D) . . . . . . . 442 x 155 x 351 mm
(17.4˝ x 6.1˝ x 13.8˝)
Accessories
Power cord x 1
Felt x 3
Warranty card x 1
Owner’s manual x 1
• Design and specifications are subject to change without
notice.
• Weight and dimensions are approximate.
• Illustrations may differ slightly from production models.
Frequency input
Input. . . . . . . . . . . . . . . . . . . . . . . . 10 MHz (under ±10 ppm)
Rectangular or Sine wave, 1.4-5 V (peak to peak)
Terminal . . . . . . . . . . . . . . . . . . . . . . . . . . . BNC coaxial/75 Ω
351mm
333mm
442mm
155mm
11
Z
TEAC CORPORATION
3-7-3, Nakacho, Musashino-shi, Tokyo 180-8550, Japan Phone: (0422) 52-5081
TEAC AMERICA, INC.
7733 Telegraph Road, Montebello, California 90640 Phone: (323) 726-0303
TEAC CANADA LTD.
5939 Wallace Street, Mississauga, Ontario L4Z 1Z8, Canada Phone: (905) 890-8008
TEAC MEXICO, S.A. De C.V
Campesinos N°184, Colonia Granjas Esmeralda, Delegacion Iztapalapa, CP 09810, México DF Phone: (525) 581-5500
TEAC UK LIMITED
5 Marlin House, Croxley Business Park, Watford, Hertfordshire, WD18 8TE, U.K. Phone: 01923-819699
TEAC EUROPE GmbH
Bahnstrasse 12, 65205 Wiesbaden-Erbenheim, Germany Phone: 0611-71580
TEAC FRANCE S.A.
17, Rue Alexis-de-Tocqueville, CE 005 92182 Antony Cedex, France Phone: (1) 42.37.01.02
TEAC ITALIANA S.p.A.
Via C. Cantù 11, 20092 Cinisello Balsamo, Milano, Italy Phone: 02-66010500
TEAC AUSTRALIA PTY., LTD.
A.B.N. 80 005 408 462
280 William Street, Melbourne VIC 3000, Australia Phone: (03) 9672-2400
This appliance has a serial number located on the rear panel. Please record
the model number and serial number and retain them for your records.
Model number
Serial number
1004.MA-0945A