1
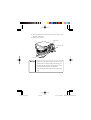
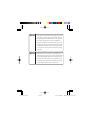
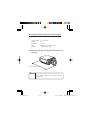
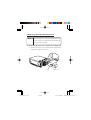
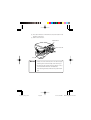
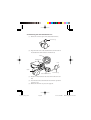
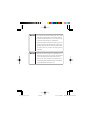
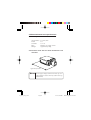
2. Attaching the long throw attachment lens
Memo
Ensure that the lens is attached and detached in a clean
room free from dust. Dust entering the inside of the
lens may result in damage.
2-1. Removing the front lens unit from the standard lens
(1) Remove the front lens cap and cord from the standard lens.
Tug on the cord gently to remove it.
Cord
Front lens cap
12
Page 12
01.2.15, 3:03 PM
(2) Press down the lever on the front lens unit, and rotate it in the
direction of the arrow.
(3) Pull it out to remove it.
Standard lens
Front lens unit
Lever
Memo
• Gently move the front lens unit to the left and right
and then pull it out horizontally when removing it.
• Do not leave the projector for long periods, or carry
it around with the front lens unit detached.
Dust entering the inside of the lens may result in damage.
13
Page 13
01.2.15, 3:03 PM
2-2. Attaching the long throw attachment lens
(1) Remove the rear lens cap from the long throw attachment lens.
Rear lens cap
(2) Align the notch on the long throw attachment lens with the notch
on the standard lens. Both notches are marked in red.
Notch
Standard lens
Cord
Notch
Front lens cap
Long throw attachment lens
(3) Rotate it in the direction of the arrow until it will turn no further.
(4) Insert the end of the cord attached to the front lens cap into the
projector’s case.
(5) Remove the front lens cap to use the projector.
14
Page 14
01.2.15, 3:03 PM
Memo
• Once the lens has been attached, gently move it left
and right to ascertain that it is fixed firmly in place.
• Use the long throw attachment lens’s rear cap as the
rear cap for the front lens unit of a standard lens.
• Ensure that both the front and rear lens caps are set
in place when the long throw attachment lens and the
standard lens front lens unit are not being used. Failure to observe this may result in the lenses getting
scratched.
Memo
• Perform the same procedure as explained in [2-1.
Removing the Front Lens Unit from the Standard
Lens] when detaching the long throw attachment lens.
• Perform the same procedure as explained in [2-2.
Attaching the Long Throw Attachment Lens] when
reattaching the standard lens front lens unit.
15
Page 15
01.2.15, 3:03 PM
4. Long throw attachment lens specifications
4-1. Lens specifications
1. Focus distance
2. Zoom
3. F number
4. Size
5. Weight
: 63.7 to 82.5mm
: x1.3
: 1.7 to 2.3
: Diameter 138 x length 101mm
: Approximately 1600g
4-2. External view with the long throw attachment lens
mounted
Memo
Do not project images with the front lens cap set in
place. Failure to observe this may result in lens cap
malformation.
17
Page 17
01.2.15, 3:03 PM
2. Attaching the wide attachment lens
Memo
Ensure that the lens is attached and detached in a clean
room free from dust. Dust entering the inside of the
lens may result in damage.
2-1. Removing the front lens unit from the standard lens
(1) Remove the front lens cap and cord from the standard lens.
Tug on the cord gently to remove it.
Cord
Front lens cap
12
Page 12
01.2.15, 3:04 PM
(2) Press down the lever on the front lens unit, and rotate it in the
direction of the arrow.
(3) Pull it out to remove it.
Standard lens
Front lens unit
Lever
Memo
• Gently move the front lens unit to the left and right
and then pull it out horizontally when removing it.
• Do not leave the projector for long periods, or carry
it around with the front lens unit detached.
Dust entering the inside of the lens may result in damage.
13
Page 13
01.2.15, 3:04 PM
2-2. Attaching the wide attachment lens
(1) Remove the rear lens cap from the wide attachment lens.
Rear lens cap
(2) Align the notch on the wide attachment lens with the notch on
the standard lens. Both notches are marked in red.
Notch
Standard lens
Cord
Notch
Front lens cap
Wide attachment lens
(3) Rotate it in the direction of the arrow until it will turn no further.
(4) Insert the end of the cord attached to the front lens cap into the
projector’s case.
(5) Remove the front lens cap to use the projector.
14
Page 14
01.2.15, 3:04 PM
Memo
• Once the lens has been attached, gently move it left
and right to ascertain that it is fixed firmly in place.
• Use the wide attachment lens’s rear cap as the rear
cap for the front lens unit of a standard lens.
• Ensure that both the front and rear lens caps are set
in place when the wide attachment lens and the standard lens front lens unit are not being used. Failure
to observe this may result in the lenses getting
scratched.
Memo
• Perform the same procedure as explained in [2-1.
Removing the Front Lens Unit from the Standard
Lens] when detaching the wide attachment lens.
• Perform the same procedure as explained in [2-2.
Attaching the Wide Attachment Lens] when reattaching the standard lens front lens unit.
15
Page 15
01.2.15, 3:04 PM
4. Wide attachment lens specifications
4-1. Lens specifications
1. Focus distance
2. Zoom
3. F number
4. Size
5. Weight
: 37.2 to 48.1mm
: x1.3
: 1.7 to 2.3
: Diameter 116 x length 113mm
: Approximately 1400g
4-2. External view with the wide attachment lens
mounted
Approximately 480mm
Memo
Do not project images with the front lens cap set in
place. Failure to observe this may result in lens cap
malformation.
17
Page 17
01.2.15, 3:04 PM