1
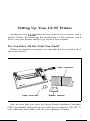
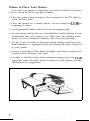
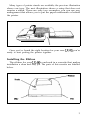
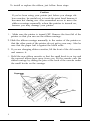
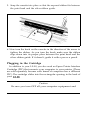
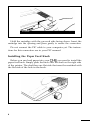
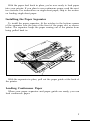
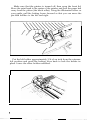
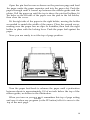
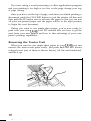
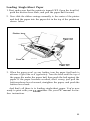
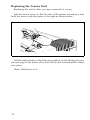
EPSON®
LX-90TM PRINTER
User’s Manual
FCC COMPLIANCE STATEMENT
FOR AMERICAN USERS
This equipment generates and uses radio frequency energy and if not installed and used
properly, that is, in strict accordance with the manufacturer’s instructions, may cause
interference to radio and television reception. It has been type tested and found to comply
with the limits for a Class B computing device in accordance with the specifications in
Subpart J of part 15 of FCC Rules, which are designed to provide reasonable protection
against such interference in a residential installation. However, there is no guarantee that
interference will not occur in a particular installation. If this equipment does cause interference to radio or television reception, which can be determined by turning the equipment off and on, the user is encouraged to try to correct the interference by one or more of
the following measures:
- Reorient the receiving antenna
- Relocate the computer with respect to the receiver
- Plug the computer into a different outlet so that the computer and receiver are on
different branch circuits.
If necessary, the user should consult the dealer or an experienced radio/television technician for additional suggestions. The user may find the following booklet prepared by the
Federal Communications Commission helpful:
“How to Identify and Resolve Radio-TV Interference Problems.”
This booklet is available from the U.S. Government Printing Office, Washington, DC
20402. Stock No. 004-000-00345-4.
WARNING
The connection of a non-shielded printer interface cable to this printer will invalidate the
FCC Certification of this device and may cause interference levels which exceed the limits
established by the FCC for this equipment.
All rights reserved. No part of this publication may be reproduced, stored in a retrieval system,
or transmitted, in any form or by any means, mechanical, photocopying, recording or otherwise, without the prior written permission of Epson America, Inc. No patent liability is
assumed with respect to the use of the information contained herein. While every precaution
has been taken in the preparation of this book, Epson America, Inc. assumes no responsibility
for errors or omissions. Neither is any liability assumed for damages resulting from the use of
the information contained herein.
Graphic on cover produced by John Cannizzo.
LX-90 and PIC are trademarks of Epson America, Inc.
Epson is a registered trademark of Epson Corporation.
Copyright © 1985 by Epson America, Inc.
Torrance, California 90505
ii
I’8592032
Contents
1
1
Setting Up Your LX-90 Printer . . . . . . . . . . . . . . . . . . . . . . . .
Do You Have All the Parts You Need? . . . . . . . . . . . . . . . . .
Where to Place Your Printer . . . . . . . . . . . . . . . . . . . . . . . . .
Installing the Ribbon . . . . . . . . . . . . . . . . . . . . . . . . . . . . . . .
Plugging in the Cartridge . . . . . . . . . . . . . . . . . . . . . . . . . . . .
Installing the Paper Feed Knob . . . . . . . . . . . . . . . . . . . . . . .
Installing the Paper Separator . . . . . . . . . . . . . . . . . . . . . . . .
Loading Continuous Paper . . . . . . . . . . . . . . . . . . . . . . . . . .
Removing the Tractor Unit . . . . . . . . . . . . . . . . . . . . . . . . . .
Loading Single-Sheet Paper . . . . . . . . . . . . . . . . . . . . . . . . . .
Replacing the Tractor Unit . . . . . . . . . . . . . . . . . . . . . . . . . . .
2
3
5
6
7
7
10
11
12
Maintenance . . . . . . . . . . . . . . . . . . . . . . . . . . . . . . . . . . . . . .
13
.....................................
14
Specifications
Setting Up Your LX-90 Printer
™
Setting up your LX-90 printer is easy, even if you’ve never used a
printer before. By following the instructions in this manual, you’ll
have your new printer ready to go in just a few minutes.
Do You Have All the Parts You Need?
When you unpack your printer, be sure that the box contains all of
the items shown:
Paper separator
Paper feed knob
Ribbon cassette
Also be sure that you have an Epson Printer Interface Cartridge
(PIP’) specifically designed for use with your computer. The PIC is
sold separately and comes with its own operation. manual.
1
Where to Place Your Printer
Now that your printer is unpacked, you need to find the best place
to put it. Keep the following tips in mind:
l
l
l
l
l
l
l
Place the printer close enough to the computer for the PIC cable to
reach between them.
Place the printer on a stable surface. Avoid setting the LX-90 on
carpeting or chairs.
Use a grounded outlet, and do not use an adapter plug.
Avoid using outlets that are controlled by wall switches-if you
accidentally turn off a switch, you could wipe out valuable information in your computer’s memory and stop your printing.
Try not to use an outlet on the same circuit breaker with large electrical machines or appliances-they can disrupt the flow of power
to your printer.
Protect your printer from direct sunlight, and keep it away from
excessive heat, moisture, and dust.
In order to use the tractor and continuous paper, put your LX-90
where the paper can flow freely in and out of the printer. See the
illustrations for suggestions.
Many types of printer stands are available; the previous illustration
shows one type. The next illustration shows a setup that does not
require a stand. These are only two examples; you can use any
arrangement that allows you to put the paper underneath or behind
the printer.
Once you’ve found the right location for your new LX-90, you’re
ready to start putting the printer together.
Installing the Ribbon
The ribbon for your LX-90 is enclosed in a cassette that makes
installation a clean and easy job. The parts of this cassette are labelled
below.
3
To install or replace the ribbon, just follow these steps:
Caution
If you’ve been using your printer just before you change ribbon cassettes, be careful not to touch the print head because it
becomes hot during use. Also remember never to move the
ribbon carriage manually when the printer is turned on,
because you may damage your printer.
1. Make sure the printer is turned OFF. Remove the front lid of the
printer so that you can see the ribbon carriage.
2. Slide the ribbon carriage manually to the center of the printer so
that the other parts of the printer do not get in your way. Also be
sure that the paper bail is against the black roller.
3. If you are changing ribbon cassettes, lift the front of the old cassette
and remove it.
4. Hold the new ribbon cassette so that the small knob is on top and
the exposed ribbon faces away from you. Fit the cassette onto the
ribbon carriage by sliding the pins at the back of the cassette under
the small hooks on the carriage.
Paper
Pin
4
5. Snap the cassette into place so that the exposed ribbon fits between
the print head and the silver ribbon guide.
6. Now turn the knob on the cassette in the direction of the arrow to
tighten the ribbon. As you turn the knob, make sure the ribbon
slips down into its proper place between the print head and the
silver ribbon guide. If it doesn’t, guide it with a pen or a pencil.
Plugging in the Cartridge
In addition to your LX-90, you also need an Epson Printer Interface
Cartridge (PIC) that connects your computer to your printer. (These
are sold separately because each brand of computer uses a different
PIC.) The cartridge slides into the rectangular opening in the back of
your Lx-90.
Caution
Be sure you turn OFF all your computer equipment and
Hold the cartridge with the grooved side facing down. Insert the
cartridge into the opening and press gently to secure the connection.
Do not connect the PIC cable to your computer yet. The instructions for this connection are in your PIC manual.
Installing the Paper Feed Knob
Before you can load paper into your LX-90, you need to install the
paper feed knob. Simply push the knob onto the shaft on the right side
of the printer. The shaft has one flat side that must be matched with
the flat side of the hole in the knob.
6
With the paper feed knob in place, you’re now ready to load paper
into your printer. If you plan to use continuous paper, read the next
two sections. For instructions on single-sheet paper, skip to the section
on loading single-sheet paper.
Installing the Paper Separator
To install the paper separator, fit the notches in the bottom comers
of the separator over the pins at the front of the paper slot, as shown
below. The separator keeps the paper coming out of the printer from
being pulled back in.
With the separator in place, pull out the paper guide at the back of
the printer.
Loading Continuous Paper
When your paper separator and paper guide are ready, you can
load continuous paper.
7
Make sure that the printer is turned off; then open the front lid.
Move the print head to the center of the printer, and pull the paper bail
away from the platen (the black roller). Using the illustration below as
your guide, pull the locking levers forward so that you can move the
pin feed holders to the left and right.
Put the left holder approximately 3/4 of an inch from the extreme
left position and push the locking lever back to lock the holder in
place. Leave the other holder unlocked.
I
Open the pin feed covers as shown on the previous page and feed
the paper under the paper separator and into the paper slot. Push the
paper through until it comes up between the ribbon guide and the
platen. Pull the paper up until the top is above the pin-feed holders; fit
the holes on the left side of the paper over the pins in the left holder;
then close the cover.
Fit the right side of the paper in the right holder, moving the holder
as needed to match the width of the paper. Close the second cover,
making sure the paper has no dips or wrinkles; then lock the right
holder in place with the locking lever. Push the paper bail against the
paper.
Now you are ready to set the top of page position.
Turn the paper feed knob to advance the paper until a perforation
between sheets is approximately l/8 of an inch below the top of the
ribbon guide, as shown in the illustration.
When you turn on your LX-90, it remembers this top of page setting
and uses it when any program (or the FF button) tells it to move to the
top of the next page.
9
If you are using a word processing or other applications program
and your printing is too high or too low on the page, change your top
of page setting.
Once you have set the top of page, each time you finish printing a
document, push the ON LINE button to put the printer off-line and
then push the FF button once to advance the paper so that you can tear
off your just-printed pages and the paper will be in the right position
to begin the next document.
Unless you want to use single-sheet paper, you’re now ready to
print with your new LX-90. Your PIC manual tells you how to get the
most from your new printer and how to take advantage of your computer’s printing capabilities.
Removing the Tractor Unit
When you want to use single-sheet paper in your LX-90, you can
remove the tractor unit quite easily. Just push back the two tractor
release levers (one of them is shown below), tilt the unit backward,
and lift it up.
Loading Single-Sheet Paper
1. First, make sure that the printer is turned OFF. Open the front lid,
push the friction lever back, and pull the paper bail forward.
2. Now slide the ribbon carriage manually to the center of the printer
and feed the paper into the paper slot in the top of the printer as
shown below.
Friction lever
Front lid
3. When the paper won’t go any further, turn the paper feed knob to
advance it (just like on a typewriter). Turn the knob until the top of
the paper fits under the paper bail, then push the bail against the
paper. If the paper becomes crooked, don’t worry; just pull the
friction-release lever forward, straighten the paper, and push the
friction lever back.
And that’s all there is to loading single-sheet paper. You’re now
ready to print with your LX-90 printer. See your PIC manual for further instructions.
11
Replacing the Tractor Unit
Replacing the tractor after you have removed it is easy.
Pull the friction lever on the left side of the printer toward you, and
hold the tractor with the gears to the right as shown below.
I
I
Tilt the tractor back so that the rear notches on the fittings fit over
the rear pegs in the tractor slots; then tilt the unit forward until it clicks
into place.
That’s all there is to it.
12
Maintenance
To keep your LX-90 working like new, always keep it in a safe and
clean place. Keep it away from dust, grease, and any heat sources. A
safe temperature range is 41°F to 95°F.
To clean the outside of the printer case, use a soft, clean cloth dampened with clear water. Stubborn stains can be removed with non-abrasive household cleaners.
The inside front portion of the printer should also be cleaned periodically to get rid of dust and paper lint. First, turn the power switch
OFF and unplug the power cord from the electrical outlet. Then remove the front lid.
Use a small vacuum cleaner and soft brush to clean inside the
printer. Be careful not to bend or damage any of the parts inside the
printer. With the power OFF, you can move the print head back and
forth to clean under it.
Once in a great while your LX-90 should be lubricated by an authorized Epson dealer.
13
Specifications
Printing method . . . . . . . . . . Impact dot matrix
Printing speed . . . . . . . . . . . . 100 characters per second per line in
pica draft mode
Printing direction . . . . . . . . . Bidirectional, logic seeking
Ribbon . . . . . . . . . . . . . . . . . . Cassette ribbon, black
Height (with tractor) . . . . . . . 5.1 inches
Width . . . . . . . . . . . . . . . . . . . 16.6 inches
Depth (with paper separator) 12.4 inches
Weight (with tractor) . . . . . . 12.5 pounds
Temperature . . . . . . . . . . . . . . Operating 41°F to 95°F
Storage -22°F to 149°F
Power requirements . . . . . . . Voltage: 110-130 volts
Frequency: 49.6 to 60.5 Hz
Consumption: 60 VA maximum
Paper types . . . . . . . . . . . . . . Single-sheet, friction feed,
7.25 to 8.5 inches wide.
Copies: Original and one sheet
14
EPSON AMERICA, INC.
LIMITED WARRANTY
Epson America, Inc. hereby warrants that it will repair or replace, at its option, any
part of the Epson product with which this warranty is enclosed which proves defective
by reason of improper workmanship and/or material, without charge for parts or
labor, for a period of one (1) year. This warranty period commences on the date of
original purchase by the buyer other than for purposes of resale, and this warranty
applies only if such original purchase by the buyer was made in the United States.
To obtain service under this warranty you must return your Epson product, properly packaged in its original container or an equivalent, to the nearest authorized
Epson Service Center or the Dealer from whom the product was purchased. Any
postage, insurance and shipping costs incurred in presenting or sending your Epson
product for service are your responsibility.
The Dealer’s original bill of sale or other satisfactory proof of the date of the original buyer purchase of your Epson product must be made available to obtain service
under this warranty.
This warranty applies only if your Epson product fails to function properly under
normal use and within the manufacturer’s specifications. Batteries, as well as optional
software packages (ROMs) not contained in the original container of your Epson
product, are excluded from coverage under this warranty. This warranty does not
apply if the Epson label or logo, or the rating label or serial number, has been removed
from your Epson product, or if, in the sole opinion of Epson, your Epson product has
been damaged by faulty or leaking batteries not supplied by Epson, or by accident,
misuse, neglect, or improper packing, shipping, modification or servicing, by other
than Epson or an authorized Epson Service Center.
SOME EPSON PRODUCTS HAVE A COMPARTMENT CONTAINING
STATIC-SENSITIVE ELECTRONIC CIRCUITRY. THIS COMPARTMENT IS
CLEARLY LABELED. DO NOT OPEN IT! THIS WARRANTY WILL BECOME
VOID IF YOU ATTEMPT TO MODIFY OR ADJUST ANY ROM OR OTHER PART
OR DEVICE IN SUCH A COMPARTMENT, OR IF YOU ATTEMPT TO ADD OR
INSERT ANY ROM OR OTHER PART OR DEVICE. IF ANY OF THESE STEPS IS
REQUIRED, BRING YOUR EPSON PRODUCT TO AN AUTHORIZED EPSON
DEALER.
THE DURATION OF ANY IMPLIED WARRANTY OF MERCHANTABILITY
FITNESS FOR A PARTICULAR PURPOSE, OR OTHERWISE, ON YOUR EPSON
PRODUCT SHALL BE LIMITED TO THE DURATION OF THE EXPRESS WARRANTY SET FORTH ABOVE. IN NO EVENT SHALL EPSON AMERICA, INC. OR
ITS AFFILIATES BE LIABLE FOR ANY LOSS, INCONVENIENCE OR DAMAGE
WHETHER DIRECT INCIDENTAL, CONSEQUENTIAL OR OTHERWISE, OR
WHETHER CAUSED BY NEGLIGENCE OR OTHER FAULT RESULTING FROM
BREACH OF ANY EXPRESS OR IMPLIED WARRANTY OF MERCHANTABILITY, FITNESS FOR A PARTICULAR PURPOSE, OR OTHERWISE, WITH RESPECT TO YOUR EPSON PRODUCT, EXCEPT AS SET FORTH HEREIN. SOME
STATES DO NOT ALLOW LIMITATIONS ON HOW LONG AN IMPLIED WARRANTY LASTS AND SOME STATES DO NOT ALLOW THE EXCLUSION OR
LIMITATION OF INCIDENTAL OR CONSEQUENTIAL DAMAGES, SO THE
ABOVE LIMITATIONS AND EXCLUSIONS MAY NOT APPLY TO YOU.
You may request information on how to obtain service under this warranty by
contacting the Dealer from whom your Epson product was purchased, or by contacting Epson America, Inc. at the address printed below:
Epson America, Inc.
Service Division
23155 Kashiwa Court
Torrance, CA 90505
(213) 534-0360
This warranty gives you specific legal rights, and you may also have other rights