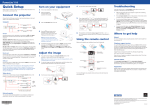
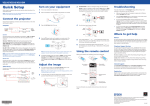
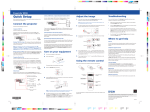
1
EX3212
Quick Setup
Before using the projector, make sure you read the safety instructions in the
online User’s Guide.
Camera, USB device, or EPSON DC-06 Document Camera
3
Connect a digital camera, USB flash drive, USB storage device, or EPSON DC-06
Document Camera to the projector’s USB TypeA (flat) port.
Troubleshooting
Press the Tele (reduce) or Wide (enlarge) buttons on the projector to
reduce or enlarge the image.
If you see a blank screen or the No signal message after turning on your
computer or video device, check the following:
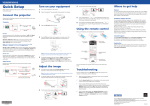
Connect the projector
4
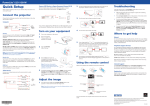
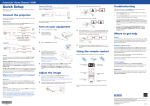
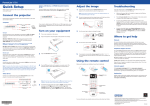
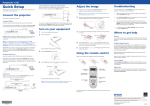
Choose from the following connections. See the sections below or the online
User’s Guide for details.
Turn the focus ring to sharpen the image.
•
Make sure the power light on the projector is green and not flashing,
and the A/V Mute slide is open.
•
Press the Source Search button on the projector or the remote control
to switch to the correct image source, if necessary.
•
If you’re using a Windows laptop, press the function key on your
keyboard that lets you display on an external monitor. It may be labeled
CRT/LCD or have an icon such as
. You may have to hold down the
Fn key while pressing it (such as Fn + F7). Wait a moment for the display
to appear.
•
If you’re using a Mac laptop, open System Preferences and select
Displays. Select the VGA Display or Color LCD option if necessary,
then click the Arrange or Arrangement tab, and select the Mirror
Displays checkbox.
Computer
USB cable
HDMI cable
VGA cable
If you connect a digital camera, USB flash drive, or USB storage device, you
can use the projector’s Slideshow feature to project images. See the online
User’s Guide for details.
5
Turn on your equipment
USB port
Connect the square end of a USB cable to the projector’s USB
TypeB
(square) port. Connect the flat end of the cable to any USB port on your
computer.
Windows® 2000 SP4 or later: After turning on the projector, follow the
on-screen instructions to install the EPSON® USB Display software
(EMP_UDSE.EXE; only on first connection). If the software screen does not
display automatically, open My Computer or Computer, then double-click
EPSON_PJ_UD.
Mac OS X 10.5.1 or higher: After turning on the projector, the setup folder
for USB Display appears in the Finder. Double-click USB Display Installer and
follow the on-screen instructions to install the EPSON USB Display software
(only on first connection).
1
2
3
If your image looks like
or
, you’ve placed the projector off
to one side of the screen at an angle. Use the horizontal slider on the
projector to correct it. Or place the projector directly in front of the
center of the screen, facing the screen squarely.
Where to get help
Turn on your computer or video source.
Plug in the projector.
The power light on the
projector turns orange.
Open the A/V Mute slide all the way.
Manual
6
Your projector automatically adjusts images that look like
or
,
but if necessary you can press the
or
button on the projector to
correct it.
Telephone support services
Using the remote control
To use the EPSON® PrivateLine® Support service, call (800) 637-7661. This
service is available for the duration of your warranty period. You may also
speak with a projector support specialist by dialing (562) 276-4394 (U.S.) or
(905) 709-3839 (Canada).
Make sure the batteries are installed as shown (two AA batteries).
Note: If you have problems installing the USB Display software, make sure the
USB Type B setting in the projector’s Extended menu is set to USB Display.
See the online User’s Guide for instructions.
Support hours are 6 AM to 8 PM, Pacific Time, Monday through Friday and
7 AM to 4 PM, Pacific Time, Saturday.
Monitor port
Connect one end of a VGA cable to the projector’s Computer port, and the
other end to your computer’s
monitor port. If you are using a laptop,
switch it to external display (see “Troubleshooting”). You can also connect an
audio cable.
4
HDMI port
5
Video device
Connect up to 4 video devices and press the Source Search button on the
projector or remote control to cycle through them.
Audio cable
Component video to VGA cable
Choose which
source to display
Turn projector
on and off
Internet support
Visit www.epson.com/support (U.S.) or www.epson.ca/support
(Canada) for solutions to common problems. You can download utilities and
documentation, get FAQs and troubleshooting advice, or e-mail Epson.
The default language of the menu system is English. To select another
language, press the Menu button on the remote control. Select
. Select Language and press
. Select
Extended and press
your language and press
. Press the Menu button to exit the
menu system.
Registration
Access projector
menus
1
If you don’t see an image, press the Source Search button on the
projector or remote control to select the image source.
Register today to get product updates, special promotions and customer-only
offers. You can use the CD included with your projector, or register online at
www.epson.com/webreg.
Navigate projector
menus
Turn off projector
display
Get solutions to
common problems
Adjust the image
S-Video cable
HDMI cable
Press the
power button on the
projector or remote control. The projector
beeps, the power light flashes green,
and then stays on.
Days and hours of support are subject to change without notice. Toll or long
distance charges may apply.
Note: To shut down the projector,
press the
power button twice, then
unplug it. You don’t have to wait for the
projector to cool down.
Connect one end of an HDMI cable to the projector’s HDMI port and the other
end to an HDMI port on your computer.
Note: To connect a Mac that includes only a Mini DisplayPort or Mini-DVI port
for video output, you need to obtain an adapter that allows you to connect
to the projector’s Computer or HDMI port. Contact Apple for compatible
adapter options. Older Mac computers (2009 and earlier) may not support
audio through the HDMI port.
For more information about using the projector, click the icon on your desktop
to access the online User’s Guide (requires an Internet connection). If you don’t
have a User’s Guide icon, you can install it from the projector CD or go to the
Epson website, as described below.
For more information on using the remote control, see the online
User’s Guide.
Note: If you still see a blank screen or have other display problems, see the
troubleshooting tips on the right.
2
To raise the image, press the
foot release button and lift
the front of the projector.
Release the button to lock the
foot in position.
RCA video cable (composite video)
EPSON is a registered trademark and EPSON Exceed Your Vision is a registered logomark of Seiko Epson
Corporation. PrivateLine is a registered trademark of Epson America, Inc.
General Notice: Other product names used herein are for identification purposes only and may be trademarks of
their respective owners. Epson disclaims any and all rights in those marks.
This information is subject to change without notice.
© 2012 Epson America, Inc. 4/12
Printed in XXXXXX
4123221
1-F
Rev.0
C
4123221
1-F
Rev.0
M
4123221
1-F
Rev.0
Y
CPD-37124
4123221
1-F
Rev.0
K