1
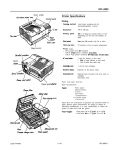
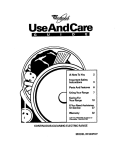
EPL-6000 LASER PRINTER
1 Assembling the Printer 1
Before you can use the printer, you need to install a few important
parts. Before proceeding, familiarize yourself with the components
shown below. The basket is inside the printer and must be removed
when you install certain parts. The other parts shown were shipped
in the accessory pack.
Paper and paper delivery
Epson does not recommend or guarantee
Paper specifications:
the use of any particular brand of paper.
Because paper characteristics are subject to
change by individual manufacturers, it is
the user's responsibility to ensure the
quality of paper used with the printer.
Paper weight:
Cotton swab
Cleaning pad
Cassette feed (plain paper):
16 to 27 lb. (60 to 101 g/m’)
Manual feed (plain paper):
14 to 34 lb. (52 to 128 g/m’)
Paper size:
Standard sizes:
210 x 297 mm (8.3x 11.7 inches)
7.25 x 10.5 inches
Range of paper
width and length:
Developer cleaner
\y
Printer Specifications
Face-up output tray
Paper feed
alignment and
direction:
Center alignment for all sizes; lengthwise
direction for standard sizes.
Printer Specifications
Paper feed:
Printing
Cassette or manual feed (paper cassette
capacity: up to 150 sheets of 20 lb. paper).
Paper eject:
Face-up or face-down selection.
Printing method:
Laser beam scanning and dry
electrophotographic process.
Paper eject
capacity:
Drum type: OPC
Facedown:
Faceup:
150 sheets (20 lb. paper)
20 sheets (20 lb. paper)
Printable area:
Exposure: Laser beam scanning
Fusing: Heat fixing
Resolution:
300 x 300 dpi
Print speed:
6 pages per minute (letter or A4)
First print:
Less than 21 seconds (letter/A4 face up)
Warm-up time:
Approximately 65 seconds at 73°F (23°C)
with 512K RAM.
Internal fonts:
6 font styles:
Courier 12 pt. portrait 10 cpi
Courier 12 pt. landscape 10 cpi
Courier Bold 12 pt. portrait 10 cpi
Courier Bold 12 pt. landscape 10 cpi
Line Printer 8.5 pt. portrait 16.66 cpi
Line Printer 8.5 pt. landscape 16.66 cpi
Cartridges:
Laser Printers
2 cartridge slots are available for identity
and font cartridges.
7/18/89
EPL-1
EPL-6000 LASER PRINTER
Mechanical
1 Interface Specifications 1
Dimensions and
weight:
Height:
8.3 inches (210 mm)
Width:
16.1 inches (410 mm)
excluding output and
input trays.
Depth:
15.4 inches (390 mm)
Weight:
Approx. 36 lb. (16 kg)
including paper cassette,
drum unit, and toner
cartridge.
Pin assignments for the parallel interface
The parallel interface connector pin assignments and a description
of the interface signals are shown in the table below.
Signal
Return
Pin
Pin
Signal
19
DATA
Signal to read data I”
20
DATA 1
DATA 2
DATA 3
DATA 4
DATA 5
DATA 6
DATA 7
DATA 6
These signals represent
information of me 1st to
8th bits of parallel data
respectively. Each signal
is at HIGH level when data
is logical 1 and LOW when
Recommended
duty cycle:
3,000 sheets per month
MPBF (Mean Prints
Between Failures):
30,000 sheets
MTBF (Mean Time
Between Failures):
Durability:
/
3,000 hours
10
21
22
23
24
25
26
27
I26
I
Direction Description
I
1 OUT
1 Acknowledge receiving data.
im
IN
Initial stage after data inside
buffer is printed.
FAULT
OUT
This signal becomes LOW
when the printer is:
lm
5 years or 300,000 sheets
(whichever comes first)
Electrical
Voltage:
120 VAC ± 10%, 60Hz ± 3Hz
Power consumption:
600W
I-
Controller hardware
RAM:
Total Memory:
2MB Memory
Board:
512K bytes
The optional 2MB memory board provides
enough memory for full-page (letter size),
300 dpi graphics plus additional
memory for downloading and other
purposes.
32
4MB Memory
Bard:
. off line
l in error state
l
malfunctioning.
Environment
Operation:
t
Temperature: 50 to 95°F (10 to 35°C)
Humidity:
Storage:
33
34
NC
35
36
NC
Not defined.
-
Not defined.
20 to 80% RH without
condensation
Temperature: 32 to 95°F (0 to 35°C)
Humidity:
l
20 to 80% RH without
condensation
l
WARNING: The life of consumables may be significantly
reduced if they are stored at temperatures outside the
range stated above.
.
Internal mode
HP LaserJet series II emulation
EPL-2
-
4MB increases capacity for downloading
of fonts, graphics, etc.
7/18/89
AU interface conditions are based on TTL. level. Both the rise
and fall of each signal must be less than 0.2 microseconds.
The column heading ‘Direction” refers to the direction of
signal flow as viewed from the printer.
“Return” denotes the twisted-pair return, to be connected at
signal ground level. For the interface wiring, be sure to use a
twisted-pair cable for each signal and to complete the
connection on the return side. These cables should be shielded
and connected to the chassis of the host computer and the
printer.
Laser Printers
EPL-6000 LASER PRINTER
Interface timing
l
When the printer is not ready to receive data, it sends an XOFF
(13 hex) to the host computer through the TD line for the
RS232C interface or SD+ and SD- lines for the RS-422A
interface.
l
The printer is ready to receive data when it is on line, no error
conditions exist, and the buffer is not tilled above the overload
value set with SelecType.
l
The printer is not ready to receive data when it is off line or
when it is on line but the remaining capacity of the data buffer is
less than the overload buffer value.
The figure below shows the timing for the parallel interface.
SELECT
-A
DATA’-a
4
DATA STROBE
ke.T
‘“i
BUSY
ACK
Serial interface pin assignments
A: 1 ps (min.)
8: 1 )B (min.)
C: 1 ps (min.)
The serial interface connector pm assignments and a description of
the interface signals are shown in the table below. The direction of
signals is given relative to the printer.
D: approx. 6 ps
I
Signal levels
Output signals:
Vo,=Oto0.4V
v,, = 2.4 to 5.0 V
Input signals:
v,, =0 to 0.8 V
V,” = 2.0 to 5.0 V
Description
Frame ground. Safety
ground Iine.
Transmit data
This pin transmits serial
Serial interface
data from the printer to
the computer.
The laser printers built-in serial interface can be set for either
RS-232C or RS-422A operation. These interfaces have the following
characteristics.
Receive data.
This pin transmits serial
data from me computer to
Data format
Word length:
7 or 8 bits
Parity:
Request to send. This pin
is HIGH when power is on
Clear to send. This pin
0 or 1 bit (None, Odd, Even, Ignore)
Start bits:
1 bit
Stop bits:
1 or 2 bits
-1
Signal ground. This pin
provides a ground for all the
signal lines.
300, 600, 1200, 2400, 4800, 9600, 19200 bits per second.
Send data. This
pin sends serial data from
the printer to the computer.
v, = 2.5 to 5V
v, = 0 to 0.5 V
procedures
Same as DTR.
I
Receive data. This pin
transmits serial data from j
the computer to the printer
The DTR signal level changes to HIGH when the printer is ready
to receive data (or to LOW if set for inverted operation by
SelecType).
Signal Ievel is RS-422A.
Data terminal ready. This
pin indicates whether or not i
;
the printer is ready to
The DTR signal level changes to LOW when the printer is not
ready to receive data (or to HIGH if set for inverted operation by
SelecType).
receive data. If the printer
ready protocol is not
selected, this pin is always
HIGH (i.e. the printer is
ready to receive data). If
printer ready protocol is
selected, the printer can
accept data when the pin
level is HIGH. and cannot
accept data when the pin
level is LOW. When busy
XON/XOFF:
l
When the printer is ready to receive data, it sends an XON
(11 hex) to the host computer through the TD line for the
RS-232C interface or SD+ and SD- lines for the RS-422A
interface. When ROBUST-XON is set to ON (by SelecType). and
data is not received within one second of the XON signal being
sent, the printer sends an XON signal every second. If ROBUSTXON is set to OFF, the printer sends only one XON signal.
Not a signal, but a +5V
power supply output.
Maximum of 300mA
Laser Printers
/
Send data. This
pin sends serial
data from me printer to
the computer. Signal level
is RS-422A
Ready/ Busy:
l
,
Signal level is RS-422A
v, = 2.2 to 12 V
v, =-I.4 to -12V
Transmission
l
1
Data set ready. This pin
indicates mat the computer
is ready to communicate
Baud rate
RS-422A:
I
indicates that the computer
is ready to receive data
from the printer.
The data format can be set using functions and menu items in
SelecType.
Signal level
RS-232C:
I
7/18/89
I
/
,
1
/
:
i
1
i
/
EPL-3
EPL-6000 LASER PRINTER
SPEClAL button - You can press this button before printing for thin
or light-weight paper or for heat-sensitive media which may require
a lower fuser temperature to avoid curling.
) Switch Settings )
I
I
The DIP switches are located at the back of your printer and are
numbered 1 through 8.
The following table shows recommended settings for different print.
media. (If you wish to try other settings, be sure to test print a few
sheets before regular use.) Paper feed and paper delivery methods
are described in the following sections.
Feed
SPECIAL
Button
Paper
Delivery
Manual
NO
Faceup or
Face-down
Auto
No
Face-up or
Face-down
Heavy Paper
(27 - 34 Ib.)
2
(101 - 126 g/m )
Manual
Yes
Envelopes
Manual
Transparencies
Manual
Labels
Manual
Paper
Thin Paper
(14-16lb)
2
(52-60 g/m )
Regular Paper
(16 - 27 lb.)
(60 - 101 g/r+)
The DIP switch settings are listed below. Use the tip of a ballpoint
pen or another small pointed object to turn the switches ON or OFF.
Pressing a switch down sets it ON and up sets it OFF.
Face-up
Face-up
No
Optional
Face-up
Optional
Face-up
CAUTION: Turn your printer off before setting the
switches. Then turn it back on to implement your changes.
1 Paper Delivery Choices 1
1
2
3
4
5
6
7
8
RS-232C
OFF
OR
OFF
OFF
-
OFF
OFF
ON
RS-422A
Off
OFF
Off
Off
OFF
ON
ON
OFF
* If DIP switch 5 is turned ON when the RS-232C serial interface is in use, pin 25
on the connector is set to +5V. If the DIP switch is turned OFF, the pin on the
connector is not used.
1 Selecting a Paper Size 1
The default paper size setting in SelecType is LTR for letter-size
paper. If you are using a different size paper, change the PAPER
SIZE setting in SelecType. You may also need to adjust the paper
guides on the paper cassette to match the size of the paper you want
to use.
Your laser printer can deliver paper face-down on top of the printer
or face-up into the face-up output tray. The advantage of printing
facedown is that when the printed stack is turned over, the pages
are collated from first page to last. On the other hand, the tace-up
output tray gives you immediate viewing of your printed output.
The face-up method of delivery is necessary for printing on media
that require a straight-through paper path, such as envelopes, labels,
heavy paper, and overhead transparencies.
To select face-up printing, simply move the paper path selector
(located on the left side of the printer) to the down position. Also be
sure that the face-up output tray is installed. (See Chapter 1 for
details.) To select facedown printing, move the paper path selector
to the up position.
Paper ejected face down
The table below lists all of the paper sizes on the SelecType menu.
LETTER
LEGAL
8.5 x 11 inches
8.5 x 14 inches
A4
210 x 297 mm
EXECUTIVE
7.25 x 10.5 inches
Paper path selector
1 Printing Methods Summary
1
YOU have several choices to make when printing. These choices
depend mainly on the type of paper or other print media you use.
Paper delivery method - You can choose between face-up output
and facedown output.
Paper feed method -You can select either automatic or manual
paper feed.
EPL-4
Printer Driver Information
Many application programs let you specify the type of printer
you’re using by selecting a printer driver. Drivers are programs that
your software uses to send commands to the printer. Application
programs often provide an installation or setup procedure that
presents a list of printer drivers to choose from.
7/18/89
Laser Printers
EPL-6000 LASER PRINTER
To take advantage of HP emulation, simply choose a printer driver
from the list below. They are listed in order of priority.
1 Self-Test 1
HP LaserJet series II
HP LaserJet Plusm
HP LaserJetTU
Successful completion of the self test indicates that you have set up
your printer correctly and that you are ready to connect the printer
to your computer. If you are unable to print this test, see Chapter 7
for troubleshooting information.
The application program’s menu may list a number of more specific
choices corresponding to various HP LaserJet font cartridges. (The
choices are labeled with capital letters, such as A, B, or C.)
The self test also lets you check your print density setting. After you
print the self test, check the character pattern to see whether you are
satisfied with the print density The section in this chapter on
adjusting print density describes how to change the print density
Fonts and font cartridges
There are six resident fonts in your printer. These correspond to the
resident fonts for the HP LaserJet series II printer. They are:
setting.
Follow the steps below to perform the self test:
1
WARNING: Never open the printer cover while the
1%
J 1 EPL-6000 is printing.
Line printer
8.5 point
portrait
Line printer
8.5 point
landscape
I
1. Be sure that your printer is plugged in and the power is on
before performing the self test.
2. Be sure that your printer is off line. (OFF L I HE appears on
your display.) If not, press the ON LINE button to set the printer
off line.
In addition, the cartridge slots on your printer let you access a wide
variety of other fonts available on font cartridges.
3. Press the MANUAL and SPECIAL buttons on your control panel at
the same time.
( Maintenance 1
4. When you release the buttons, SELF TEST appears on the
display and the printer prints a self test.
Notes:
l
It is important to press the buttons at the same time.
l
For more information on using the control panel. see
Chapter 3.
*If you regularly print high density graphics (more than 5% page density, you
need to replace the drum unit more often.
The toner cartridge and cleaning pad must be replaced about every
1,500 pages. (The initial toner cartridge lasts about 750 pages.) A
TONER EMPTY message appears when it is time to change these
components.
Part of the character pattern is shown below. Look at your printout
to determine whether the print is too light or too dark. If you need
to change the print density, see the following section on adjusting
print density.
The drum unit must be replaced about every 10,000 pages. (If you
regularly print high density graphics (more than 5% page density).
you need to replace the drum unit at the same time you install the
eighth toner cartridge.) When you replace the drum unit, it is also
necessary to change the drum replacement cartridge, which
monitors drum usage.
A CHANGE DRUM message appears when it is time to change the
drum unit and drum replacement cartridge. Also, the indicator light
on the drum replacement cartridge helps you monitor drum usage,
so that you know when a drum change is imminent.
A service overhaul must be performed at 100,000 pages by an
authorized Epson dealer.
Adjusting print density
If the self test you printed is too light or too dark, adjust the print
density as follows:
Each of these procedures is described in detail in this chapter.
1. Open the printer cover by lifting up on the latch.
Laser Printers
7/18/89
EPL-5
EPL-6000 LASER PRINTER
2. Locate the density control knob, which is in the front right
comer inside the printer.
Follow the steps below to perform the status print test:
1. Be sure that your printer is plugged in and the power is on.
2
Be sure that your printer is off line. (OFF LINE appears on
your display.) If not, press the ON LINE button to set the printer
off Tine.
3. Press the A and V buttons at the same time.
4. When you release the buttons, STATUS PRINT appears on
the display and the printer outputs the status print test.
3. To make the print darker, turn the knob clockwise as shown
below.
A portion of the printout is shown below.
Note: Increasing the print density increases toner
consumption. if you increase the mint density, you need to
replace the toner cartridge more frequently.
j
4. To make the print lighter, turn the knob counterclockwise.
1 Font and Status Print Tests
1
The font print test
1. To perform the font print test, press the RESET/CONTINUE and the
SPECIAL buttons at the same time.
1 Error Messages 1
Notes:
2. When you release the buttons, FONT PRINT appears on the
display and the printer outputs a font print test.
A portion of the font print test printout is shown below.
l
When a problem has been corrected, you may need to press
the ON LINE button to resume printing.
l
Certain problem require that you press the RESET/CONTINUE
button to continue printing. However, when the AUTO CONT
SelecType option is set to ON, the printer automatically clears
the error and resumes printing for the following error messages:
PS CHANGE
ERROR 20
ERROR 21
ERROR 22
ERROR 40
When the AUTO CONT SelecType option is set to ON, your
printer resumes priming even though the problem may not
have been fixed. This may cause a problem with your printed
output.
CHANGE DRUM
Status print test
The status print test gives you information on current printer
settings, such as paper size, number of copies selected, and font
source and number.
The drum unit may not be installed properly. Open the printer and
make sure the drum unit is seated properly in the basket. (Press
down simultaneously on the drum unit’s two green handles to make
sure the unit has clicked into place.)
Also, the drum replacement cartridge may not be installed. Be sure
to install a new drum replacement cartridge each time you replace
the drum unit.
EPL-6
7/18/89
Laser Printers
EPL-6000 LASER PRINTER
If the message remains, the drum unit and the drum replacement
cartridge must be replaced. See the section on replacing the drum
unit in Chapter 6.
Note: If you are using a non-standard paper size (one that is not
listed on the PAPER SIZE menu in the SelecType), manual
feeding may be necessary. gee Chapter 4 for details.
COVER OPEN
After clearing the error, you have two options:
The printer cover is open. Close the cover and press the ON LINE
button to set the printer on line and begin normal printing.
1. Change the paper in thecassette; then enter SelecType and
change the paper size to match. Press the ON LINE button after
exiting SelecType to continue printing.
ERROR 20
Not enough memory is available. Press the RESET/CONTINUE button
to continue printing. Your page may be printed as two or more
separate pages. This error can also be cleared by turning the printer
off and back on again. It may be necessary to simplify your print job
by downloading a smaller font, deleting some macros, or using a
lower resolution. You may also wish to purchase the optional 2MB
memory board available for this printer.
2 Alternatively, press the ON LINE button to continue printing on
the current paper. (The message PAPER SIZE ERROR appears
in the display.) Sea PAPER SIZE ERROR above.
TONER EMPTY
ERROR 21
The developer unit may not be installed properly. Open the printer
and make sure the developer unit is seated properly in the basket
The page is too complex to print. Press the RESET/CONTINUE button
to eject the page and clear the error. This error can also be cleared by
turning the printer off and back on again. Before you continue
printing, simplify the page you are trying to print
If the message remains, the toner is low and you must replace the
toner cartridge. See the section on replacing the toner cartridge in
Chapter 6.
CPU ERROR
ERROR 10
ERROR 11
ERROR 12
ERROR 22
The buffer has overflowed due to a communication protocol error.
Make sure that your SelecType settings match the communication
protocol settings of your computer. If the problem persists, contact
your authorized Epson dealer for service.
ERROR
ERROR
ERROR
ERROR
30
31
32
33
If one of these error messages appears, follow the steps below.
1. Press the RESET/CONTINUE button
ERROR 40
2
A parity or baud rate error has occurred. Press the RESET/CONTINUE
button to clear the error. Make sure your SelecType settings match
your computer configuration. If the problem persists, contact your
authorized Epson dealer for service.
If the error does not clear, turn the printer off for at least five
seconds. Then turn it back on.
3. If the problem remains, service is required. If you need service,
contact an authorized Epson dealer. If you need assistance
locating a dealer, call the Epson Consumer Information Center at
1-800-922-8911 for the location of the nearest Epson dealer.
FONT CART ERROR
The font cartridge selected using the FONT SOURCE SelecType
option is not installed properly. Turn the power off. Then remove
the cartridge and reinsert it. Turn the power back on and resend the
print job. If the problem persists, make sure that the correct FONT
SOURCE option has been selected in SelecType. See the section on
SelecType in Chapter 3 for details.
Routine Cleaning
It is necessary to clean certain printer components regularly to
ensure optimal print quality. Cleaning should be performed
whenever the drum unit or toner cartridge is replaced. You should
also clean the components listed below If you are having problems
with print quality, as discussed in Chapter 7.
INSERTION ERROR
There is a paper feeding problem. See the section on paper jams in
this chapter for details.
PAPER EMPTY
Cleaning schedule
There is no paper in the paper cassette or the paper cassette is not
installed properly. Load more paper into the paper cassette or
properly install the cassette. See Chapter 4 for details.
The toner cartridge is replaced about every 1,500 pages, and the
drum unit is replaced every 10,000 pages. Bach time you replace one
of these components, you should clean the following items:
PAPER JAM
Paper is jammed inside the printer. See the section on paper jams in
this chapter.
l
l
l
Note: If the printer was recently transported, the paper feed
mechanism may need to be aligned. See the section on setting the
paper feed mechanism in Chapter 1 for details.
l
Basket
Laser beam lens.
Note: You should also clean each of these items if you are having
print quality problems, as discussed in Chapter 7.
PAPER SIZE ERROR
If you press the ON LINE button to override the PS CHANGE
message, this message appears as your print job ejects to remind
you to change the paper and SelecType PAPER SIZE option. See
PS CHANGE below.
(When replacing the drum, you should also clean the main charger
wire on the new drum unit, as described in the section on replacing
the drum unit.)
PS CHANGE
WARNING: You should turn off your printer and
disconnect the power cord before cleaning your printer.
Your application software has requested a paper size that does not
match your SelecType setting or paper. Press the RESET/CONTINUE
button to clear the error; the printer is set off line.
Laser Printers
Transfer charger wire and discharge wire
Paper guide
7/18/89
EPL-7
EPL-6000 LASER PRINTER
Cleaning the laser beam lens
Note: Cleaning the lens is required at an interval of 10,000 pages
(the same interval as for changing the drum). If you wish, you can
clean the lens when you change the drum and skip this procedure
when you change the toner cartridge. If you plan to skip this
procedure. go to step 3 for information on reassembling your
Follow these steps to clean the laser beam lens:
Cleaning the transfer charger and discharge wires
Follow the steps below to clean the transfer charger wire and
discharge wire.
Note: Locate some isopropyl alcohol to use for cleaning purposes
before proceeding
1. Make sure the printer is turned off, then disconnect the power
cord from the wall outlet. Also be sure that the printer cover is
open and that the basket is removed from the printer.
1. Locate the lens, which is the clear plastic component inside the
top cover of your printer.
WARNING: This procedure exposes the green drum unit,
which is in the basket. Because the drum is light-sensitive,
2 Clean the lens with a lens cleaning cloth or other clean, soft
cloth. Do not use alcohol
minutes, maximum. It is recommended that you cover the
drum unit with a soft cloth or sheet of paper whenever the
drum is exposed.
2
Locate a cotton swab.
3.
with the printer cover open, locate the transfer charger wire and
the discharge wire, which are in indentations at the bottom of
the printer, beneath where the basket normally rests. These
wires are thin and difficult to spot instantly.
Raised printer cover
Transfer charger wire
3. To ready your printer for printing reinstall your basket. (Press
down simultaneously on the drum unit’s two green handles
until the drum unit clicks into place.) Then close the printer
cover. Plug in the power cord and turn your printer back on.
4. Gently clean the main charger wire with a cotton swab dipped
in alcohol. Run the swab along the length of the wire. You need
to insert the cotton swab a fraction of an inch into the slot to
reach the wire.
I General Printer Maintenance
In addition to the maintenance called for by the display panel
messages, the following simple maintenance procedures may be
occasionally necessary:
5. With the top cover of the printer open, align the arrow on the
back of the basket with the arrow on the printer case. (The
arrows point toward each other when the unit is properly
installed.) Gently lower the basket into place.
l
Cleaning the developer unit. You should clean the developer
unit if vertical white lines appear on your printed page.
l
Cleaning the main charger wire. You should clean this wire if
print quality declines.
These procedures are described below.
Cleaning the developer unit
If vertical white lines appear on your printed page, you need to
clean the developer unit with the developer cleaner. Follow these
steps:
1. Locate the developer cleaner. A cleaner is included with the
accessory pack that comes with your printer. A cleaner is also
packed with replacement drum units.
EPL-8
7/18/89
Laser Printers
EPL-6000 LASER PRINTER
2
Insert the hooked edge of the developer cleaner about a half inch
(13 mm) between the developer roller and the brass blade, as
shown below. Draw the cleaner the full length of the developer
unit several times, discarding excess toner. Then reinstall the
developer unit in the basket.
Installation/Support Tips
Set up
1. R66d fhr olraning
ohapt6r ol the Urur’6 Manual prior to
in6tallation.
2.
T66t pap6r tor the larUr prtnt6r prior to puroha66.
Toner Cartridges
Thrr6 IUU two typw of tonor cartridg66. The initial tidg6, whloh
1 ISO Characters 1
16 u66d when the EPL8ooo I6 brand n6w and when the d6v6lop6r
The decimal numbers in the top row show the characters that differ
from Roman-8 for each of the ISO symbol sets listed in the first
enough ton6r for about 15tlO prints.
unil 16 rOpbO6d. holds enough tonr for approximat6ty 750 pdnt6.
The 6Uppb oartrldgr, u66d for rsplao6ment at dl othU tim66, hold6
column.
Software
1.
When u6ing 6ofhvam p&age6 with the EPL-, 66kot HP
hS6dt 6Wi@6 11 a8 th6 pfint6r. !f thi6 i6 not aWiiab!O, 6&W%
HP La66rJ6t + . If neither i6 nnllable, 66leot HP -Jet.
2.
It you M uolng a font oartrldgs, rn6ur6 that the 6oftware i6
wt up to 6uppolt it.
Laser Printers
7/18/89
EPL-9