1
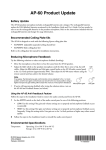
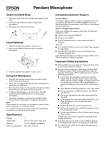
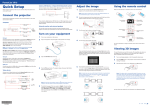
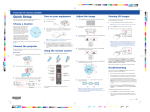
AP-60
Installation Guide
Copyright Notice
All rights reserved. No part of this publication may be reproduced, stored in a retrieval system, or transmitted in any form
or by any means, electronic, mechanical, photocopying, recording, or otherwise, without the prior written permission of
Seiko Epson Corporation.
The information contained herein is designed only for use with this Epson product. Epson is not responsible for any use of
this information as applied to other equipment.
Neither Seiko Epson Corporation nor its affiliates shall be liable to the purchaser of this product or third parties for
damages, losses, costs, or expenses incurred by purchaser or third parties as a result of: accident, misuse, or abuse of this
product or unauthorized modifications, repairs, or alterations to this product, or (excluding the U.S.) failure to strictly
comply with Seiko Epson Corporation’s operating and maintenance instructions.
Trademarks
Epson is a registered trademark and Epson Exceed Your Vision is a registered logomark of Seiko Epson Corporation.
General Notice: Other product names used herein are for identification purposes only and may be trademarks of their
respective owners. Epson disclaims any and all rights in those marks.
This information is subject to change without notice.
© 2009 Epson America, Inc. 7/09
CPD-27595
2
Important Safety Instructions
CAUTION: To reduce the risk of electric shock, do not remove the cover. No user serviceable parts inside. Refer
servicing to qualified personnel.
CAUTION: These servicing instructions are for use by qualified service personnel only. To reduce the risk of
electric shock, do not perform any servicing other than that contained in the operating instructions unless you
are qualified to do so.
WARNING: To
reduce the risk of fire or electric shock, do not expose this apparatus to rain or moisture.
The lightning flash with arrowhead, within an equilateral triangle, is intended to alert the user to
the presence of uninsulated “dangerous voltage” within the product’s enclosure that may be of
sufficient magnitude to constitute a risk of electrical shock to persons.
The exclamation point, within an equilateral triangle, is intended to alert the user to the presence
of important operating maintenance (servicing) instructions in the literature accompanying the
appliance.
1. Read these instructions.
2. Keep these instructions.
3. Heed all warnings.
4. Follow all instructions.
5. Do not use this apparatus near water.
6. Clean only with dry cloth.
7. Do not block any ventilation openings. Install in accordance with the manufacturer’s instructions.
8. Do not install near any heat sources such as radiators, heat registers, stoves, or other apparatus (including
amplifiers) that produce heat.
9. Do not defeat the safety purpose of the polarized or grounding-type plug. A polarized plug has two blades
with one wider than the other. A grounding type plug has two blades and a third grounding prong. The
wide blade or the third prong is provided for your safety. If the provided plug does not fit into your outlet,
consult an electrician for replacement of the obsolete outlet.
10. Protect the power cord from being walked on or pinched particularly at plugs, convenience receptacles, and
the point where they exit from the apparatus.
11. Only use attachments/accessories specified by the manufacturer.
12. Unplug this apparatus during lightning storms or when unused for long periods of time.
13. Refer all servicing to qualified service personnel. Servicing is required when the apparatus has been damaged
in any way, such as power-supply cord or plug is damaged, liquid has been spilled or objects have fallen into
the apparatus, the apparatus has been exposed to rain or moisture, does not operate normally, or has been
dropped.
3
All safety and operating instructions should be read before using the system. After you have read all instructions,
save this information for later reference.
The documentation and system use graphical symbols to show how to use the system safely. Please understand
and respect these caution symbols in order to avoid injury to persons or property.
Warnings
Indicate information that, if ignored, could possibly result in personal injury or
even death due to incorrect handling.
Cautions
Indicate information that, if ignored, could possibly result in personal injury or
physical damage due to incorrect handling.
Warnings
•
Check the specifications of the power cable. Using an inappropriate power cable could result in fire or
electric shock. The power cable supplied with the system is intended to comply with power supply
requirements for the country of purchase. If using within the country of purchase, do not use any power
cable other than the one supplied with the system. If using the system overseas, check the power supply
voltage, outlet shape and electrical rating of the system to make sure that it conform to the local standards,
and purchase a proper power cable in the country.
•
Do not use a power cable that is damaged. Fire or electric shock may result.
•
Do not modify the power cable.
•
Do not place heavy objects on top of the power cable.
•
Do not bend, twist or pull the power cable excessively.
•
Keep the power cable away from hot electrical appliances.
•
Contact your dealer if the wires of the power cable become exposed or broken.
•
Connect the power cable to a grounded outlet.
•
Take the following precautions when handling the plug. Failure to comply with these precautions could
result in fire or electric shock.
•
Do not overload outlets, extension cables or multi-socket devices.
•
Do not insert the plug into the outlet with dust present.
•
Insert the plug firmly into the outlet.
•
Do not handle the plug with wet hands.
•
Do not pull the power cable when disconnecting the plug. Always be sure to hold the plug when
disconnecting it.
•
Do not set the volume too high from the outset. A loud sound may be produced suddenly that may cause
damage to your hearing. As a precaution, lower the volume before you turn off the system then raise it
gradually after you turn it back on.
•
Be aware of the fact that listening to loud sound over a long period of time leads to hearing damage.
•
Epson accepts no responsibility for any of the components of this product falling due to the lack of strength
of the ceiling or inadequate installation.
4
•
Do not leave the system or the remote control with batteries inside a vehicle with the windows closed, in
places where they will be exposed to direct sunlight, or in other places that may become extremely hot.
Thermal deformation or technical malfunction may occur, which could result in fire.
•
Do not use sprays containing a flammable gas to remove dirt or dust which is adhering to the system. Static
electricity or an electric spark may be produced when turning the power on, the gases may ignite and result
in a fire.
•
Make sure all the bolts, screws, and nuts are tight once the installation is finished. There is a risk of the
system falling and it could cause of severe injury if any of the hardware is loose.
•
Unplug the system when it will not be used for extended periods.
•
Never open any covers on the system. Dangerous electrical voltages inside the system can severely injure
you.
•
Check the structure and materials of the location at which the system (including the safety wires and anchor
bolts) is mounted, and use the most appropriate installation method. If installation work is not carried out
correctly, the system could fall down and cause injury or even death.
•
Do not hang from the system or the ceiling mount to avoid the risk of a falling accident.
•
Keep the power of the system and the projector turned off during the installation. There is a risk of an
electric shock.
•
Be aware of the neck strap when using the pendant microphone. The neck strap may snap off if handled
roughly.
•
Never pull the neck strap when it is hung around the neck. It may result in injury or accident.
Cautions
•
Unplug the system from the outlet before cleaning. This avoids electric shock during cleaning.
•
Unplug the system from the outlet and refer all repairs to qualified service personnel under the following
conditions:
•
If smoke, unusual smells or unusual noises come from the system.
•
If liquid or foreign objects get inside the system.
•
If the system has been dropped or the case has been damaged.
Continuing to use under these conditions may result in fire or electric shock.
•
Do not use the system in places where there are lots of humidity or dust, near cooking or heating appliances,
or in places where it may come into contact with smoke or steam.
•
Do not place the system on an unstable cart, stand, or table. The system may fall down or tip over, and may
result in injury.
•
Incorrect battery usage may cause leakage of battery fluid and battery rupture, which could result in fire,
injury or corrosion of the system. When replacing batteries, take the following precautions:
•
Insert batteries so that the polarities (+ and -) are correct.
•
Do not use batteries of different types or mix old and new batteries.
•
Do not use any batteries other than those specified in this guide.
5
•
If the batteries leak, wipe away battery fluid with a soft cloth. If fluid gets on your hands, wash them
immediately.
•
Replace the batteries as soon as they run out.
•
Remove the batteries if you will not be using the system for a long period of time.
•
Do not expose batteries to heat or flame and do not put them in water.
•
Dispose of used batteries according to local regulations.
•
Keep these batteries out of the reach of children. Batteries are choking hazards and are very dangerous if
swallowed.
Consult your state and local regulations regarding proper disposal of batteries.
•
Never loosen any bolts, screws, or nuts after installation. Periodically check to make sure that none of them
have come loose. If you find loose hardware, retighten it firmly.
•
Before moving the system, be sure to check that the power is turned off, the plug is disconnected from the
outlet, and all cables are disconnected. Fire or electric shock may result.
•
Do not place any heavy objects on the system or stand on it. It may tip over and cause injury or damage to
the system.
•
Do not use or store the system where the temperature is too high or too low. Avoid places where the
temperature changes frequently and rapidly.
Additional Safety Instructions
•
Safety measures must be practiced at all times during the installation of this product. Proper installation
procedures, as outlined in these instructions, must be adhered to. Failure to do so could result in serious
personal injury or death.
•
This product should be installed by a professional audio/video installer or other qualified professional.
Epson cannot provide advice concerning construction practices or building codes in your area.
•
Prior to installing this product, read the installation instructions completely. Keep these instructions in an
easily accessible place for future reference.
•
Do not attempt to install this product if you have any doubts as to its proper assembly and installation.
•
Use proper equipment to prevent personal injury or property damage, such as a ladder for reaching high
places or a stud finder to locate the center of studs.
•
The included mounting hardware is intended for use with a 1.5-inch pipe mount.
•
Do not attempt to use hollow-wall anchors, screws, or similar mounting hardware to mount this product to
wallboard or plasterboard. This product cannot be safely mounted like that. You must mount this product
with the included 1.5-inch mounting pipe, as outlined in these instructions.
•
The ceiling structure on which this product is mounted must be capable of safely supporting the weight of
this product (approximately 15.2 lbs [6.9 kg]) and the weight of your projector. If the structures cannot
support these weights, they must be reinforced.
•
When mounting the equipment on a ceiling that contains studs or joists, the exact center of the studs or
joists must be confirmed prior to installation.
6
•
Do not install this product where it may be subject to impact or vibration.
•
Do not install this product in direct sunlight or near a heater vent, fireplace, or other source of heat.
•
Do not install this product on a slanted ceiling.
•
Personal injury and/or damage to the equipment could result from dropping or mishandling this product.
•
Some of the components included with this product may be packaged in plastic bags. Keep plastic bags
away from small children to avoid any risk of suffocation.
•
Do not place the components of this product near sources of heat or in direct sunlight.
•
Make sure nothing blocks the ventilation openings on any of the components. Allow for sufficient heat
dispersion. Ensure that there is at least 8 inches (20 cm) between any ventilation openings and the walls or
ceiling.
•
Where the mains plug is used as the disconnect device, the disconnect device shall remain readily operable.
•
When unplugging the power cord, handle it carefully. Hold the plug when unplugging the cord.
•
This product should be operated only from the type of power source indicated on the marking label. If you
are not sure of the type of power supplied in your (school, business, home), consult your product dealer or
local power company.
•
Do not overload wall outlets, extension cords, or integral convenience receptacles as this can result in a risk
of fire or electric shock.
•
Keep the system components free from moisture, water, and dust.
•
Do not let insecticides, benzene, or thinner come in contact with any components of the system.
•
Never push objects of any kind through openings in the system components as they may touch dangerous
voltage points or short-out parts that could result in a fire or electric shock. Never spill liquid of any kind on
the product.
•
Except as specifically explained in these instructions, do not attempt to service this product yourself. Refer
all servicing to qualified service personnel.
•
Never disassemble or modify the product in any way. Dangerous electrical voltages inside the components
can severely injure you.
•
When replacement parts are required, be sure the service technician has used replacement parts specified by
the manufacturer or have the same characteristics as the original part. Unauthorized substitutions may result
in fire, electric shock, or other hazards.
•
Do not place the system near high-voltage power lines or sources of magnetism. The system may not
operate properly.
7
Contents
Introduction . . . . . . . . . . . . . . . . . . . . . . . . . . . . . . . . . . . . . . . . . . . . . . . . . . . . . . . . . . . . . . . . . . . . . . . 9
Planning the Installation . . . . . . . . . . . . . . . . . . . . . . . . . . . . . . . . . . . . . . . . . . . . . . . . . . . . . . . . . . . . . 10
Installing the IR Dome Sensor . . . . . . . . . . . . . . . . . . . . . . . . . . . . . . . . . . . . . . . . . . . . . . . . . . . . . . . . . 11
Install the Mounting Pipe . . . . . . . . . . . . . . . . . . . . . . . . . . . . . . . . . . . . . . . . . . . . . . . . . . . . . . . . . . . . 13
Install the AP-60 . . . . . . . . . . . . . . . . . . . . . . . . . . . . . . . . . . . . . . . . . . . . . . . . . . . . . . . . . . . . . . . . . . . 14
Install the Projector . . . . . . . . . . . . . . . . . . . . . . . . . . . . . . . . . . . . . . . . . . . . . . . . . . . . . . . . . . . . . . . . . 19
Attach the Neck Strap . . . . . . . . . . . . . . . . . . . . . . . . . . . . . . . . . . . . . . . . . . . . . . . . . . . . . . . . . . . . . . . 19
Insert Batteries . . . . . . . . . . . . . . . . . . . . . . . . . . . . . . . . . . . . . . . . . . . . . . . . . . . . . . . . . . . . . . . . . . . . . 20
Adjust the Sound . . . . . . . . . . . . . . . . . . . . . . . . . . . . . . . . . . . . . . . . . . . . . . . . . . . . . . . . . . . . . . . . . . . 21
Solving Problems . . . . . . . . . . . . . . . . . . . . . . . . . . . . . . . . . . . . . . . . . . . . . . . . . . . . . . . . . . . . . . . . . . . 23
Where To Get Help. . . . . . . . . . . . . . . . . . . . . . . . . . . . . . . . . . . . . . . . . . . . . . . . . . . . . . . . . . . . . . . . . 26
8
Introduction
Before installing the AP-60, you should perform the following steps:
•
Run all wiring required for the audio and power connections for the AP-60 and projector.
•
If you have a projector already installed, remove the projector from the 1.5-inch mounting pipe and remove
the old mounting pipe. If you aren’t installing a projector with the AP-60, make sure you have a ceiling
mount compatible with a 1.5-inch NPT mounting pipe installed.
Parts List
Before starting, make sure you have all the parts listed below. If you’re missing any parts, contact Epson as
described on page 26.
Pendant microphone
AP-60
Power cable
Neck strap
Remote control
LR6 (alkaline)
AA batteries
R6 (manganese)
AA batteries
M10 bolt and nut
Lower bracket
Guy wires
M47.5 jam nut
Coaxial cable
IR dome sensor
Mounting pipe
Note
The included installation hardware is designed for a 1.5-inch pipe mount. You may need additional hardware if your setup
varies.
Additional Accessories
You can purchase projectors, screens, or other accessories from an Epson authorized reseller. To find the nearest
reseller, call 800-GO-EPSON (800-463-7766). Or you can purchase online at www.epsonstore.com (U.S. sales)
or www.epson.ca (Canadian sales).
To order an additional pendant microphone, request part number V12H3290M1.
9
Planning the Installation
Here are the basic steps required to install the AP-60. Allow at least 1 to 2 hours to complete the installation. Be
sure to read all of the installation instructions before starting.
Note
Epson strongly recommends that the AP-60 be installed by a professional audio/video installer or other qualified
professional. Epson cannot provide advice concerning construction practices or building codes in your area.
The Installation requires at least two people.
For added safety, install the included guy wires to prevent the AP-60 from falling. Ensure that the ceiling is strong enough
before installing the wires.
1
Install the IR dome sensor. See page 11.
2
Install the mounting pipe. See page 13.
3
Install the AP-60 and connect cables.
See page 14.
4
Install projector and connect cables.
See page 19.
5
Adjust the sound. See page 21.
10
Required Tools and Hardware
The AP-60 should be installed by a professional audio/video installer or other qualified professional. To install
the system, the installer will need these tools:
•
Phillips screwdriver
•
Large adjustable wrench
•
Ladder
•
Hardware for securing the IR dome sensor and coaxial cable
Note
Depending on your ceiling construction, additional tools and hardware may be required.
Installing the IR Dome Sensor
The IR dome sensor is the first thing you’ll need to install. To ensure proper audio reception, the IR dome
sensor should be positioned to have direct line of sight to most areas of the room. The IR dome sensor should
also be mounted in a location free of obstructions and away from strong light sources. When choosing a location
for the IR dome sensor, keep the following in mind:
•
Do not install the IR dome sensor or coaxial cable near power cables. This can cause unwanted audio noise
or reduce the sensitivity and range of the IR dome sensor.
•
Do not bound the coaxial cable to any other cables.
•
Do not install the IR sensor near strong light sources, such as incandescent bulbs, halogen lamps,
fluorescent lights, or a window.
•
The IR dome sensor must be mounted at least 3.28 feet (1 meter) away from fluorescent lights.
•
Do not install the IR dome sensor in a dusty environment. This can reduce the sensitivity and range of the
IR dome sensor.
•
Do not paint the cover of the IR dome sensor.
•
The use of IR remote controls of any kind can interrupt the sound or cause noise.
•
The IR dome sensor receives reflected signals from the walls, floor, and ceiling. The reception may be
reduced if the wall, floor, or ceiling colors are dark.
•
The sound may break up if the IR dome sensor is installed near a window or in a room with a lot of
windows. Apply light-colored curtains or blinds to improve the sound quality.
•
Install the IR dome sensor on a ceiling that is less than 9.8 feet (3 meters) high. If the ceiling is too high, the
IR dome sensor may not be able to receive the microphone’s signal from directly under the IR dome.
11
Locate the following parts:
•
IR dome sensor
•
Coaxial cable
Warning
Make sure that the ceiling is strong enough to support the IR dome sensor and coaxial cable. Epson accepts no
responsibility for the IR dome sensor falling due to insufficient ceiling strength or inadequate installation.
1
Bend both ends of the mounting bracket as shown below.
2
Securely attach the IR dome sensor to the ceiling. Installation varies depending on your building
construction.
3
Attach the coaxial cable to the IR dome sensor.
4
Secure the coaxial cable to the ceiling.
Note
The coaxial cable can also be run in the ceiling instead of securing it to the ceiling. For best performance, keep it
away from electrical wires and florescent lighting.
12
Install the Mounting Pipe
Warning
Make sure that the installed ceiling mount is designed to support the total weight of both the AP-60 and your projector. If
you’re installing the AP-60 without a projector, the ceiling mount must be designed to support the total weight of the
AP-60 (approximately 15.2 lbs [6.9 kg]).
1
Thread the included mounting pipe into your ceiling mount.
2
Follow your ceiling mount manufacturer’s instructions to secure the pipe to the ceiling mount.
13
Install the AP-60
Locate the following parts:
•
AP-60
•
Lower bracket
•
M47.5 jam nut
•
M10 bolt and nut
1
Locate the lower bracket and M47.5 jam nut and have them close by.
2
Before attaching the AP-60 to the mounting pipe, feed the projector’s power and video cables through the
cable channel as shown below.
3
Slide the AP-60 and the lower bracket onto the mounting pipe with the audio control panel facing the front
of the room. The lower bracket’s cutout should line up with the cable channel on the bottom of the AP-60.
4
Secure the lower bracket with the M47.5 jam nut as shown below. Do not attach the M10 bolt and nut at
this time.
Lower bracket
cutout
Lower bracket
M47.5 jam nut
14
5
Remove the two screws from the audio control panel.
Remove screws
6
Gently remove the audio control panel from the AP-60 and keep it supported at all times.
Warning
Pulling out the audio control panel too quickly or not supporting the audio control panel when it is removed from the
AP-60 can permanently damage the cable connections on the back of the audio control panel.
15
7
Insert the audio cables into the cable channel, then feed the cables through the audio control panel slot as
shown below.
8
Connect the audio cables to the audio control panel.
RCA line input
Power
ANTFD
HF
Off / Low / Hi Off / On
Line 1
LCP
Output
Rec
L
Microphone
CMD
IR sensor
RS232
R
Line 2
DVD
3.5 mm stereo-mini jack input
9
3.5 mm stereo-mini jack output
Gently slide the audio control panel back into the AP-60 while pulling out any excess cable from the top of
the unit.
16
10 Secure the two screws that hold the audio control panel in place.
11 Attach the IR dome sensor cable to the top of the AP-60.
12 Once the cables are positioned as desired, lift the AP-60 and secure the lower bracket with the M10 bolt and
nut.
13 Tighten the M47.5 jam nut until it’s flush with the lower bracket.
17
14 Attach the included guy wires to the AP-60 as shown below.
15 Attach the guy wires to a secure location. Installation varies depending on your building construction.
Note
When installing the guy wires, do not make them too taut. This can cause the AP-60 to be unstable on the mounting
pipe and lower bracket.
16 Connect the power cable to the AP-60.
18
Install the Projector
When installing a projector under the AP-60, make sure that all of the mounting hardware and guy wires are
secured correctly. Follow the instructions included with your projector mount to attach the projector to the
mounting pipe. Then connect power and video cables to the projector as necessary.
Attach the Neck Strap
1
Disconnect both ends of the pendant microphone’s neck strap.
2
Attach the ends of the neck strap to the pendant microphone.
19
3
Reconnect the ends of the neck strap.
Insert Batteries
1
Remove the remote control battery cover.
2
Check the battery label and insert the included R6 (manganese) AA batteries into the remote control.
3
Replace the remote control battery cover.
4
Open the pendant microphone’s battery cover.
20
5
Check the battery label and insert the included LR6 (alkaline) AA batteries into the pendant microphone.
6
Close the pendant microphone’s battery cover.
Adjust the Sound
Before adjusting the audio levels, make sure that you have connected your audio equipment to the AP-60. Then
follow the steps in this sections to adjust the audio levels.
1
Press the P power button on the AP-60 remote control to turn on the system. The P power light on the
AP-60 turns green.
Press to turn on
2
Adjust the Microphone 1, Microphone 2, Line 1, and Line 2 gain control knobs to the far left setting to
turn the gains all the way down.
Gain control knobs
3
Make sure that all of your audio sources are connected and turned on.
21
4
Have an assistant wear the pendant microphone with the black emitter facing away from them.
5
Adjust the neck strap so that the top of the microphone is just below the assistant’s collarbone.
Emitter
6
Set the Channel switch to 1.
Set to Channel 1
7
Press the power button until it clicks into place. The power button turns green.
Power button
8
Verify that the Mic 1 light on AP-60 is lit.
9
Adjust the Gain wheel until the white line on the is next to Up, but still visible.
White line
22
10 Have an assistant speak normally into the microphone and gradually increase the Microphone 1 gain
control knob on the AP-60 until the notch on the gain control knob is facing straight up.
Microphone 1 gain control knob
11 Press the Volume + button on the AP-60 remote control while speaking into the microphone. Continue
pressing the button until you hear feedback (howling).
12 Press the Volume – button until the feedback stops, then press the Volume – button four or five more times.
Note
If you hear feedback at low volume levels, remove the audio control panel from the AP-60 (see page 15) and set the
Set the ANTFD switch to the Low or Hi position.
If your room is highly reflective, you may hear a ringing sound when using the AP-60. To reduce the ringing sound,
remove the audio control panel from the AP-60 (see page 15) and set the HF switch to the On position.
13 If you have a second microphone, be sure to set it to Channel 2 and repeat steps 9 and10. When you’re
done, the microphones should be the same volume level.
14 Adjust the volume control on the audio device that is connected to Line 1 so that it is 50 to 75 percent of
maximum volume. If your audio device does not have a volume adjustment, continue with step 15.
15 Have an assistant play audio from the device that is connected to Line 1 while speaking into the
microphone.
16 Adjust the Line 1 gain control knob on AP-60 until the Line 1 audio is slightly quieter than the
microphone audio.
17 Repeat steps 14 to 16 for the audio source connected to Line 2.
18 Have an assistant play audio from the device that is connected to Line 1 or Line 2.
19 Adjust the Balance setting on the AP-60 so that the sound is directed towards the students/audience and
away from where the speaker will be standing.
Solving Problems
If you’re having a problem with the AP-60, check for a solution in one of these sections:
•
“Basic Operation Problems”below
•
“Sound Problems” on page 24
•
“Problems Using the Pendant Microphone” on page 25
•
“Problems Using the Remote Control” on page 25
If you cannot solve the problem on your own, contact Epson for help.
23
Basic Operation Problems
Problem
The system doesn’t turn on.
Solution
Press the P power button on the AP-60 remote control to turn the system on or off.
The remote control’s batteries may need to be replaced. See page 18.
Check the P power light on the AP-60. When the AP-60 is off, the light is orange. This
indicates that the system is receiving power. If the light is not on, make sure that your
electrical outlet is working and that the power cord is connected securely.
The pendant microphone doesn’t
turn on.
See “Problems Using the Pendant Microphone” on page 25.
The remote control doesn’t work.
See “Problems Using the Remote Control” on page 25.
There is no sound.
See “Sound Problems” on page 24.
Sound Problems
Problem
Solution
There is no sound.
Make sure the AP-60 is turned on. If the AP-60 doesn’t receive an audio signal for 60
minutes, it turns off automatically.
Press the Mute button on the remote control to make sure the sound wasn’t muted
or turned off.
Try increasing the volume. Depending on your audio source, it’s possible that no
sound may be heard at lower settings.
If you can’t hear audio from the microphone, make sure that the Gain control
wheel on the pendant microphone is set so that the white line is next to Up, but still
visible.
If you’ve connected an external audio device such as an MP3 player, make sure its
volume control is adjusted to allow sound output.
There are too many audio
The AP-60 plays audio from all sources at the same time. Be sure to turn off
sources playing at the same time. unwanted audio sources as necessary.
My voice isn’t loud enough.
Use the Gain control wheel on the pendant microphone to increase the
microphone sensitivity.
Adjust the master volume.
Adjust the Microphone gain control knob on the AP-60.
External audio devices are too
loud
Use the Gain control wheel on the pendant microphone to increase the
microphone sensitivity.
Adjust the audio levels, see page 21 for details.
I hear a ringing sound in the room
when using the AP-60.
To reduce the ringing sound heard in highly-reflective environments, remove the two
screws securing the audio control panel and gently remove the audio control panel
from the AP-60. (See page 15 for details on removing the audio control panel.) Set
the HF switch to the On position. Gently slide the audio control panel back into the
AP-60 while pulling out any excess cable from the top of the unit, and secure the
two screws that hold the audio control panel in place.
I hear feedback (howling).
Move the pendant microphone away from the AP-60.
Turn down the Gain control wheel on the pendant microphone.
Turn down the master volume.
Turn down the Microphone gain control knob on the AP-60.
To reduce the amount of feedback heard in highly-reflective environments, remove
the two screws securing the audio control panel and gently remove the audio
control panel from the AP-60. (See page 15 for details on removing the audio
control panel.) Set the ANTFD switch to the Low or Hi position to reduce the amount
of feedback. Gently slide the audio control panel back into the AP-60 while pulling
out any excess cable from the top of the unit, and secure the two screws that hold
the audio control panel in place.
24
Problems Using the Pendant Microphone
Problem
Solution
The power light won’t come on.
You may need to replace the pendant microphone’s batteries (see page 20).
There is no sound.
Check to make sure that the pendant microphone’s power button is green. If it’s red
or not lit, replace the batteries (see page 20).
Make sure the AP-60 is turned on. If the AP-60 doesn’t receive an audio signal for 60
minutes, it turns off automatically.
Press the Mute button on the remote control to make sure the sound wasn’t muted
or turned off.
Try increasing the volume.
Adjust the Gain control on the pendant microphone to increase the microphone
sensitivity.
Make sure that the pendant microphone is positioned with the black emitter
window facing away from you and is free of obstructions.
Check the connection of the pendant microphone to the AP-60. The light on the
AP-60 should match the channel selected on the remote control.
If you’re using more than one microphone, make sure that each microphone is set
to use a different channel.
Check to see if the IR dome sensor’s red power light is lit. If it’s not, contact your
maintenance department to check the cable connections.
My voice isn’t loud enough.
Use the Gain control wheel on the pendant microphone to increase the
microphone sensitivity.
Adjust the master volume.
Adjust the Microphone gain control knob on the AP-60.
External audio devices are too
loud
Use the Gain control wheel on the pendant microphone to increase the
microphone sensitivity.
Use the volume control on the external audio device to decrease the volume of the
external audio device.
Problems Using the Remote Control
Problem
Solution
The system doesn’t respond to
the remote control.
Make sure you’re within about 20 feet of the AP-60. Point the remote control toward
the AP-60.
You may need to replace the remote control’s batteries (see page 18).
Turn off nearby equipment that emits infrared energy, such as a radiant room
heater.
The remote control has been lost
or damaged.
Contact Epson for help, see page 26.
25
Where To Get Help
Internet Support
Visit Epson’s support website at epson.com/support and select your product for solutions to common
problems. You can download product documentation, view FAQs, or e-mail Epson with your questions.
Speak to a Support Representative
To use the Epson PrivateLine® Support service, call (800) 637-7661 and enter the PIN on the Epson PrivateLine
Support card that came with your document camera. This is the fastest way of speaking to a live representative,
and it’s free. This service is available 6 am to 6 pm, Pacific Time, Monday through Friday, for the duration of
your warranty period.
You may also speak with a support specialist by dialing one of these numbers:
•
U.S.: (562) 276-4394, 6 AM to 6 PM, Pacific Time, Monday through Friday.
•
Canada: (905) 709-3839, 6 AM to 6 PM, Pacific Time, Monday through Friday
Days and hours of support are subject to change without notice. Toll or long distance charges may apply.
Before you call, please have this information ready:
•
Product name (AP-60) and serial number (located on the back of the product)
•
Proof of purchase (such as a store receipt) and date of purchase
•
Description of the problem, including computer, audio, or video configuration
Purchase Accessories
You can purchase projectors, screens, or other accessories from an Epson authorized reseller. To find the nearest
reseller, call 800-GO-EPSON (800-463-7766). Or you can purchase online at www.epsonstore.com (U.S. sales)
or www.epson.ca (Canadian sales).
To order an additional pendant microphone, request part number V12H3290M1.
26
Printed in XXX