1
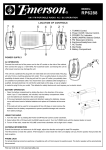
Location of Controls
LCD DISPLAY
HOLD SWITCH
VOLUME + BUTTON
HEADPHONE JACK
VOLUME - BUTTON
USB CAP
M
EN
U
FWD BUTTON
POWER/PLAY/
PAUSE/STOP BUTTON
Quick Start Guide
MP120 (128MB)
MP320 (256MB)
MENU BUTTON
Copyright/Trademarks
Warning
© 2005 Emerson Radio Corp. All rights reserved.
Emerson Radio Corp. shall not be liable for any errors contained herein or for
any damages arising out of or related to this document or the information
contained herein, even if Emerson Radio Corp. has been advised of the
possibility of such damages. This document is intended for informational and
instructional purposes only. Emerson Radio Corp. reserves the right to make
changes in the specifications and other information contained in this
document without prior notification. Emerson Radio Corp. disclaims any
obligation to update the information contained herein.
Microsoft®, WMA™ and the Windows® logo are trademarks or registered
trademarks of Microsoft Corporation in the United States and/or other
countries. Mac and the Mac logo are trademarks of Apple Computer, Inc.
registered in the United States and/or other countries. Pentium is a registered
trademark of Intel in the United States and/or other countries.
All other product names may be trademarks of the companies with which they
are associated.
Emerson Radio Corp.
Parsippany, New Jersey 07054
For additional set-up or operating assistance
Please call: 1-800-898-9020
To reduce the risk of shock hazard, do not expose this product to rain or any type of moisture,
as well as do not disassemble the player. There are no user-serviceable parts inside.
Caution: Any changes or modifications not expressly approved by the party responsible
for compliance could void the user's authority to operate this device.
Shield cables must be used with this unit to ensure compliance with the Class B FCC
limits.
Risk of explosion, damage or battery leakage is possible if battery is replaced or inserted
incorrectly, as well as an incorrect type. Never attempt to charge a non-rechargeable
alkaline battery. Please dispose of used batteries according to local laws.
This device complies with Part 15 of the FCC Rules. Operation is subject to the following
two conditions: (1) This device may not cause harmful interference, and (2) This device
must accept any interference received, including interference that may cause undesired
operation.
Note: This equipment has been tested and found to comply with the limits for a Class B
digital device, pursuant to Part 15 of the FCC Rules. These limits are designed to provide
reasonable protection against harmful interference in a residential installation. This
equipment generates, uses, and can radiate radio frequency energy and, if not installed
and used in accordance with the instructions, may cause harmful interference to radio
communications. However, there is no guarantee that interference will not occur in a
particular installation. If this equipment does cause harmful interference to radio or
television reception, which can be determined by turning the equipment off and on, the
user is encouraged to try to correct the interference by one or more of the following
measures:
-
Emerson Radio Corp. World Wide Web address:
http://www.emersonradio.com
Emerson Radio Corp. email address for customer
inquiries: [email protected]
BATTERY COMPARTMENT
Part No. 16-2980
503-02
Printed in China
-
Reorient or relocate the receiving antenna.
Increase the separation between the equipment and receiver.
Connect the equipment into an outlet on a circuit different from that to which the
receiver is connected.
Consult the dealer or an experienced radio/TV technician for help.
Under the environment with electrostatic discharge, the sample may malfunction and
require user to reset the sample.
REV BUTTON
Troubleshooting
Player is not recognized on my Windows® 98 computer: Download and install
the MP120/MP320 driver from www.emersonradio.com. Connect the player to
your computer and follow your operating system's instructions to finish installing
the driver.
If player is still not recognized, locate the Universal Serial Bus (USB) devices
in your operating system's device manager. If your MP120/MP320 driver
displays a problem, follow your operating instruction's directions for updating
the device driver and load the downloaded MP120/MP320 driver.
After transferring files to the player, music did not play or data was not
present: Make sure music is in the MP3 or WMA™ format. Follow your
operating system's instructions for safely disconnecting USB devices.
Buttons do not work/player does not power up: Make sure the HOLD switch
is in the off position. Make sure the battery is in the correct position. Replace
the battery with a new one if necessary.
No sound is heard through the headphones: Check the headphone
connection and adjust the volume level.
System Requirements
• Windows® 98, 98SE, ME, 2000 and XP (Driver is required for Windows 98SE
and below) / Mac® OS 9.2.2 or higher
• IBM PC / Mac® compatible machine with USB Port*
• Pentium MMX® 233MHz or higher
• 64 MB minimum RAM
• 10 MB free space minimum on hard drive
* The player is compatible with USB 2.0 / 1.1 / 1.0 ports.
1
2
Unpack box contents
Deluxe Earbud
Headphones
MP120/MP320 Player
U
N
ME
3
Insert the battery (not included)
1. Slide the battery compartment cover as shown.
1. Remove cap.
2. Insert one fresh "AAA" alkaline battery in the battery
compartment. Be sure to follow the polarity marking in
the battery compartment. If the battery is inserted
incorrectly the unit will not work.
2. Place USB connector of player into female side of the
USB extension cord (A). Plug the other end of the
extension cord (B) into an open USB port in computer.
3. Slide the battery compartment into place.
USB Cable
Pouch
Armband
NOTE: Player can be connected directly to computer if
space permits.
• When the battery is getting weak, the indicator changes
from " " (full battery) to " " (replace battery) in the
display, the battery is almost exhausted and should be
changed as soon as possible. Do not leave weak or
exhausted battery in the player as it will eventually leak
and cause corrosion inside the battery compartment.
1
U
N
ME
NU
ME
3
Warranty
Information
Quick Start Guide
Connect player to your computer
2
A
NU
ME
U
M
EN
Warranty Card
B
1
2
4
Transferring music and data files
1. Confirm player is powered up and connected to computer.
2. On your Desktop, double-click the "My Computer" icon.
3. Drag and drop files onto the MP120/MP320 drive ("Removable Disk").
NOTE: The player stores all types of formatted files. However, it
will only play MP3, WMA™, and WMA™ with DRM™ (copy
protected) formatted files.
To transfer WMA™ with DRM™ formatted files to
MP120/MP320, please visit www.emersonradio.com for details.
NOTE:
•
5
"AAA"
BATTERY
Use your MP120/MP320 as a MP3 player
6
How to operate your player
1. Unplug player from the USB cord. Make sure you have at
least one MP3 or WMA™ file already stored on the player.
Power on the unit: Press and hold the POWER/PLAY/
PAUSE/STOP
button for approximately 2 seconds.
2. Make sure the HOLD switch is in the off position (A) and
that the player is on (B).
To play track: Press the POWER/PLAY/PAUSE/STOP
button.
3. Connect the earbuds to the headphone jack.
To select a different track: Press the FWD
buttons.
4. Press the POWER/PLAY/PAUSE/STOP button to begin
playing an audio track.
Your player will have slightly less memory available than stated due
to the necessary memory needed for its firmware.
or REV
To search through a track: Press and hold the FWD
REV buttons.
or
To momentarily pause track: Press the POWER/PLAY/PAUSE/
STOP
button when track is playing. indicator appears.
NOTE: If you are using Windows® 98, you must first download
and install the driver from www.emersonradio.com.
To resume track: Press the POWER/PLAY/PAUSE/STOP
button when track is paused.
3
2
A HOLD 'Off'
To adjust volume: Press the VOL + or - buttons.
3.5mm
2
1
4
NU
ME
2
3
B PRESS & HOLD
TO POWER ON
To stop track: Press and hold the POWER/PLAY/ PAUSE/STOP
button for approximately 2 seconds when track is playing.
Power off the unit: Press and hold the POWER/PLAY/
PAUSE/STOP
button for approximately 5 seconds .
To lock the buttons from accidentally being pressed: Slide
the HOLD switch to the on position. indicator appears.