1
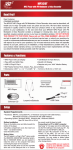
MP320
®
MP3 Player
Setup
Installation
Operation
System Requirements
• Hardware: IBM PC, Compatible PC or Notebook Computer with USB interface.
• Operating System: Windows98/SE, Windows Me, Windows2000/XP
Read First!
Dear Customer,
CONGRATULATIONS.
The MP320 MP3 Player, when used as described, will enable you to enjoy CD-quality music
any where and any time. We have taken numerous measures in quality control to ensure
that your product arrives in top condition and will perform to your satisfaction. In the rare
event that your MP320 MP3 Player contains a damaged or missing item, does not
perform as specified, requires warranty service or you have an installation problem.
DO NOT RETURN THIS PRODUCT TO THE STORE. Please call our TOLL-FREE NUMBER
(1-800-445-1797) and ask to speak with a member of our technical service team, or submit
your questions by e-mail to [email protected] and a member of our
technical service team will respond by E-Mail to your questions. Our in-house technical
service team will expedite delivery of your part, advise you on installation, or help
troubleshoot a problem with you. If your product needs warranty service, our technical
service team representatives will help you obtain the fastest remedy possible under the
warranty.
Installing Battery
Press on the battery cover in the direction of the
arrow to slide it off.
Insert one AAA - size battery.
Close the battery cover.
Insert the larger end of the USB cable into the
USB port of the PC and insert the other smaller
end to the USB connector of the player.
You’ll see a safe removal icon at the right
bottom of the screen. When you open “My
Computer” on the desktop, you will see a new
removable disk. That indicates the connection is
successful.
Before Using
Connecting to the PC
The MP3 player is a plug & play device under
WIN2000/XP/ME OS. But for WIN98/SE, you are
required to install the driver first before
connecting it to the computer.
Insert the driver CD into the CD-ROM and
execute the Setup.htm file on it. Click the player
picture with correct model.
Windows 98/SE users are
required to install the driver
BEFORE connecting the MP320
to the computer!
Installation
Operation
LCD Display
Specifications
Play Speed
• MP3 Player with LCD Display
• Plays MP3, WMA, and WAV Files
• 128 MB Built-In Flash Memory
• 8 to 12 Hours of Playing Time
• USB 2.0 Plug N’ Play™
• Requires only one AAA battery
• EQ Presets; Rock, Classic, Jazz, Pop, Normal and User Setable
EQ Mode
Repeat Mode
A-B Repeat
Play Indicator
Battery Charge
Track Number
Length of Current Track
Current Folder
Elapsed Time
File type
Title Track
BASIC OPERATION
Parts
Parts
MP3 Player
Manual
One AAA Battery
Earbuds
Neck Strap
USB Cable
Software CD
Features & Functions
USB Port
Hold
MENU
Carry Strap Holder
A-B
Increase Volume
Next
Play
Earphone Jack
Previous
Display
Decrease Volume
Battery Compartment
Give Us A Call, We'll Help You Install!
For Information and Technical Assistance, Call Toll-Free in U.S.A. and Canada.
1-800-445-1797
PLEASE DO NOT RETURN PRODUCT TO STORE.
Play ........................................................ Press the Play button to play track.
Pause
................................................ During playback, press the Play button to pause.
Stop........................................................ During playback, press and hold the Play button for
a while to stop the playback and return to the
beginning of current track.
Volume ................................................ Press the V+ button to increase the volume.
Press the V- button to decrease the volume.
Previous Track
................................ Press the button.
Next Track
........................................ Press the button.
Fast Forward ........................................ Press and hold the button.
Rewind ................................................ Press and hold the button.
Lock/Unlock buttons ........................ Slide the Hold switch to the locked position to lock
buttons against being pressed accidentally.
Slide the Hold switch to the unlocked position to
enable all buttons.
Enter The Main Menu ........................ Press and hold the MENU button for a few seconds
to enter the main menu
Select Menu Item or Option ................ Press the
button or
button to select the menu
item and press the Play button to confirm the
selection.
Return To The Previous Menu Level Press the Menu button to return to the previous level.
The player will return to the previous level
automatically if there is no activity within 10
seconds.
Exit From The Menu
........................ Select “Return” and press the Play button to exit. Or,
do not press any button, and the player will exit
automatically.
Folder Navigation Mode
................ Press the Menu button to enter the navigation mode,
and you see the play list of current folder.
Close The Folder ................................ In the navigation mode, press the button to close the
current folder and return to the previous directory.
ADVANCED OPERATION
A-B Repeat
To repeat a section of the current track, Press the A-B button during playback to select the start
point of the section to repeat. The top of the LCD screen shows “A-”.
Press the A-B button again at the desired end point of the repeat. The top of the screen will now
display “A-B”. The section between the start point and the end point will be played repeatedly.
To end the A-B repeat,
press the A-B button shortly.
Play Modes
You can switch between the following five play modes:
Normal – Play all tracks in the current folder in order.
Repeat One – Repeats the current track.
Repeat All – Repeats all tracks in the player.
Folder - Repeats all tracks in the current folder.
Shuffle – Repeats all tracks in the current folder at random.
Introduction – Play the first 10 seconds of every track in the current folder.
To Select The Play Mode:
Press and hold the Menu button to enter the main menu.
1. Select the “PLAY SETTING” item and press the Play button to confirm.
2. Select the “REPEAT” item and press the Play button to show the provided options.
3. Select the desired mode option and press the Play button to confirm.
Switch EQ Mode
You can play the tracks with different pre-set equalizer settings.
The device provides 5 EQ modes: Normal, Rock, Jazz, Classic and Pop.
To Set The Eq Mode:
1. Enter the main menu, select “PLAY SETTING” and press the Play button to confirm.
2. Select “EQUALIZER” and press the Play button to show the provided options.
3. Select the desired EQ setting option and press the Play button to confirm.
Adjust The Play Speed
1. On the main menu, select “PLAY SETTING” and press the Play button to confirm.
2.Select “PLAY SPEED” option and press the Play button to continue.
3. Press the button to slow down the playback or press the button to speed up the playback.
The “00” level is the normal speed.
Delete Single Track
1. Press the Menu button to enter the folder navigation mode.
2. Select the track that you want to delete and press the A-B button to delete it.
3. Press the button to select “YES” option and press the Play button to confirm deletion. Or,
select “NO” to cancel deletion.
Delete All Tracks
To delete all tracks in the player, you need to format the device.
1. Enter the main menu, select the “Control Menu” item and press the Play button to show its
submenus.
2. Select the “FORMAT” option and press the Play button to Confirm.
Display Lyric
To display song lyrics during playback, you must edit the lyrics using the Lyric Manager software
first, then copy the edited file to the player. For detailed information on editing lyrics, see the
section “Using the Lyric Manager”.
Open The Folder ................................ In the navigation mode, press the
button or the
Play button to open the current folder and return to
the previous directory.
Select The Track To Play
................ Expand the folder, use the V+ or V- button to select
the track that you want to play and press the Play
button to play the track.
Visit us on the WEB
WWW.ROADMASTERUSA.COM
TM
©2005 MegaSound
TM
All designs, logos and images are the exclusive property of MegaSound and/or it’s affiliates. All rights reserved.
Advanced Operation
Lyric Manager
Recording With The Built-in Microphone
Installing Lyric Manager
Before editing lyrics you will need to install the Lyric Manager software.
Record
In The Music Mode, Press The A-B Key When The Playback Pauses Or Stops.
Or, Enter The Voice Mode, And Press The A-B Key To Start Recording.
Free Space
Available Time
File Type
Bit Rate
File Name
Sample Rate
Used Space
Free Space
READY TO RECORD
Elapsed Time
Used Space
Free Space
RECORDING
To End Recording, Press The Play Key To Save The Voice File.
Note: During Recording, You Can Press The A-B Key To Pause And Then Press It Again To Resume Recording.
Record Settings
You Can Set The Recording Format As Mp3 Or Wav Before Recording:
1. On The Main Menu, Select “Record Setting” And Press The Play Key To Show The Options.
2. Select “Voice Record” And Press The Play Key To Confirm.
3. Select “File Type” And Press The Play Key To Continue.
4. Select “Mp3 File” Or “Wav File” Option. For “Mp3 File”, You Can Also Adjust The Bit Rate And
Sample Rate Using The Key And Key To Get Excellent Sound Quality
Play Voice File
Press The Menu Key To Enter The Folder Navigation Mode And Select The Voice File That You Want To
Play.
Customizing Settings
On The Main Menu, Select The “Control Menu” Item And Press The Play Key To Enter The System
Settings Mode.
Timer
1. Sleep Off - To Set The Continuous
Playback
Time Before Which The Player Is Turned Off
Automatically, Select The “Sleep Off” Option,
And Use The
Key And
Key To Specify
The Time.
2. Power Off - To Set The Length Of Time
After Which The Player Is Turned Off
Automatically When There Is No Activity,
Select The “Power Off” Option, And Use
The
Key And
Key To Specify The Time.
Screen
1. Backlight - To Specify The Backlight Time,
Select “Backlight” And Use The
Key And
Key To Specify The Time.
2. Contrast - To Set The LCD Contrast, Select
“Contrast” And Use The
Key And
Key
To Adjust The Contrast Level.
Format
To Empty All Files In The Player, Use The
Format Option.
System Info
View The System Information Including
Version No., Total Capacity And Remaining
Space.
1. Insert the driver CD into the CD-ROM and execute the Setup.htm file on it. Click the Lyric
Manager file below the EM633X player picture.
2. Select “Run this program from its current location” in order to execute Setup.exe program at
once, and then click “OK” to continue.
3. Click “Yes” on the following dialogue to start installation.
4. The installation progress starts.
5. Click “Next” to continue.
6. Click “Yes” to accept the license agreement
7. Click “Finish” to finish the installation
Editing Lyrics
1.Click “Start” menu on the tool bar,
select “Programs”, then select “Lyric
Manager” to run Lyric Manager.
2. On the left pane, select the MP3 or
WMA audio file. On the right pane,
click the foldericon above the right
pane and select the lyric file with
format of LRC or TXT to import the
lyric file.
3. For the LRC file, just click the " " icon above the left pane to combine the MP3 or WMA
file and the lyric file. Then save the combined file.
For a TXT file that has no time stamp, you can insert the time stamp by following these steps:
A. On the left pane, select the track and press the " " key to play the track. During playback,
you can press the " " button to pause or press the " " to stop the playback.
B. When you are listening to the playback, click the “Insert Time” button to insert the start time
of each sentence on the right pane.
C. When all sentences are marked by time stamp, click the " " icon to combine the MP3 file
and the lyric file, and then save the combined file.
USB Control
A Tool That Is Used During Device Manufacture.
4. Copy the combined file to the player. When you play the combined file, you see the lyric
displays.
Language
To Select The Display Language, Select
“Language”, Use The
Or
Key To Select
The Desired Language And Press The Play
Key To Confirm.
Notice
Return
Return To The Main Menu.
Firmware Upgrade
To get the latest version of the device, you can upgrade the firmware by the following steps.
Method 1:
1. Download the update file named as FMYIFANG.BIN from the provider’s website to root of the player.
2. Take out the battery, and connect the player to the PC, you see “FIRMWARE UPGRADE” on the display.
3. When “FIRMWARE UPGRADE” disappears, remove the player and reconnect it.
4. Please wait for the device to complete formatting. When a dialog box pops up, just ignore it.
5. Connect the player to PC once again. When you see a removable disk, upgrade finishes.
Method 2:
1. Copy the FMYIFANG.BIN update file to the player.
2. Power on the player, it will start firmware upgrade automatically. During upgrade, please make sure
the battery charge is enough. Otherwise, the device will be damaged.
IMPORTANT NOTICE!
DO NOT REMOVE THE PLAYER UNDER THE FOLLOWING CONDITIONS THE DEVICE MAY BE DAMAGED!
1. The message “FIRMWARE UPGRADE” has not disappeared yet.
2. Formatting is in progress.
The firmware upgrade process will format the device. Please backup the data before upgrade.
Plug & Play is only available for WIN2000/XP.
Plug & Play is not supported by WIN98 and WIN98SE a driver needs to be installed.
Push the Hold switch to the unlocked position to enable all keys before operation.
Please replace the battery immediately when the display indicates low battery, or the device
will be powered off automatically.
Please unplug the player properly to avoid data losing.
The transfer rate displayed on the PC may be different depending on the operating system.
Exact transfer rate should be subject to the player's indication.
When the recorded voice file is too large, it is normal that the response of the device may be
slow.
Cautions
1. Do not subject the device to severe impact or drop it from high position.
2. Do not use the player in extreme hot or cold, dusty or damp field. Do not expose it to direct
sunshine.
3. Back up the data frequently in case of accident data loss.
4. Avoid using the player in strong magnetic field.
5. Keep the device away from water or other liquids. In the event that water or other liquids
enter the device, power off the product immediately, take out the battery and clean the device.
6. Do not use chemical solution to clean the device in order to avoid corrosion. Clean it with a
dry cloth.
7. We are not responsible for the damages or lost data caused by malfunction, misusing,
repairing the device or battery replacement.
8. Do not attempt to disassemble, repair or modify the product, or it will be out of guarantee.
9. The design of the player or actual display may be different from what is shown in this manual.
It should be subject to the actual display or design.
Troubleshooting
Possible Cause
Solution
The LCD is blank when the
play button is pressed.
1. No battery or battery is too low.
2. The keys are locked.
1. Install or replace the battery.
2. Unlock the Hold switch.
The player will not turn
on even when the
battery is replaced.
The internal flash memory
may have errors from static,
magnetism, or improper
removal from the computer.
Upgrade the firmware.
The player will not play when
play key is pressed and
the player is on.
The keys are locked by
the Hold switch.
Slide the Hold Switch to the
unlocked position.
No sound when playing
music or voice file.
1. The volume is too low.
2. The file is corrupt.
1. Turn the volume up.
2. Delete the file or
play another file.
The player is not recognized
by the computer.
1. The driver is not installed
or is corrupt.
2. The USB cable is not fully
inserted into the USB jack.
3. The USB cable is not
supported by the computer.
1. Install/reinstall the driver.
2. Make the USB cable
is fully inserted
2. Upgrade the computer.
The displayed time is
constantly changing.
The bit rate of the MP3 file
Use fixed bit rate to
is changing during playback. compress the file.
The player has an error
when you plug into &
unplug from the computer.
The player is unplugged
during file transfer.
Do not unplug the player
during file transfer.
The removable disc icon
does not show up when
the player is plugged
into the computer.
The “USB CONTROL” option
is selected and the device
is in the system mode.
Reconnect the player
to the computer.
The total memory displayed
is not the same as the
indicated player capacity.
Part is the memory is used to
store programs and display
characters on the LCD .
Problem
Limited Warranty
MegaSoundTM products are designed and manufactured to provide a high level of trouble-free performance. MegaSoundTM warrants,
to the original purchaser, that its products are free from defects in material and workmanship for 30 days from the date of original
purchase, as part of our commitment to product excellence. MegaSoundTM and/or it’s affiliates routinely improves the designs,
materials or production methods of its existing products. Because it is impractical to publicize all changes in every product, we
reserve the right to make such changes without notice.
CONDITIONS OF WARRANTY:
If during the 30 day warranty period your new product is found to be defective, MegaSoundTM will repair such defect, or replace the
product, without charge for parts or labor subject to the following conditions:
1. All repairs must be performed by MegaSoundTM and/or it’s affiliates in Eatontown, New Jersey.
2. The equipment must not have been altered or been damaged through negligence, accident, or improper operation.
3. The replacement of parts are exempted from this warranty when replacement is necessary due to normal wear and tear.
4. All warranty claims must be accompanied by a copy of the sales receipt or bill of sale.
5. Repair or replacement parts supplied by MegaSoundTM under this warranty are protected only for the unexpired portion of the
original warranty.
6. In the case of car s, this warranty does not extend to the elimination of car static or motor noise; correction of antenna problems;
costs incurred for the removal or reinstallation of the product; damage to tapes, speakers, accessories or car electrical systems.
7. MegaSoundTM will not be responsible for any charge incurred for installation.
OWNER'S RESPONSIBILITIES:
MegaSoundTM will make every effort to provide warranty service within a reasonable period of time.
SHOULD YOU HAVE ANY QUESTIONS ABOUT SERVICE RECEIVED, OR IF YOU WOULD LIKE ASSISTANCE IN OBTAINING
SERVICE, PLEASE CALL TOLL FREE 1-800-445-1797, 8:30am - 4:30pm EST.
In order to provide you with the proper warranty service, we request that you adhere to the following procedure:
1. Include a copy of your sales receipt or bill of sale with your unit when it is returned for warranty service.
2. If it is necessary to return your product for service, please return it securely packed, preferably in the original shipping carton, and
freight and insurance prepaid to the following address: MegaSoundTM, Service Department, 6 G Industrial Way West, Eatontown,
New Jersey 07724.
3. Please include a detailed explanation of the problem you are having.
4. If your product is found by MegaSoundTM to have a defect in material or workmanship, within the warranty period, it will be
repaired or replaced at no charge and returned to you prepaid. Where permitted by Iaw MegaSoundTM liability shall be limited to that
set forth in this warranty. This warranty shall be the exclusive remedy of the purchaser.
MegaSoundTM makes no other warranty of any kind, expressed or implied; and all implied warranties, are hereby disclaimed by
MegaSoundTM and excluded from this warranty, MegaSoundTM and/or it’s affiliates, the manufacturer, distributor and seller shall not
be liable for any injury, loss or damage, incidental or consequential, arising out of the use or intended use of the product.
TM
©2005 MegaSound
TM
All designs, logos and images are the exclusive property of MegaSound and/or it’s affiliates. All rights reserved. 022405 Printed in China 00000