1
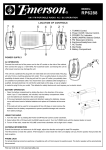
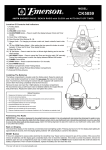
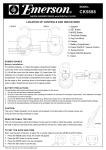
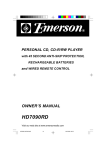
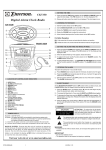
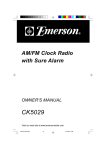
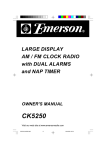
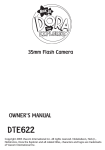
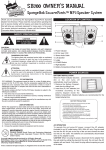
Emerson Radio Corp. has produced this audio product under
license from Nickelodeon. We have taken great care to make sure
your unit was in perfect working order when it left our factory.
It has been designed to give you many years of enjoyment and
trouble free operation. Read this manual before operating this unit
to become familiar with its features. In the event you require
technical assistance, please contact the Emerson Radio Customer
Service hotline at 1-800-898-9020. Retain this manual for future
reference.
CASSETTE PLAYER WITH
NOTES:
• Please avoid using this unit in places of high temperature or
humidity over prolonged periods of time as damage may occur.
• Exposure to direct sunlight in places such as car interiors may
cause the unit to become warped and/or lead to malfunctioning.
• Avoid using or storing this unit in dusty or sandy locations.
FM RADIO
For future reference, record the serial number in the space
provided.
Model No: DTE200
Serial Number____________________
OWNER'S MANUAL
DTE200
Copyright 2004 Viacom International Inc. All Rights Reserved. Nickelodeon,
Dora the Explorer and all related titles, logos and characters are
trademarks of Viacom International Inc.
1
POWER SOURCES (CONTINUED)
LOCATION OF CONTROLS
1
2 3 4
Remove the battery cover on the rear of the unit and insert four (4) “C” cell
batteries (not included), observing the battery polarity indicated in the
compartment. Replace the Battery Compartment cover.
-
Cassette Compartment
FAST FORWARD l
Button
3. PLAY ® Button
4. STOP ■ Button
5. VOLUME Control
6. FM Antenna
7. Earphone Jack
8. Function (TAPE/RADIO)
Switch
9. TUNING Control
10. Battery Compartment
(Rear of Unit)
11. DC 6V Jack (Rear of
Unit)
+
10 11
1.
2.
+
9
6
-
78
5
POWER SOURCES
AC OPERATION
TO LISTEN TO THE FM RADIO
1
-
2
1
+
2
For private listening, connect low impedance 3.5mm (32 ohm) headphones
(not included) to this jack.
-
BATTERY PRECAUTIONS
Follow these precautions when using batteries in this device:
1. Use only the size and type of batteries specified.
2. Be sure to follow the correct polarity when installing the batteries as indicated in the
battery compartment. Reversed batteries may cause damage to the device.
3. Do not mix different types of batteries together (e.g. Alkaline and Carbon-zinc) or old
batteries with fresh ones.
4. If the device is not to be used for a long period of time, remove the batteries to prevent
damage or injury from possible battery leakage.
5. Do not try to recharge batteries not intended to be recharged; they can overheat and
rupture. (Follow battery manufacturer’s directions.)
HEADPHONES JACK
+
To operate the unit using AC power, connect a 6V, 300mA z AC adapter
(not included) to an AC outlet having 120V, 60Hz AC only. Plug the small end into
the DC 6V jack on the rear of the unit and connect the other end into the AC outlet.
The batteries are automatically disconnected when the AC adapter is used.
CAUTION: When not using AC power, disconnect the AC adapter from the
wall outlet by pulling the plug (not the cord). Do not touch the AC adapter with
wet hands. Fully insert the plug without exposing any part of the blade.
NOTE: AC adapter sold separately.
OPERATION
Slide the Function switch to the
RADIO position.
2
Tune a station by turning the TUNING
control 1. Adjust the VOLUME control
2 as desired.
Antennas
FM: Turn the unit for best FM reception.
3
1
OPERATION (CONTINUED)
CARE AND MAINTENANCE
TO PLAY A TAPE
2
1
1
2
Lift up the cassette door and insert
a prerecorded tape. Close the
cassette door. Set the Function
switch to the TAPE position.
3
Push the PLAY button
to start
playback and adjust the VOLUME
control as desired.
AUTOMATIC STOP
This cassette player has a built-in
Automatic Stop System that stops
the tape when it reaches the end in
the Play mode.
CASSETTE TAPE USAGE
Longer length tapes of 45 (C-90) and
60 (C-120) minutes of playing time on
each side are not recommended.
These tapes use thinner material and
have a greater chance for malfunction
such as tape spillage from the cassette,
internal binding and tape tearing. Use
only high quality tapes. If there is any
slack in the tape, remove it before
inserting the cassette. To do so, place a pencil in one of the hubs and
rotate it until the slack is taken up.
CARE AND MAINTENANCE
Clean the tape head, capstan and pinch roller using a cotton swab
slightly moistened with alcohol. Avoid scratching the head surface.
To clean the unit housing, use a soft cloth slightly dampened with
water and wipe dry.
To stop the tape before it reaches
the end, push the STOP button.
Cotton Swab
Capstan
TO FAST FORWARD A TAPE
1
TO FAST FORWARD A TAPE
To rapidly advance the tape, push
. To
the Fast Forward button
rapidly advance the tape while in
the play mode, push the STOP
button
before pressing the Fast
Forward button .
2
1
Head
CAUTION: Never use chemicals such as benzene or paint thinner for
cleaning, otherwise the case may become deformed or discolored.
4
5
TROUBLESHOOTING GUIDE
Should this unit develop a problem, check the following before seeking service.
POSSIBLE
CAUSE
POSSIBLE
SOLUTION
Power does
Batteries are weak,
Insert batteries
not come on.
dead or not inserted
properly or replace with
correctly.
fresh batteries.
Function switch not
Set Function switch
SYMPTOM
GENERAL
RADIO
No sound.
set to RADIO position.
Noise or sound
VOLUME control at
Turn the VOLUME
control up.
distorted.
Turn the unit for
best reception.
CASSETTE
No sound.
Sound distorted.
LIMITED WARRANTY
Emerson Radio Corp. warrants manufacturing defects in original
material, including original parts and workmanship, under normal use
and conditions, for a period of ninety (90) days from the date of original
purchase in the U.S. With your dated proof of purchase, we will
provide repair service at no charge for labor and parts at an authorized
Depot Repair Facility, or replace the product in our discretion. For
repair or replacement, pack your unit in a padded box, enclose your
check or money order payable to Emerson Radio Corp. in the amount
of $5.00 (not required by California residents) to cover shipping and
handling costs, and enclose a copy of your proof of purchase. Send
your unit to:
Emerson Radio Corp.
5101 Statesman Drive,
Irving, TX 75063.
to RADIO position.
minimum position.
FM–Interference.
Function switch not
Set Function switch to
set to TAPE position.
TAPE position.
VOLUME control at
Turn the VOLUME
minimum position.
control up.
Dirty head.
Clean head.
This warranty does not cover damage from negligence; misuse; abuse;
accident; failure to follow operating instructions; commercial use;
rental; repairs by an unauthorized facility; or products purchased, used,
serviced or damaged outside of the United States.
THIS WARRANTY GIVES YOU SPECIFIC LEGAL RIGHTS, AND YOU
MAY ALSO HAVE OTHER RIGHTS WHICH VARY FROM STATE TO
STATE.
AU898H
EMERSON
PART NO.: 21-2058
607-02
Printed in China
5101 Statesman Drive,
Irving, TX 75063.
6
Pinch Roller
7