1
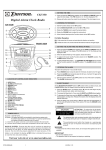
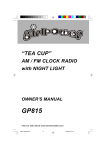
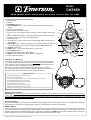
MODEL:
CK5859
AM/FM SHOWER RADIO / BEACH RADIO with CLOCK and AUTO-SHUT OFF TIMER
Location Of Controls And Indicators
1.) Folding Stand.
2.) Speaker.
3.) VOLUME Control Knob.
4.) CLOCK/TIMER Button – Press to switch the display between Clock and Timer
modes.
5.) Clock/Timer LCD Display.
6.) Direct Number Entry Buttons (0 – 9).
7.) Hanger Hook – For hanging on shower curtain rod, beach umbrella, beach chair,
etc.
8.) “5” Key (12/24 Display Mode) – After setting the time press this button to switch
between 12 Hour and 24 Hour Time display formats.
9.) Radio Dial Scale.
10.) “S” Set Button – Press to start the Hour or Minute digits flashing and to start the
clock running.
11.) OFF/RESET Button – Press to cancel the Timer and shut the radio ‘Off’manually.
During Hour setting press to switch the display between PM and AM modes.
12.) TUNING Control Knob.
13.) START Button – Press to start the timer/turn ‘On’the radio.
14.) Band FM/AM Selector.
15.) Battery Compartment (Under Folding Stand).
16.) RESET Button (Inside Pinhole Below Battery Compartment).
17.) External FM Wire Antenna.
7
8
6
5
9
4
10
11
12
3
13
2
14
15
1
16
17
Installing The Batteries
The battery compartment is located under the folding stand. Raise the stand and
use a small slotted screwdriver to loosen the two screws that secure the battery
door. To prevent you from losing the screws they are equipped with washers that
prevent them from being completely removed from the door.
Remove the door and insert the 3 “AA” batteries in the battery compartment.
We recommend using a well-known brand of alkaline batteries for longest life and
best performance. Replace the battery door and tighten the screws.
Battery Precautions
• Replacement of batteries must be done by an adult.
• Do not mix old and new batteries.
• Do not mix alkaline, standard (carbon-zinc) or rechargeable (nickel-cadmium) batteries.
• The supply terminals are not to be short-circuited.
• Non-rechargeable batteries are not to be recharged.
• Exhausted batteries are to be removed.
• Only batteries of the equivalent type are to be used.
• Batteries are to be inserted with the correct polarity.
• Dispose of batteries properly. Do not dispose of batteries in fire. The batteries may explode or leak.
Positioning The Radio
IMPORTANT: This radio is designed to be splash/moisture resistant. It is not waterproof and cannot be immersed in water or any
other liquid. You may hang the radio from the shower curtain rod in your bathroom but it should be positioned in such a way that
it is not in the direct path of the shower spray. Open the folding leg/stand to place the radio on your bathroom vanity, table, shelf
or any other flat surface.
Back Lit Display
The Clock/Timer display in this model has a momentary blue back lighting system. Pressing any key turns ‘On’the display back lighting for
approximately 6 seconds, then the display lighting switches ‘Off’automatically to conserve the batteries.
RESET Button
If the unit is subjected to excess static electricity the clock/timer may ‘freeze’and not respond to any of the controls. If this occurs first
remove all batteries until the display goes completely blank, then re-insert the batteries. If this fails to correct the problem, remove the
batteries again and use a straightened paper clip or similar object to depress the RESET button located inside the small hole below the
battery compartment. Then re-insert the batteries, replace the battery door and reset the clock.
Visit our web site at www.emersonradio.com
Setting The Time (Clock)
When the batteries are first installed the buzzer will beep twice, the display turns ‘On’and shows “12:00”.
1.) While the display shows “12:00” press the S button once. The Hour digits begin to flash.
2.) If you are setting the time to PM, press the OFF/RESET button once. The PM indicator appears. If you are setting
the time to AM, skip this step and proceed to Step 3.
Repeatedly pressing the OFF/RESET button while the hour digits are flashing switches the display between the
AM mode (PM indicator ‘Off’) and PM mode (PM indicator ‘On’)
3.) While the hour digits are flashing enter the correct hour by pressing the respective number keys.
Note: You must enter two digits for the hour display. For example if the hour is 2:00 press the “0” button
first and then the “2” button. When the desired hour appears on the display press the S button again. The
hour digits stop flashing and the minute digits begin to flash.
4.) Use the number buttons to enter the correct minute and press the S button again. The minute digits stop flashing
and the clock begins to run.
PM
PM
Setting The Timer/Radio Operation
The 99 minute timer allows you to play the radio for between 1 minute and 99 minutes and then the radio stops, the buzzer alarm sounds
for 90 seconds, and the power shuts ‘Off’automatically.
1.) If the display is showing the time, press the CLOCK/TIMER button once to change to the Timer display “00:00”. Repeatedly pressing
the CLOCK/TIMER button switches the display between the Clock and Timer modes.
2.) While the display is in the Timer mode “00:00” press the appropriate number buttons to enter the number of minutes you wish the radio
to play before shutting off automatically.
Note: You can only enter whole minutes from “1” to “99”. You cannot enter seconds.
RADIO ON
3.) When the desired number of minutes appears on the display press the START button to turn the radio ‘On’.
The RADIO ON indicator appears in the display.
4.) Set the AM/FM band switch to the desired band.
5.) Rotate the TUNING knob to tune in the desired station.
6.) Rotate the VOLUME control to adjust the volume level.
7.) When the timer counts down to “00:00” the radio stops, the display lighting comes ‘On’, the electronic buzzer sounds for 90 seconds,
and then the power shuts ‘Off’automatically.
8.) To shut the radio ‘Off’manually and cancel the timer operation, press the OFF/RESET button at any time.
The radio shuts ‘Off’and the timer is reset to “00:00”. To view current time, press the CLOCK/TIMER button.
Antenna Information
AM – The AM antenna is inside the cabinet. If AM reception is unsatisfactory slowly rotate the unit until you find the position that provides
the best reception.
FM – Make sure the external FM wire antenna is extended to its full length. It may be necessary to vary the position and direction of this
antenna until you find the position that provides the best reception.
Care And Maintenance
If the cabinet becomes dusty or dirty it may be wiped with a soft cloth slightly moistened with a mild soap and water solution. Do not use any
abrasive cleaners or cleaning pads to avoid scratching the cabinet.
When the sound becomes weak or distorted, and the performance becomes unsatisfactory, replace the batteries as soon as possible.
Never leave weak or exhausted batteries in the radio for an extended period of time.
FCC Information
This device complies with Part 15 of the FCC Rules. Operation is subject to the following two conditions:
(1) This device may not cause harmful interference, and
(2) This device must accept any interference received, including interference that may cause undesired operation.
LIMITED WARRANTY
Emerson Radio Corp. warrants manufacturing defects in original
material, including original parts and workmanship, under normal use
and conditions, for a period of ninety (90) days from the date of original
purchase in the U.S. With your dated proof of purchase, we will provide
repair service at no charge for labor and parts at an authorized Depot
Repair Facility, or replace the product in our discretion. For repair or
replacement, pack your unit in a padded box, enclose your check or
money order payable to Emerson Radio Corp. in the amount of $5.00
(not required by California residents) to cover shipping and handling
costs, and enclose a copy of your proof of purchase. Send your unit to:
Emerson Radio Corp.,
5101 Statesman Drive,
Irving, TX 75063.
1-800-898-9020.
This warranty does not cover damage from negligence, misuse, abuse,
accident, failure to follow operating instructions, commercial use, rental,
repairs by an unauthorized facility, or products purchased, used, serviced
or damaged outside of the United States.
THIS WARRANTY GIVES YOU SPECIFIC LEGAL RIGHTS, AND
YOU MAY ALSO HAVE OTHER RIGHTS WHICH VARY FROM
STATE TO STATE.
AU898H
Part No.:16-2981
506-02
Printed in China