1
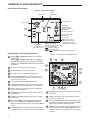
INSTALLER/CONFIGURATION MENU
1)
2)
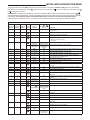
This control can be configured for:
SS1 – Single Stage System
HP1 – Heat Pump with one stage of compressor
(2 heat/1 cool)
(Dual Fuel see menu item 25)
GAS or Electric (ELE) fan operation. If the heating
system requires the thermostat to energize the fan,
select ELE. Select GAS if the heating system energizes
the fan on a call for heat. Note: Resetting the thermostat switches the option to ELE.
3) Programs per week – This control can be configured for
7 independent day or 5+1+1 day programming or non-
programmable modes. Default is 7-day mode. The display indicates "7 Days" as default. Other options "5
Days" or "0 Days" can be selected by pressing touch keys,
or . If "0 Days" is selected for non-programmable mode, the step for EMR will be skipped, as this feature will not be available in this mode.
4) Program Steps per day – This control can be configured
for 4 or 2 program steps per day. Default is "4 PS" and
can be toggled between 4 PS and 2 PS by pressing
the
or
touch keys.
5) System Switch Configuration (SS1/HP1) – This thermostat is configured for Heat and Cool with Auto changeover default (Cool-Off-Heat-Auto). Can be configured as
Heat & Cool (Cool-Off-Heat), or Heat Only (Off-Heat), or
Cool Only (Cool-Off).
When the control is in heat pump configuration (HP1), the
system switch configuration will have an additional mode
available namely, Emer for Emergency Mode.
6) Energy Management Recovery (EMR) – (this step is
skipped if configured as non-programmable).
When set to "On" causes the thermostat to start heating
or cooling early to make the building temperature reach
the program setpoint at the time you specify.
Example: Let us say, the heating program is 65°F at
night and 70° at 7 AM. If the building temperature is 65°F,
the difference is 5°F. Allowing 5 minutes per °F rise, the
thermostat setpoint will change to 70° at 6:35 AM.
Cooling allows more time per °F, because it takes
longer to reach temperature.
7, 8 & 9) Cycle Rate Selection – The factory default setting
is fast cycle (FA Cr) in all modes (Heat, Cool, Emer). To
slow cycling (SL, Cr), press touch keys
or
toggle
between FA & SL. The cycle rates are as below different
selections:
Mode
Fast rate
Slow rate
Heat
0.6°F
1.2°F
Cool
1.2°F
1.7°F
Emer
1.2°F
1.7°F
10)Select Compressor Lockout (CL) – Selecting CL On
will cause the thermostat to wait 5 minutes between
cooling cycles. This is intended to help protect the compressor from short cycling. Some of the newer compressors have already got a time delay built in and
do not require this feature to be activated in the thermostat. Your compressor manufacturer can tell you if this
lockout feature is already present in their system. When
the thermostat compressor time delay is activated, it will
flash the set point for up to five minutes.
11) Select Continuous Backlight – In low lighting conditions, display backlight improves the display contrast.
When C terminal is connected, selecting dL On will turn
6
the backlight on continuously. Selecting dL Off will turn
the backlight on momentarily after any key is pressed.
When C terminal is not powered (battery only), dL On enables the momentary backlight whenever a key is
pressed.
12)Select Backlight Intensity – This thermostat has the
ability to provide two selectable intensities of the back
light: HI and LO. Using
or
touch keys you can
toggle the selection between HI and LO.
13)Select Temperature Display Adjustment 4 LO to 4 HI
This allows you to adjust the room temperature display
by an amount in the range of -4°F to +4°F in 1° steps by
using the
or
touch keys. Your thermostat was
accurately calibrated at the factory, however you have the
option to change the display temperature value to match
your previous thermostat, if you so prefer.
14)Select °F or °C Readout – Select the desired temper
ature unit by pressing
or . Factory default is °F.
15)Select Audio Prompting (Beeper) On or Off – Factory
default setting is on (b, On). If you wish to turn off the
beeper select OFF.
16)Select Daylight Saving Time Calculation – This feature
will allow the thermostat to calculate the DST automatically and apply it to the Real Time Clock display. Default
On. Use
or
touch keys to select the feature, OFF.
17 & 18)Select Automatic Schedule – This feature allows
programming a “Comfort Temperature” into all program
periods with the Auto Schedule key. When Heat AS (for
Heat mode) or Cool AS (for Cool mode) is selected On,
the Auto Schedule feature is ready to be set. Off indicates that the feature is not ready to be used or a
“Comfort Temperature is already set. See Auto Schedule
in Programming section.
19)Select Cool Savings™: With Cool Savings™ enabled,
the thermostat will make small adjustments to the
setpoint temperature during periods of high demand to
reduce AC system running time and save energy. When
the cooling system has been running for more than 20
minutes, humidity in the home will be lower and a higher
temperature will feel comfortable. After 20 minutes of run
time, the thermostat will start increasing the setpoint
temperature in steps of less than one degree as the
system continues to run. These adjustments will eventually cause the system to satisfy the thermostat to turn the
system off and reduce the energy consumption. When
the Cool Savings™ feature is active and making adjustments, the display will flash “Cool Savings”. The
amount of the adjustments to the setpoint temperature
is dependent on the Cool Savings™ value that is set, 1
being the least adjustment and 6 being the most adjustment. With this feature set to OFF, no change will occur
when the AC system is continuously running during the
periods of high demand. Periods of high demand will normally occur during the late afternoon and early evening
on the hottest d
ays of the summer. As demand lessens
the adjustments to setpoint temperature are reversed
until setpoint temperature returns to normal and “Cool
Savings” no longer flashes.